


 本文详细介绍了如何实现Vue项目在Jenkins上的自动化部署,包括需求描述、效果展示、采用的技术(Jenkins、K8S、Docker、Nginx)以及具体的实施步骤,如配置default.conf、nginx.conf、Dockerfile、K8S脚本和Jenkinsfile。通过配置,当uat分支提交时,UAT项目将自动发布,而master分支则需要管理员手动发布。
本文主要实现了提交代码后,触发Jenkins自动化部署Vue项目至K8S
1. 需求描述
我们希望提交uat分支时,UAT项目能够自动发布,提交master分支时,无需自动发布,管理员手工发布
2. 效果展示
Jenkins各阶段构建状态如图所示:

K8S容器状态如图所示:

3. 采用技术
Jenkins + K8S + Docker + Nginx
4. 具体实现
4.1 编写default.conf
在Vue项目根目录新建default.conf文件,主要进行代理配置、首页配置、端口配置,需修改实际api与IP端口配置
server {
    listen       80;
    server_name  localhost;
    location / {
        root   /usr/share/nginx/html;
        index  index.html index.htm;
    }
    location ^~ /api/ {        # 这里的配置/api/前缀会在匹配后忽略掉,但是需要配合proxy_pass设置,在路径后添加"/"后缀
        proxy_pass       http://IP:8688/;
        proxy_set_header Host $host;      # 这个配置必须添加,否则会出现nginx 400
        proxy_set_header X-Real-IP $remote_addr;
        proxy_set_header X-Forwarded-For $proxy_add_x_forwarded_for;
    }

    error_page   500 502 503 504  /50x.html;
    location = /50x.html {
        root   /usr/share/nginx/html;
    }
}
4.2 编写nginx.conf
在Vue项目根目录新建nginx.conf文件,主要配置请求体大小等,不需要修改
user  nginx;
worker_processes  auto;

error_log  /var/log/nginx/error.log notice;
pid        /var/run/nginx.pid;


events {
    worker_connections  1024;
}


http {
    include       /etc/nginx/mime.types;
    default_type  application/octet-stream;
    log_format  main  '$remote_addr - $remote_user [$time_local] "$request" '
                      '$status $body_bytes_sent "$http_referer" '
                      '"$http_user_agent" "$http_x_forwarded_for"';
    access_log  /var/log/nginx/access.log  main;
    sendfile        on;
    keepalive_timeout  65;
    include /etc/nginx/conf.d/*.conf;
    client_max_body_size 100M;
}
4.3 编写Dockerfile文件
在项目根目录新建Dockerfile文件,镜像nginx改为自己公司内网仓库即可,其他不需要修改
FROM nginx:1.25
RUN mkdir -p /home/sfxs/insoletool/logs
VOLUME /home/sfxs/insoletool/logs
WORKDIR /opt
COPY dist /usr/share/nginx/html/
COPY default.conf /etc/nginx/conf.d/
COPY nginx.conf /etc/nginx/
EXPOSE 80
4.4 编写K8S脚本
在项目根目录新建builds\k8stest目录,然后新建insole-tool.yaml文件,建好命名空间insole后,修改镜像名,可以直接拿来用
apiVersion: apps/v1
kind: Deployment
metadata:
  name: insole-tool-web
  namespace: insole
spec:
  replicas: 1
  strategy:
    type: RollingUpdate
    rollingUpdate:
      maxSurge: 1
      maxUnavailable: 0
  revisionHistoryLimit: 5
  selector:
    matchLabels:
      project: insole-tool-web
      app: insole
  template:
    metadata:
      labels:
        project: insole-tool-web
        app: insole
        buildId: latest
    spec:
      imagePullSecrets:
        - name: gensci-harbor
      containers:
        - name: insole-tool-web
          image: xxxx.com/company/insole-tool-web:uat
          imagePullPolicy: Always
          livenessProbe:
            tcpSocket:
              port: 80
            initialDelaySeconds: 60
            periodSeconds: 20
            failureThreshold: 5
            timeoutSeconds: 10
          readinessProbe:
            tcpSocket:
              port: 80
            initialDelaySeconds: 20
            periodSeconds: 10
            failureThreshold: 10
            timeoutSeconds: 5
          ports:
            - containerPort: 80
              name: web
              protocol: TCP
          volumeMounts:
            - name: host-time
              mountPath: /etc/localtime
      volumes:
        - name: host-time
          hostPath:
            path: /etc/localtime
---
apiVersion: v1
kind: Service
metadata:
  name: insole-tool-web
  namespace: insole
  labels:
    project: insole-tool-web
    app: insole
spec:
  type: NodePort
  selector:
    project: insole-tool-web
    app: insole
  ports:
    - port: 80
      targetPort: 80
      nodePort: 31050
4.5 编写JenkinsfileUat脚本
在项目根目录新建JenkinsfileUat脚本,内容如下
#!/usr/bin/env groovy
pipeline {
    agent any
    stages {
        stage("Git Checkout") {
            steps {
                git changelog: false, credentialsId: 'gitlab-secret', poll: false, branch: 'uat', url: 'https://xxxx.com/medical-apparatus/insole-tool.git'
            }
        }
        stage('Node Build') {
            steps {
                sh '''
                echo 开始构建项目
                npm config set registry https://registry.npmmirror.com
                npm install
                npm run build
                echo 完成构建项目
                '''
            }
        }
        stage('Docker Build') {
            steps {
                script {
                    dir("") {// 因为此处运维配置了机器狗自动登录Docker仓库,所以不需要授权,否则需要授权配置
                        sh '''
                        docker build -t xxxx.com/company/insole-tool-web:uat .
                        docker push xxxx.com/company/insole-tool-web:uat
                        '''
                    }
                }
            }
        }
        stage('K8SUAT Deploy') {
            steps {
                script {
                    dir("builds/k8stest") {
                        withKubeConfig([credentialsId: 'xxxx-test-k8s']) { // 这里找运维配置好,直接拿来授权用
                            sh "sed -i 's/latest/v_${env.BUILD_ID}/' insole-tool.yaml"
                            sh "kubectl apply -f insole-tool.yaml"
                        }
                    }
                }
            }
        }
    }
}
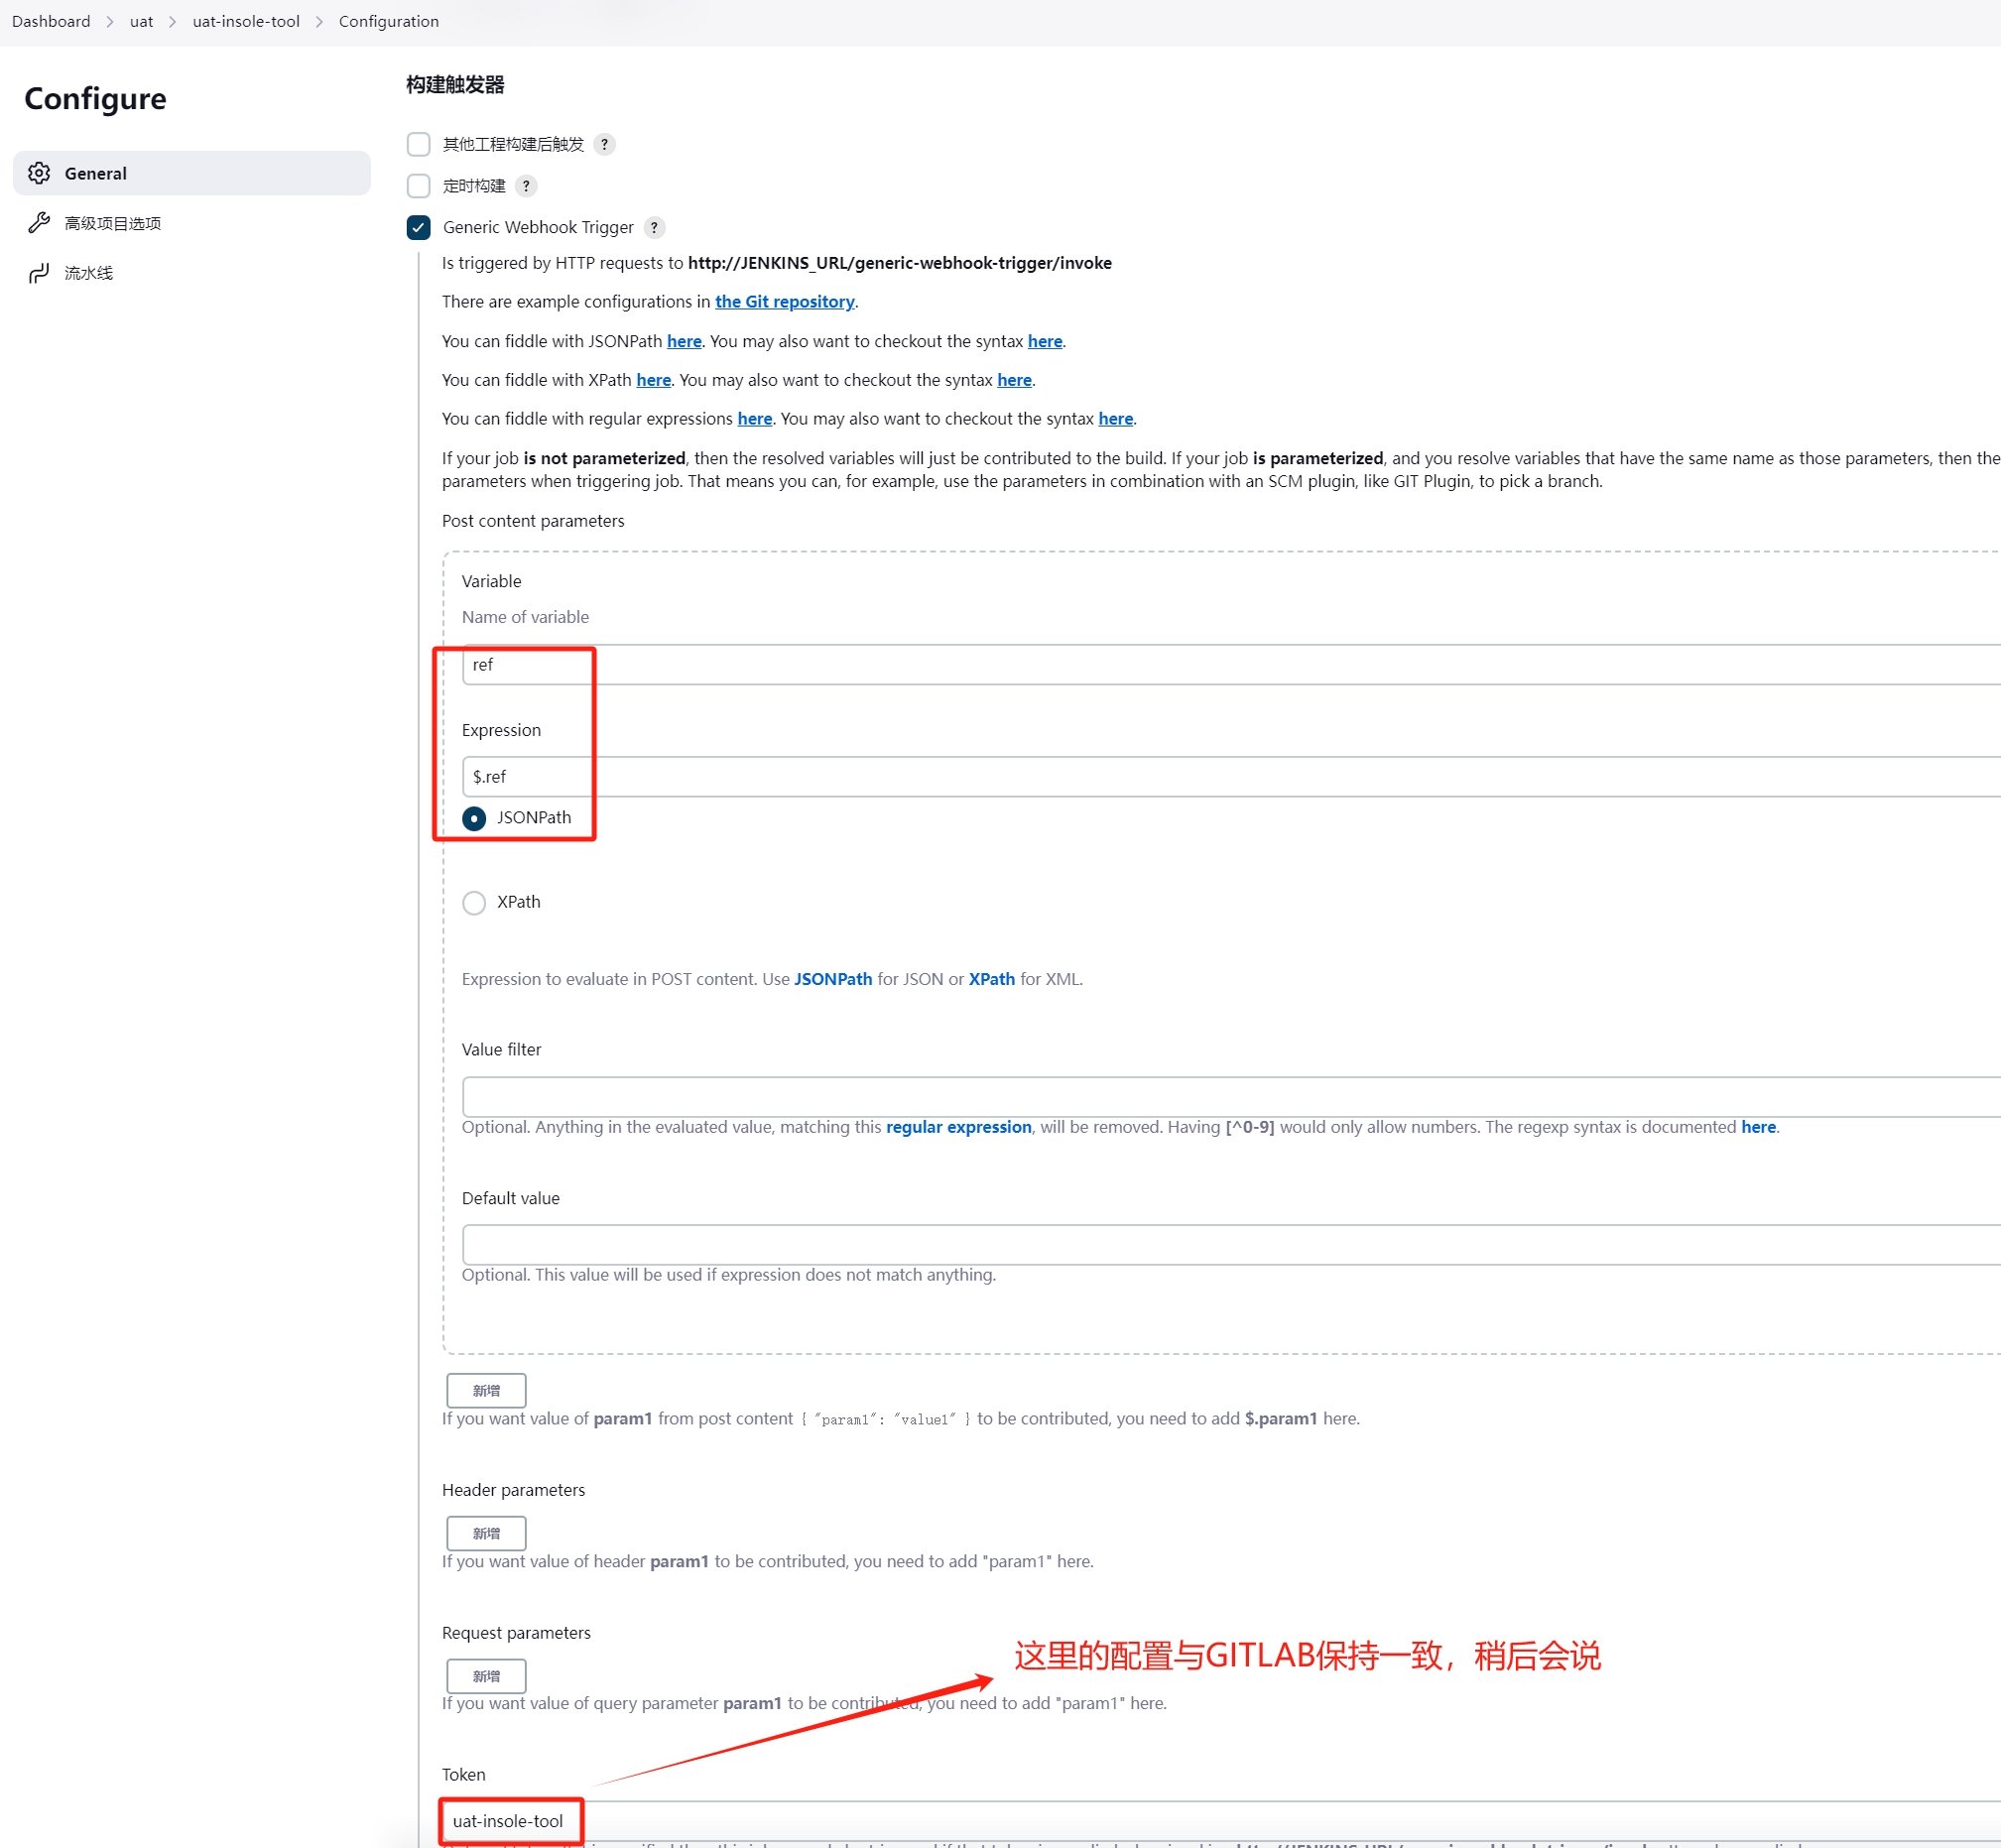
4.6 配置Jenkins
我们装好Webhook触发插件后,配置如图所示
配置构建触发器,生产环境master分支不需要配置自动发布
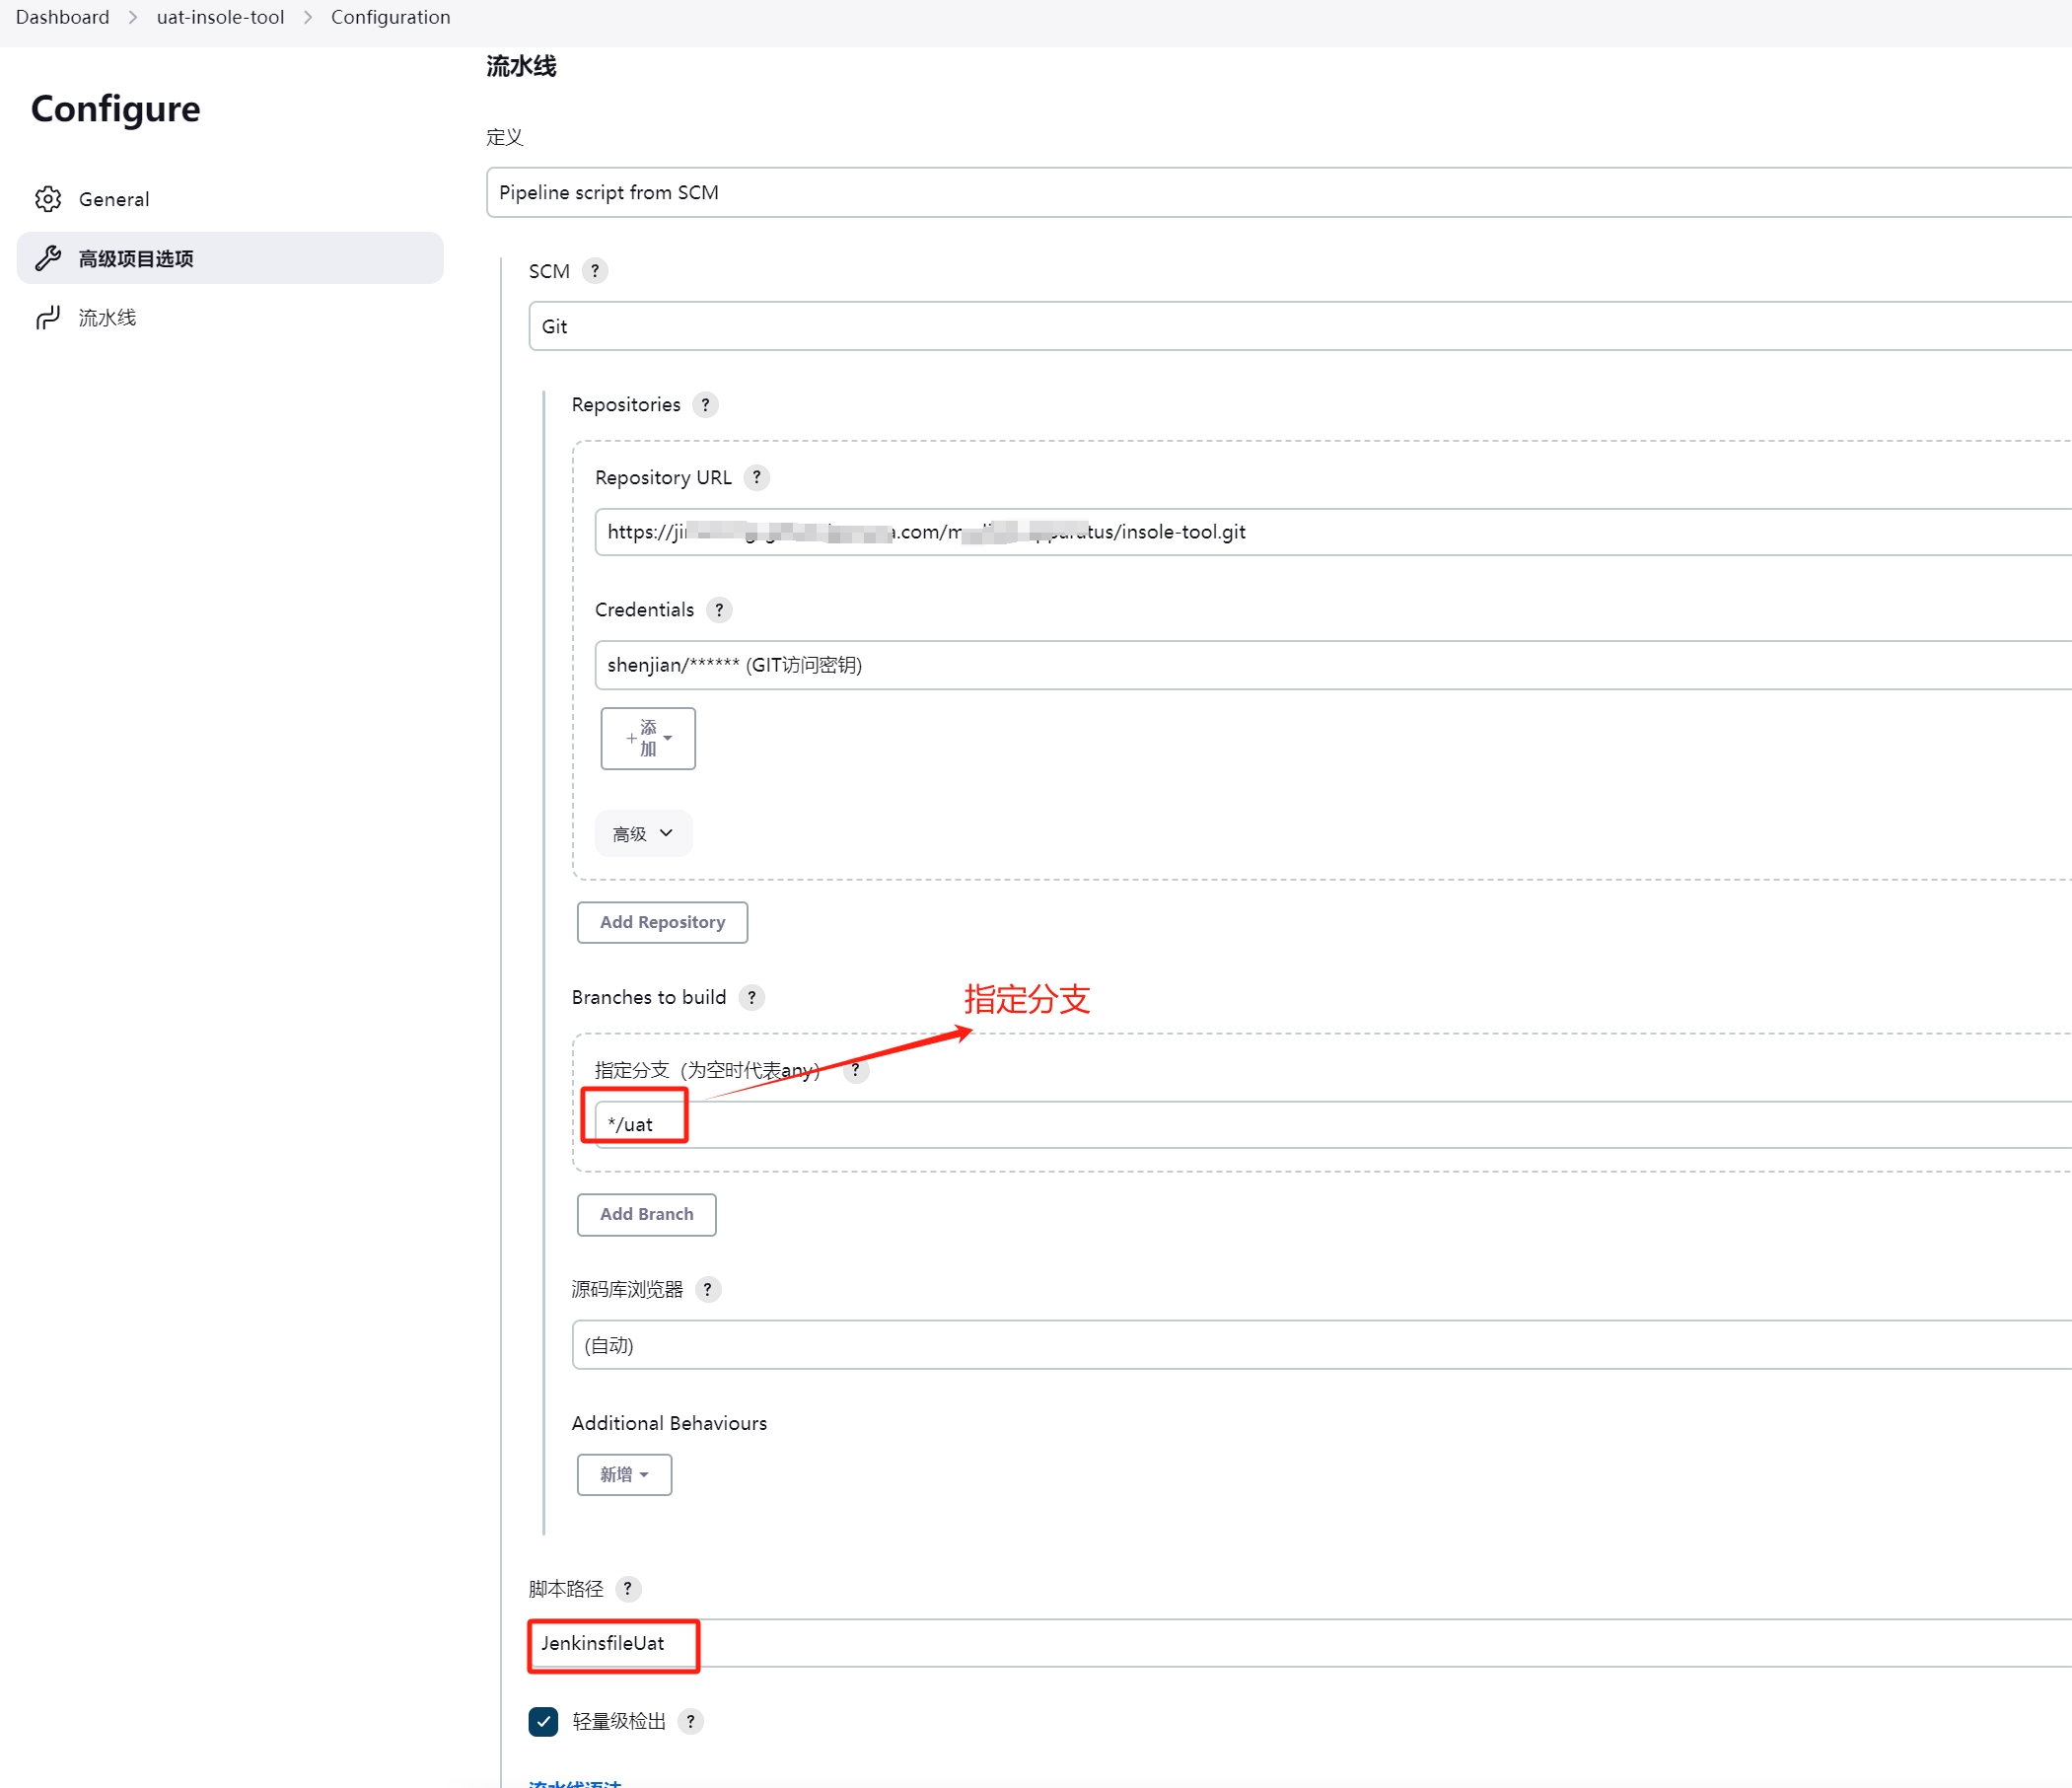
配置流水线,替换为master分支与JenkinsfileProd文件即可,在进行builds\k8sprod\insole-tool.yaml文件改写即可
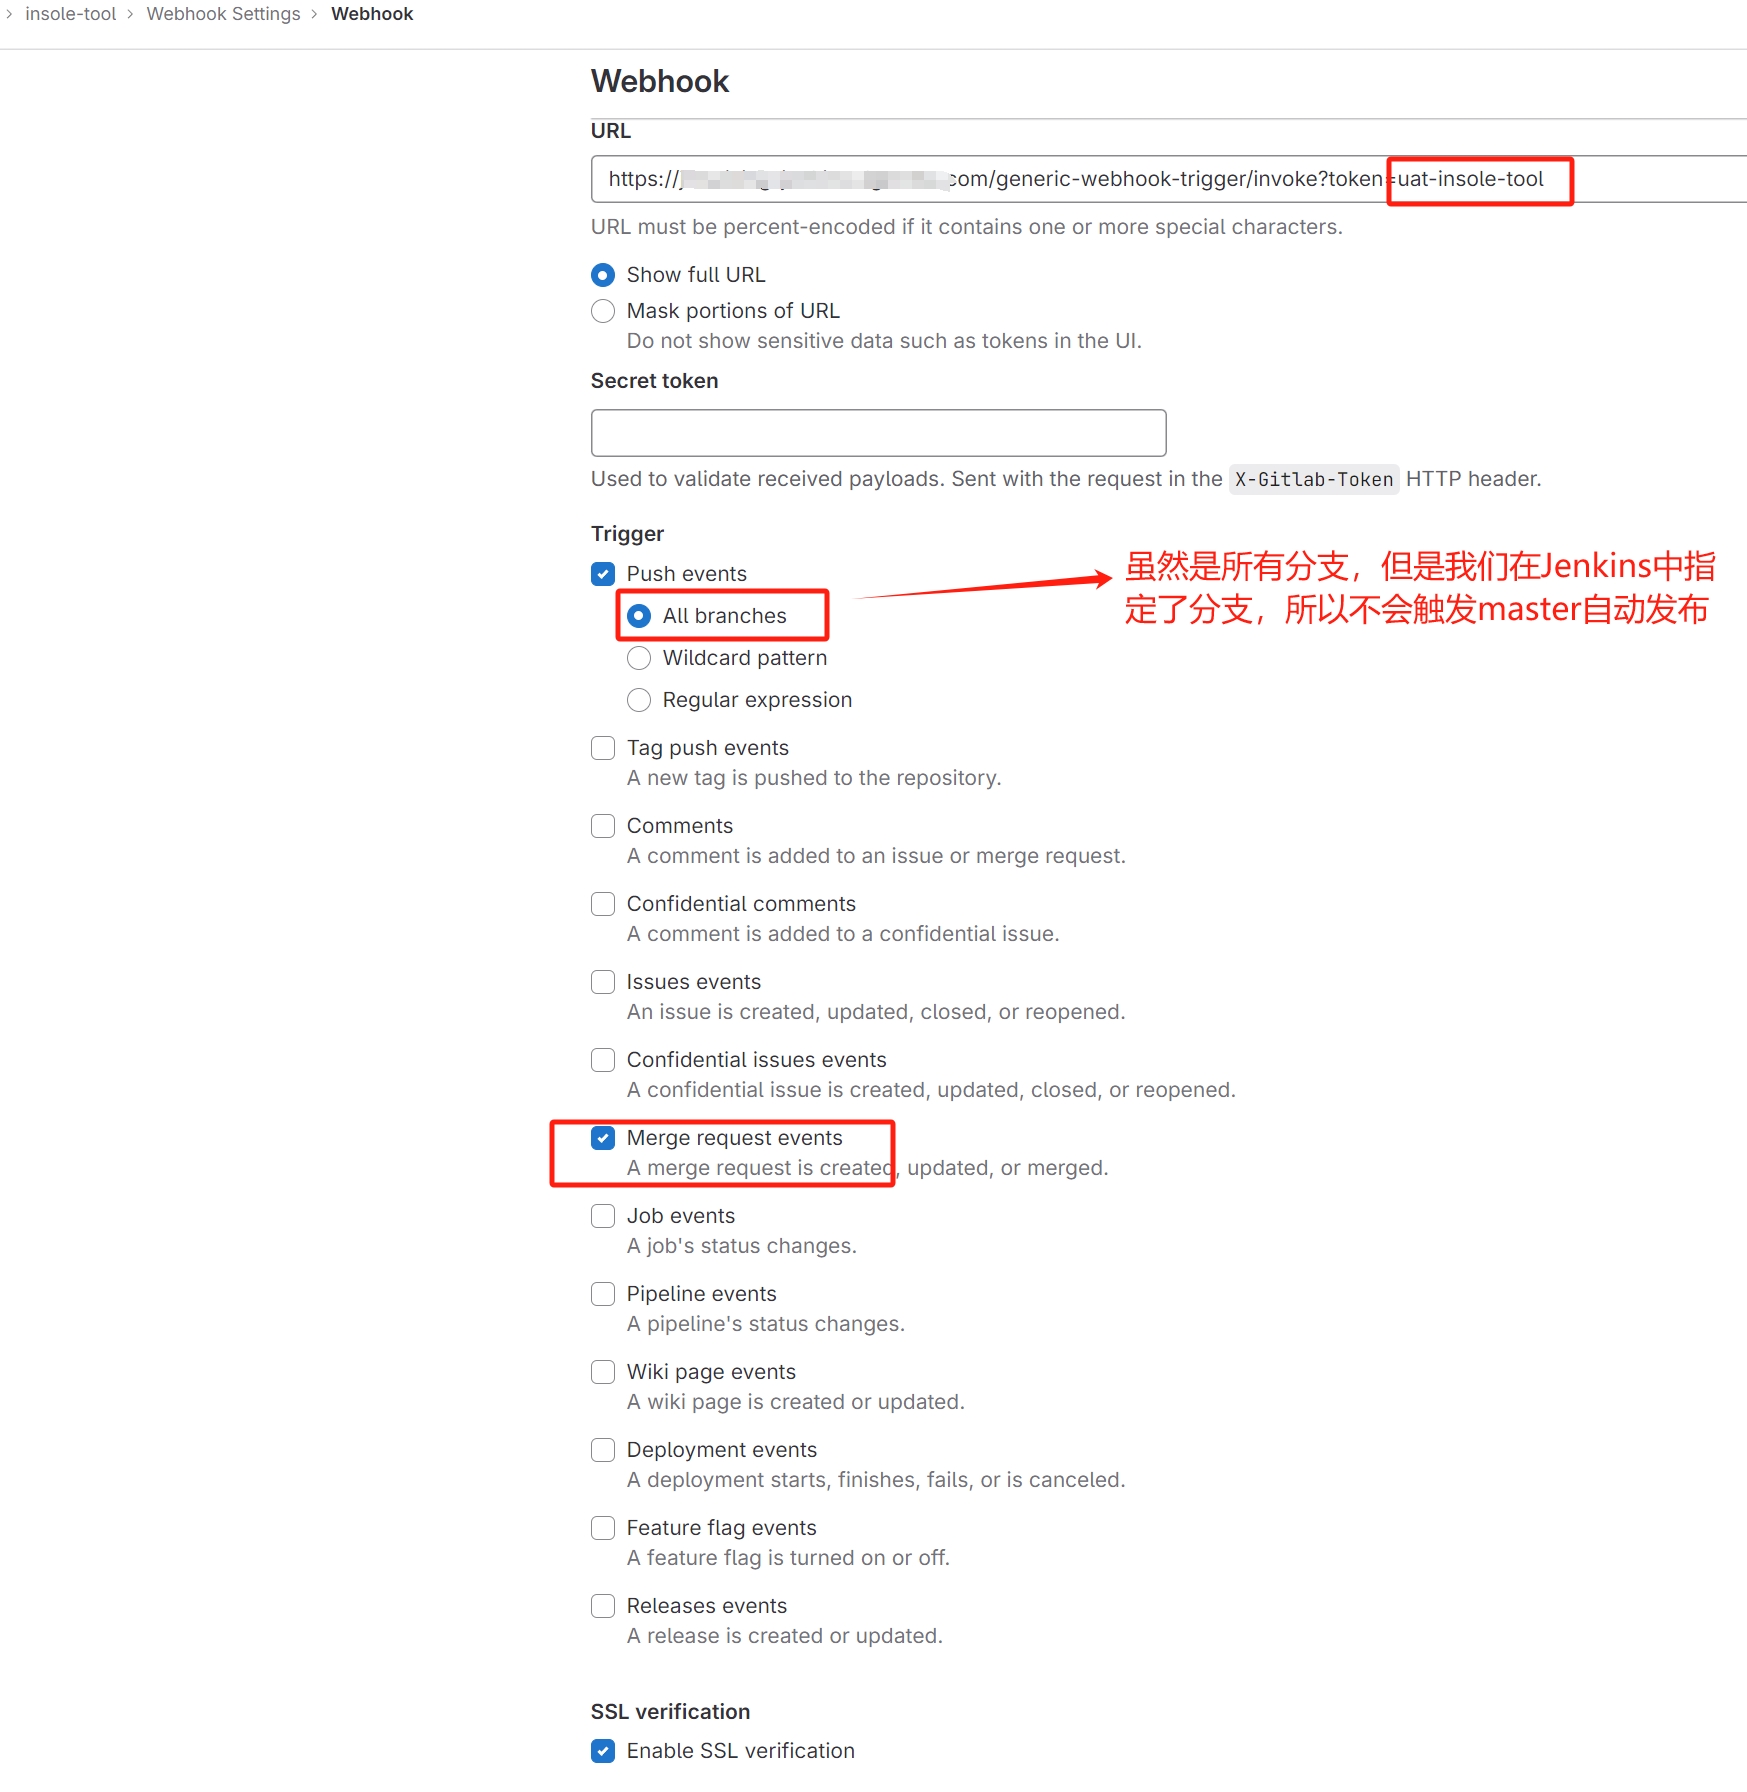
4.7 配置Gitlab
在gitlab上我们配置Webhook钩子,触发事件设置为所有分支,token设置为上面设置的内容
提交代码试下吧,欢迎关注公众号算法小生


 8871
8871

 被折叠的 条评论
为什么被折叠?
被折叠的 条评论
为什么被折叠?
 到【灌水乐园】发言


