


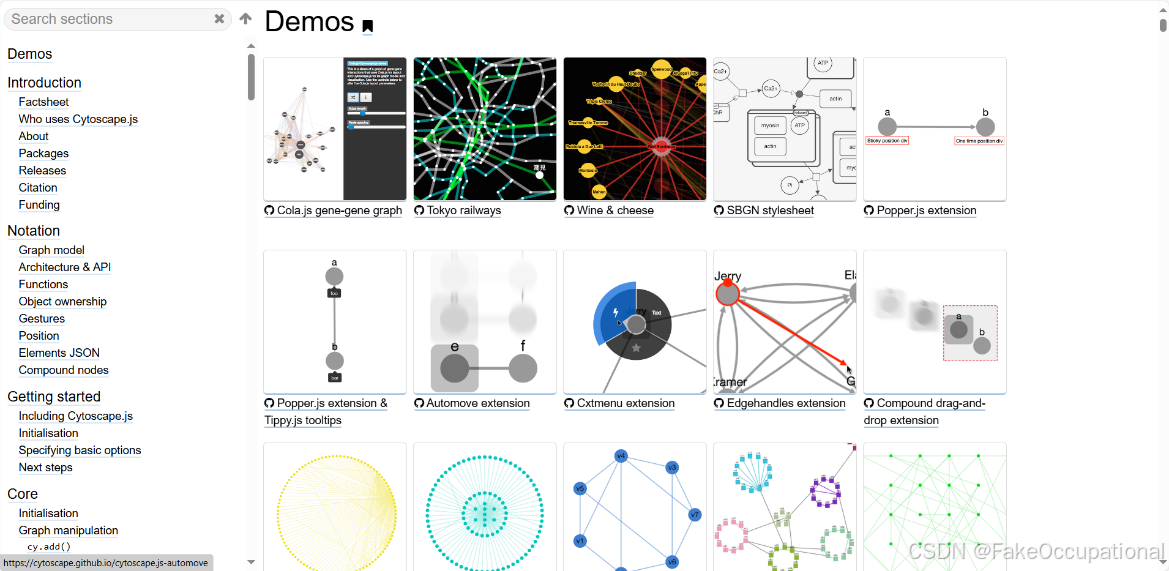
Cytoscape.js简介
-
历史:Cytoscape 创建于多伦多大学并发表在牛津生物信息学(2016 年、2023 年)。
-
Cytoscape 和 Cytoscape.js :从长远来看,Cytoscape 和 Cytoscape.js 将集成得更加紧密。Cytoscape 现在支持读写 Cytoscape.js 的网络和表 JSON 文件。另外,Cytoscape 可以将样式转换为 Cytoscape.js 的样式对象。来源。
-
特点:轻量级的图网络库,专为绘制复杂的网络图而设计,支持节点和边的可视化。
-
交互功能:内置放缩、平移、拖动、点击交互、选择节点等功能。还支持复杂的样式和动画效果。
-
适用场景:知识图谱、社交网络分析、生物网络可视化等。
-
优点:开箱即用,功能强大,支持多种布局算法(如力导向布局、同心圆布局)。
-
官网:Cytoscape.js
-
以下是 Cytoscape 支持的常用布局:
| 布局名称 | 特点 | 常用参数 | 适用场景 |
|---|---|---|---|
| Grid | 网格状排列节点 | rows, cols | 规则分布的图表 |
| Circle | 节点排列成圆形 | radius, startAngle, endAngle | 环形关系、闭环网络 |
| Concentric | 同心圆排列,按节点属性分层 | minNodeSpacing, levelWidth | 分层结构、中心-外围关系图 |
| Breadthfirst | 基于广度优先搜索的层次布局 | root, spacingFactor, directed | 树形结构、层次关系图 |
| Dagre | DAG(有向无环图)布局 | rankDir, nodeSep, rankSep | 流程图、依赖关系图 |
| Cose | 力导向布局,基于物理力学模型 | idealEdgeLength, nodeRepulsion, gravity | 复杂网络、社交关系图 |
| Klay | 层次化布局(需要插件) | direction, spacing, edgeSpacingFactor | 大型有向图、流程图 |
简单示例代码
运行效果
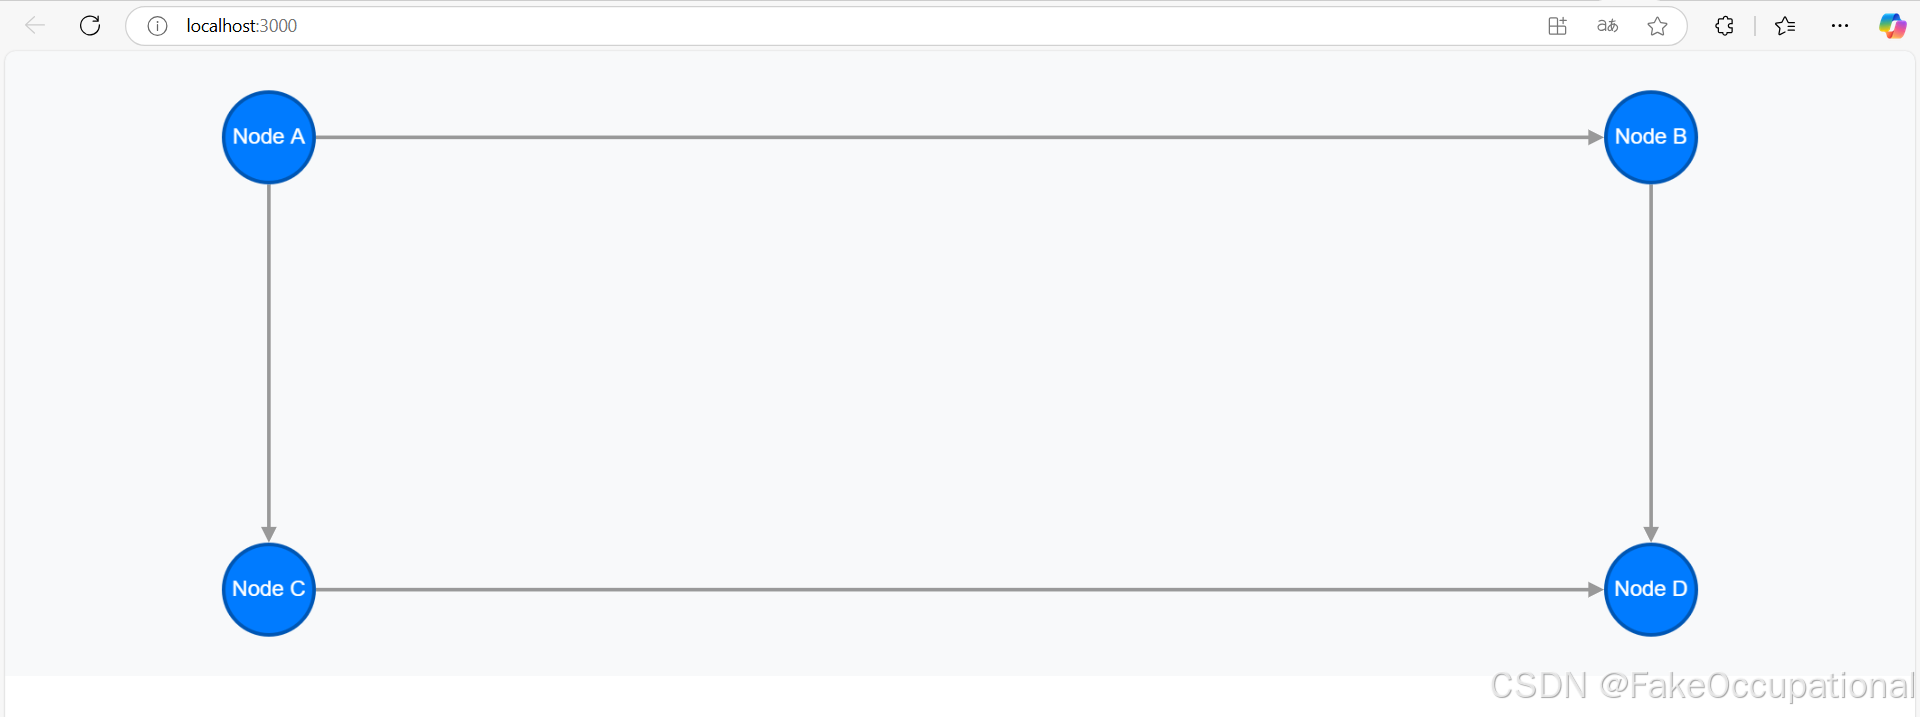
- Cytoscape 实例:
containerRef用于引用<div>容器。cytoscape()函数初始化 Cytoscape 实例,并设置容器、节点和边、样式、以及布局。elements定义了 4 个节点(A,B,C,D)和 4 条边。
- 样式:
- 节点( selector: ‘node’):蓝色背景、白色标签、圆形节点。
- 边(selector: ‘edge’):灰色线条,带箭头的曲线。
- 布局:使用
grid布局自动排列节点。
完整代码
- 在项目中安装
cytoscape:
npm install cytoscape
import React, { useEffect, useRef } from 'react';
import cytoscape from 'cytoscape';

const CytoscapeExample = () => {
    const containerRef = useRef(null);

    useEffect(() => {
        // 初始化 Cytoscape 实例
        const cy = cytoscape({
            container: containerRef.current, // 绑定容器
            elements: [
                // 定义节点
                { data: { id: 'A', label: 'Node A' } },
                { data: { id: 'B', label: 'Node B' } },
                { data: { id: 'C', label: 'Node C' } },
                { data: { id: 'D', label: 'Node D' } },
                // 定义边
                { data: { source: 'A', target: 'B' } },
                { data: { source: 'A', target: 'C' } },
                { data: { source: 'B', target: 'D' } },
                { data: { source: 'C', target: 'D' } }
            ],
            style: [
                {
                    selector: 'node',
                    style: {
                       // 'shape': 'rectangle', // 设置节点为方形
                        'background-color': '#007bff',
                        'label': 'data(label)',
                        'color': '#fff',
                        'text-valign': 'center',
                        'text-halign': 'center',
                        'width': 50,
                        'height': 50,
                        'font-size': '12px',
                        'border-width': 2,
                        'border-color': '#0056b3'
                    }
                },
                {
                    selector: 'edge',
                    style: {
                        'width': 2,
                        'line-color': '#999',
                        'target-arrow-shape': 'triangle',
                        'target-arrow-color': '#999',
                        'curve-style': 'bezier'
                    }
                }
            ],
            layout: {
                name: 'grid', // 使用网格布局
                rows: 2
            }
        });

        // 清理 Cytoscape 实例
        return () => {
            cy.destroy();
        };
    }, []);

    return (
        <div
            ref={containerRef}
            style={{ width: '100%', height: '500px', backgroundColor: '#f8f9fa' }}
        />
    );
};

export default CytoscapeExample;
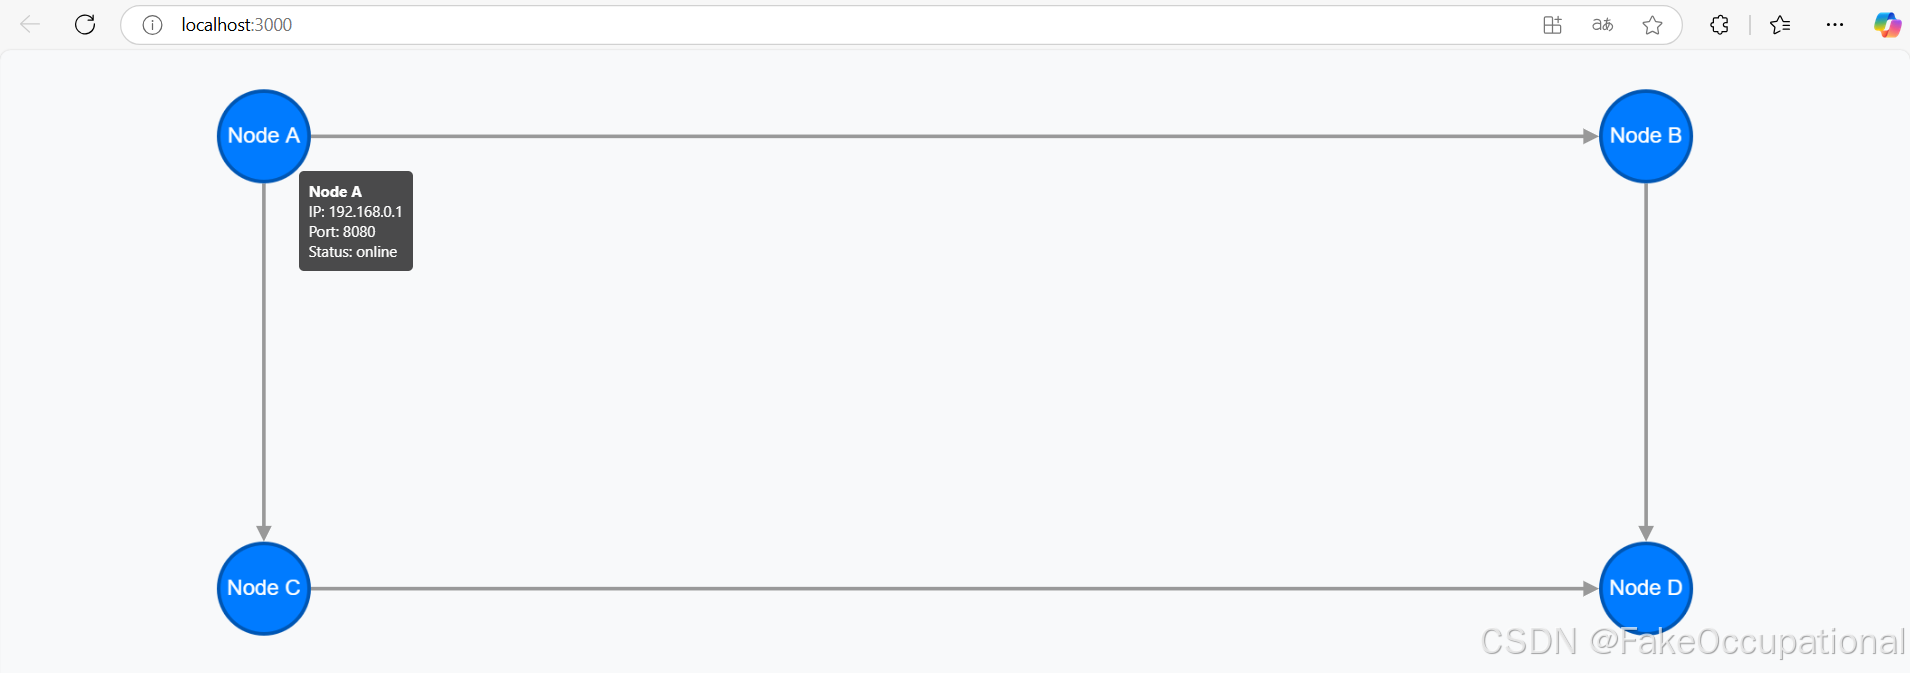
显示节点其他信息+点击事件
运行效果
- 节点属性:为每个节点添加了
ip、port、status等属性。 - Tooltip 功能:
- 创建一个
div元素作为 Tooltip。 - 监听
mouseover事件来显示节点的属性。 - 监听
mousemove事件调整 Tooltip 位置,使其跟随鼠标。 - 监听
mouseout事件隐藏 Tooltip。
- 创建一个
完整代码
import React, { useEffect, useRef } from 'react';
import cytoscape from 'cytoscape';

const CytoscapeExample = () => {
    const containerRef = useRef(null);

    useEffect(() => {
        // 初始化 Cytoscape 实例
        const cy = cytoscape({
            container: containerRef.current, // 绑定容器
            elements: [
                // 定义节点,包含更多属性
                { data: { id: 'A', label: 'Node A', ip: '192.168.0.1', port: 8080, status: 'online' } },
                { data: { id: 'B', label: 'Node B', ip: '192.168.0.2', port: 8081, status: 'offline' } },
                { data: { id: 'C', label: 'Node C', ip: '192.168.0.3', port: 8082, status: 'online' } },
                { data: { id: 'D', label: 'Node D', ip: '192.168.0.4', port: 8083, status: 'online' } },
                // 定义边
                { data: { source: 'A', target: 'B' } },
                { data: { source: 'A', target: 'C' } },
                { data: { source: 'B', target: 'D' } },
                { data: { source: 'C', target: 'D' } }
            ],
            style: [
                {
                    selector: 'node',
                    style: {
                        'background-color': '#007bff',
                        'label': 'data(label)',
                        'color': '#fff',
                        'text-valign': 'center',
                        'text-halign': 'center',
                        'width': 50,
                        'height': 50,
                        'font-size': '12px',
                        'border-width': 2,
                        'border-color': '#0056b3'
                    }
                },
                {
                    selector: 'edge',
                    style: {
                        'width': 2,
                        'line-color': '#999',
                        'target-arrow-shape': 'triangle',
                        'target-arrow-color': '#999',
                        'curve-style': 'bezier'
                    }
                }
            ],
            layout: {
                name: 'grid', // 使用网格布局
                rows: 2
            }
        });

        // 添加 Tooltip 功能
        const tooltip = document.createElement('div');
        tooltip.style.position = 'absolute';
        tooltip.style.padding = '8px';
        tooltip.style.backgroundColor = 'rgba(0, 0, 0, 0.7)';
        tooltip.style.color = '#fff';
        tooltip.style.borderRadius = '4px';
        tooltip.style.fontSize = '12px';
        tooltip.style.display = 'none';
        tooltip.style.pointerEvents = 'none';
        document.body.appendChild(tooltip);

        // 节点鼠标悬停事件
        cy.on('mouseover', 'node', (event) => {
            const node = event.target;
            const { label, ip, port, status } = node.data();

            // 设置 Tooltip 内容
            tooltip.innerHTML = `
                <strong>${label}</strong><br/>
                IP: ${ip}<br/>
                Port: ${port}<br/>
                Status: ${status}
            `;
            tooltip.style.display = 'block';
        });

        // 鼠标移动时调整 Tooltip 位置
        cy.on('mousemove', (event) => {
            tooltip.style.left = `${event.renderedPosition.x + 15}px`;
            tooltip.style.top = `${event.renderedPosition.y + 15}px`;
        });

        // 鼠标离开节点时隐藏 Tooltip
        cy.on('mouseout', 'node', () => {
            tooltip.style.display = 'none';
        });

        // 节点点击事件( on('click')或on('tap') ),弹出详细信息 https://js.cytoscape.org/#eles.on
        cy.on('click', 'node', (event) => {
            const node = event.target;
            const { id, label, ip, port, status } = node.data();
            alert(`节点详细信息:
                ID: ${id}
                Label: ${label}
                IP: ${ip}
                Port: ${port}
                Status: ${status}`);
        });


        // 清理 Cytoscape 实例和 Tooltip
        return () => {
            cy.destroy();
            document.body.removeChild(tooltip);
        };
    }, []);

    return (
        <div
            ref={containerRef}
            style={{ width: '100%', height: '500px', backgroundColor: '#f8f9fa' }}
        />
    );
};

export default CytoscapeExample;
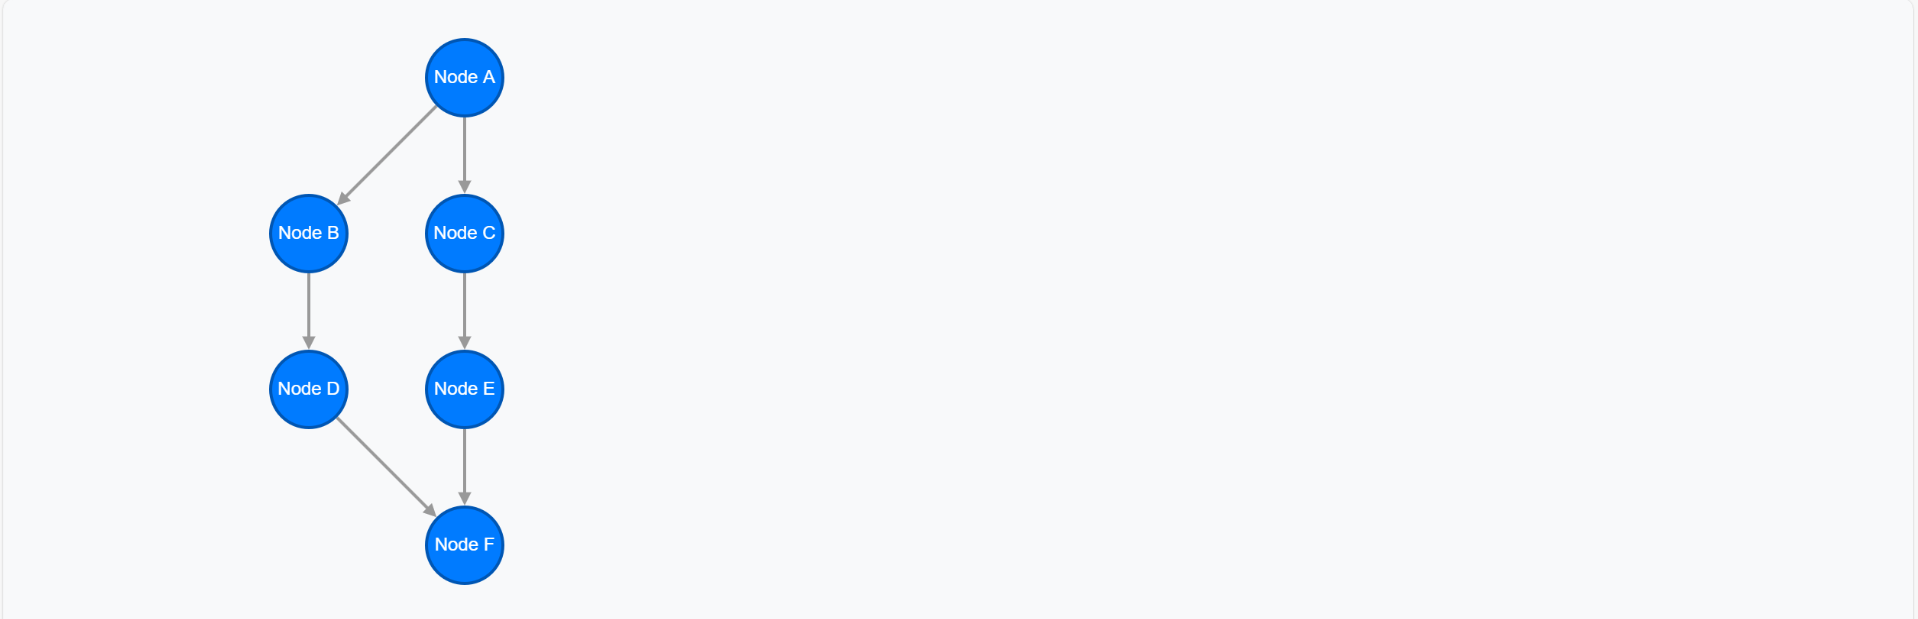
cytoscape-dagre布局
- Dagre 布局是一种基于有向无环图(DAG)的布局算法,适合展示流程图和层次关系的图形。
运行效果
完整代码
npm i cytoscape-dagre
import React, { useEffect, useRef } from 'react';
import cytoscape from 'cytoscape';
import dagre from 'cytoscape-dagre';

cytoscape.use(dagre); // 注册 dagre 插件

const CytoscapeDagreExample = () => {
    const containerRef = useRef(null);

    useEffect(() => {
        const cy = cytoscape({
            container: containerRef.current,
            elements: [
                { data: { id: 'A', label: 'Node A' } },
                { data: { id: 'B', label: 'Node B' } },
                { data: { id: 'C', label: 'Node C' } },
                { data: { id: 'D', label: 'Node D' } },
                { data: { id: 'E', label: 'Node E' } },
                { data: { id: 'F', label: 'Node F' } },
                { data: { source: 'A', target: 'B' } },
                { data: { source: 'A', target: 'C' } },
                { data: { source: 'B', target: 'D' } },
                { data: { source: 'C', target: 'E' } },
                { data: { source: 'D', target: 'F' } },
                { data: { source: 'E', target: 'F' } }
            ],
            style: [
                {
                    selector: 'node',
                    style: {
                        'background-color': '#007bff',
                        'label': 'data(label)',
                        'color': '#fff',
                        'text-valign': 'center',
                        'text-halign': 'center',
                        'width': 50,
                        'height': 50,
                        'font-size': '12px',
                        'border-width': 2,
                        'border-color': '#0056b3'
                    }
                },
                {
                    selector: 'edge',
                    style: {
                        'width': 2,
                        'line-color': '#999',
                        'target-arrow-shape': 'triangle',
                        'target-arrow-color': '#999',
                        'curve-style': 'bezier'
                    }
                }
            ],
            layout: {
                name: 'dagre', // 使用 dagre 布局
                rankDir: 'TB', // 排列方向:从上到下 (Top to Bottom)
                align: 'DR',
                nodeSep: 50, // 节点间距
                edgeSep: 10, // 边间距
                rankSep: 50 // 层级间距
            }
        });

        return () => cy.destroy();
    }, []);

    return (
        <div
            ref={containerRef}
            style={{ width: '100%', height: '500px', backgroundColor: '#f8f9fa' }}
        />
    );
};

export default CytoscapeDagreExample;
支持动态展开
运行效果
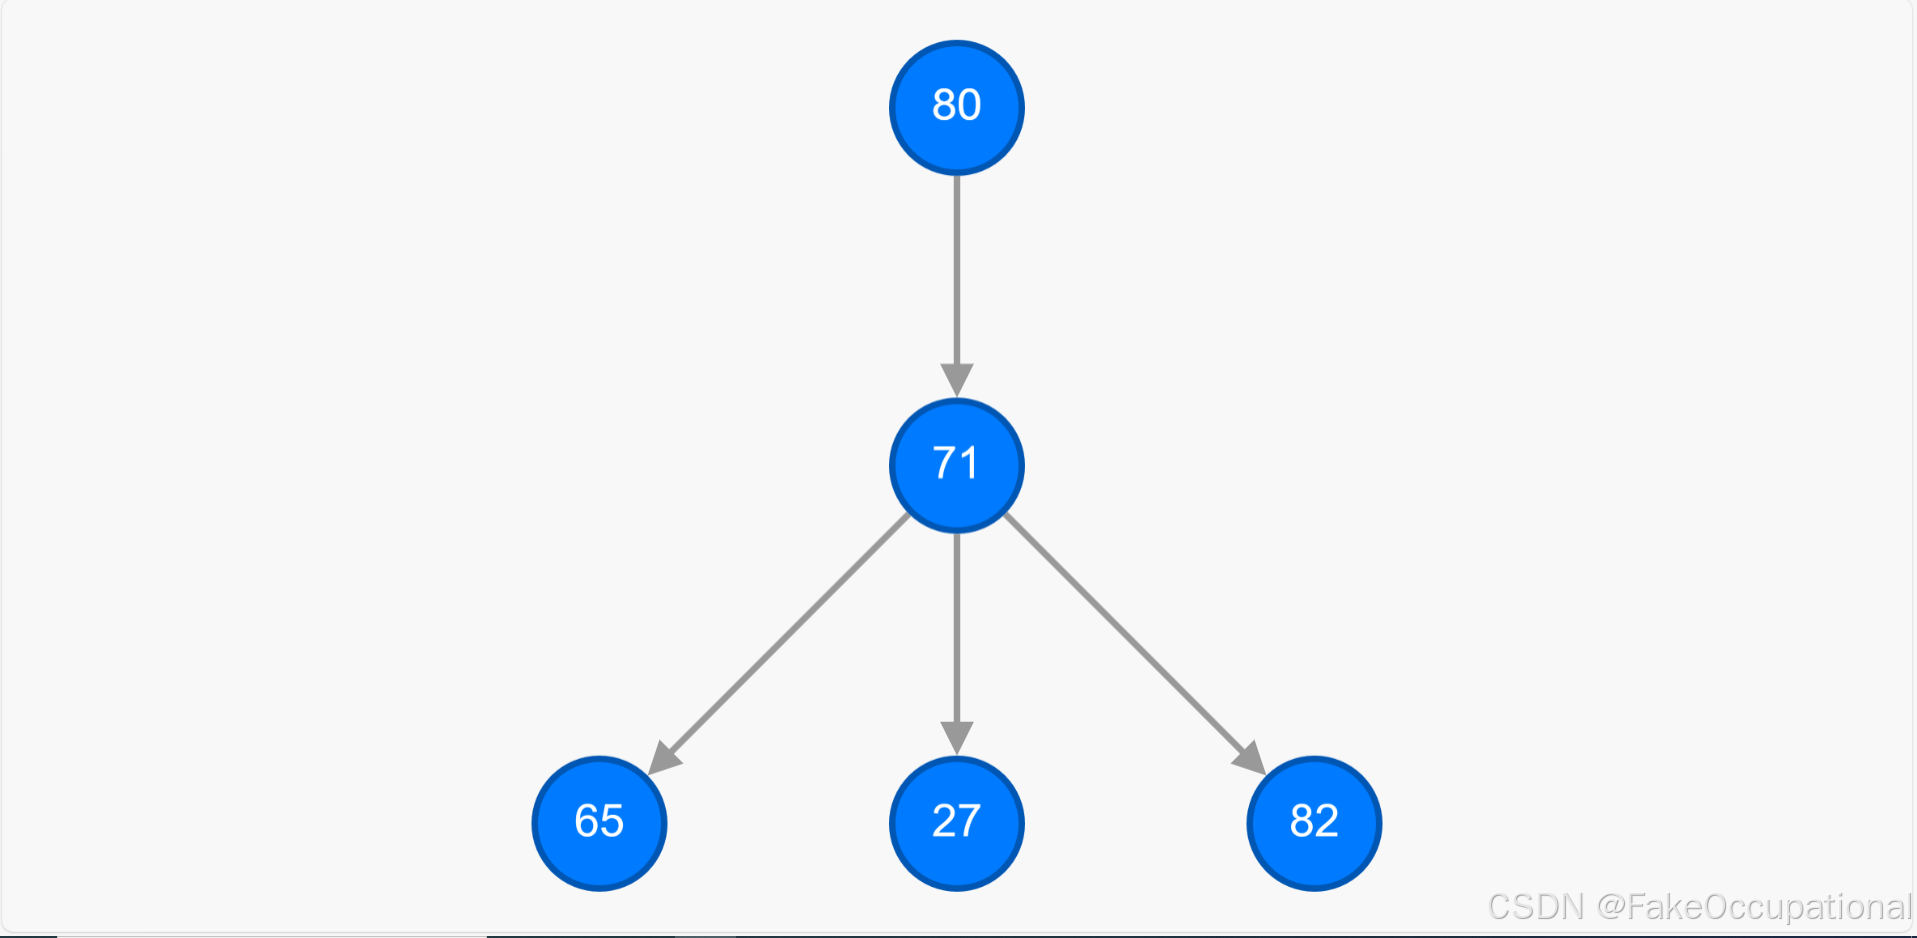
完整代码
import React, { useEffect, useRef } from 'react';
import cytoscape from 'cytoscape';
import dagre from 'cytoscape-dagre';

// 注册 dagre 布局插件
cytoscape.use(dagre);

const CytoscapeTree = () => {
    const cyRef = useRef(null);
    const containerRef = useRef(null);

    // 生成子节点的函数,确保没有循环
    const createChildNodes = (parentId, count) => {
        const existingNodes = cyRef.current.nodes().map(node => node.id());
        const nodes = [];
        const edges = [];

        for (let i = 0; i < count; i++) {
            const nodeId = `${parentId}-${i}`;
            if (!existingNodes.includes(nodeId)) {
                const randomValue = Math.floor(Math.random() * 100);
                nodes.push({
                    data: {
                        id: nodeId,
                        label: randomValue.toString(),
                        expanded: false,
                        hasChildren: true
                    }
                });
                edges.push({
                    data: {
                        id: `edge-${parentId}-${nodeId}`,
                        source: parentId,
                        target: nodeId
                    }
                });
            }
        }
        return { nodes, edges };
    };

    useEffect(() => {
        // 初始化 Cytoscape
        cyRef.current = cytoscape({
            container: containerRef.current,
            elements: {
                nodes: [{
                    data: {
                        id: 'root',
                        label: Math.floor(Math.random() * 100).toString(),
                        expanded: false,
                        hasChildren: true
                    }
                }],
                edges: []
            },
            style: [
                {
                    selector: 'node',
                    style: {
                        'background-color': '#007bff',
                        'label': 'data(label)',
                        'width': 40,
                        'height': 40,
                        'text-valign': 'center',
                        'text-halign': 'center',
                        'font-size': '14px',
                        'color': '#fff',
                        'border-width': 2,
                        'border-color': '#0056b3'
                    }
                },
                {
                    selector: 'edge',
                    style: {
                        'width': 2,
                        'line-color': '#999',
                        'curve-style': 'bezier',
                        'target-arrow-shape': 'triangle',
                        'target-arrow-color': '#999',
                        'arrow-scale': 1.2
                    }
                },
            ],
            layout: {
                name: 'dagre',
                rankDir: 'TB',
                spacingFactor: 1.2,
                animate: true,
                animationDuration: 500
            }
        });

        // 处理节点点击事件
        cyRef.current.on('tap', 'node', function (evt) {
            const node = evt.target;
            const nodeId = node.id();
            const isExpanded = node.data('expanded');

            if (!isExpanded) {
                // 展开节点
                const { nodes, edges } = createChildNodes(nodeId, Math.floor(Math.random() * 3) + 1);
                cyRef.current.add([...nodes, ...edges]);
                node.data('expanded', true);
            } else {
                // 折叠节点:移除所有子节点及其后代
                const descendants = node.successors();
                cyRef.current.remove(descendants);
                node.data('expanded', false);
            }

            // 重新布局,确保图形是有向无环的
            cyRef.current.layout({
                name: 'dagre',
                rankDir: 'TB',
                spacingFactor: 1.2,
                animate: true,
                animationDuration: 500
            }).run();
        });

        // 清理函数
        return () => {
            if (cyRef.current) {
                cyRef.current.destroy();
            }
        };
    }, []);

    return (
        <div
            ref={containerRef}
            style={{
                width: '100%',
                height: '100vh',
                backgroundColor: '#f8f8f8'
            }}
        />
    );
};

export default CytoscapeTree;


 710
710

 被折叠的 条评论
为什么被折叠?
被折叠的 条评论
为什么被折叠?
 到【灌水乐园】发言


