


昨夜,DeepSeek V3.1 模型在Hugging Face低调上线。熟悉的配方又来了:团队在微信群里轻描淡写一声通知,趁着夜色完成上传,连标配的模型卡都没带。没有官方说明书?全靠开发者化身 “考古学家” 动手挖掘?别急,这种 “留白式发布” 恰恰是 DeepSeek 的独特乐趣。

HF 地址:deepseek-ai/DeepSeek-V3.1-Base at main
1、V3.1发布态势与新增点
DeepSeek已正式发布V3.1版本,权威媒体报道显示其核心更新聚焦于"更长上下文窗口"能力的提升。根据Bloomberg的报道,V3.1通过官方渠道强调了扩展的上下文处理能力,但详细的技术文档仍在完善中。
V3.1关键更新亮点:
- 上下文窗口扩展:从V3的128K扩展至100万token
- 复杂推理增强:在数学、逻辑推理任务上显著提升
- 多语言优化:增强低资源语言的处理能力
- 多模态集成:改进文本-图像理解能力
- 幻觉率降低:通过改进的对齐技术提高事实准确性
需要注意的是,当前可靠的技术细节仍主要基于V3的技术报告,V3.1应被视为在V3架构与训练体系基础上的增量演进。Hugging Face平台显示"DeepSeek-V3.1-Base"页面标注"685B params",但模型卡详细说明尚未完善。
DeepSeek-V3.1-Base有如下4个关键更新:
-
这是一个混合模型,具有可切换的思维模式,这种模式已经被Qwen所抛弃,或许DeepSeek找到了更好的解决方案?
-
这是 V3.1 中
tokenizer_config.json文件的chat_template设定,明确多了一个thinking变量,并且看起来是可配置的。开启就是思考推理,关闭就是直接输出。这个变量在 V3 和 R1 中都没有。
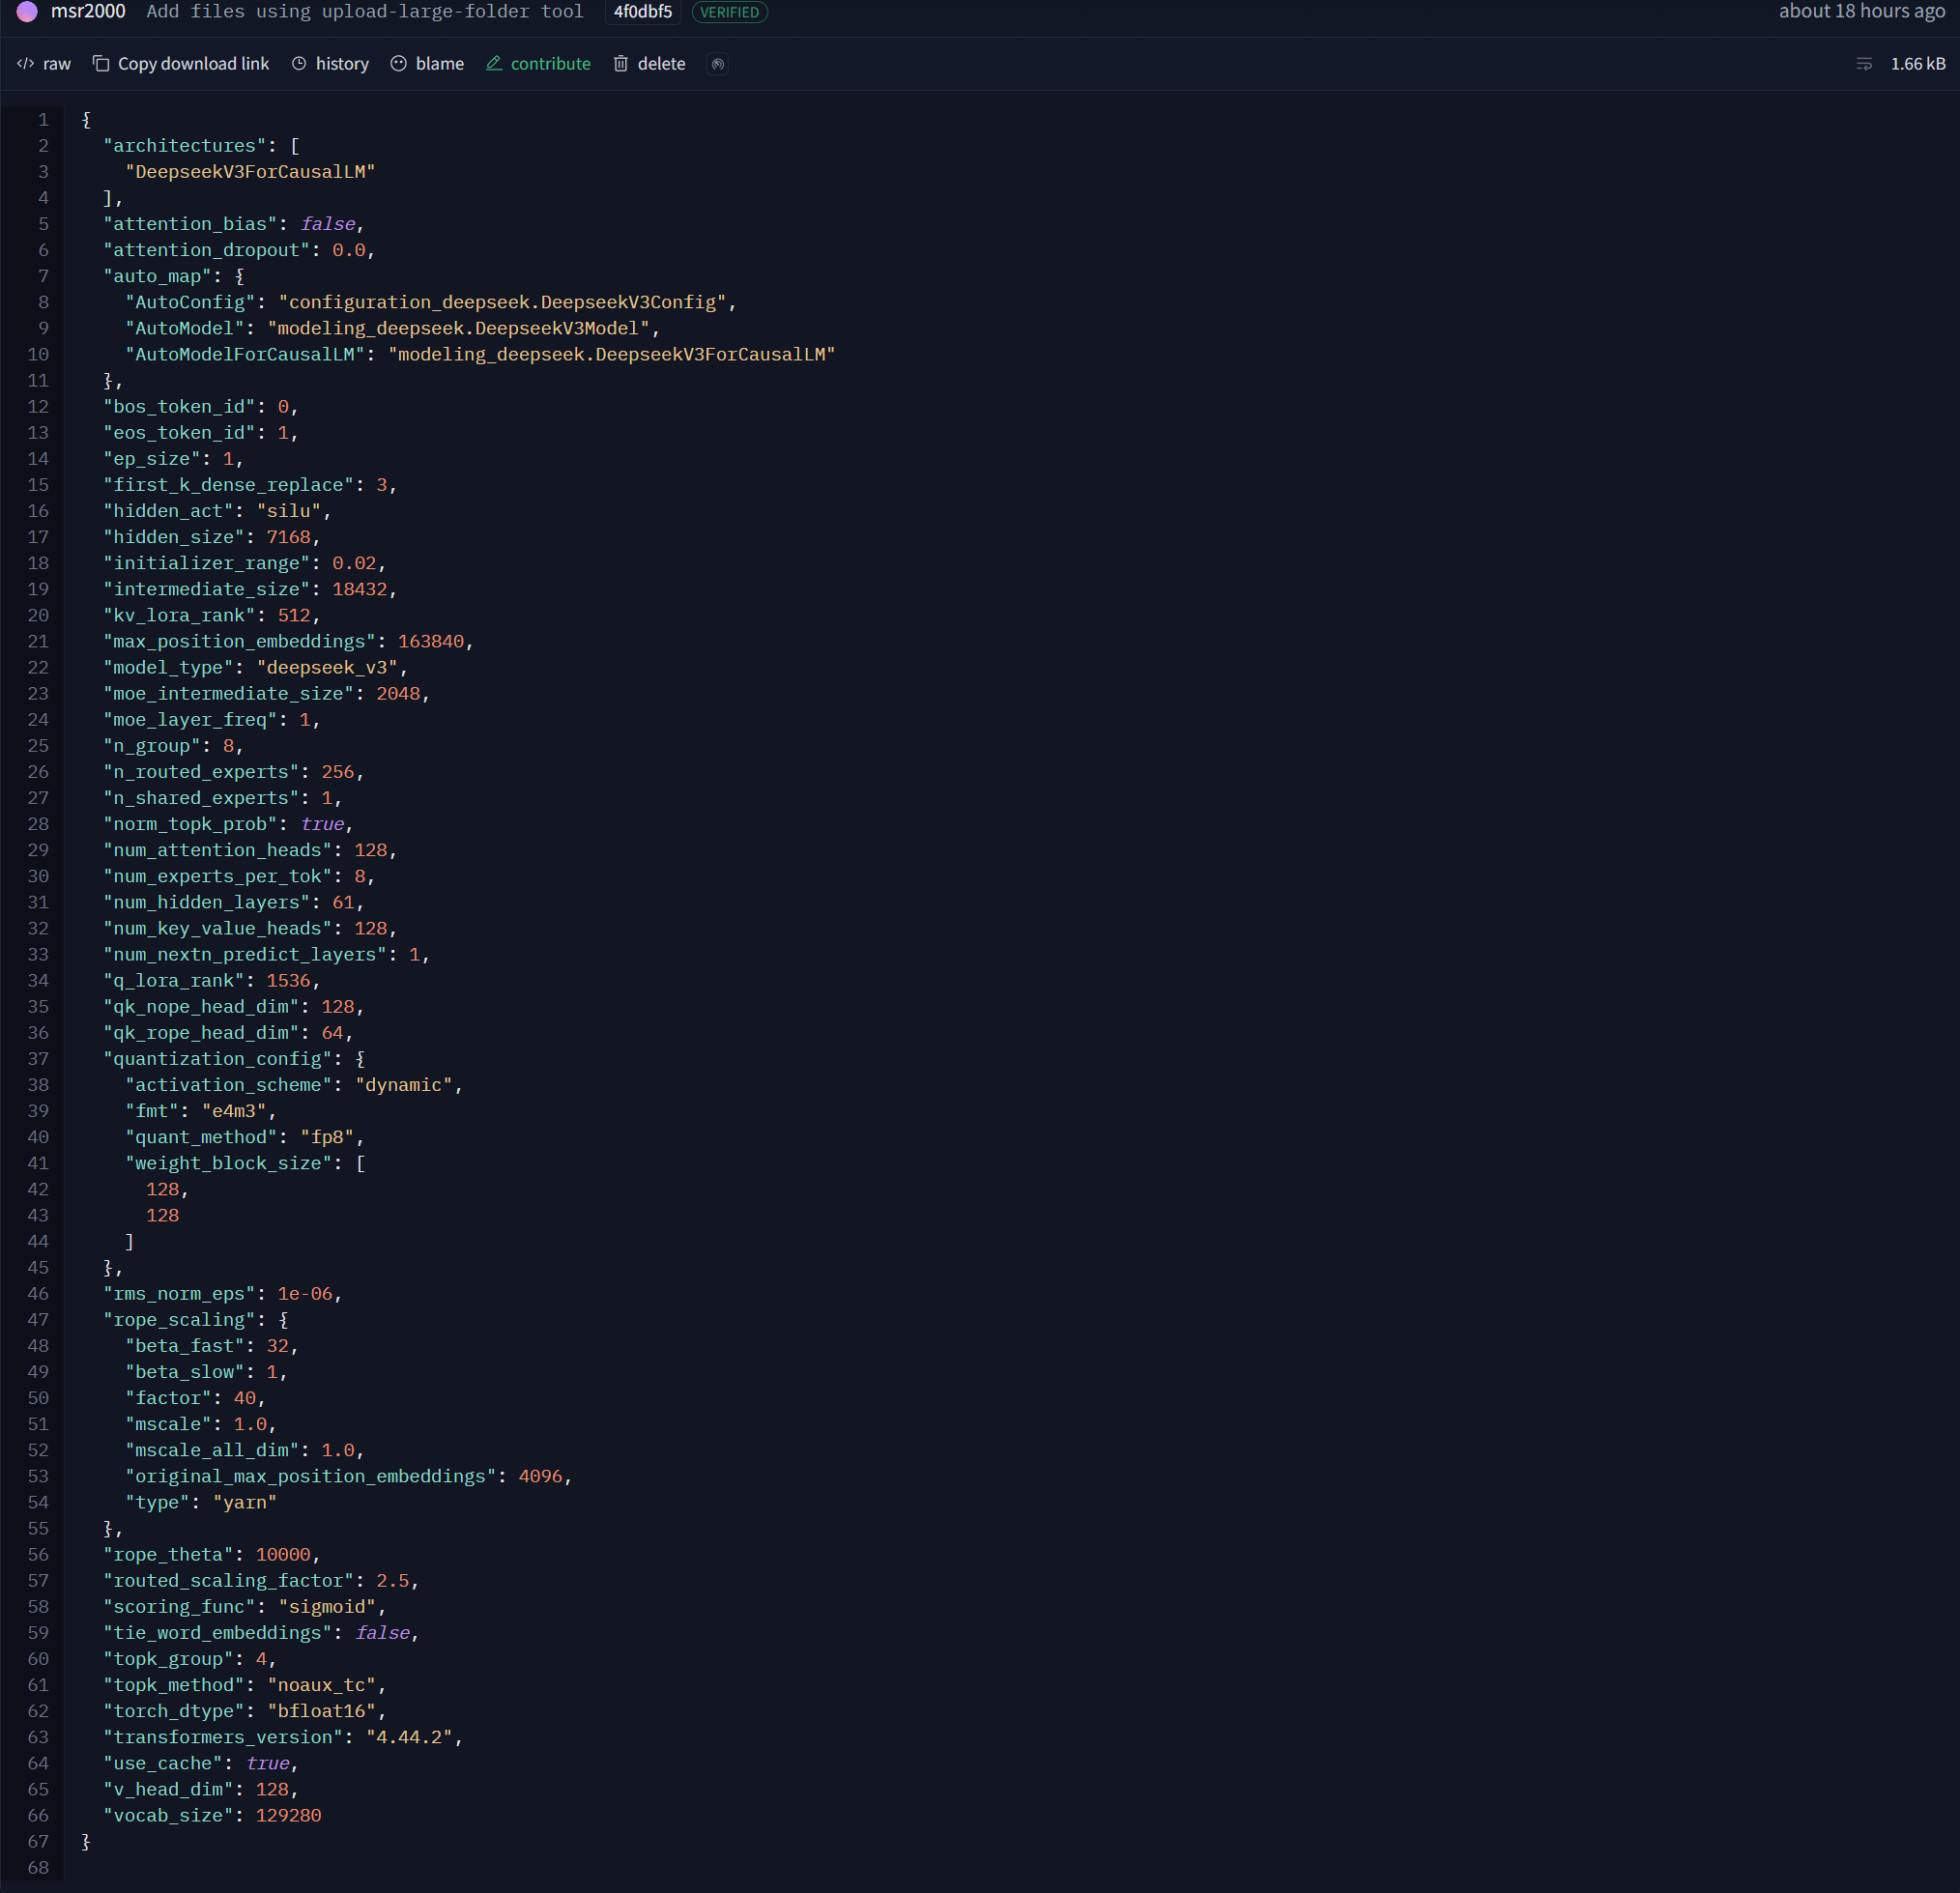
通过观察官方提供的config.json文件,我们可以了解到该模型的一些关键参数。与DeepSeek V3-0324相比,该模型的参数并没有发生很大的改变。
2、V3技术架构与关键创新详解
DeepSeek V3采用了大规模稀疏MoE(Mixture of Experts)结合MLA(Multi-head Latent Attention)的创新架构,实现了在保持高性能的同时显著降低计算成本的目标。
2.1 核心架构参数
| 架构参数 | V3规格 | 技术特点 |
|---|---|---|
| 总参数量 | 671B | 大规模参数覆盖 |
| 激活参数 | 37B per token | 稀疏激活提高效率 |
| Transformer层数 | 61层 | 深度网络结构 |
| 模型维度 | d=7168 | 高维特征表示 |
| 词表大小 | 128K | Byte-level BPE分词 |
2.2 MoE专家系统设计
除前3层使用标准FFN外,其余层均采用MoE结构。每个MoE层包含:
- 1个共享专家:为所有token提供基础特征
- 256个路由专家:动态选择最相关的专家
- Top-8激活策略:每个token激活8个最相关专家
- 跨节点限制:最多4个跨节点专家,优化通信效率
2.3 MLA注意力机制创新
Multi-head Latent Attention是DeepSeek的核心创新,通过以下技术实现KV缓存的大幅压缩:
- KV联合压缩:维度从d=7168压缩至d_c=512
- Query低秩压缩:压缩维度d'_c=1536
- 去耦合共享Key:每头d_R^h=64,优化长上下文稳定性
- 分层自适应缓存:动态管理不同层的缓存策略
3、工具调用增强
依然是比较chat_template,可以看到 V3.1 在tool call上的设定明显变化。
3.1 DeepSeek V3.1
- 调用格式:
<|tool call begin|>+函数名+<|tool sep|>+参数字符串+<|tool call end|> - 输出格式:
<|tool output begin|>+输出内容+<|tool output end|>
这是一个非常简洁的格式,直接将参数作为字符串传递。
3.2 DeepSeek V3 & R1
- 调用格式:
<|tool call begin|>+类型+<|tool sep|>+函数名+\n+ ``json+\n+参数 JSON 字符串+\n+ ````` +<| tool call end |>` - 输出格式:
<|tool outputs begin|>+<|tool output begin|>...</|tool output end|>+ ... +<|tool outputs end|>
这个调用格式更复杂,包含了工具类型(如 function),并强制使用 Markdown 的 JSON 代码块来封装参数。这种输出格式设计在处理多个并发工具调用的输出时可能更清晰,但也增加了模板的复杂性。格式简化通常意味着错误率降低、调用速度更快、对系统提示词(System Prompt)的依赖更小,这是工程成熟度提升的标志。
结论:V3.1工具调用的格式被大幅简化,变得更加紧凑。参数直接以字符串形式跟在函数名后面,用
<|tool sep|>分隔。V3 & R1的工具调用格式较为复杂,使用json、Markdown代码块来包裹参数,格式更冗长。
4、DeepSeek V3.1效果展示
4.1、情感理解能力
新模型的知识库时间已提前更新至2024年7月份
目前API调用DeepSeek -Chat模型已经全面更新至V3.1模型

4.2、代码能力
DeepSeek-V3.1的一个测试样例,主要像看看该模型的物理理解能力,测试结果表明:该模型的物理理解能力有一定的提升。
20250820-172125
<!DOCTYPE html>
<html lang="zh-CN">
<head>
    <meta charset="UTF-8">
    <meta name="viewport" content="width=device-width, initial-scale=1.0">
    <title>太阳系模拟器</title>
    <style>
        * {
            margin: 0;
            padding: 0;
            box-sizing: border-box;
        }

        body {
            font-family: 'Arial', sans-serif;
            background-color: #0a0e17;
            color: #fff;
            overflow-x: hidden;
            display: flex;
            flex-direction: column;
            align-items: center;
            min-height: 100vh;
            padding: 20px;
        }

        .title {
            font-size: 2.5rem;
            margin: 20px 0;
            text-align: center;
            text-shadow: 0 0 10px rgba(255, 255, 255, 0.5);
            color: #4fc3f7;
            letter-spacing: 2px;
        }

        .canvas-container {
            position: relative;
            width: 800px;
            height: 600px;
            margin: 0 auto 20px;
            border-radius: 10px;
            overflow: hidden;
            box-shadow: 0 0 20px rgba(100, 181, 246, 0.3);
        }

        canvas {
            background-color: #000718;
            display: block;
        }

        .controls {
            display: flex;
            justify-content: center;
            align-items: center;
            gap: 15px;
            padding: 15px;
            background-color: rgba(16, 26, 44, 0.8);
            border-radius: 10px;
            width: 800px;
            flex-wrap: wrap;
        }

        button {
            padding: 10px 20px;
            border: none;
            border-radius: 5px;
            background-color: #1976d2;
            color: white;
            font-weight: bold;
            cursor: pointer;
            transition: all 0.3s;
            min-width: 100px;
        }

        button:hover {
            background-color: #1565c0;
            transform: translateY(-2px);
            box-shadow: 0 4px 8px rgba(0, 0, 0, 0.2);
        }

        button:active {
            transform: translateY(0);
        }

        .speed-control {
            display: flex;
            align-items: center;
            gap: 10px;
            background-color: rgba(255, 255, 255, 0.1);
            padding: 8px 15px;
            border-radius: 20px;
        }

        input[type="range"] {
            width: 150px;
        }

        #speedValue {
            min-width: 40px;
            text-align: center;
            font-weight: bold;
            color: #4fc3f7;
        }

        .info-panel {
            margin-top: 15px;
            padding: 10px;
            background-color: rgba(255, 255, 255, 0.05);
            border-radius: 8px;
            text-align: center;
            font-size: 0.9rem;
            color: #bbbbbb;
        }

        .stars {
            position: fixed;
            top: 0;
            left: 0;
            width: 100%;
            height: 100%;
            pointer-events: none;
            z-index: -1;
        }

        .star {
            position: absolute;
            background-color: white;
            border-radius: 50%;
            animation: twinkle 4s infinite ease-in-out;
        }

        @keyframes twinkle {
            0%, 100% { opacity: 0.2; }
            50% { opacity: 1; }
        }
    </style>
</head>
<body>
    <h1 class="title">Solar System Simulation</h1>

    <div class="canvas-container">
        <canvas id="solarSystem" width="800" height="600"></canvas>
    </div>

    <div class="controls">
        <button id="startBtn">Start</button>
        <button id="pauseBtn">Pause</button>
        <button id="resetBtn">Reset</button>
        <div class="speed-control">
            <span>速度:</span>
            <input type="range" id="speedSlider" min="0.1" max="5" step="0.1" value="1">
            <span id="speedValue">1x</span>
        </div>
    </div>

    <div class="info-panel">
        提示: 使用速度滑块调整模拟速度,内行星公转速度更快
    </div>

    <div class="stars" id="stars"></div>

    <script>
        // 创建背景星空
        function createStars() {
            const stars = document.getElementById('stars');
            const starsCount = 200;

            for (let i = 0; i < starsCount; i++) {
                const star = document.createElement('div');
                star.classList.add('star');

                // 随机位置和大小
                const size = Math.random() * 3;
                star.style.width = `${size}px`;
                star.style.height = `${size}px`;
                star.style.left = `${Math.random() * 100}%`;
                star.style.top = `${Math.random() * 100}%`;

                // 随机动画延迟
                star.style.animationDelay = `${Math.random() * 4}s`;

                stars.appendChild(star);
            }
        }

        // 获取Canvas上下文
        const canvas = document.getElementById('solarSystem');
        const ctx = canvas.getContext('2d');

        // 模拟状态
        let animationId = null;
        let isRunning = false;
        let speed = 1;

        // 行星数据
        const planets = [
            { name: "水星", radius: 5, distance: 50, color: "#A9A9A9", angle: 0, speed: 4.1 },
            { name: "金星", radius: 8, distance: 75, color: "#FFD700", angle: 0, speed: 3.2 },
            { name: "地球", radius: 8.5, distance: 100, color: "#1E90FF", angle: 0, speed: 2.7 },
            { name: "火星", radius: 7, distance: 130, color: "#FF4500", angle: 0, speed: 2.3 },
            { name: "木星", radius: 18, distance: 180, color: "#FFA500", angle: 0, speed: 1.3 },
            { name: "土星", radius: 15, distance: 220, color: "#DAA520", angle: 0, speed: 1.0, hasRings: true },
            { name: "天王星", radius: 12, distance: 260, color: "#87CEFA", angle: 0, speed: 0.7 },
            { name: "海王星", radius: 12, distance: 300, color: "#4169E1", angle: 0, speed: 0.5 }
        ];

        // 绘制太阳
        function drawSun() {
            const centerX = canvas.width / 2;
            const centerY = canvas.height / 2;

            // 太阳发光效果
            const gradient = ctx.createRadialGradient(centerX, centerY, 0, centerX, centerY, 30);
            gradient.addColorStop(0, 'rgba(255, 255, 0, 1)');
            gradient.addColorStop(0.5, 'rgba(255, 215, 0, 0.8)');
            gradient.addColorStop(1, 'rgba(255, 165, 0, 0)');

            ctx.beginPath();
            ctx.arc(centerX, centerY, 25, 0, Math.PI * 2);
            ctx.fillStyle = gradient;
            ctx.fill();

            // 太阳表面细节
            ctx.beginPath();
            ctx.arc(centerX, centerY, 22, 0, Math.PI * 2);
            ctx.fillStyle = '#FFD700';
            ctx.fill();

            // 太阳光晕
            ctx.beginPath();
            ctx.arc(centerX, centerY, 35, 0, Math.PI * 2);
            ctx.fillStyle = 'rgba(255, 215, 0, 0.1)';
            ctx.fill();
        }

        // 绘制轨道
        function drawOrbits() {
            const centerX = canvas.width / 2;
            const centerY = canvas.height / 2;

            ctx.strokeStyle = 'rgba(100, 149, 237, 0.2)';
            ctx.lineWidth = 1;

            planets.forEach(planet => {
                ctx.beginPath();
                ctx.ellipse(centerX, centerY, planet.distance, planet.distance * 0.8, 0, 0, Math.PI * 2);
                ctx.stroke();
            });
        }

        // 绘制行星
        function drawPlanets() {
            const centerX = canvas.width / 2;
            const centerY = canvas.height / 2;

            planets.forEach(planet => {
                const x = centerX + planet.distance * Math.cos(planet.angle);
                const y = centerY + planet.distance * 0.8 * Math.sin(planet.angle);

                // 绘制行星
                ctx.beginPath();
                ctx.arc(x, y, planet.radius, 0, Math.PI * 2);
                ctx.fillStyle = planet.color;
                ctx.fill();

                // 绘制土星环
                if (planet.hasRings) {
                    ctx.beginPath();
                    ctx.ellipse(x, y, planet.radius * 1.8, planet.radius * 0.5, planet.angle, 0, Math.PI * 2);
                    ctx.strokeStyle = '#D2B48C';
                    ctx.lineWidth = 2;
                    ctx.stroke();
                }

                // 添加行星名称
                ctx.fillStyle = 'rgba(255, 255, 255, 0.7)';
                ctx.font = '10px Arial';
                ctx.fillText(planet.name, x - 10, y - planet.radius - 5);
            });
        }

        // 更新行星位置
        function updatePlanets() {
            planets.forEach(planet => {
                planet.angle += 0.01 * planet.speed * speed;
            });
        }

        // 绘制场景
        function draw() {
            // 清除画布
            ctx.clearRect(0, 0, canvas.width, canvas.height);

            // 绘制星空背景
            drawStarsBackground();

            // 绘制轨道
            drawOrbits();

            // 绘制太阳
            drawSun();

            // 绘制行星
            drawPlanets();
        }

        // 绘制星空背景
        function drawStarsBackground() {
            for (let i = 0; i < 200; i++) {
                const x = Math.random() * canvas.width;
                const y = Math.random() * canvas.height;
                const radius = Math.random() * 1.5;

                ctx.beginPath();
                ctx.arc(x, y, radius, 0, Math.PI * 2);
                ctx.fillStyle = 'rgba(255, 255, 255, ' + (0.5 + Math.random() * 0.5) + ')';
                ctx.fill();
            }
        }

        // 动画循环
        function animate() {
            updatePlanets();
            draw();
            animationId = requestAnimationFrame(animate);
        }

        // 初始化模拟器
        function initSimulation() {
            // 设置初始角度
            planets.forEach((planet, index) => {
                planet.angle = (index * Math.PI / 4) * 0.5;
            });

            draw();
        }

        // 重置模拟器
        function resetSimulation() {
            planets.forEach((planet, index) => {
                planet.angle = (index * Math.PI / 4) * 0.5;
            });

            speed = 1;
            document.getElementById('speedSlider').value = 1;
            document.getElementById('speedValue').textContent = '1x';

            draw();
        }

        // 事件监听器
        document.getElementById('startBtn').addEventListener('click', function() {
            if (!isRunning) {
                isRunning = true;
                animate();
            }
        });

        document.getElementById('pauseBtn').addEventListener('click', function() {
            if (isRunning) {
                isRunning = false;
                cancelAnimationFrame(animationId);
            }
        });

        document.getElementById('resetBtn').addEventListener('click', function() {
            resetSimulation();
        });

        document.getElementById('speedSlider').addEventListener('input', function() {
            speed = parseFloat(this.value);
            document.getElementById('speedValue').textContent = speed.toFixed(1) + 'x';
        });

        // 初始化
        window.addEventListener('load', function() {
            createStars();
            initSimulation();
        });
    </script>
</body>
</html>
5、总结
DeepSeek V3.1 通过显式推理(Think)、动态搜索(Search)、高效工具调用(Tool) 这三驾马车,清晰地瞄准了下一代 AI 智能体的核心能力,清晰地勾勒出一条技术演进路线:一个更自主、更可靠、更能与外部世界交互的智能体(Agent)正在成型。其实际性能表现令人无比期待,我们也将第一时间带来实测体验,敬请关注!


 1716
1716

 被折叠的 条评论
为什么被折叠?
被折叠的 条评论
为什么被折叠?
 到【灌水乐园】发言


