


- 🍨 本文为🔗365天深度学习训练营 中的学习记录博客
- 🍖 原作者:K同学啊 | 接辅导、项目定制
文章目录
- 前言
- 1 我的环境
- 2 代码实现与执行结果
- 3 知识点详解
- 3.1 自建vgg16模型
- 3.2 拔高尝试--VGG16+BatchNormalization
- 3.3 拔高尝试--VGG16+BatchNormalization+Dropout层
- 3.4 拔高尝试--VGG16+BatchNormalization+Dropout层+增加训练集比例
- 3.5 拔高尝试--VGG16+BatchNormalization+Dropout层+增加训练集比例+自适应平均池化层代替全连接层(模型轻量化)
- 3.6 拔高尝试--VGG16+BatchNormalization+Dropout层+增加训练集比例+全局平均池化层代替全连接层(模型轻量化)
- 3.6 拔高尝试--VGG16+BatchNormalization+Dropout层+增加训练集比例+全局平均池化层代替全连接层(模型轻量化)+L2正则化参数λ(weight_decay项)的优化器
- 3.7 PyTorch程序实现L1和L2正则项
- 总结
前言
本文将采用pytorch框架创建CNN网络,实现好莱坞明星识别。讲述实现代码与执行结果,并浅谈涉及知识点。
关键字: 增加Dropout层,增加训练集比例,全局平均池化层代替全连接层(模型轻量化),PyTorch程序实现L1和L2正则项
1 我的环境
- 电脑系统:Windows 11
- 语言环境:python 3.8.6
- 编译器:pycharm2020.2.3
- 深度学习环境:
torch == 1.9.1+cu111
torchvision == 0.10.1+cu111 - 显卡:NVIDIA GeForce RTX 4070
2 代码实现与执行结果
2.1 前期准备
2.1.1 引入库
import torch
import torch.nn as nn
from torchvision import transforms, datasets
import time
from pathlib import Path
from PIL import Image
from torchinfo import summary
import torch.nn.functional as F
from torchvision.models import vgg16
import copy
import matplotlib.pyplot as plt

plt.rcParams['font.sans-serif'] = ['SimHei']  # 用来正常显示中文标签
plt.rcParams['axes.unicode_minus'] = False  # 用来正常显示负号
plt.rcParams['figure.dpi'] = 100  # 分辨率
import warnings

warnings.filterwarnings('ignore')  # 忽略一些warning内容,无需打印
2.1.2 设置GPU(如果设备上支持GPU就使用GPU,否则使用CPU)
"""前期准备-设置GPU"""
# 如果设备上支持GPU就使用GPU,否则使用CPU
 device = torch.device("cuda" if torch.cuda.is_available() else "cpu")
 print("Using {} device".format(device))
输出
Using cuda device
2.1.3 导入数据
'''前期工作-导入数据'''
data_dir = r"D:\DeepLearning\data\monkeypox_recognition"
data_dir = Path(data_dir)

data_paths = list(data_dir.glob('*'))
classeNames = [str(path).split("\\")[-1] for path in data_paths]
print(classeNames)
输出
['Angelina Jolie', 'Brad Pitt', 'Denzel Washington', 'Hugh Jackman', 'Jennifer Lawrence', 'Johnny Depp', 'Kate Winslet', 'Leonardo DiCaprio', 'Megan Fox', 'Natalie Portman', 'Nicole Kidman', 'Robert Downey Jr', 'Sandra Bullock', 'Scarlett Johansson', 'Tom Cruise', 'Tom Hanks', 'Will Smith']
2.1.4 可视化数据
'''前期工作-可视化数据'''
    subfolder = Path(data_dir)/"Angelina Jolie"
    image_files = list(p.resolve() for p in subfolder.glob('*') if p.suffix in [".jpg", ".png", ".jpeg"])
    plt.figure(figsize=(10, 6))
    for i in range(len(image_files[:12])):
        image_file = image_files[i]
        ax = plt.subplot(3, 4, i + 1)
        img = Image.open(str(image_file))
        plt.imshow(img)
        plt.axis("off")
    # 显示图片
    plt.tight_layout()
    plt.show()

2.1.4 图像数据变换
'''前期工作-图像数据变换'''
total_datadir = data_dir

# 关于transforms.Compose的更多介绍可以参考:https://blog.youkuaiyun.com/qq_38251616/article/details/124878863
train_transforms = transforms.Compose([
    transforms.Resize([224, 224]),  # 将输入图片resize成统一尺寸
    transforms.ToTensor(),  # 将PIL Image或numpy.ndarray转换为tensor,并归一化到[0,1]之间
    transforms.Normalize(  # 标准化处理-->转换为标准正太分布(高斯分布),使模型更容易收敛
        mean=[0.485, 0.456, 0.406],
        std=[0.229, 0.224, 0.225])  # 其中 mean=[0.485,0.456,0.406]与std=[0.229,0.224,0.225] 从数据集中随机抽样计算得到的。
])
total_data = datasets.ImageFolder(total_datadir, transform=train_transforms)
print(total_data)
print(total_data.class_to_idx)
输出
Dataset ImageFolder
    Number of datapoints: 1800
    Root location: D:\DeepLearning\data\HollywoodStars
    StandardTransform
Transform: Compose(
               Resize(size=[224, 224], interpolation=bilinear, max_size=None, antialias=None)
               ToTensor()
               Normalize(mean=[0.485, 0.456, 0.406], std=[0.229, 0.224, 0.225])
           )
{'Angelina Jolie': 0, 'Brad Pitt': 1, 'Denzel Washington': 2, 'Hugh Jackman': 3, 'Jennifer Lawrence': 4, 'Johnny Depp': 5, 'Kate Winslet': 6, 'Leonardo DiCaprio': 7, 'Megan Fox': 8, 'Natalie Portman': 9, 'Nicole Kidman': 10, 'Robert Downey Jr': 11, 'Sandra Bullock': 12, 'Scarlett Johansson': 13, 'Tom Cruise': 14, 'Tom Hanks': 15, 'Will Smith': 16}
2.1.4 划分数据集
'''前期工作-划分数据集'''
train_size = int(0.8 * len(total_data))  # train_size表示训练集大小,通过将总体数据长度的80%转换为整数得到;
test_size = len(total_data) - train_size  # test_size表示测试集大小,是总体数据长度减去训练集大小。
# 使用torch.utils.data.random_split()方法进行数据集划分。该方法将总体数据total_data按照指定的大小比例([train_size, test_size])随机划分为训练集和测试集,
# 并将划分结果分别赋值给train_dataset和test_dataset两个变量。
train_dataset, test_dataset = torch.utils.data.random_split(total_data, [train_size, test_size])
print("train_dataset={}\ntest_dataset={}".format(train_dataset, test_dataset))
print("train_size={}\ntest_size={}".format(train_size, test_size))
输出
train_dataset=<torch.utils.data.dataset.Subset object at 0x000001D633C4E610>
test_dataset=<torch.utils.data.dataset.Subset object at 0x000001D633C4E580>
train_size=1440
test_size=360
2.1.4 加载数据
'''前期工作-加载数据'''
batch_size = 32

train_dl = torch.utils.data.DataLoader(train_dataset,
                                       batch_size=batch_size,
                                       shuffle=True,
                                       num_workers=1)
test_dl = torch.utils.data.DataLoader(test_dataset,
                                      batch_size=batch_size,
                                      shuffle=True,
                                      num_workers=1)
2.1.4 查看数据
'''前期工作-查看数据'''
for X, y in test_dl:
    print("Shape of X [N, C, H, W]: ", X.shape)
    print("Shape of y: ", y.shape, y.dtype)
    break
输出
Shape of X [N, C, H, W]:  torch.Size([32, 3, 224, 224])
Shape of y:  torch.Size([32]) torch.int64
2.2 构建CNN网络模型

"""构建CNN网络"""
# 加载预训练模型,并且对模型进行微调
    # Downloading: "https://download.pytorch.org/models/vgg16-397923af.pth"
    # to C:\Users\胡蓉/.cache\torch\hub\checkpoints\vgg16-397923af.pth
    model = vgg16(pretrained=True).to(device)  # 加载预训练的vgg16模型

    for param in model.parameters():
        param.requires_grad = False  # 冻结模型的参数,这样子在训练的时候只训练最后一层的参数

    # 修改classifier模块的第6层(即:(6): Linear(in_features=4096, out_features=2, bias=True))
    # 注意查看我们下方打印出来的模型
    model.classifier._modules['6'] = nn.Linear(4096, len(classeNames))  # 修改vgg16模型中最后一层全连接层,输出目标类别个数


model = Model_vgg16().to(device)
print(model)
输出
VGG(
  (features): Sequential(
    (0): Conv2d(3, 64, kernel_size=(3, 3), stride=(1, 1), padding=(1, 1))
    (1): ReLU(inplace=True)
    (2): Conv2d(64, 64, kernel_size=(3, 3), stride=(1, 1), padding=(1, 1))
    (3): ReLU(inplace=True)
    (4): MaxPool2d(kernel_size=2, stride=2, padding=0, dilation=1, ceil_mode=False)
    (5): Conv2d(64, 128, kernel_size=(3, 3), stride=(1, 1), padding=(1, 1))
    (6): ReLU(inplace=True)
    (7): Conv2d(128, 128, kernel_size=(3, 3), stride=(1, 1), padding=(1, 1))
    (8): ReLU(inplace=True)
    (9): MaxPool2d(kernel_size=2, stride=2, padding=0, dilation=1, ceil_mode=False)
    (10): Conv2d(128, 256, kernel_size=(3, 3), stride=(1, 1), padding=(1, 1))
    (11): ReLU(inplace=True)
    (12): Conv2d(256, 256, kernel_size=(3, 3), stride=(1, 1), padding=(1, 1))
    (13): ReLU(inplace=True)
    (14): Conv2d(256, 256, kernel_size=(3, 3), stride=(1, 1), padding=(1, 1))
    (15): ReLU(inplace=True)
    (16): MaxPool2d(kernel_size=2, stride=2, padding=0, dilation=1, ceil_mode=False)
    (17): Conv2d(256, 512, kernel_size=(3, 3), stride=(1, 1), padding=(1, 1))
    (18): ReLU(inplace=True)
    (19): Conv2d(512, 512, kernel_size=(3, 3), stride=(1, 1), padding=(1, 1))
    (20): ReLU(inplace=True)
    (21): Conv2d(512, 512, kernel_size=(3, 3), stride=(1, 1), padding=(1, 1))
    (22): ReLU(inplace=True)
    (23): MaxPool2d(kernel_size=2, stride=2, padding=0, dilation=1, ceil_mode=False)
    (24): Conv2d(512, 512, kernel_size=(3, 3), stride=(1, 1), padding=(1, 1))
    (25): ReLU(inplace=True)
    (26): Conv2d(512, 512, kernel_size=(3, 3), stride=(1, 1), padding=(1, 1))
    (27): ReLU(inplace=True)
    (28): Conv2d(512, 512, kernel_size=(3, 3), stride=(1, 1), padding=(1, 1))
    (29): ReLU(inplace=True)
    (30): MaxPool2d(kernel_size=2, stride=2, padding=0, dilation=1, ceil_mode=False)
  )
  (avgpool): AdaptiveAvgPool2d(output_size=(7, 7))
  (classifier): Sequential(
    (0): Linear(in_features=25088, out_features=4096, bias=True)
    (1): ReLU(inplace=True)
    (2): Dropout(p=0.5, inplace=False)
    (3): Linear(in_features=4096, out_features=4096, bias=True)
    (4): ReLU(inplace=True)
    (5): Dropout(p=0.5, inplace=False)
    (6): Linear(in_features=4096, out_features=17, bias=True)
  )
)
2.3 训练模型
2.3.1 设置超参数
"""训练模型--设置超参数"""
loss_fn = nn.CrossEntropyLoss()  # 创建损失函数,计算实际输出和真实相差多少,交叉熵损失函数,事实上,它就是做图片分类任务时常用的损失函数
learn_rate = 1e-4  # 学习率
optimizer1 = torch.optim.SGD(model.parameters(), lr=learn_rate)# 作用是定义优化器,用来训练时候优化模型参数;其中,SGD表示随机梯度下降,用于控制实际输出y与真实y之间的相差有多大
optimizer2 = torch.optim.Adam(model.parameters(), lr=learn_rate)
lr_opt = optimizer2
model_opt = optimizer2
# 调用官方动态学习率接口时使用2
lambda1 = lambda epoch : 0.92 ** (epoch // 4)
# optimizer = torch.optim.SGD(model.parameters(), lr=learn_rate)
scheduler = torch.optim.lr_scheduler.LambdaLR(lr_opt, lr_lambda=lambda1) #选定调整方法
2.3.2 编写训练函数
"""训练模型--编写训练函数"""
# 训练循环
def train(dataloader, model, loss_fn, optimizer):
    size = len(dataloader.dataset)  # 训练集的大小,一共60000张图片
    num_batches = len(dataloader)  # 批次数目,1875(60000/32)

    train_loss, train_acc = 0, 0  # 初始化训练损失和正确率

    for X, y in dataloader:  # 加载数据加载器,得到里面的 X(图片数据)和 y(真实标签)
        X, y = X.to(device), y.to(device) # 用于将数据存到显卡

        # 计算预测误差
        pred = model(X)  # 网络输出
        loss = loss_fn(pred, y)  # 计算网络输出和真实值之间的差距,targets为真实值,计算二者差值即为损失

        # 反向传播
        optimizer.zero_grad()  # 清空过往梯度
        loss.backward()  # 反向传播,计算当前梯度
        optimizer.step()  # 根据梯度更新网络参数

        # 记录acc与loss
        train_acc += (pred.argmax(1) == y).type(torch.float).sum().item()
        train_loss += loss.item()

    train_acc /= size
    train_loss /= num_batches

    return train_acc, train_loss
2.3.3 编写测试函数
"""训练模型--编写测试函数"""
# 测试函数和训练函数大致相同,但是由于不进行梯度下降对网络权重进行更新,所以不需要传入优化器
def test(dataloader, model, loss_fn):
    size = len(dataloader.dataset)  # 测试集的大小,一共10000张图片
    num_batches = len(dataloader)  # 批次数目,313(10000/32=312.5,向上取整)
    test_loss, test_acc = 0, 0

    # 当不进行训练时,停止梯度更新,节省计算内存消耗
    with torch.no_grad(): # 测试时模型参数不用更新,所以 no_grad,整个模型参数正向推就ok,不反向更新参数
        for imgs, target in dataloader:
            imgs, target = imgs.to(device), target.to(device)

            # 计算loss
            target_pred = model(imgs)
            loss = loss_fn(target_pred, target)

            test_loss += loss.item()
            test_acc += (target_pred.argmax(1) == target).type(torch.float).sum().item()#统计预测正确的个数

    test_acc /= size
    test_loss /= num_batches

    return test_acc, test_loss
2.3.4 正式训练
"""训练模型--正式训练"""
epochs = 40
train_loss = []
train_acc = []
test_loss = []
test_acc = []
best_test_acc=0

for epoch in range(epochs):
    milliseconds_t1 = int(time.time() * 1000)

    # 更新学习率(使用自定义学习率时使用)
    # adjust_learning_rate(lr_opt, epoch, learn_rate)

    model.train()
    epoch_train_acc, epoch_train_loss = train(train_dl, model, loss_fn, model_opt)
    scheduler.step() # 更新学习率(调用官方动态学习率接口时使用)

    model.eval()
    epoch_test_acc, epoch_test_loss = test(test_dl, model, loss_fn)

    train_acc.append(epoch_train_acc)
    train_loss.append(epoch_train_loss)
    test_acc.append(epoch_test_acc)
    test_loss.append(epoch_test_loss)

    # 获取当前的学习率
    lr = lr_opt.state_dict()['param_groups'][0]['lr']

    milliseconds_t2 = int(time.time() * 1000)
    template = ('Epoch:{:2d}, duration:{}ms, Train_acc:{:.1f}%, Train_loss:{:.3f}, Test_acc:{:.1f}%,Test_loss:{:.3f}, Lr:{:.2E}')
    if best_test_acc < epoch_test_acc:
        best_test_acc = epoch_test_acc
        #备份最好的模型
        best_model = copy.deepcopy(model)
        template = (
            'Epoch:{:2d}, duration:{}ms, Train_acc:{:.1f}%, Train_loss:{:.3f}, Test_acc:{:.1f}%,Test_loss:{:.3f}, Lr:{:.2E},Update the best model')
    print(
        template.format(epoch + 1, milliseconds_t2-milliseconds_t1, epoch_train_acc * 100, epoch_train_loss, epoch_test_acc * 100, epoch_test_loss, lr))
# 保存最佳模型到文件中
PATH = './best_model.pth'  # 保存的参数文件名
torch.save(model.state_dict(), PATH)
print('Done')
输出最高精度为Test_acc:42.5%
Epoch: 1, duration:9673ms, Train_acc:12.5%, Train_loss:2.731, Test_acc:22.2%,Test_loss:2.485, Lr:1.00E-04,Update the best model
Epoch: 2, duration:7337ms, Train_acc:19.5%, Train_loss:2.405, Test_acc:24.4%,Test_loss:2.335, Lr:1.00E-04,Update the best model
Epoch: 3, duration:7149ms, Train_acc:24.9%, Train_loss:2.240, Test_acc:27.5%,Test_loss:2.218, Lr:1.00E-04,Update the best model
...
Epoch:39, duration:8449ms, Train_acc:60.6%, Train_loss:1.296, Test_acc:41.9%,Test_loss:1.744, Lr:4.72E-05
Epoch:40, duration:8261ms, Train_acc:62.0%, Train_loss:1.293, Test_acc:41.7%,Test_loss:1.790, Lr:4.34E-05
2.4 结果可视化
"""训练模型--结果可视化"""
epochs_range = range(epochs)

plt.figure(figsize=(12, 3))
plt.subplot(1, 2, 1)

plt.plot(epochs_range, train_acc, label='Training Accuracy')
plt.plot(epochs_range, test_acc, label='Test Accuracy')
plt.legend(loc='lower right')
plt.title('Training and Validation Accuracy')

plt.subplot(1, 2, 2)
plt.plot(epochs_range, train_loss, label='Training Loss')
plt.plot(epochs_range, test_loss, label='Test Loss')
plt.legend(loc='upper right')
plt.title('Training and Validation Loss')
plt.show()
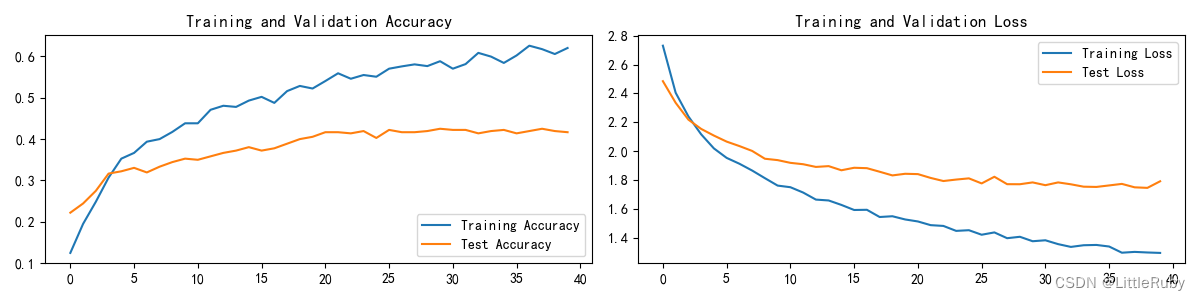
2.4 指定图片进行预测
def predict_one_image(image_path, model, transform, classes):
    test_img = Image.open(image_path).convert('RGB')
    plt.imshow(test_img)  # 展示预测的图片
    plt.show()

    test_img = transform(test_img)
    img = test_img.to(device).unsqueeze(0)

    model.eval()
    output = model(img)

    _, pred = torch.max(output, 1)
    pred_class = classes[pred]
    print(f'预测结果是:{pred_class}')

# 将参数加载到model当中
model.load_state_dict(torch.load(PATH, map_location=device))

"""指定图片进行预测"""
classes = list(total_data.class_to_idx)
# 预测训练集中的某张照片
predict_one_image(image_path=str(Path(data_dir)/"Monkeypox"/"M01_01_00.jpg"),
                  model=model,
                  transform=train_transforms,
                  classes=classes)

输出
预测结果是:Angelina Jolie
2.6 模型评估
"""模型评估"""
best_model.eval()
epoch_test_acc, epoch_test_loss = test(test_dl, best_model, loss_fn)
# 查看是否与我们记录的最高准确率一致
print(epoch_test_acc, epoch_test_loss)
输出
0.425 1.770088533560435
3 知识点详解
3.1 自建vgg16模型
"""构建CNN网络"""
class vgg16net(nn.Module):
    def __init__(self):
        super(vgg16net, self).__init__()
        # 卷积块1
        self.block1 = nn.Sequential(
            nn.Conv2d(3, 64, kernel_size=(3, 3), stride=(1, 1), padding=(1, 1)),
            nn.ReLU(),
            nn.Conv2d(64, 64, kernel_size=(3, 3), stride=(1, 1), padding=(1, 1)),
            nn.ReLU(),
            nn.MaxPool2d(kernel_size=(2, 2), stride=(2, 2))
        )
        # 卷积块2
        self.block2 = nn.Sequential(
            nn.Conv2d(64, 128, kernel_size=(3, 3), stride=(1, 1), padding=(1, 1)),
            nn.ReLU(),
            nn.Conv2d(128, 128, kernel_size=(3, 3), stride=(1, 1), padding=(1, 1)),
            nn.ReLU(),
            nn.MaxPool2d(kernel_size=(2, 2), stride=(2, 2))
        )
        # 卷积块3
        self.block3 = nn.Sequential(
            nn.Conv2d(128, 256, kernel_size=(3, 3), stride=(1, 1), padding=(1, 1)),
            nn.ReLU(),
            nn.Conv2d(256, 256, kernel_size=(3, 3), stride=(1, 1), padding=(1, 1)),
            nn.ReLU(),
            nn.Conv2d(256, 256, kernel_size=(3, 3), stride=(1, 1), padding=(1, 1)),
            nn.ReLU(),
            nn.MaxPool2d(kernel_size=(2, 2), stride=(2, 2))
        )
        # 卷积块4
        self.block4 = nn.Sequential(
            nn.Conv2d(256, 512, kernel_size=(3, 3), stride=(1, 1), padding=(1, 1)),
            nn.ReLU(),
            nn.Conv2d(512, 512, kernel_size=(3, 3), stride=(1, 1), padding=(1, 1)),
            nn.ReLU(),
            nn.Conv2d(512, 512, kernel_size=(3, 3), stride=(1, 1), padding=(1, 1)),
            nn.ReLU(),
            nn.MaxPool2d(kernel_size=(2, 2), stride=(2, 2))
        )
        # 卷积块5
        self.block5 = nn.Sequential(
            nn.Conv2d(512, 512, kernel_size=(3, 3), stride=(1, 1), padding=(1, 1)),
            nn.ReLU(),
            nn.Conv2d(512, 512, kernel_size=(3, 3), stride=(1, 1), padding=(1, 1)),
            nn.ReLU(),
            nn.Conv2d(512, 512, kernel_size=(3, 3), stride=(1, 1), padding=(1, 1)),
            nn.ReLU(),
            nn.MaxPool2d(kernel_size=(2, 2), stride=(2, 2))
        )
        self.avgpool = nn.AdaptiveAvgPool2d(output_size=(7, 7))
        # 全连接网络层,用于分类
        self.classifier = nn.Sequential(
            nn.Linear(in_features=512 * 7 * 7, out_features=4096),
            nn.ReLU(),
            nn.Linear(in_features=4096, out_features=4096),
            nn.ReLU(),
            nn.Linear(in_features=4096, out_features=17)
        )

    def forward(self, x):
        x = self.block1(x)
        x = self.block2(x)
        x = self.block3(x)
        x = self.block4(x)
        x = self.block5(x)
        x = self.avgpool(x)
        x = torch.flatten(x, start_dim=1)
        x = self.classifier(x)

        return x
最高Test_acc:41.4%
3.2 拔高尝试–VGG16+BatchNormalization
class vgg16_BN(nn.Module):
    def __init__(self):
        super(vgg16_BN, self).__init__()
        # 卷积块1
        self.block1 = nn.Sequential(
            nn.Conv2d(3, 64, kernel_size=(3, 3), stride=(1, 1), padding=(1, 1)),
            nn.ReLU(),
            nn.Conv2d(64, 64, kernel_size=(3, 3), stride=(1, 1), padding=(1, 1)),
            nn.ReLU(),
            nn.BatchNorm2d(64),
            nn.MaxPool2d(kernel_size=(2, 2), stride=(2, 2))
        )
        # 卷积块2
        self.block2 = nn.Sequential(
            nn.Conv2d(64, 128, kernel_size=(3, 3), stride=(1, 1), padding=(1, 1)),
            nn.ReLU(),
            nn.Conv2d(128, 128, kernel_size=(3, 3), stride=(1, 1), padding=(1, 1)),
            nn.ReLU(),
            nn.BatchNorm2d(128),
            nn.MaxPool2d(kernel_size=(2, 2), stride=(2, 2))
        )
        # 卷积块3
        self.block3 = nn.Sequential(
            nn.Conv2d(128, 256, kernel_size=(3, 3), stride=(1, 1), padding=(1, 1)),
            nn.ReLU(),
            nn.Conv2d(256, 256, kernel_size=(3, 3), stride=(1, 1), padding=(1, 1)),
            nn.ReLU(),
            nn.Conv2d(256, 256, kernel_size=(3, 3), stride=(1, 1), padding=(1, 1)),
            nn.ReLU(),
            nn.BatchNorm2d(256),
            nn.MaxPool2d(kernel_size=(2, 2), stride=(2, 2))
        )
        # 卷积块4
        self.block4 = nn.Sequential(
            nn.Conv2d(256, 512, kernel_size=(3, 3), stride=(1, 1), padding=(1, 1)),
            nn.ReLU(),
            nn.Conv2d(512, 512, kernel_size=(3, 3), stride=(1, 1), padding=(1, 1)),
            nn.ReLU(),
            nn.Conv2d(512, 512, kernel_size=(3, 3), stride=(1, 1), padding=(1, 1)),
            nn.ReLU(),
            nn.BatchNorm2d(512),
            nn.MaxPool2d(kernel_size=(2, 2), stride=(2, 2))
        )
        # 卷积块5
        self.block5 = nn.Sequential(
            nn.Conv2d(512, 512, kernel_size=(3, 3), stride=(1, 1), padding=(1, 1)),
            nn.ReLU(),
            nn.Conv2d(512, 512, kernel_size=(3, 3), stride=(1, 1), padding=(1, 1)),
            nn.ReLU(),
            nn.Conv2d(512, 512, kernel_size=(3, 3), stride=(1, 1), padding=(1, 1)),
            nn.ReLU(),
            nn.BatchNorm2d(512),
            nn.MaxPool2d(kernel_size=(2, 2), stride=(2, 2))
        )
        self.avgpool = nn.AdaptiveAvgPool2d(output_size=(7, 7))

        # 全连接网络层,用于分类
        self.classifier = nn.Sequential(
            nn.Linear(in_features=512 * 7 * 7, out_features=4096),
            nn.ReLU(),
            nn.Linear(in_features=4096, out_features=4096),
            nn.ReLU(),
            nn.Linear(in_features=4096, out_features=17)
        )

    def forward(self, x):
        x = self.block1(x)
        x = self.block2(x)
        x = self.block3(x)
        x = self.block4(x)
        x = self.block5(x)
        x = self.avgpool(x)
        x = torch.flatten(x, start_dim=1)
        x = self.classifier(x)

        return x
最高Test_acc:42.2%
3.3 拔高尝试–VGG16+BatchNormalization+Dropout层
class vgg16_BN_dropout(nn.Module):
    def __init__(self):
        super(vgg16_BN_dropout, self).__init__()
        # 卷积块1
        self.block1 = nn.Sequential(
            nn.Conv2d(3, 64, kernel_size=(3, 3), stride=(1, 1), padding=(1, 1)),
            nn.ReLU(),
            nn.Conv2d(64, 64, kernel_size=(3, 3), stride=(1, 1), padding=(1, 1)),
            nn.ReLU(),
            nn.BatchNorm2d(64),
            nn.MaxPool2d(kernel_size=(2, 2), stride=(2, 2))
        )
        # 卷积块2
        self.block2 = nn.Sequential(
            nn.Conv2d(64, 128, kernel_size=(3, 3), stride=(1, 1), padding=(1, 1)),
            nn.ReLU(),
            nn.Conv2d(128, 128, kernel_size=(3, 3), stride=(1, 1), padding=(1, 1)),
            nn.ReLU(),
            nn.BatchNorm2d(128),
            nn.MaxPool2d(kernel_size=(2, 2), stride=(2, 2))
        )
        # 卷积块3
        self.block3 = nn.Sequential(
            nn.Conv2d(128, 256, kernel_size=(3, 3), stride=(1, 1), padding=(1, 1)),
            nn.ReLU(),
            nn.Conv2d(256, 256, kernel_size=(3, 3), stride=(1, 1), padding=(1, 1)),
            nn.ReLU(),
            nn.Conv2d(256, 256, kernel_size=(3, 3), stride=(1, 1), padding=(1, 1)),
            nn.ReLU(),
            nn.BatchNorm2d(256),
            nn.MaxPool2d(kernel_size=(2, 2), stride=(2, 2))
        )
        # 卷积块4
        self.block4 = nn.Sequential(
            nn.Conv2d(256, 512, kernel_size=(3, 3), stride=(1, 1), padding=(1, 1)),
            nn.ReLU(),
            nn.Conv2d(512, 512, kernel_size=(3, 3), stride=(1, 1), padding=(1, 1)),
            nn.ReLU(),
            nn.Conv2d(512, 512, kernel_size=(3, 3), stride=(1, 1), padding=(1, 1)),
            nn.ReLU(),
            nn.BatchNorm2d(512),
            nn.MaxPool2d(kernel_size=(2, 2), stride=(2, 2))
        )
        # 卷积块5
        self.block5 = nn.Sequential(
            nn.Conv2d(512, 512, kernel_size=(3, 3), stride=(1, 1), padding=(1, 1)),
            nn.ReLU(),
            nn.Conv2d(512, 512, kernel_size=(3, 3), stride=(1, 1), padding=(1, 1)),
            nn.ReLU(),
            nn.Conv2d(512, 512, kernel_size=(3, 3), stride=(1, 1), padding=(1, 1)),
            nn.ReLU(),
            nn.BatchNorm2d(512),
            nn.MaxPool2d(kernel_size=(2, 2), stride=(2, 2))

        )
        self.dropout = nn.Dropout(p=0.5)
        self.avgpool = nn.AdaptiveAvgPool2d(output_size=(7, 7))
        # 全连接网络层,用于分类
        self.classifier = nn.Sequential(
            nn.Linear(in_features=512 * 7 * 7, out_features=4096),
            nn.ReLU(),
            nn.Linear(in_features=4096, out_features=4096),
            nn.ReLU(),
            nn.Linear(in_features=4096, out_features=17)
        )

    def forward(self, x):
        x = self.block1(x)
        x = self.block2(x)
        x = self.block3(x)
        x = self.block4(x)
        x = self.block5(x)
        x = self.dropout(x)
        x = self.avgpool(x)
        x = torch.flatten(x, start_dim=1)
        x = self.classifier(x)

        return x
最高Test_acc:46.1%
3.4 拔高尝试–VGG16+BatchNormalization+Dropout层+增加训练集比例
保留模型为VGG16+BatchNormalization+Dropout层,将总体数据长度的80%作为训练集改为90%
 '''前期工作-划分数据集'''
    train_size = int(0.9 * len(total_data))  # train_size表示训练集大小,通过将总体数据长度的80%转换为整数得到;
    test_size = len(total_data) - train_size  # test_size表示测试集大小,是总体数据长度减去训练集大小。
最高Test_acc:48.3%
3.5 拔高尝试–VGG16+BatchNormalization+Dropout层+增加训练集比例+自适应平均池化层代替全连接层(模型轻量化)
# 模型轻量化-全局平均池化层代替全连接层+BN+dropout
class vgg16_BN_dropout_globalavgpool(nn.Module):
    def __init__(self):
        super(vgg16_BN_dropout_globalavgpool, self).__init__()
        # 卷积块1
        self.block1 = nn.Sequential(
            nn.Conv2d(3, 64, kernel_size=(3, 3), stride=(1, 1), padding=(1, 1)),
            nn.ReLU(),
            nn.Conv2d(64, 64, kernel_size=(3, 3), stride=(1, 1), padding=(1, 1)),
            nn.ReLU(),
            nn.BatchNorm2d(64),
            nn.MaxPool2d(kernel_size=(2, 2), stride=(2, 2))
        )
        # 卷积块2
        self.block2 = nn.Sequential(
            nn.Conv2d(64, 128, kernel_size=(3, 3), stride=(1, 1), padding=(1, 1)),
            nn.ReLU(),
            nn.Conv2d(128, 128, kernel_size=(3, 3), stride=(1, 1), padding=(1, 1)),
            nn.ReLU(),
            nn.BatchNorm2d(128),
            nn.MaxPool2d(kernel_size=(2, 2), stride=(2, 2))
        )
        # 卷积块3
        self.block3 = nn.Sequential(
            nn.Conv2d(128, 256, kernel_size=(3, 3), stride=(1, 1), padding=(1, 1)),
            nn.ReLU(),
            nn.Conv2d(256, 256, kernel_size=(3, 3), stride=(1, 1), padding=(1, 1)),
            nn.ReLU(),
            nn.Conv2d(256, 256, kernel_size=(3, 3), stride=(1, 1), padding=(1, 1)),
            nn.ReLU(),
            nn.BatchNorm2d(256),
            nn.MaxPool2d(kernel_size=(2, 2), stride=(2, 2))
        )
        # 卷积块4
        self.block4 = nn.Sequential(
            nn.Conv2d(256, 512, kernel_size=(3, 3), stride=(1, 1), padding=(1, 1)),
            nn.ReLU(),
            nn.Conv2d(512, 512, kernel_size=(3, 3), stride=(1, 1), padding=(1, 1)),
            nn.ReLU(),
            nn.Conv2d(512, 512, kernel_size=(3, 3), stride=(1, 1), padding=(1, 1)),
            nn.ReLU(),
            nn.BatchNorm2d(512),
            nn.MaxPool2d(kernel_size=(2, 2), stride=(2, 2))
        )
        # 卷积块5
        self.block5 = nn.Sequential(
            nn.Conv2d(512, 512, kernel_size=(3, 3), stride=(1, 1), padding=(1, 1)),
            nn.ReLU(),
            nn.Conv2d(512, 512, kernel_size=(3, 3), stride=(1, 1), padding=(1, 1)),
            nn.ReLU(),
            nn.Conv2d(512, 512, kernel_size=(3, 3), stride=(1, 1), padding=(1, 1)),
            nn.ReLU(),
            nn.BatchNorm2d(512),
            nn.MaxPool2d(kernel_size=(2, 2), stride=(2, 2))

        )
        self.dropout = nn.Dropout(p=0.5)
        self.avgpool = nn.AdaptiveAvgPool2d(output_size=(7, 7))
        # 全连接网络层,用于分类
        self.classifier = nn.Sequential(
            nn.Linear(in_features=512 * 7 * 7, out_features=17),
        )

    def forward(self, x):
        x = self.block1(x)
        x = self.block2(x)
        x = self.block3(x)
        x = self.block4(x)
        x = self.block5(x)
        x = self.dropout(x)
        x = self.avgpool(x)
        x = torch.flatten(x, start_dim=1)
        x = self.classifier(x)

        return x
训练过程如下
Epoch: 1, duration:14848ms, Train_acc:13.8%, Train_loss:3.096, Test_acc:6.1%,Test_loss:3.145, Lr:1.00E-04,Update the best model
Epoch: 2, duration:12785ms, Train_acc:23.5%, Train_loss:2.581, Test_acc:23.9%,Test_loss:2.559, Lr:1.00E-04,Update the best model
...
Epoch:37, duration:12460ms, Train_acc:100.0%, Train_loss:0.001, Test_acc:58.3%,Test_loss:1.807, Lr:4.72E-05
Epoch:38, duration:12480ms, Train_acc:100.0%, Train_loss:0.001, Test_acc:57.8%,Test_loss:1.802, Lr:4.72E-05
Epoch:39, duration:12416ms, Train_acc:100.0%, Train_loss:0.001, Test_acc:57.8%,Test_loss:1.764, Lr:4.72E-05
Epoch:40, duration:12545ms, Train_acc:100.0%, Train_loss:0.001, Test_acc:58.9%,Test_loss:1.785, Lr:4.34E-05,Update the best model
最高Test_acc:58.9%

3.6 拔高尝试–VGG16+BatchNormalization+Dropout层+增加训练集比例+全局平均池化层代替全连接层(模型轻量化)
# 模型轻量化-全局平均池化层代替全连接层+BN+dropout
class vgg16_BN_dropout_globalavgpool(nn.Module):
    def __init__(self):
        super(vgg16_BN_dropout_globalavgpool, self).__init__()
        # 卷积块1
        self.block1 = nn.Sequential(
            nn.Conv2d(3, 64, kernel_size=(3, 3), stride=(1, 1), padding=(1, 1)),
            nn.ReLU(),
            nn.Conv2d(64, 64, kernel_size=(3, 3), stride=(1, 1), padding=(1, 1)),
            nn.ReLU(),
            nn.BatchNorm2d(64),
            nn.MaxPool2d(kernel_size=(2, 2), stride=(2, 2))
        )
        # 卷积块2
        self.block2 = nn.Sequential(
            nn.Conv2d(64, 128, kernel_size=(3, 3), stride=(1, 1), padding=(1, 1)),
            nn.ReLU(),
            nn.Conv2d(128, 128, kernel_size=(3, 3), stride=(1, 1), padding=(1, 1)),
            nn.ReLU(),
            nn.BatchNorm2d(128),
            nn.MaxPool2d(kernel_size=(2, 2), stride=(2, 2))
        )
        # 卷积块3
        self.block3 = nn.Sequential(
            nn.Conv2d(128, 256, kernel_size=(3, 3), stride=(1, 1), padding=(1, 1)),
            nn.ReLU(),
            nn.Conv2d(256, 256, kernel_size=(3, 3), stride=(1, 1), padding=(1, 1)),
            nn.ReLU(),
            nn.Conv2d(256, 256, kernel_size=(3, 3), stride=(1, 1), padding=(1, 1)),
            nn.ReLU(),
            nn.BatchNorm2d(256),
            nn.MaxPool2d(kernel_size=(2, 2), stride=(2, 2))
        )
        # 卷积块4
        self.block4 = nn.Sequential(
            nn.Conv2d(256, 512, kernel_size=(3, 3), stride=(1, 1), padding=(1, 1)),
            nn.ReLU(),
            nn.Conv2d(512, 512, kernel_size=(3, 3), stride=(1, 1), padding=(1, 1)),
            nn.ReLU(),
            nn.Conv2d(512, 512, kernel_size=(3, 3), stride=(1, 1), padding=(1, 1)),
            nn.ReLU(),
            nn.BatchNorm2d(512),
            nn.MaxPool2d(kernel_size=(2, 2), stride=(2, 2))
        )
        # 卷积块5
        self.block5 = nn.Sequential(
            nn.Conv2d(512, 512, kernel_size=(3, 3), stride=(1, 1), padding=(1, 1)),
            nn.ReLU(),
            nn.Conv2d(512, 512, kernel_size=(3, 3), stride=(1, 1), padding=(1, 1)),
            nn.ReLU(),
            nn.Conv2d(512, 512, kernel_size=(3, 3), stride=(1, 1), padding=(1, 1)),
            nn.ReLU(),
            nn.BatchNorm2d(512),
            nn.MaxPool2d(kernel_size=(2, 2), stride=(2, 2))

        )
        self.dropout = nn.Dropout(p=0.5)
        self.avgpool = nn.AdaptiveAvgPool2d(output_size=(1, 1))
        # 全连接网络层,用于分类
        self.classifier = nn.Sequential(
            nn.Linear(in_features=512 , out_features=17),
        )

    def forward(self, x):
        x = self.block1(x)
        x = self.block2(x)
        x = self.block3(x)
        x = self.block4(x)
        x = self.block5(x)
        x = self.dropout(x)
        x = self.avgpool(x)
        x = torch.flatten(x, start_dim=1)
        x = self.classifier(x)

        return x
训练过程如下
Epoch: 1, duration:11936ms, Train_acc:15.9%, Train_loss:2.601, Test_acc:5.6%,Test_loss:3.159, Lr:1.00E-04,Update the best model
Epoch: 2, duration:11456ms, Train_acc:24.8%, Train_loss:2.266, Test_acc:22.8%,Test_loss:2.378, Lr:1.00E-04,Update the best model
Epoch: 3, duration:11442ms, Train_acc:30.3%, Train_loss:2.063, Test_acc:21.7%,Test_loss:2.313, Lr:1.00E-04
Epoch: 4, duration:11506ms, Train_acc:35.9%, Train_loss:1.923, Test_acc:20.6%,Test_loss:2.521, Lr:9.20E-05
Epoch: 5, duration:11486ms, Train_acc:42.7%, Train_loss:1.733, Test_acc:27.2%,Test_loss:2.365, Lr:9.20E-05,Update the best model
Epoch: 6, duration:11462ms, Train_acc:50.3%, Train_loss:1.548, Test_acc:44.4%,Test_loss:1.831, Lr:9.20E-05,Update the best model
Epoch: 7, duration:11502ms, Train_acc:55.7%, Train_loss:1.367, Test_acc:32.8%,Test_loss:2.377, Lr:9.20E-05
Epoch: 8, duration:11496ms, Train_acc:62.9%, Train_loss:1.212, Test_acc:29.4%,Test_loss:2.325, Lr:8.46E-05
Epoch: 9, duration:11496ms, Train_acc:72.7%, Train_loss:0.972, Test_acc:31.1%,Test_loss:2.225, Lr:8.46E-05
Epoch:10, duration:11454ms, Train_acc:79.4%, Train_loss:0.770, Test_acc:37.8%,Test_loss:1.976, Lr:8.46E-05
Epoch:11, duration:11481ms, Train_acc:85.1%, Train_loss:0.590, Test_acc:43.9%,Test_loss:2.346, Lr:8.46E-05
Epoch:12, duration:11519ms, Train_acc:89.8%, Train_loss:0.482, Test_acc:40.0%,Test_loss:1.956, Lr:7.79E-05
Epoch:13, duration:11494ms, Train_acc:95.1%, Train_loss:0.297, Test_acc:51.7%,Test_loss:1.789, Lr:7.79E-05,Update the best model
Epoch:14, duration:11512ms, Train_acc:98.5%, Train_loss:0.162, Test_acc:51.7%,Test_loss:1.703, Lr:7.79E-05
Epoch:15, duration:11500ms, Train_acc:99.3%, Train_loss:0.092, Test_acc:55.6%,Test_loss:1.639, Lr:7.79E-05,Update the best model
Epoch:16, duration:11509ms, Train_acc:99.8%, Train_loss:0.058, Test_acc:62.2%,Test_loss:1.188, Lr:7.16E-05,Update the best model
Epoch:17, duration:11485ms, Train_acc:100.0%, Train_loss:0.024, Test_acc:69.4%,Test_loss:1.104, Lr:7.16E-05,Update the best model
Epoch:18, duration:11480ms, Train_acc:100.0%, Train_loss:0.016, Test_acc:69.4%,Test_loss:1.065, Lr:7.16E-05
Epoch:19, duration:11488ms, Train_acc:100.0%, Train_loss:0.010, Test_acc:69.4%,Test_loss:1.073, Lr:7.16E-05
Epoch:20, duration:11490ms, Train_acc:100.0%, Train_loss:0.008, Test_acc:69.4%,Test_loss:1.054, Lr:6.59E-05
Epoch:21, duration:11565ms, Train_acc:100.0%, Train_loss:0.007, Test_acc:69.4%,Test_loss:1.041, Lr:6.59E-05
Epoch:22, duration:11544ms, Train_acc:100.0%, Train_loss:0.006, Test_acc:71.1%,Test_loss:1.043, Lr:6.59E-05,Update the best model
Epoch:23, duration:11519ms, Train_acc:100.0%, Train_loss:0.005, Test_acc:69.4%,Test_loss:1.042, Lr:6.59E-05
Epoch:24, duration:11495ms, Train_acc:100.0%, Train_loss:0.005, Test_acc:70.6%,Test_loss:1.054, Lr:6.06E-05
Epoch:25, duration:11569ms, Train_acc:100.0%, Train_loss:0.004, Test_acc:69.4%,Test_loss:1.068, Lr:6.06E-05
Epoch:26, duration:11642ms, Train_acc:100.0%, Train_loss:0.004, Test_acc:73.3%,Test_loss:1.011, Lr:6.06E-05,Update the best model
Epoch:27, duration:11585ms, Train_acc:100.0%, Train_loss:0.003, Test_acc:72.8%,Test_loss:1.047, Lr:6.06E-05
Epoch:28, duration:11594ms, Train_acc:100.0%, Train_loss:0.003, Test_acc:70.0%,Test_loss:1.043, Lr:5.58E-05
Epoch:29, duration:11580ms, Train_acc:100.0%, Train_loss:0.003, Test_acc:70.6%,Test_loss:1.014, Lr:5.58E-05
Epoch:30, duration:11571ms, Train_acc:100.0%, Train_loss:0.003, Test_acc:71.7%,Test_loss:1.036, Lr:5.58E-05
Epoch:31, duration:11591ms, Train_acc:100.0%, Train_loss:0.002, Test_acc:70.6%,Test_loss:1.015, Lr:5.58E-05
Epoch:32, duration:11565ms, Train_acc:100.0%, Train_loss:0.002, Test_acc:70.0%,Test_loss:1.018, Lr:5.13E-05
Epoch:33, duration:11563ms, Train_acc:100.0%, Train_loss:0.002, Test_acc:68.9%,Test_loss:1.046, Lr:5.13E-05
Epoch:34, duration:11628ms, Train_acc:100.0%, Train_loss:0.002, Test_acc:71.1%,Test_loss:1.078, Lr:5.13E-05
Epoch:35, duration:11556ms, Train_acc:100.0%, Train_loss:0.002, Test_acc:70.6%,Test_loss:1.015, Lr:5.13E-05
Epoch:36, duration:11593ms, Train_acc:100.0%, Train_loss:0.002, Test_acc:70.0%,Test_loss:1.057, Lr:4.72E-05
Epoch:37, duration:11639ms, Train_acc:100.0%, Train_loss:0.002, Test_acc:69.4%,Test_loss:1.019, Lr:4.72E-05
Epoch:38, duration:11568ms, Train_acc:100.0%, Train_loss:0.002, Test_acc:71.1%,Test_loss:1.023, Lr:4.72E-05
Epoch:39, duration:11612ms, Train_acc:100.0%, Train_loss:0.002, Test_acc:71.7%,Test_loss:1.039, Lr:4.72E-05
Epoch:40, duration:11650ms, Train_acc:100.0%, Train_loss:0.001, Test_acc:70.6%,Test_loss:1.016, Lr:4.34E-05
最高Test_acc:73.3%
3.6 拔高尝试–VGG16+BatchNormalization+Dropout层+增加训练集比例+全局平均池化层代替全连接层(模型轻量化)+L2正则化参数λ(weight_decay项)的优化器
优化器增加参数weight_decay
optimizer3 = torch.optim.Adam(model.parameters(), lr=learn_rate, weight_decay=1e-4) #增加权重衰减,即L2正则化
model_opt = optimizer3
Epoch: 1, duration:12027ms, Train_acc:16.5%, Train_loss:2.584, Test_acc:9.4%,Test_loss:3.070, Lr:1.00E-04,Update the best model
Epoch: 2, duration:11577ms, Train_acc:25.7%, Train_loss:2.247, Test_acc:16.7%,Test_loss:2.642, Lr:1.00E-04,Update the best model
Epoch: 3, duration:11566ms, Train_acc:31.5%, Train_loss:2.024, Test_acc:25.0%,Test_loss:2.367, Lr:1.00E-04,Update the best model
Epoch: 4, duration:11556ms, Train_acc:38.8%, Train_loss:1.839, Test_acc:22.8%,Test_loss:2.349, Lr:9.20E-05
Epoch: 5, duration:11552ms, Train_acc:45.1%, Train_loss:1.644, Test_acc:25.0%,Test_loss:2.287, Lr:9.20E-05
Epoch: 6, duration:11561ms, Train_acc:49.3%, Train_loss:1.544, Test_acc:27.8%,Test_loss:2.305, Lr:9.20E-05,Update the best model
Epoch: 7, duration:11608ms, Train_acc:56.9%, Train_loss:1.334, Test_acc:33.3%,Test_loss:2.050, Lr:9.20E-05,Update the best model
Epoch: 8, duration:11588ms, Train_acc:63.1%, Train_loss:1.192, Test_acc:38.9%,Test_loss:1.962, Lr:8.46E-05,Update the best model
Epoch: 9, duration:11559ms, Train_acc:69.0%, Train_loss:1.030, Test_acc:35.6%,Test_loss:2.020, Lr:8.46E-05
Epoch:10, duration:11562ms, Train_acc:75.7%, Train_loss:0.834, Test_acc:35.0%,Test_loss:2.138, Lr:8.46E-05
Epoch:11, duration:11538ms, Train_acc:80.4%, Train_loss:0.708, Test_acc:31.7%,Test_loss:2.584, Lr:8.46E-05
Epoch:12, duration:11546ms, Train_acc:85.1%, Train_loss:0.590, Test_acc:33.9%,Test_loss:2.304, Lr:7.79E-05
Epoch:13, duration:11541ms, Train_acc:89.9%, Train_loss:0.418, Test_acc:46.1%,Test_loss:1.800, Lr:7.79E-05,Update the best model
Epoch:14, duration:11579ms, Train_acc:94.9%, Train_loss:0.287, Test_acc:58.3%,Test_loss:1.397, Lr:7.79E-05,Update the best model
Epoch:15, duration:11581ms, Train_acc:98.5%, Train_loss:0.158, Test_acc:57.8%,Test_loss:1.514, Lr:7.79E-05
Epoch:16, duration:11622ms, Train_acc:99.1%, Train_loss:0.102, Test_acc:54.4%,Test_loss:1.497, Lr:7.16E-05
Epoch:17, duration:11550ms, Train_acc:99.8%, Train_loss:0.054, Test_acc:61.1%,Test_loss:1.148, Lr:7.16E-05,Update the best model
Epoch:18, duration:11567ms, Train_acc:100.0%, Train_loss:0.032, Test_acc:67.2%,Test_loss:1.091, Lr:7.16E-05,Update the best model
Epoch:19, duration:11571ms, Train_acc:99.9%, Train_loss:0.025, Test_acc:61.7%,Test_loss:1.174, Lr:7.16E-05
Epoch:20, duration:11579ms, Train_acc:99.9%, Train_loss:0.026, Test_acc:66.7%,Test_loss:1.028, Lr:6.59E-05
Epoch:21, duration:11618ms, Train_acc:100.0%, Train_loss:0.010, Test_acc:71.1%,Test_loss:0.918, Lr:6.59E-05,Update the best model
Epoch:22, duration:11670ms, Train_acc:100.0%, Train_loss:0.007, Test_acc:72.2%,Test_loss:0.917, Lr:6.59E-05,Update the best model
Epoch:23, duration:11588ms, Train_acc:100.0%, Train_loss:0.005, Test_acc:71.7%,Test_loss:0.902, Lr:6.59E-05
Epoch:24, duration:11571ms, Train_acc:100.0%, Train_loss:0.005, Test_acc:70.6%,Test_loss:0.932, Lr:6.06E-05
Epoch:25, duration:11617ms, Train_acc:100.0%, Train_loss:0.004, Test_acc:71.7%,Test_loss:0.908, Lr:6.06E-05
Epoch:26, duration:11599ms, Train_acc:100.0%, Train_loss:0.003, Test_acc:72.8%,Test_loss:0.901, Lr:6.06E-05,Update the best model
Epoch:27, duration:11607ms, Train_acc:100.0%, Train_loss:0.003, Test_acc:70.6%,Test_loss:0.899, Lr:6.06E-05
Epoch:28, duration:11606ms, Train_acc:100.0%, Train_loss:0.002, Test_acc:73.9%,Test_loss:0.900, Lr:5.58E-05,Update the best model
Epoch:29, duration:11564ms, Train_acc:100.0%, Train_loss:0.002, Test_acc:71.1%,Test_loss:0.875, Lr:5.58E-05
Epoch:30, duration:11564ms, Train_acc:100.0%, Train_loss:0.002, Test_acc:73.3%,Test_loss:0.924, Lr:5.58E-05
Epoch:31, duration:11615ms, Train_acc:100.0%, Train_loss:0.002, Test_acc:71.1%,Test_loss:0.905, Lr:5.58E-05
Epoch:32, duration:11603ms, Train_acc:100.0%, Train_loss:0.002, Test_acc:73.3%,Test_loss:0.873, Lr:5.13E-05
Epoch:33, duration:11547ms, Train_acc:100.0%, Train_loss:0.002, Test_acc:73.3%,Test_loss:0.879, Lr:5.13E-05
Epoch:34, duration:11563ms, Train_acc:100.0%, Train_loss:0.001, Test_acc:75.6%,Test_loss:0.871, Lr:5.13E-05,Update the best model
Epoch:35, duration:11608ms, Train_acc:100.0%, Train_loss:0.002, Test_acc:72.2%,Test_loss:0.893, Lr:5.13E-05
Epoch:36, duration:11551ms, Train_acc:100.0%, Train_loss:0.001, Test_acc:72.2%,Test_loss:0.937, Lr:4.72E-05
Epoch:37, duration:11571ms, Train_acc:100.0%, Train_loss:0.001, Test_acc:73.3%,Test_loss:0.932, Lr:4.72E-05
Epoch:38, duration:11552ms, Train_acc:100.0%, Train_loss:0.001, Test_acc:73.3%,Test_loss:0.899, Lr:4.72E-05
Epoch:39, duration:11591ms, Train_acc:100.0%, Train_loss:0.001, Test_acc:73.3%,Test_loss:0.927, Lr:4.72E-05
Epoch:40, duration:11566ms, Train_acc:100.0%, Train_loss:0.001, Test_acc:74.4%,Test_loss:0.909, Lr:4.34E-05

最高Test_acc:75.6%
3.7 PyTorch程序实现L1和L2正则项
3.7.1 背景介绍
在机器学习中,我们的目标是找到一个能够最小化损失函数的模型。然而,如果我们只关注最小化损失函数,我们可能会得到一个过于复杂的模型,这个模型在训练数据上表现得很好,但在新的数据上可能表现得很差。这就是所谓的过拟合。
为了防止过拟合,我们可以在损失函数中添加一个正则项,这个正则项会惩罚模型的复杂度。L1和L2正则项就是两种常见的正则项。
3.7.2 公式推导
关于正则化的公式推导,网上有很多大牛进行过生动的介绍和讲解,为避免重复造轮子,大家可以在阅读下面的内容前去看一看这篇博客:一篇文章完全搞懂正则化(Regularization)
在大致了解了L1和L2的技术后,我们再做一个简单的梳理与回顾:
对于 L 1 L1 L1来说,就是在原有的loss函数中加入:
L 1 = λ ∑ ∣ w i ∣ L1 = \lambda\sum\left|w_i\right| L1=λ∑∣wi∣
同理, L 2 L2 L2就是加入:
L 2 = λ ∑ w i 2 L2 = \lambda\sum w_i^2 L2=λ∑wi2
其中, w w w表示网络模型中的参数。
3.7.3 程序实现
3.7.3.1 正则化实现
所谓添加正则项,就是在loss函数上再加入一项。因此我们可以定义一个附加的函数,来计算L1和L2所产生的额外损失数值:
# 定义L1正则化函数
def l1_regularizer(weight, lambda_l1):
    return lambda_l1 * torch.norm(weight, 1)

# 定义L2正则化函数
def l2_regularizer(weight, lambda_l2):
    return lambda_l2 * torch.norm(weight, 2)
上面的程序中定义了L1和L2的计算方法,也就是对所有网络参数weight做取绝对值和平方操作。在实际使用中,只需要把函数返回的值加入的原始的loss结果中便实现了正则操作。
3.7.3.2 网络实例
为了更好的展示如何在自己的网络训练模型中使用正则化技术,首先给出一个没有加入正则项的网络训练程序(方便大家去和下面加入正则项的程序对比;也可以根据这个框架比对自己写的程序,快速定位应该修改的地方):
import torch
import torch.nn as nn

#定义网络结构
class CNN(nn.Module):
    pass

# 实例化网络模型
model = CNN()
# 定义损失函数
criterion = nn.MSELoss()
# 定义优化器
optimizer = torch.optim.SGD(model.parameters(), lr=0.01)
# 迭代训练
for epoch in range(1000):
    #训练模型
    model.train()
    for i, data in enumerate(train_loader, 0):
        #1 解析数据并加载到GPU
        inputs, labels = data
        inputs, labels = inputs.to(device), labels.to(device)
        #2 梯度清0
        optimizer.zero_grad()
        #3 前向传播
        outputs = model(inputs)
        #4 计算损失
        loss = criterion(outputs, labels)
        #5 反向传播和优化
        loss.backward()
        optimizer.step()
3.7.3.3 在网络中加入正则项
下面的程序实现了从loss损失函数层面加入正则项:
import torch
import torch.nn as nn

#定义网络结构
class CNN(nn.Module):
    pass

# 实例化网络模型
model = CNN()
# 定义损失函数
criterion = nn.MSELoss()
# 定义优化器
optimizer = torch.optim.SGD(model.parameters(), lr=0.01)
# 迭代训练
for epoch in range(1000):
    #训练模型
    model.train()
    for i, data in enumerate(train_loader, 0):
        #1 解析数据并加载到GPU
        inputs, labels = data
        inputs, labels = inputs.to(device), labels.to(device)
        #2 梯度清0
        optimizer.zero_grad()
        #3 前向传播
        outputs = model(inputs)
        #4 计算损失
        #4.1 定义L1和L2正则化参数
        lambda_l1 = 0.01
        lambda_l2 = 0.01

        #4.2 计算L1和L2正则化
        l1_regularization = l1_regularizer(model.weight, lambda_l1)
        l2_regularization = l2_regularizer(model.weight, lambda_l2)

        #4.3 向loss中加入L1和L2
        loss = criterion(outputs, labels)
        loss += l1_regularization + l2_regularization

        #5 反向传播和优化
        loss.backward()
        optimizer.step()
程序中的l1_regularizer()和l2_regularizer()函数是3.7.3.1节中手动实现的L1和L2计算函数。
注:本示例中是将L1和L2独立在loss函数外实现的。但是在实际操作中,最保险的做法是将L1和L2的计算过程放在loss函数里,也就是重写loss函数。具体操作就是在loss里面调用上面的两个计算函数。
3.7.3.4 PyTorch中自带的正则方法:权重衰减
在本章的前三节,介绍了如何手动实现正则计算并将它嵌入至神经网络中,但是作为网络基本处理技术中的一种,PyTorch自带了正则化技术。它被集成在了优化器里。
以上面程序中用到的优化器torch.optim.SGD为例,我们下面来介绍如何通过它直接对网络进行正则化处理。
optimizer = torch.optim.SGD(model.parameters(), lr=lr, weight_decay=1e-4)
上面的是SGD的通用定义方式,其中参数的含义为:
- model.parameters(): 模型的所有可学习参数
- lr:学习率
- weight_decay:权重衰减系数
其中,权重衰减系数weight_decay就是一种正则方法。具体而言:权重衰减等价于 L 2 范数正则化(regularization)。具体的推导和解析可见博客:
神经网络中的权重衰减weight_decay
正则化之WEIGHT_DECAY
3.7.4 正则项的使用注意事项
在使用L1和L2正则项时,需要注意以下几点:
正则化参数λ λλ的选择很重要。如果 λ λ λ太大,模型可能会过于简单,导致欠拟合。如果 λ λ λ太小,正则化的效果可能会不明显。
L1和L2正则项可以同时使用,这就是所谓的Elastic Net。
L1正则项可能会导致模型不稳定,因为它会使得一些模型参数变为0。如果数据有轻微的变化,模型的参数可能会有大的变化。
3.7.5 正则化总结
总的来说,使用正则项是一种有效的防止模型过拟合的技术。它可以帮助我们在保证模型拟合能力的同时,避免出现过拟合现象,从而提高模型的泛化能力。同时,正则项的使用也可以帮助我们进行特征选择,减小模型的复杂度,提高模型的可解释性。
但是,正则项的使用也存在一些限制。例如,在某些情况下,正则项可能会对模型的性能造成一定的影响。此外,正则项的系数需要进行合理调整,过大或过小都可能导致模型性能下降。同时,一个好的网络训练结果是多种因素共同作用决定的,在使用正则项的同时,也不能忽视其它技术(例如dropout)。
参考链接:PyTorch程序实现L1和L2正则项
总结
通过本文的学习,学会预加载官方VGG16模型实现新网络的构建,学会自建VGG16网络模型,在为了是案列准确率提高的状况下,尝试了增加BatchNormalization,Dropout层,全局平均池化层代替全连接层(模型轻量化)等方式。
自建vgg16模型:最高Test_acc:41.4%
VGG16+BatchNormalization:最高Test_acc:42.2%
VGG16+BatchNormalization+Dropout层:Test_acc:最高Test_acc:46.1%
拔高尝试–VGG16+BatchNormalization+Dropout层+增加训练集比例:最高Test_acc:48.3%
拔高尝试–VGG16+BatchNormalization+Dropout层+增加训练集比例+自适应平均池化层代替全连接层(模型轻量化):最高Test_acc:58.9%
拔高尝试–VGG16+BatchNormalization+Dropout层+增加训练集比例+全局平均池化层代替全连接层(模型轻量化):最高Test_acc:73.3%
VGG16+BatchNormalization+Dropout层+增加训练集比例+全局平均池化层代替全连接层(模型轻量化)+L2正则化参数λ(weight_decay项)的优化器:最高Test_acc:75.6%
从实验效果看,增加Dropout层,增加训练集比例,全局平均池化层代替全连接层(模型轻量化),模型精度提升较为明显,由于每次训练结果均不同,所以,最高测试精度仅为某次测试的结果。
 115


 扫一扫


 被折叠的 条评论
为什么被折叠?
 到【灌水乐园】发言


