


一、制作基于windows系统批量重命名文件小工具
参考博客:
使用python做一个批量重命名文件的小工具_讷言丶的博客-优快云博客
效果展示:
临时01
代码实现:
import os
from tkinter import filedialog
import tkinter as tk
from tkinter import messagebox

root = tk.Tk()
root.geometry('400x200+550+200')
root.title('批量重命名文件小工具')
page = tk.Frame()
page.pack()
text = tk.StringVar()


def rename_file():
    filepath = filedialog.askdirectory()
    index = 0
    if len(os.listdir(filepath)) == 0:
        messagebox.showinfo(title="文件重命名", message="该目录下文件为空,请重新选择目录")
    else:
        for filename in os.listdir(filepath):
            index += 1
            file_path = os.path.join(filepath, filename)
            if os.path.isfile(file_path):
                name, ext = os.path.splitext(filename)
                new_name = text.get() + str(index) + ext
                # print(new_name)
                os.rename(file_path, os.path.join(filepath, new_name))
        messagebox.showinfo(title='文件重命名', message='文件重命名成功,请查看目录')


tk.Label(page).grid(row=0, column=1)
tk.Label(page, text='文件名称前缀:', font=('华文楷体', 15)).grid(row=2, column=1, pady=10)
tk.Entry(page, textvariable=text).grid(row=2, column=2)
tk.Button(page, text='选择目录并重命名文件', font=('华文楷体', 15), command=rename_file).grid(row=3, column=2)
root.mainloop()
二、制作时间戳转换器
效果展示:
临时03
代码实现:
import time
import tkinter as tk
from tkinter import messagebox

root = tk.Tk()
root.geometry('400x300+500+300')
root.title('时间戳转换工具')

usertime = tk.StringVar()
usertimestamp = tk.StringVar()

page = tk.Frame(root)
page.pack()

tk.Label(page).grid(row=0, column=1)

tk.Label(page, text='请输入时间【格式:Y-M-D h:m:s】:', font=('黑体', 10)).grid(row=1, column=1, pady=10)
tk.Entry(page, textvariable=usertime).grid(row=1, column=2)

tk.Label(page, text='请输入时间戳: ', font=('黑体', 10)).grid(row=3, column=1, pady=30)
tk.Entry(page, textvariable=usertimestamp).grid(row=3, column=2)


# 将时间转换为时间戳,秒级
def timestamp_s():
    time_value = usertime.get()
    timeArray = time.strptime(time_value, "%Y-%m-%d %H:%M:%S")
    timestamp = time.mktime(timeArray)
    times = int(timestamp)
    messagebox.showinfo(title='时间戳(s)', message=f'获取到的时间戳(s)为{times}')


# 将时间转换为时间戳,毫秒级
def timestamp_ms():
    time_value = usertime.get()
    timeArray = time.strptime(time_value, "%Y-%m-%d %H:%M:%S")
    timestamp = time.mktime(timeArray)
    times = int(round(timestamp * 1000))
    messagebox.showinfo(title='时间戳(s)', message=f'获取到的时间戳(s)为{times}')


# 秒级时间戳转换
def time_s():
    time_value = usertimestamp.get()
    if len(time_value) == 10:
        timeas = int(time_value)
        time_local = time.localtime(timeas)
        dt = time.strftime("%Y-%m-%d %H:%M:%S", time_local)
        messagebox.showinfo(title='时间', message=f'获取到的时间为{dt}')
    elif len(time_value) == 13:
        timeas = int(time_value)
        timestamps = int(round(timeas / 1000))
        time_local = time.localtime(timestamps)
        dt = time.strftime("%Y-%m-%d %H:%M:%S", time_local)
        messagebox.showinfo(title='时间', message=f'获取到的时间为{dt}')

tk.Button(page, text='转换为时间戳(s)', command=timestamp_s).grid(row=2, column=1)
tk.Button(page, text='转换为时间戳(ms)', command=timestamp_ms).grid(row=2, column=2)
tk.Button(page, text='转换为时间', command=time_s).grid(row=4, column=1)
root.mainloop()
三、制作图书管理小工具
效果展示:
临时02
代码实现:
import tkinter as tk
from tkinter import messagebox


# 定义Book类
class Book:
    def __init__(self, title, author, isbn):
        self.title = title
        self.author = author
        self.isbn = isbn


# 定义GUI窗口
class BookManagementSystem:
    def __init__(self, master):
        self.master = master
        self.master.title("图书管理系统")

        # 创建标题标签
        tk.Label(self.master, text="图书管理系统", font=("Arial", 20)).grid(column=0, row=0, columnspan=3, pady=10)

        # 创建书籍信息输入框
        tk.Label(self.master, text="书名").grid(column=0, row=1)
        self.title_entry = tk.Entry(self.master)
        self.title_entry.grid(column=1, row=1, padx=5, pady=5)
        tk.Label(self.master, text="作者").grid(column=0, row=2)
        self.author_entry = tk.Entry(self.master)
        self.author_entry.grid(column=1, row=2, padx=5, pady=5)
        tk.Label(self.master, text="ISBN号").grid(column=0, row=3)
        self.isbn_entry = tk.Entry(self.master)
        self.isbn_entry.grid(column=1, row=3, padx=5, pady=5)

        # 创建添加书籍按钮
        self.add_book_button = tk.Button(self.master, text="添加书籍", command=self.add_book)
        self.add_book_button.grid(column=0, row=4, pady=10)

        # 创建书籍列表框
        tk.Label(self.master, text="当前书籍列表").grid(column=2, row=1)
        self.book_listbox = tk.Listbox(self.master)
        self.book_listbox.grid(column=2, row=2, rowspan=3, padx=10, pady=5)
        self.update_book_list()

        # 创建删除书籍按钮
        self.delete_book_button = tk.Button(self.master, text="删除书籍", command=self.delete_book)
        self.delete_book_button.grid(column=2, row=4, pady=10)

    # 添加书籍方法
    def add_book(self):
        title = self.title_entry.get()
        author = self.author_entry.get()
        isbn = self.isbn_entry.get()
        book = Book(title, author, isbn)
        with open("books.txt", "a") as f:
            f.write(f"{book.title},{book.author},{book.isbn}\n")
        messagebox.showinfo("添加书籍", "添加书籍成功!")
        self.update_book_list()

    # 删除书籍方法
    def delete_book(self):
        selection = self.book_listbox.curselection()
        if len(selection) == 0:
            messagebox.showerror("删除书籍", "请选择要删除的书籍!")
            return
        index = selection[0]
        book = self.book_listbox.get(index)
        with open("books.txt", "r") as f:
            lines = f.readlines()
        with open("books.txt", "w") as f:
            for line in lines:
                if line.strip() != book:
                    f.write(line)
        messagebox.showinfo("删除书籍", "删除书籍成功!")
        self.update_book_list()

    # 更新书籍列表方法
    def update_book_list(self):
        self.book_listbox.delete(0, tk.END)
        with open("books.txt", "r") as f:
            for line in f.readlines():
                book = line.strip()
                self.book_listbox.insert(tk.END, book)


# 启动GUI窗口
if __name__ == '__main__':
    root = tk.Tk()
    app = BookManagementSystem(root)
    root.mainloop()
四、制作jpg、png图片转ico图标小工具
效果展示:
临时04
代码实现:
import tkinter as tk
from tkinter import filedialog
# PythonMargick包可以到Unofficial Windows Binaries for Python Extension Packages下载
import PythonMagick

root = tk.Tk()
root.withdraw()

Fpath = filedialog.askopenfilename()

img = PythonMagick.Image(Fpath)
# 这里要设置一下尺寸,不然会报ico尺寸异常错误
img.sample('256x256')
img.write('robin.ico')
五、制作图片和base64互转小工具
效果展示:
临时05
代码实现:
import base64
import tkinter as tk
from tkinter import filedialog

root = tk.Tk()
root.withdraw()

Fpath = filedialog.askopenfilename()
def file_to_base64():
    print(Fpath)
    f=open(Fpath,'rb') #二进制方式打开图文件
    ls_f=base64.b64encode(f.read()) #读取文件内容,转换为base64编码
    open('x.txt', 'wb').write(ls_f)

def base64_to_file():
    print(Fpath)
    decoded = base64.b64decode(open(Fpath, 'rb').read())
    open('1.jpg', 'wb').write(decoded)  # 保存


if __name__ == '__main__':
    if "jpg" in Fpath or 'png' in Fpath or 'jpeg' in Fpath:
        file_to_base64()
    elif 'txt' in Fpath:
        base64_to_file()
六、制作英文翻译器(小工具)
代码逻辑:
requests模块请求第三方翻译接口,拿到数据后通过tkinter展示出来
效果展示:
临时06
代码实现:
import requests
import tkinter as tk
from tkinter import messagebox

root = tk.Tk()
root.geometry('1000x500+350+100')
root.title('英文翻译器')
page = tk.Frame()
page.pack()

text = tk.StringVar()
tk.Label(page).grid(row=0, column=1)
tk.Label(page, text='翻译小程序', font=('黑体', 20)).grid(row=1, column=1, pady=20)


def sure():
    page.pack_forget()
    page2.pack()


def exit():
    page2.pack_forget()
    page.pack()


def dcfy():
    url = 'https://fanyi.xxx.com/trans'
    headers = {
        "user-agent": 'Mozilla/5.0 (Windows NT 10.0; Win64; x64) AppleWebKit/537.36 (KHTML, like Gecko) Chrome/111.0.0.0 Safari/537.36',
        "referer": 'https://fanyi.xxx.com/'
    }
    chinese = text.get()
    data = {
        'q': chinese,
        'from': 'Auto',
        'to': 'Auto'
    }

    resp = requests.post(url=url, headers=headers, data=data).json()
    chinatext = resp.get('web')[0]['key']
    Englishtext = resp.get('web')[0]['value'][0]
    messagebox.showinfo(title='单词翻译', message=Englishtext)


def para():
    page.pack_forget()
    page3.pack()


def exit2():
    page3.pack_forget()
    page.pack()


def dlfy():
    url = 'https://fanyi.xxx.com/trans'
    headers = {
        "user-agent": 'Mozilla/5.0 (Windows NT 10.0; Win64; x64) AppleWebKit/537.36 (KHTML, like Gecko) Chrome/111.0.0.0 Safari/537.36',
        "referer": 'https://fanyi.xxx.com/'
    }
    chinese = text.get()
    data = {
        'q': chinese,
        'from': 'Auto',
        'to': 'Auto'
    }

    resp = requests.post(url=url, headers=headers, data=data).json()
    Englishtext = resp['translation'][0]
    messagebox.showinfo(title='段落句子翻译', message=f'{Englishtext}')


tk.Button(page, text='单词翻译', font=('黑体', 15), command=sure).grid(row=2, column=1, pady=20)
tk.Button(page, text='句子翻译', font=('黑体', 15), command=para).grid(row=2, column=2, padx=10, pady=20)

page2 = tk.Frame()
tk.Entry(page2, textvariable=text, bd=5).grid(row=2, column=2, pady=20)
tk.Button(page2, text='翻译', font=('黑体', 15), command=dcfy).grid(row=3, column=1, padx=20)
tk.Button(page2, text='返回上一页', font=('黑体', 15), command=exit).grid(row=3, column=2, pady=20)

page3 = tk.Frame()
tk.Entry(page3, textvariable=text, bd=5).grid(row=2, column=2, pady=20)
tk.Button(page3, text='翻译', font=('黑体', 15), command=dlfy).grid(row=3, column=1, padx=20)
tk.Button(page3, text='返回上一页', font=('黑体', 15), command=exit2).grid(row=3, column=2, pady=20)

root.mainloop()
七、制作图片查看器(小工具):
效果展示:
临时07
代码实现:
import tkinter as tk
import glob
from PIL import Image, ImageTk

root = tk.Tk()  # 创建窗口
root.geometry('650x700+300+50')  # 设置弹出窗口的大小和在屏幕中的位置
root.title('图片查看器')  # 设置弹出窗口的标题

imgs = glob.glob('img/*.jpeg')
imgs = [ImageTk.PhotoImage(Image.open(item)) for item in imgs]

current_photo_no = 0
img_label = tk.Label(root, image=imgs[current_photo_no], width=640, height=640)
img_label.pack()
number_var = tk.StringVar()
number_var.set('1 of 8')
tk.Label(root, textvariable=number_var, bd=1, relief=tk.SUNKEN, anchor=tk.CENTER).pack(fill=tk.X)

button_form = tk.Frame(root)
button_form.pack()
prev_img = tk.Button(button_form, text='上一页')
next_img = tk.Button(button_form, text='下一页')
prev_img.pack(side=tk.LEFT, anchor=tk.CENTER)
next_img.pack(side=tk.RIGHT, anchor=tk.CENTER)


def change_images(next_no):
    global current_photo_no
    current_photo_no += next_no
    if current_photo_no >= len(imgs):
        current_photo_no = 0
    if current_photo_no < 0:
        current_photo_no = len(imgs) - 1
    number_var.set(f'{current_photo_no + 1} of {len(imgs)}')
    img_label.configure(image=imgs[current_photo_no])


prev_img.config(command=lambda: change_images(-1))
next_img.config(command=lambda: change_images(1))
root.mainloop()
八、制作BMI身体指数计算器(小工具):
效果展示:
临时08
代码实现:
import tkinter as tk
from tkinter import messagebox

root = tk.Tk()
root.geometry('350x230+500+230')  # 设置弹出框位置和大小
# root.iconbitmap('E:/pythonProject/3.ico')  # 设置弹出框图标

root.title('BMI身体指数计算器')

height = tk.DoubleVar()
weight = tk.DoubleVar()

page = tk.Frame(root)
page.pack()

tk.Label(page).grid(row=0, column=0)

tk.Label(page, text='身高(米): ').grid(row=2, column=1, pady=20)
tk.Entry(page, textvariable=height).grid(row=2, column=2)

tk.Label(page, text='体重(kg): ').grid(row=3, column=1, pady=20)
tk.Entry(page, textvariable=weight).grid(row=3, column=2)


def jisuan():
    shengao = height.get()
    tizhong = weight.get()
    # print(shengao,tizhong)
    if shengao > 0 and tizhong > 0:
        BMI = tizhong / shengao ** 2
        BMI_new = float(('%.2f' % BMI))
        messagebox.showinfo(title='BMI身体指数计算',
                            message=f'您的身高为{shengao}m,您的体重为{tizhong}kg,您的BMI身体指数为{BMI_new}')
        if BMI_new < 18.4:
            messagebox.showinfo(title='BMI身体指数计算', message='BMI指数较低,提示您的身体消瘦,要注意补充营养哦!')
        elif BMI_new > 18.5 and BMI_new < 24:
            messagebox.showinfo(title='BMI身体指数计算', message='BMI指数为正常值,继续加油!')
        elif BMI_new > 24 and BMI_new < 28:
            messagebox.showinfo(title='BMI身体指数计算',
                                message='BMI指数较高,属于是超重了,提示您需要合理饮食,加强锻炼哦!')
        elif BMI_new > 28:
            messagebox.showinfo(title='BMI身体指数计算',
                                message='BMI指数很高,属于肥胖了,提示您需要注意身体健康了,过胖会增加人体器官的负担哦!')


tk.Button(page, text='计算', command=jisuan).grid(row=4, column=2, pady=10)

root.mainloop()
九,制作json数据格式化小工具
小工具效果:对于json格式(混乱)的数据做规范修改,格式化输出json数据。
import json
import tkinter as tk
from tkinter import filedialog

root = tk.Tk()
root.withdraw()

json_data_path = filedialog.askopenfilename()

with open(json_data_path) as json_file:
    data = json.load(json_file)

formatted_data = json.dumps(data, indent=4, sort_keys=True)
with open(json_data_path, 'w') as fp:
    fp.write(formatted_data)
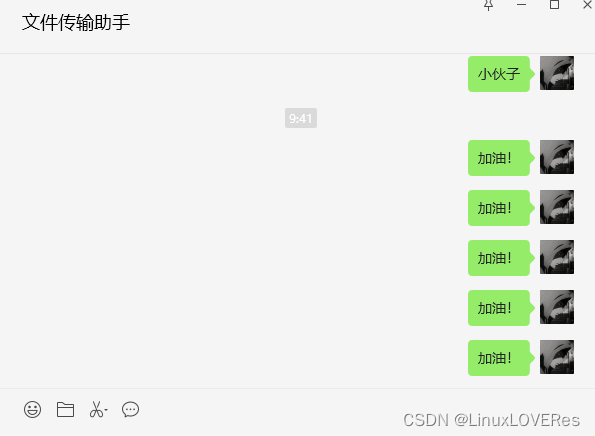
十,微信消息轰炸
代码逻辑:即通过python的pyautogui库定位到微信的像素位置,然后通过模拟鼠标键盘操作自动发送消息
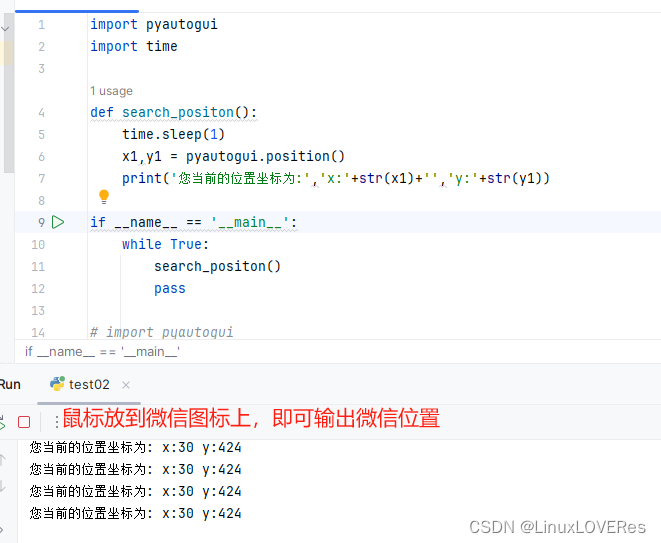
实现步骤:
1)先通过pyautogui定位到微信的桌面位置。
import pyautogui
import time

def search_positon():
    time.sleep(1)
    x1,y1 = pyautogui.position()
    print('您当前的位置坐标为:','x:'+str(x1)+'','y:'+str(y1))

if __name__ == '__main__':
    while True:
        search_positon()
        pass
效果展示:【具体方位不是固定的,只要确认可以点击打开微信即可】
2)编写消息发送逻辑,通过pyautogui自动下发微信消息
import pyautogui
import time
import pyperclip

user = input('输入用户名称:')
userinput = input('输入要发送的消息:')
pyautogui.click(37, 428, button='left', clicks=2)
# 找到微信程序位置,打开微信程序
time.sleep(0.5)
# 睡眠0.5秒
pyautogui.click(368, 83, button='left', clicks=1)
# 点击微信搜索框,具体位置可以通过运行上面的代码定位
pyperclip.copy(user)
pyautogui.hotkey('Ctrl', 'v')
# 输入搜索内容
pyautogui.press('enter')
# 点击回车搜索
time.sleep(0.5)
pyautogui.press('enter')
while True:
    pyperclip.copy(userinput)
    pyautogui.hotkey('Ctrl', 'v')
    pyautogui.press('enter')
    time.sleep(0.5)
# 死循环执行消息发送,每隔0.5秒发送一次
效果展示:

十一,制作OCR图片识别小工具
参考博客:
效果展示:
临时09
代码实现:
from PIL import Image
import pytesseract
import tkinter as tk
from tkinter import filedialog

root = tk.Tk()
root.withdraw()

Fpath = filedialog.askopenfilename()


def read_image(name):
    with open('视频文件.txt','w',encoding='utf-8') as fp:
        fp.write(pytesseract.image_to_string(Image.open(name), lang='chi_sim'))

def main():
    read_image(Fpath)

if __name__ == '__main__':
    reslet = main()
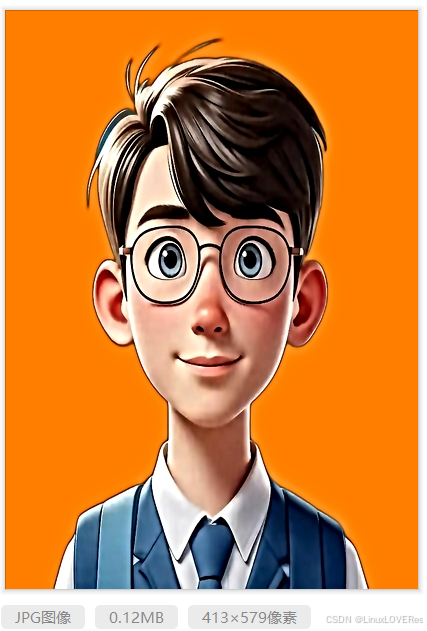
十二,python代码制作证件照
效果展示:
将1寸蓝底照片修改为2寸橘色背景照片
原图:

代码修改后的效果图:
代码实现:
from rembg import remove
from PIL import Image, ImageEnhance
import cv2
import numpy as np


def create_id_photo(input_path, output_path,
                    bg_color=(255, 255, 255),
                    target_size=(295, 413),
                    dpi=300,
                    enhance=True):
    """
    制作专业证件照
    参数:
    input_path: 输入图片路径
    output_path: 输出图片路径
    bg_color: 背景颜色 (RGB)
    target_size: 目标尺寸 (宽, 高)
    dpi: 输出分辨率
    enhance: 是否启用图像增强
    """
    # 1. 去除背景
    with open(input_path, 'rb') as f:
        input_image = Image.open(f).convert("RGB")
        output_image = remove(input_image)

    # 2. 替换背景
    background = Image.new('RGB', output_image.size, bg_color)
    background.paste(output_image, mask=output_image.split()[3])  # 使用alpha通道

    # 3. 转换为OpenCV格式进行美颜处理
    cv_image = cv2.cvtColor(np.array(background), cv2.COLOR_RGB2BGR)

    if enhance:
        # 4. 美颜处理
        cv_image = cv2.bilateralFilter(cv_image, 9, 75, 75)  # 双边滤波
        cv_image = cv2.detailEnhance(cv_image, sigma_s=10, sigma_r=0.15)  # 细节增强

    # 5. 转换回PIL格式
    result_img = Image.fromarray(cv2.cvtColor(cv_image, cv2.COLOR_BGR2RGB))

    # 6. 调整尺寸
    result_img = result_img.resize(target_size, Image.LANCZOS)

    # 7. 增强对比度和锐度
    enhancer = ImageEnhance.Contrast(result_img)
    result_img = enhancer.enhance(1.1)
    enhancer = ImageEnhance.Sharpness(result_img)
    result_img = enhancer.enhance(1.2)

    # 8. 保存结果
    result_img.save(output_path, dpi=(dpi, dpi), quality=100)
    print(f"证件照已保存至 {output_path}")


# 使用示例
if __name__ == "__main__":
    # 常用尺寸预设(宽×高,单位:像素)
    sizes = {
        "1寸": (295, 413),  # 2.5×3.5cm @ 300dpi
        "2寸": (413, 579),  # 3.5×4.9cm @ 300dpi
        "小2寸": (413, 531)  # 3.5×4.5cm @ 300dpi
    }

    create_id_photo(
        input_path="C:/Users/17496/Pictures/个人二寸照片.jpg",
        output_path="C:/Users/17496/Pictures/动漫一寸照片.jpg",
        bg_color=("#FF7F00"),  # 白色背景
        target_size=sizes["2寸"],
        dpi=300,
        enhance=True
    )
注意事项:
1.)此代码运行前需要先安装对应的python库。
pip install pillow
pip install opencv-python
pip install rembg
如代码运行报错提示还有其他库缺失,请自行对应安装python库。
2.)图片大变小效果会比较好(比如1寸照改2寸照),小变大效果会比较差(比如2寸照改1寸照)
十三,python代码将pdf文件转为word文件
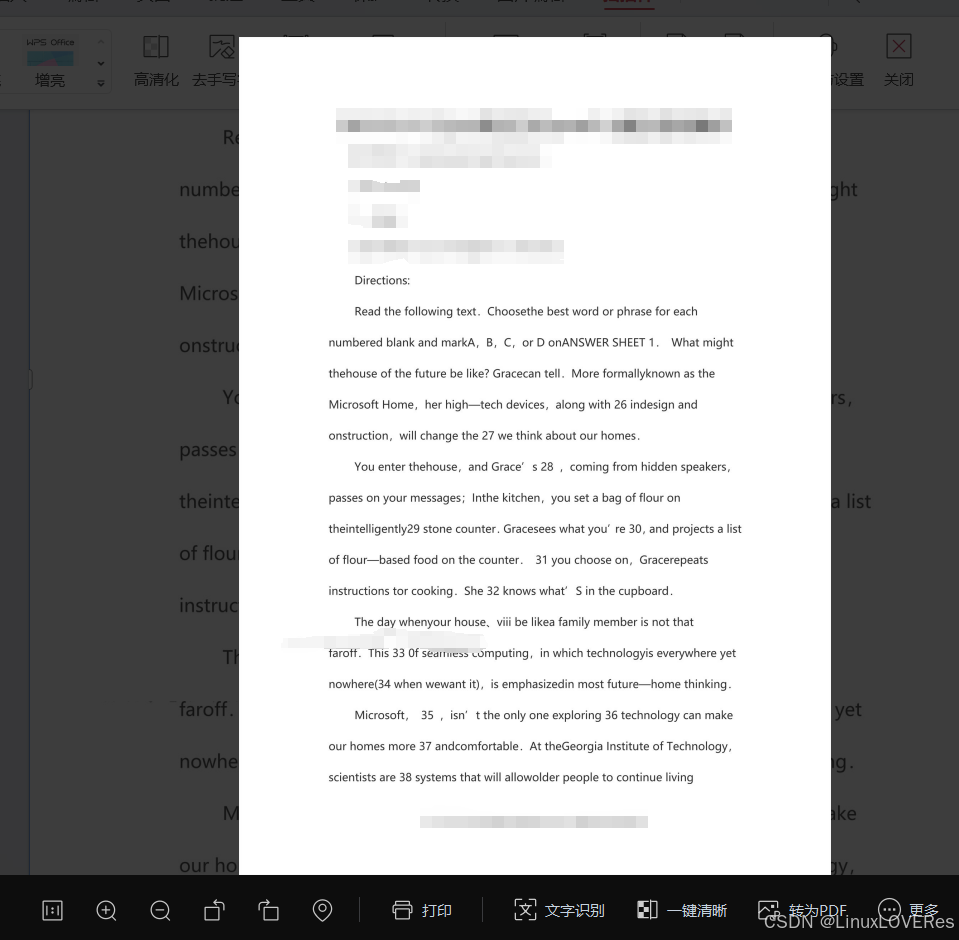
pdf文件分类:
pdf文件分为文字版pdf文件和图片版pdf文件。区分pdf文件是图片还是文字可以在文件中双击,双击后如果出现图片即为图片版pdf文件,双击后可以编辑即为文字版pdf。
下图为图片版pdf文件和文字版pdf文件示意图。
代码逻辑:
1,)针对文字类型的pdf文件
使用python的pdf2docx、pymupdf、python-docx库操作转换,使用tkinter库选择文件。
具体代码如下:
# 安装依赖库(需提前执行)
# pip install pdf2docx
# pip install pymupdf
# pip install python-docx
# pip install tkinter

import os
from pdf2docx import Converter
import fitz  # PyMuPDF
from tkinter import Tk, filedialog

def select_file():
    """选择PDF文件"""
    root = Tk()
    root.withdraw()  # 隐藏Tk窗口
    file_path = filedialog.askopenfilename(
        title="选择PDF文件",
        filetypes=[("PDF Files", "*.pdf")]
    )
    return file_path

def pdf_to_word(pdf_path, docx_path=None):
    """将PDF转换为Word文档"""
    try:
        # 使用pdf2docx库转换(保留格式)
        cv = Converter(pdf_path)
        if not docx_path:
            docx_path = pdf_path.replace(".pdf", "_converted.docx")
        cv.convert(docx_path, start=0, end=None)  # 转换全部页面
        cv.close()
        print(f"转换成功!文件已保存至: {docx_path}")
        return True
    except Exception as e:
        print(f"转换失败: {str(e)}")
        return False

if __name__ == "__main__":
    pdf_path = select_file()
    if pdf_path:
        pdf_to_word(pdf_path)
    else:
        print("未选择文件!")
效果展示:
pdf文字版文件转word文件
2,)针对图片类型的pdf文件
代码逻辑:
使用PyMuPDF库扫描提取所有pdf的图片,将提取到的pdf图片暂存到当前目录下的临时目录中,然后调用base64库将提取暂存的图片转为base64格式,之后调用百度云的OCR接口获取识别后的文本。最后将获取到的所有文本整合到word文件中。
import os
import fitz  # PyMuPDF
import base64
import requests
from docx import Document
from tkinter import Tk, filedialog

# 百度OCR配置(替换成您的实际API信息)
API_KEY = "xxxxxxxxxxxxx"
SECRET_KEY = "xxxxxxxxxxxxxxxxxxxxxxxxxxx"

# 百度OCR接口参数
OCR_URL = "https://aip.baidubce.com/rest/2.0/ocr/v1/xxxxxx_basic"
# 高精度版接口 具体可以登录百度云官网查看接口,
# 链接:https://console.bce.baidu.com/support/?timestamp=1742695013150#/api?product=AI&project=%E6%96%87%E5%AD%97%E8%AF%86%E5%88%AB&parent=%E9%80%9A%E7%94%A8%E5%9C%BA%E6%99%AFOCR&api=rest%2F2.0%2Focr%2Fv1%2Fgeneral_basic&method=post


class PDFToWordConverter:
    def __init__(self):
        self.access_token = self.get_access_token()
        self.doc = Document()
        self.temp_img_folder = "temp_pdf_images"

    def get_access_token(self):
        """获取百度OCR的Access Token"""
        url = "https://aip.baidubce.com/oauth/2.0/token"
        params = {
            "grant_type": "client_credentials",
            "client_id": API_KEY,
            "client_secret": SECRET_KEY
        }
        return requests.post(url, params=params).json().get("access_token")

    def extract_images_from_pdf(self, pdf_path):
        """从PDF提取所有图片到临时文件夹"""
        if not os.path.exists(self.temp_img_folder):
            os.makedirs(self.temp_img_folder)

        doc = fitz.open(pdf_path)
        image_paths = []

        for page_num in range(len(doc)):
            page = doc.load_page(page_num)
            image_list = page.get_images(full=True)

            for img_index, img in enumerate(image_list):
                xref = img[0]
                base_image = doc.extract_image(xref)
                image_bytes = base_image["image"]
                image_ext = base_image["ext"]
                image_filename = f"{self.temp_img_folder}/page{page_num}_img{img_index}.{image_ext}"

                with open(image_filename, "wb") as img_file:
                    img_file.write(image_bytes)
                image_paths.append(image_filename)

        doc.close()
        return image_paths

    def image_to_base64(self, image_path):
        """将图片转换为Base64编码"""
        with open(image_path, "rb") as f:
            return base64.b64encode(f.read()).decode("utf-8")

    def baidu_ocr(self, image_base64):
        """调用百度OCR接口识别图片文字"""
        headers = {'Content-Type': 'application/x-www-form-urlencoded'}
        payload = {
            "image": image_base64,
            "access_token": self.access_token,
            "language_type": "CHN_ENG"  # 中英文混合
        }
        response = requests.post(OCR_URL, headers=headers, data=payload)
        if response.status_code == 200:
            return response.json()
        return None

    def process_pdf(self, pdf_path):
        """处理PDF主流程"""
        # 1. 提取PDF中的图片
        image_paths = self.extract_images_from_pdf(pdf_path)
        if not image_paths:
            raise ValueError("未检测到PDF中的图片内容")

        # 2. 逐张识别并写入Word
        for img_path in image_paths:
            # 转换为Base64
            img_base64 = self.image_to_base64(img_path)

            # 调用OCR
            result = self.baidu_ocr(img_base64)

            # 解析结果
            if result and "words_result" in result:
                for item in result["words_result"]:
                    self.doc.add_paragraph(item["words"])
                self.doc.add_page_break()  # 保持分页

        # 3. 保存Word文件
        output_path = pdf_path.replace(".pdf", "_OCR.docx")
        self.doc.save(output_path)
        print(f"转换完成!文件已保存至:{output_path}")

        # 4. 清理临时文件(可选)
        # import shutil
        # shutil.rmtree(self.temp_img_folder)


def main():
    root = Tk()
    root.withdraw()
    pdf_path = filedialog.askopenfilename(
        title="选择PDF文件",
        filetypes=[("PDF Files", "*.pdf")]
    )

    if not pdf_path:
        print("未选择文件")
        return

    converter = PDFToWordConverter()
    converter.process_pdf(pdf_path)


if __name__ == "__main__":
    main()
效果展示:
pdf图片版文件转word文件
注意事项:
1,)上述代码需要对应安装各类python库。
2,)代码运行后会在当前目录下生成一个图片目录,用于存放提取的pdf图片,代码运行完后不需要可以自行删除。
3,)百度云的OCR有使用限制,个人用户使用标准文字识别接口有2000次免费,超过后需要付费使用。
百度云OCR相关链接:
1,OCR控制台界面:百度智能云控制台
2,OCR接口文档界面:服务与支持

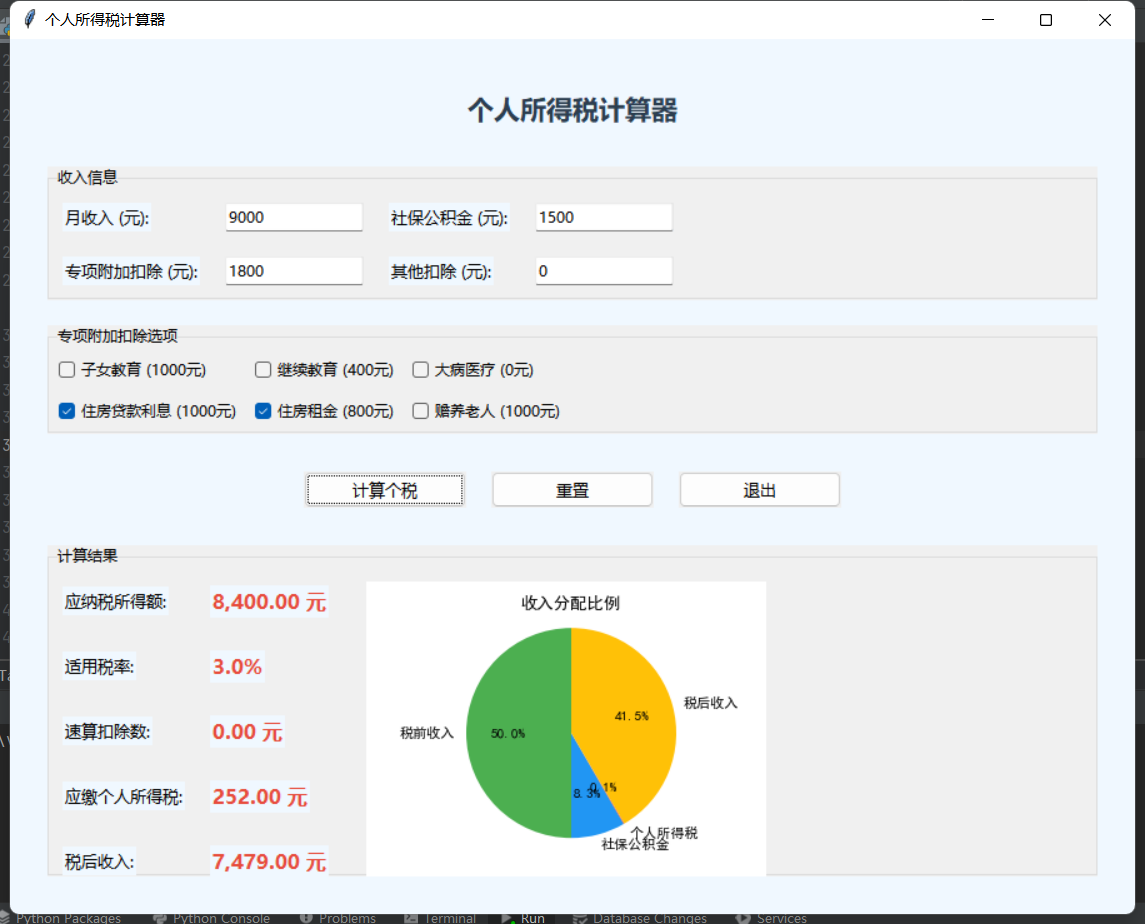
十四,python 制作个税计算小工具
效果展示:
代码实现:
import tkinter as tk
from tkinter import ttk, messagebox
import matplotlib.pyplot as plt
from matplotlib.backends.backend_tkagg import FigureCanvasTkAgg

# 税率表(2023年最新)
TAX_RATES = [
    {"min": 0, "max": 36000, "rate": 0.03, "deduction": 0},
    {"min": 36000, "max": 144000, "rate": 0.1, "deduction": 2520},
    {"min": 144000, "max": 300000, "rate": 0.2, "deduction": 16920},
    {"min": 300000, "max": 420000, "rate": 0.25, "deduction": 31920},
    {"min": 420000, "max": 660000, "rate": 0.3, "deduction": 52920},
    {"min": 660000, "max": 960000, "rate": 0.35, "deduction": 85920},
    {"min": 960000, "max": float('inf'), "rate": 0.45, "deduction": 181920}
]

# 专项附加扣除标准
SPECIAL_DEDUCTIONS = {
    "子女教育": 1000,
    "继续教育": 400,
    "大病医疗": 0,  # 实际金额据实扣除
    "住房贷款利息": 1000,
    "住房租金": 800,
    "赡养老人": 1000
}

plt.rcParams['font.sans-serif'] = ['SimHei'] # 设置显示中文字体
plt.rcParams['axes.unicode_minus'] = False  # 设置正常显示符号

class TaxCalculator:
    def __init__(self, root):
        self.root = root
        self.root.title("个人所得税计算器")
        self.root.geometry("900x700+400+50")
        self.root.resizable(True, True)
        self.root.configure(bg="#f0f8ff")

        # 设置应用图标
        try:
            self.root.iconbitmap("tax_icon.ico")  # 如果有图标文件的话
        except:
            pass

        # 创建样式
        self.style = ttk.Style()
        self.style.configure("TFrame", background="#f0f8ff")
        self.style.configure("TLabel", background="#f0f8ff", font=("微软雅黑", 10))
        self.style.configure("TButton", font=("微软雅黑", 10))
        self.style.configure("Header.TLabel", font=("微软雅黑", 16, "bold"), foreground="#2c3e50")
        self.style.configure("Result.TLabel", font=("微软雅黑", 12, "bold"), foreground="#e74c3c")

        # 创建主框架
        self.main_frame = ttk.Frame(root)
        self.main_frame.pack(fill=tk.BOTH, expand=True, padx=20, pady=20)

        # 创建标题
        self.header = ttk.Label(self.main_frame, text="个人所得税计算器", style="Header.TLabel")
        self.header.pack(pady=20)

        # 创建输入框架
        self.input_frame = ttk.LabelFrame(self.main_frame, text="收入信息")
        self.input_frame.pack(fill=tk.X, padx=10, pady=10)

        # 创建输入字段
        ttk.Label(self.input_frame, text="月收入 (元):").grid(row=0, column=0, padx=10, pady=10, sticky=tk.W)
        self.monthly_income = tk.DoubleVar(value=10000)
        ttk.Entry(self.input_frame, textvariable=self.monthly_income, width=15).grid(row=0, column=1, padx=10, pady=10)

        ttk.Label(self.input_frame, text="社保公积金 (元):").grid(row=0, column=2, padx=10, pady=10, sticky=tk.W)
        self.social_security = tk.DoubleVar(value=1500)
        ttk.Entry(self.input_frame, textvariable=self.social_security, width=15).grid(row=0, column=3, padx=10, pady=10)

        ttk.Label(self.input_frame, text="专项附加扣除 (元):").grid(row=1, column=0, padx=10, pady=10, sticky=tk.W)
        self.special_deduction = tk.DoubleVar(value=0)
        ttk.Entry(self.input_frame, textvariable=self.special_deduction, width=15).grid(row=1, column=1, padx=10,
                                                                                        pady=10)

        ttk.Label(self.input_frame, text="其他扣除 (元):").grid(row=1, column=2, padx=10, pady=10, sticky=tk.W)
        self.other_deduction = tk.DoubleVar(value=0)
        ttk.Entry(self.input_frame, textvariable=self.other_deduction, width=15).grid(row=1, column=3, padx=10, pady=10)

        # 专项附加扣除选项
        self.deductions_frame = ttk.LabelFrame(self.main_frame, text="专项附加扣除选项")
        self.deductions_frame.pack(fill=tk.X, padx=10, pady=10)

        self.deduction_vars = {}
        row_idx = 0
        col_idx = 0
        for idx, (deduct_name, amount) in enumerate(SPECIAL_DEDUCTIONS.items()):
            var = tk.BooleanVar(value=False)
            self.deduction_vars[deduct_name] = var
            cb = ttk.Checkbutton(self.deductions_frame, text=f"{deduct_name} ({amount}元)",
                                 variable=var, command=self.update_special_deduction)
            cb.grid(row=row_idx, column=col_idx, padx=5, pady=5, sticky=tk.W)

            col_idx += 1
            if col_idx > 2:
                col_idx = 0
                row_idx += 1

        # 创建按钮
        self.button_frame = ttk.Frame(self.main_frame)
        self.button_frame.pack(pady=20)

        ttk.Button(self.button_frame, text="计算个税", command=self.calculate_tax, width=15).pack(side=tk.LEFT, padx=10)
        ttk.Button(self.button_frame, text="重置", command=self.reset_fields, width=15).pack(side=tk.LEFT, padx=10)
        ttk.Button(self.button_frame, text="退出", command=root.quit, width=15).pack(side=tk.LEFT, padx=10)

        # 创建结果显示区域
        self.result_frame = ttk.LabelFrame(self.main_frame, text="计算结果")
        self.result_frame.pack(fill=tk.BOTH, expand=True, padx=10, pady=10)

        # 创建结果标签
        ttk.Label(self.result_frame, text="应纳税所得额:").grid(row=0, column=0, padx=10, pady=5, sticky=tk.W)
        self.taxable_income_label = ttk.Label(self.result_frame, text="0.00 元", style="Result.TLabel")
        self.taxable_income_label.grid(row=0, column=1, padx=10, pady=5, sticky=tk.W)

        ttk.Label(self.result_frame, text="适用税率:").grid(row=1, column=0, padx=10, pady=5, sticky=tk.W)
        self.tax_rate_label = ttk.Label(self.result_frame, text="0%", style="Result.TLabel")
        self.tax_rate_label.grid(row=1, column=1, padx=10, pady=5, sticky=tk.W)

        ttk.Label(self.result_frame, text="速算扣除数:").grid(row=2, column=0, padx=10, pady=5, sticky=tk.W)
        self.quick_deduction_label = ttk.Label(self.result_frame, text="0.00 元", style="Result.TLabel")
        self.quick_deduction_label.grid(row=2, column=1, padx=10, pady=5, sticky=tk.W)

        ttk.Label(self.result_frame, text="应缴个人所得税:").grid(row=3, column=0, padx=10, pady=5, sticky=tk.W)
        self.tax_amount_label = ttk.Label(self.result_frame, text="0.00 元", style="Result.TLabel")
        self.tax_amount_label.grid(row=3, column=1, padx=10, pady=5, sticky=tk.W)

        ttk.Label(self.result_frame, text="税后收入:").grid(row=4, column=0, padx=10, pady=5, sticky=tk.W)
        self.net_income_label = ttk.Label(self.result_frame, text="0.00 元", style="Result.TLabel")
        self.net_income_label.grid(row=4, column=1, padx=10, pady=5, sticky=tk.W)

        # 创建图表区域
        self.chart_frame = ttk.Frame(self.result_frame)
        self.chart_frame.grid(row=0, column=2, rowspan=5, padx=20, pady=10, sticky=tk.NSEW)

        # 初始图表
        self.fig, self.ax = plt.subplots(figsize=(4, 3), dpi=80)
        self.canvas = FigureCanvasTkAgg(self.fig, master=self.chart_frame)
        self.canvas.get_tk_widget().pack(fill=tk.BOTH, expand=True)
        self.update_chart([100], ["收入分布"])

        # 添加状态栏
        self.status_bar = ttk.Label(root, text="就绪", relief=tk.SUNKEN, anchor=tk.W)
        self.status_bar.pack(side=tk.BOTTOM, fill=tk.X)

        # 绑定事件
        self.root.bind("<Return>", lambda event: self.calculate_tax())

    def update_special_deduction(self):
        """更新专项附加扣除总额"""
        total = 0
        for deduct_name, var in self.deduction_vars.items():
            if var.get():
                total += SPECIAL_DEDUCTIONS[deduct_name]
        self.special_deduction.set(total)

    def calculate_taxable_income(self):
        """计算应纳税所得额"""
        try:
            # 获取输入值
            monthly_income = self.monthly_income.get()
            social_security = self.social_security.get()
            special_deduction = self.special_deduction.get()
            other_deduction = self.other_deduction.get()

            # 计算年收入
            annual_income = monthly_income * 12

            # 计算应纳税所得额
            taxable_income = annual_income - 60000  # 基本减除费用(5000*12)
            taxable_income -= social_security * 12  # 社保公积金
            taxable_income -= special_deduction * 12  # 专项附加扣除
            taxable_income -= other_deduction * 12  # 其他扣除

            return max(0, taxable_income)
        except:
            messagebox.showerror("输入错误", "请输入有效的数值")
            return 0

    def find_tax_rate(self, taxable_income):
        """根据应纳税所得额查找适用税率"""
        for level in TAX_RATES:
            if taxable_income > level["min"] and taxable_income <= level["max"]:
                return level["rate"], level["deduction"]
        return 0.45, 181920  # 默认最高税率

    def calculate_tax(self):
        """计算个人所得税"""
        taxable_income = self.calculate_taxable_income()

        if taxable_income <= 0:
            tax_rate = 0
            quick_deduction = 0
            tax_amount = 0
        else:
            tax_rate, quick_deduction = self.find_tax_rate(taxable_income)
            tax_amount = taxable_income * tax_rate - quick_deduction
            tax_amount = max(0, tax_amount)  # 确保税额不为负

        # 更新结果标签
        self.taxable_income_label.config(text=f"{taxable_income:,.2f} 元")
        self.tax_rate_label.config(text=f"{tax_rate * 100:.1f}%")
        self.quick_deduction_label.config(text=f"{quick_deduction:,.2f} 元")
        self.tax_amount_label.config(text=f"{tax_amount:,.2f} 元")

        # 计算税后收入
        net_income = (self.monthly_income.get() - self.social_security.get()
                      - (tax_amount / 12) - self.other_deduction.get())
        self.net_income_label.config(text=f"{net_income:,.2f} 元")

        # 更新图表
        tax_per_month = tax_amount / 12
        labels = ['税前收入', '社保公积金', '个人所得税', '税后收入']
        sizes = [
            self.monthly_income.get(),
            self.social_security.get(),
            tax_per_month,
            net_income
        ]
        self.update_chart(sizes, labels)

        # 更新状态栏
        self.status_bar.config(
            text=f"计算完成: 月收入 {self.monthly_income.get():,.2f} 元, 个税 {tax_per_month:,.2f} 元")

    def update_chart(self, sizes, labels):
        """更新饼图"""
        self.ax.clear()

        # 过滤掉值为0的部分
        filtered_sizes = []
        filtered_labels = []
        for size, label in zip(sizes, labels):
            if size > 0:
                filtered_sizes.append(size)
                filtered_labels.append(label)

        if filtered_sizes:
            colors = ['#4CAF50', '#2196F3', '#F44336', '#FFC107']
            self.ax.pie(filtered_sizes, labels=filtered_labels, autopct='%1.1f%%',
                        colors=colors[:len(filtered_sizes)], startangle=90)
            self.ax.axis('equal')  # 保证饼图是圆形
            self.ax.set_title('收入分配比例')
        else:
            self.ax.text(0.5, 0.5, '无数据', ha='center', va='center', fontsize=12)

        self.canvas.draw()

    def reset_fields(self):
        """重置所有输入字段"""
        self.monthly_income.set(10000)
        self.social_security.set(1500)
        self.special_deduction.set(0)
        self.other_deduction.set(0)

        # 重置复选框
        for var in self.deduction_vars.values():
            var.set(False)

        # 重置结果
        self.taxable_income_label.config(text="0.00 元")
        self.tax_rate_label.config(text="0%")
        self.quick_deduction_label.config(text="0.00 元")
        self.tax_amount_label.config(text="0.00 元")
        self.net_income_label.config(text="0.00 元")

        # 重置图表
        self.update_chart([100], ["收入分布"])
        self.status_bar.config(text="已重置所有字段")


if __name__ == "__main__":
    root = tk.Tk()
    app = TaxCalculator(root)
    root.mainloop()


 1278
1278


 到【灌水乐园】发言


