


从Ray2.6.0开始,RLlib正在采用一个新的堆栈进行训练和模型定制,逐渐用RLModule API取代ModelV2 API和策略API的一些复杂部分。
高级python API
用户训练流
在基本训练示例中,Tune将在每次训练迭代中对您的算法调用一次train(),并报告新的训练结果。有时,希望完全控制训练,但仍然在Tune内部运行。Tune支持可用于实现自定义训练工作流的自定义可训练函数。
为了对训练进行更细粒度的控制,您可以直接使用RLlib的低级构建块来实现完全定制的训练工作流。
课程学习 Curriculum Learning
在课程学习中,环境可以设置为不同的困难(或“任务”),以允许学习通过受控阶段(从简单到更困难)。RLlib附带了一个基本的课程学习API,利用TaskSettableEnv环境API。您的环境只需要实现set_task和get_task方法即可工作。然后,您可以在配置中定义一个env_task_fn,它接收最后的训练结果并返回一个新任务,以便将env设置为:
from ray.rllib.env.apis.task_settable_env import TaskSettableEnv

class MyEnv(TaskSettableEnv):
    def get_task(self):
        return self.current_difficulty

    def set_task(self, task):
        self.current_difficulty = task

def curriculum_fn(train_results, task_settable_env, env_ctx):
    # Very simple curriculum function.
    current_task = task_settable_env.get_task()
    new_task = current_task + 1
    return new_task

# Setup your Algorithm's config like so:
config = {
    "env": MyEnv,
    "env_task_fn": curriculum_fn,
}
# Train using `Tuner.fit()` or `Algorithm.train()` and the above config stub.
# ...
还有两种方法可以使用RLlib的其他API来实施课程学习。
1.使用算法应用编程接口并在调用 train()之间更新环境。这个例子显示了在调谐函数中运行的算法。这与上面描述的内置env_task_fn应用编程接口在后台已经做的基本相同,但是允许您对训练循环做更多的自定义。
import ray
from ray import train, tune
from ray.rllib.algorithms.ppo import PPO

def train_fn(config):
    algo = PPO(config=config, env=YourEnv)
    while True:
        result = algo.train()
        train.report(result)
        if result["episode_reward_mean"] > 200:
            task = 2
        elif result["episode_reward_mean"] > 100:
            task = 1
        else:
            task = 0
        algo.workers.foreach_worker(
            lambda ev: ev.foreach_env(
                lambda env: env.set_task(task)))

num_gpus = 0
num_workers = 2

ray.init()
tune.Tuner(
    tune.with_resources(train_fn, resources=tune.PlacementGroupFactory(
        [{"CPU": 1}, {"GPU": num_gpus}] + [{"CPU": 1}] * num_workers
    ),)
    param_space={
        "num_gpus": num_gpus,
        "num_workers": num_workers,
    },
).fit()
2.您还可以使用RLlib的回调API根据新的训练结果更新环境:
import ray
from ray import tune
from ray.rllib.agents.callbacks import DefaultCallbacks

class MyCallbacks(DefaultCallbacks):
    def on_train_result(self, algorithm, result, **kwargs):
        if result["episode_reward_mean"] > 200:
            task = 2
        elif result["episode_reward_mean"] > 100:
            task = 1
        else:
            task = 0
        algorithm.workers.foreach_worker(
            lambda ev: ev.foreach_env(
                lambda env: env.set_task(task)))

ray.init()
tune.Tuner(
    "PPO",
    param_space={
        "env": YourEnv,
        "callbacks": MyCallbacks,
    },
).fit()
全局协调Global Coordination
有时,需要在RLlib管理的不同进程中的代码片段之间进行协调。例如,维护某个变量的全局平均值,或集中控制策略使用的超参数可能很有用。Ray提供了一种通过命名参与者named actors来实现这一点的通用方法(在此处了解有关Ray参与者的更多信息)。这些参与者被分配了一个全局名称,并且可以使用这些名称检索它们的句柄。例如,考虑维护一个共享的全局计数器,该计数器由环境递增,并定期从驱动程序中读取:
import ray


@ray.remote
class Counter:
    def __init__(self):
        self.count = 0

    def inc(self, n):
        self.count += n

    def get(self):
        return self.count


# on the driver
counter = Counter.options(name="global_counter").remote()
print(ray.get(counter.get.remote()))  # get the latest count

# in your envs
counter = ray.get_actor("global_counter")
counter.inc.remote(1)  # async call to increment the global count 增加全局计数的异步调用
Ray actors 提供高水平的性能,因此在更复杂的情况下,它们可以用于实现通信模式,例如参数服务器和全还原 allduce。
回调和自定义指标
您可以提供在策略评估期间调用的回调。这些回调可以访问当前事件的状态。某些回调,如on_postprocess_trajectory、on_sample_end和on_train_result也是可以对中间数据或结果应用自定义后处理的地方。
用户定义的状态可以为迭代中的episode.user_data dict,以及通过保存值到来报告的自定义标量指标 episode.custom_metrics dict。这些自定义指标custom_metrics将被聚合并作为训练结果的一部分报告。有关完整示例,请查看此处的示例脚本和此处的这些单元测试用例。
您可以通过访问worker.policy_config[“in_evaluation”]检查RolloutWorker是否处于评估模式,创建可在每个评估阶段运行的自定义逻辑。然后,您可以在 DefaultCallbacks 子类中的 on_episode_start() 或 on_episode_end() 中实现此检查。为了在整个评估运行之前和之后运行回调,我们提供了 on_evaluate_start() 和 on_evaluate_end。
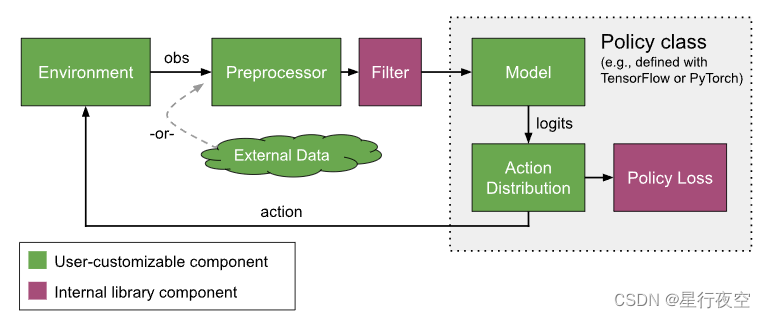
模型Models、预处理器Preprocessors和动作分布Action Distributions
下图提供了RLlib中不同组件之间数据流的概念性概述。我们从一个环境开始,它——给定一个动作——产生一个观察。观察在被发送到神经网络模型之前,由预处理器和过滤器预处理(例如用于运行均值归一化)。模型输出反过来由动作分布解释,以确定下一个动作。
绿色突出显示的组件可以替换为自定义的用户定义实现,如下一节所述。紫色组件是RLlib内部的,这意味着它们只能通过更改算法源代码来修改。
默认行为
内置预处理器
RLlib 尝试根据环境的观察空间选择其内置预处理器之一。因此,适用以下简单规则:
- 离散观测值是 one-hot 编码的,例如离散 (3) 且值=1 -> [0, 1, 0]。
- 多离散观测值的编码方式是对每个离散元素进行 one-hot 编码,然后连接各个 one-hot 编码向量。例如MultiDiscrete([3, 4]) 且 value=[1, 3] -> [0 1 0 0 0 0 1] 因为第一个 1 编码为 [0 1 0],第二个 3 编码为 [0 0 0 1];然后将这两个向量连接到 [0 1 0 0 0 0 1]。
- 元组和字典观察被展平,因此,离散和多离散子空间的处理如上所述。此外,原始的字典/元组观察结果仍然可以在a)模型中通过输入字典的“obs”键(扁平化的观察结果在“obs_flat”中),以及b)通过以下代码行的策略(例如:将其放入损失函数中以访问原始观察结果: dict_or_tuple_obs = Restore_original_dimensions(input_dict[“obs”], self.obs_space, “tf|torch”)
对于 Atari 观察空间,RLlib 默认使用 DeepMind 预处理器 (preprocessor_pref=deepmind)。然而,如果算法的配置键 preprocessor_pref 设置为“rllib”,则以下映射适用于 Atari 类型的观察空间:
- 形状 (210, 160, 3) 的图像缩小为 dim x dim,其中 dim 是模型配置键(请参阅下面的默认模型配置)。另外,您可以设置grayscale=True将颜色通道减少到1,或者设置zero_mean=True来生成-1.0到1.0的值(而不是默认的0.0到1.0的值)。
- Atari RAM 观测值(形状为 (128, ) 的一维空间)是零平均值(值在 -1.0 和 1.0 之间)。
在所有其他情况下,不会使用预处理器,来自环境的原始观察结果将直接发送到您的模型中。
默认模型配置设置
在下面的段落中,我们将首先描述 RLlib 自动构建模型的默认行为(如果您没有设置自定义模型),然后深入探讨如何通过更改这些设置或编写自己的模型类来自定义模型。
默认情况下,RLlib 将为您的模型使用以下配置设置。其中包括:
- FullyConnectedNetworks(fcnet_hiddens和fcnet_activation)全连接神经网络的隐藏层设置,激活函数设置
- VisionNetworks(conv_filters和conv_activation)、
- 自动RNN包装、是否使用LSTM进行包装
- 自动注意力(GTrXL)包装
- 一些针对Atari环境的特殊选项
MODEL_DEFAULTS: ModelConfigDict = {
    # Experimental flag.
    # If True, user specified no preprocessor to be created
    # (via config._disable_preprocessor_api=True). If True, observations
    # will arrive in model as they are returned by the env.
    # 如果为 True,则用户指定不创建预处理器(通过 config._disable_preprocessor_api=True)。
    # 如果为 False,则观察结果将在环境返回时到达模型中。
    "_disable_preprocessor_api": False,

    # Experimental flag.
    # If True, RLlib will no longer flatten the policy-computed actions into
    # a single tensor (for storage in SampleCollectors/output files/etc..),
    # but leave (possibly nested) actions as-is. Disabling flattening affects:
    # - SampleCollectors: Have to store possibly nested action structs.
    # - Models that have the previous action(s) as part of their input.
    # - Algorithms reading from offline files (incl. action information).
    # 如果为 True,RLlib 将不再将策略计算的操作展平为单个张量
    "_disable_action_flattening": False,

    # === Built-in options ===
    # FullyConnectedNetwork (tf and torch): rllib.models.tf|torch.fcnet.py
    # These are used if no custom model is specified and the input space is 1D.
    # Number of hidden layers to be used.
    # 隐藏层神经元个数
    "fcnet_hiddens": [256, 256],

    # Activation function descriptor.
    # Supported values are: "tanh", "relu", "swish" (or "silu", which is the same),
    # "linear" (or None).
    # 激活函数
    "fcnet_activation": "tanh",

    # VisionNetwork (tf and torch): rllib.models.tf|torch.visionnet.py
    # These are used if no custom model is specified and the input space is 2D.
    # Filter config: List of [out_channels, kernel, stride] for each filter.
    # Example:
    # Use None for making RLlib try to find a default filter setup given the
    # observation space.
    # 如果未指定自定义模型且输入空间为 2D 过滤器配置,则使用这些:每个过滤器的 [out_channels、kernel、stride] 列表,如果是None则自动选择
    "conv_filters": None,

    # Activation function descriptor.
    # Supported values are: "tanh", "relu", "swish" (or "silu", which is the same),
    # "linear" (or None).
    # 过滤器的激活函数描述符
    "conv_activation": "relu",

    # Some default models support a final FC stack of n Dense layers with given
    # activation:
    # - Complex observation spaces: Image components are fed through
    #   VisionNets, flat Boxes are left as-is, Discrete are one-hot'd, then
    #   everything is concated and pushed through this final FC stack.
    # - VisionNets (CNNs), e.g. after the CNN stack, there may be
    #   additional Dense layers.
    # - FullyConnectedNetworks will have this additional FCStack as well
    # (that's why it's empty by default).
    # 一些默认模型支持具有给定激活的 n 个密集层的最终 FC 堆栈
    "post_fcnet_hiddens": [],
    "post_fcnet_activation": "relu",

    # For DiagGaussian action distributions, make the second half of the model
    # outputs floating bias variables instead of state-dependent. This only
    # has an effect is using the default fully connected net.
    # 对于 DiagGaussian 动作分布,使模型的后半部分输出浮动偏差变量而不是状态相关变量。这仅在使用默认的全连接网络时有效。
    "free_log_std": False,

    # Whether to skip the final linear layer used to resize the hidden layer
    # outputs to size `num_outputs`. If True, then the last hidden layer
    # should already match num_outputs.
    "no_final_linear": False,
    # Whether layers should be shared for the value function.
    "vf_share_layers": True,

	# 是否用 LSTM 包装模型以及相关的配置
    # == LSTM ==
    # Whether to wrap the model with an LSTM.
    "use_lstm": False,
    # Max seq len for training the LSTM, defaults to 20.
    "max_seq_len": 20,
    # Size of the LSTM cell.
    "lstm_cell_size": 256,
    # Whether to feed a_{t-1} to LSTM (one-hot encoded if discrete).
    "lstm_use_prev_action": False,
    # Whether to feed r_{t-1} to LSTM.
    "lstm_use_prev_reward": False,
    # Whether the LSTM is time-major (TxBx..) or batch-major (BxTx..).
    "_time_major": False,

	# 注意力网(实验性:torch 版本未经测试):是否使用 GTrXL(“Gru Transformer XL”;注意网)作为默认模型的包装模型,及其相关配置
    # == Attention Nets (experimental: torch-version is untested) ==
    # Whether to use a GTrXL ("Gru transformer XL"; attention net) as the
    # wrapper Model around the default Model.
    "use_attention": False,
    # The number of transformer units within GTrXL.
    # A transformer unit in GTrXL consists of a) MultiHeadAttention module and
    # b) a position-wise MLP.
    "attention_num_transformer_units": 1,
    # The input and output size of each transformer unit.
    "attention_dim": 64,
    # The number of attention heads within the MultiHeadAttention units.
    "attention_num_heads": 1,
    # The dim of a single head (within the MultiHeadAttention units).
    "attention_head_dim": 32,
    # The memory sizes for inference and training.
    "attention_memory_inference": 50,
    "attention_memory_training": 50,
    # The output dim of the position-wise MLP.
    "attention_position_wise_mlp_dim": 32,
    # The initial bias values for the 2 GRU gates within a transformer unit.
    "attention_init_gru_gate_bias": 2.0,
    # Whether to feed a_{t-n:t-1} to GTrXL (one-hot encoded if discrete).
    "attention_use_n_prev_actions": 0,
    # Whether to feed r_{t-n:t-1} to GTrXL.
    "attention_use_n_prev_rewards": 0,

	# Atari ,设置为 True 以启用 4x 堆叠行为
    # == Atari ==
    # Set to True to enable 4x stacking behavior.
    "framestack": True,
    # Final resized frame dimension
    "dim": 84,
    # (deprecated) Converts ATARI frame to 1 Channel Grayscale image
    "grayscale": False,
    # (deprecated) Changes frame to range from [-1, 1] if true
    "zero_mean": True,

	# 用户模型的选项:要使用的自定义模型的名称,参数,
    # === Options for custom models ===
    # Name of a custom model to use
    "custom_model": None,
    # Extra options to pass to the custom classes. These will be available to
    # the Model's constructor in the model_config field. Also, they will be
    # attempted to be passed as **kwargs to ModelV2 models. For an example,
    # see rllib/models/[tf|torch]/attention_net.py.
    "custom_model_config": {},
    # Name of a custom action distribution to use.
    "custom_action_dist": None,
    # Custom preprocessors are deprecated. Please use a wrapper class around
    # your environment instead to preprocess observations.
    "custom_preprocessor": None,

	# RLModules 中 ModelConfig 的选项:要编码的潜在维度,是否始终检查 RLlib 默认模型的输入和输出的规范
    # === Options for ModelConfigs in RLModules ===
    # The latent dimension to encode into.
    # Since most RLModules have an encoder and heads, this establishes an agreement
    # on the dimensionality of the latent space they share.
    # This has no effect for models outside RLModule.
    # If None, model_config['fcnet_hiddens'][-1] value will be used to guarantee
    # backward compatibility to old configs. This yields different models than past
    # versions of RLlib.
    "encoder_latent_dim": None,
    # Whether to always check the inputs and outputs of RLlib's default models for
    # their specifications. Input specifications are checked on failed forward passes
    # of the models regardless of this flag. If this flag is set to `True`, inputs and
    # outputs are checked on every call. This leads to a slow-down and should only be
    # used for debugging. Note that this flag is only relevant for instances of
    # RLlib's Model class. These are commonly generated from ModelConfigs in RLModules.
    "always_check_shapes": False,

    # Deprecated keys:
    # Use `lstm_use_prev_action` or `lstm_use_prev_reward` instead.
    "lstm_use_prev_action_reward": DEPRECATED_VALUE,
    # Deprecated in anticipation of RLModules API
    "_use_default_native_models": DEPRECATED_VALUE,

}
内置模型
在对原始环境输出进行预处理(如果适用)后,处理后的观察结果将通过策略的模型提供。如果没有指定自定义模型(请参阅下面关于如何自定义模型的进一步信息),RLlib将根据简单的启发式方法选择一个默认模型:
- 用于形状长度大于 2 的观察的视觉网络(TF 或 Torch),例如 (84 x 84 x 3)。
- 用于其他一切的完全连接的网络(TF 或 Torch)。
这些默认模型类型可以通过算法配置中的模型配置键进一步配置(如上所述)。可用设置在上面列出,也记录在模型曲库文件中。
请注意,对于视觉网络情况,如果您的环境观察具有自定义大小,您可能需要配置conv_filters。例如,“模型”:{“dim”: 42,“conv_filters”:[[16,[4,4],2],[32,[4,4],2],[512,[11,11],1]]}用于42x42观察。因此,始终确保最后一个Conv2D输出的输出形状为[B,1,1,X](PyTorch为[B,X,1,1]),其中B=批处理,X=最后一个Conv2D层的过滤器数量,以便RLlib可以将其展平。如果不是这种情况,将抛出信息错误。
内置自动LSTM和自动注意包装
此外,如果您在模型配置中设置“use_lstm”: True或“use_attention”:True,您的模型输出将分别由LSTM单元(TF或Torch)或注意力(GTrXL)网络(TF或Torch)进一步处理。更一般地说**,RLlib支持对其所有策略梯度算法(A3C、PPO、PG、IMPALA)使用循环/注意力模型**,并且必要的序列处理支持内置到其策略评估实用程序中。
对于完全自定义的RNN/LSTM/注意力网络设置,请参阅下面的循环模型和注意力网络/Tranformers部分。
保存和加载您的RL算法和策略
您可以使用检查点对象来存储和加载算法或策略的当前状态以及这些结构中的神经网络(权重)。在下面,我们将介绍如何创建这些检查点(从而将您的算法和策略保存到磁盘),在哪里可以找到它们,以及如何从这样一个给定的检查点恢复(加载)您的算法或策略。
什么是检测点 checkpoint
检查点是一组信息,位于目录(可能包含更多子目录)中,用于恢复算法或单个策略实例。首先用于创建检查点的算法或策略实例可能在此之前已经训练过,也可能没有训练过。
RLlib使用Checkpoint类来创建检查点并从中恢复对象。
检查点目录中包含状态信息的主文件目前是使用Ray的cloudpickle包生成的。由于cloud dickle相对于使用的python版本来说是不稳定的,我们目前正在尝试使用msgpack(和msgpack_numpy)作为替代检查点格式。如果您对生成python-veron独立检查点感兴趣,请参阅下文以获取更多详细信息。
算法检查点
算法检查点包含算法的所有状态,包括其配置、其实际算法子类、其所有策略的权重、其当前计数器等。
从这样的检查点恢复新算法会使您处于这样一种状态,您可以继续使用该新算法,就像您继续使用旧算法(从其中获取检查点)一样。
如何创建算法检查点?
Algorithm save() 方法创建一个新的检查点(其中包含文件的目录)。
让我们看一个关于如何创建这样一个算法检查点的简单示例:
# Create a PPO algorithm object using a config object ..
from ray.rllib.algorithms.ppo import PPOConfig

my_ppo_config = PPOConfig().environment("CartPole-v1")
my_ppo = my_ppo_config.build()

# .. train one iteration ..
my_ppo.train()
# .. and call `save()` to create a checkpoint.
save_result = my_ppo.save()
path_to_checkpoint = save_result.checkpoint.path
print(
    "An Algorithm checkpoint has been created inside directory: "
    f"'{path_to_checkpoint}'."
)

# Let's terminate the algo for demonstration purposes.
my_ppo.stop()
# Doing this will lead to an error.
# my_ppo.train()
检查点特定于py版本,但可以转换为与版本无关
通过save()方法创建的算法检查点总是基于cloudpickle的,因此取决于使用的python版本。这意味着不能保证您能够使用使用python 3.8创建的检查点在运行python 3.9的新环境中恢复算法。
但是,我们现在提供了一个实用程序,用于将检查点(使用Algorithm.save()生成)转换为与python版本无关的检查点(基于msgpack)。然后,您可以使用新转换的msgpack检查点从中恢复另一个算法实例。看看这个简短的例子,看看如何做到这一点:
import tempfile

from ray.rllib.algorithms.algorithm import Algorithm
from ray.rllib.algorithms.simple_q import SimpleQConfig
from ray.rllib.utils.checkpoints import convert_to_msgpack_checkpoint


# Base config used for both pickle-based checkpoint and msgpack-based one.
config = SimpleQConfig().environment("CartPole-v1")
# Build algorithm object.
algo1 = config.build()

# Create standard (pickle-based) checkpoint.
with tempfile.TemporaryDirectory() as pickle_cp_dir:
    # Note: `save()` always creates a pickle based checkpoint.
    algo1.save(checkpoint_dir=pickle_cp_dir)

    # But we can convert this pickle checkpoint to a msgpack one using an RLlib utility
    # function.
    with tempfile.TemporaryDirectory() as msgpack_cp_dir:
        convert_to_msgpack_checkpoint(pickle_cp_dir, msgpack_cp_dir)

        # Try recreating a new algorithm object from the msgpack checkpoint.
        # Note: `Algorithm.from_checkpoint` now works with both pickle AND msgpack
        # type checkpoints.
        algo2 = Algorithm.from_checkpoint(msgpack_cp_dir)

# algo1 and algo2 are now identical.
这样,您可以继续运行您的算法并偶尔save()它们,或者——如果您正在使用Ray Tune运行试验——使用Tune的集成检查点设置。和以前一样,这将产生基于cloudpickle 的检查点。一旦您需要迁移到更高(或更低)的python版本,请使用convert_to_msgpack_checkpoint()实用程序,创建一个基于msgpack的检查点,并将其交给**Algorithm.from_checkpoint()**或将其提供给您的Tune配置。RLlib现在能够从这两种格式中重新创建算法。
如何从检查点恢复算法?
给定我们的检查点路径(由Algorithm.save()返回),我们现在可以创建一个全新的算法实例,并使其与我们在上面的示例中停止的(因此不能再使用)完全相同:
from ray.rllib.algorithms.algorithm import Algorithm
# Use the Algorithm's `from_checkpoint` utility to get a new algo instance
# that has the exact same state as the old one, from which the checkpoint was
# created in the first place:
my_new_ppo = Algorithm.from_checkpoint(path_to_checkpoint)
# Continue training.
my_new_ppo.train()
或者,您也可以首先使用用于原始算法的相同配置创建一个新的算法实例,然后调用new算法的恢复()方法,将检查点目录传递给它:
# Re-build a fresh algorithm.
my_new_ppo = my_ppo_config.build()
# Restore the old (checkpointed) state.
my_new_ppo.restore(save_result)
# Continue training.
my_new_ppo.train()
上述过程曾经是恢复算法的唯一方法,但是,它比使用from_checkpoint()实用程序更乏味,因为它需要额外的步骤,并且您必须将原始配置存储在某个地方。
如何自定义策略
本页描述了用于在RLlib中实现算法的内部概念。如果修改或添加新算法到RLlib,您可能会发现这很有用。
Policy 类封装了RL算法的核心数值组件。这通常包括确定要采取的操作的策略模型、经验的轨迹后处理器以及改进给定后处理经验的策略的损失函数。有关一个简单的示例,请参阅策略梯度策略定义。
与深度学习框架的大多数交互都隔离到Policy接口,允许RLlib支持多个框架。为了简化策略的定义,RLlib包括Tensorflow和PyTorch特定的模板。您也可以从头开始编写自己的。这里有一个例子:
样本收集和轨迹视图
SampleCollector类用于存储和检索临时数据
RLlib的RolloutWorker在运行实时环境时,使用SamplerInput类与该环境交互并产生批量体验。SamplerInput的两个实现的子类是SyncSample和AsyncSample(驻留在RolloutWorker. sample属性下)。
如果“_use_trajectory_view_api”顶级配置键设置为True(默认情况下,因为版本>=1.1.0),每个这样的采样器对象都将使用SampleCollector API在推出期间存储和检索临时环境、模型和其他数据(见下图)。

RLlib实现的样本收集过程:
策略的模型告诉采样器及其SampleCollector对象,要存储哪些数据以及如何将其呈现回依赖的方法(例如Model.compute_actions())。这是使用将字符串(列名)映射到视图需求对象的判决来完成的(详细信息见下文)。
单个此类推出的确切行为和其中的环境转换数量由以下算法Config. rollout(…)参数确定:
轨迹视图API(Trajectory View API)
轨迹视图应用编程接口允许自定义模型定义它们需要轨迹的哪些部分来执行前向传递。例如,在最简单的情况下,模型可能只查看最新的观察。然而,基于RNN或注意力的模型可以查看模型发出的先前状态,将先前看到的奖励与当前观察连接起来,或者需要n个最近观察的整个范围。
看到这里了,给辛苦搬运的博主助力一杯奶茶,或者一个免费的赞吧。


 1207
1207

 被折叠的 条评论
为什么被折叠?
被折叠的 条评论
为什么被折叠?
 到【灌水乐园】发言


