Jetson(ubuntu)下切换python版本方法

本文档介绍了如何在Jetson系列盒子(基于Ubuntu系统)上将默认的Python2.7切换到Python3。通过使用`update-alternatives`命令安装和配置两个版本的Python,然后通过交互式配置选择Python3作为默认版本。此方法同样适用于Ubuntu系统。

摘要生成于 C知道 ,由 DeepSeek-R1 满血版支持, 前往体验 >

Jetson系列盒子经过刷机之后,python版本默认是python2.7,若想要切换到python3版本,需要执行如下命令,把两个版本的python加入到alternatives列表中:

sudo update-alternatives --install /usr/bin/python python /usr/bin/python2 100
sudo update-alternatives --install /usr/bin/python python /usr/bin/python3 150
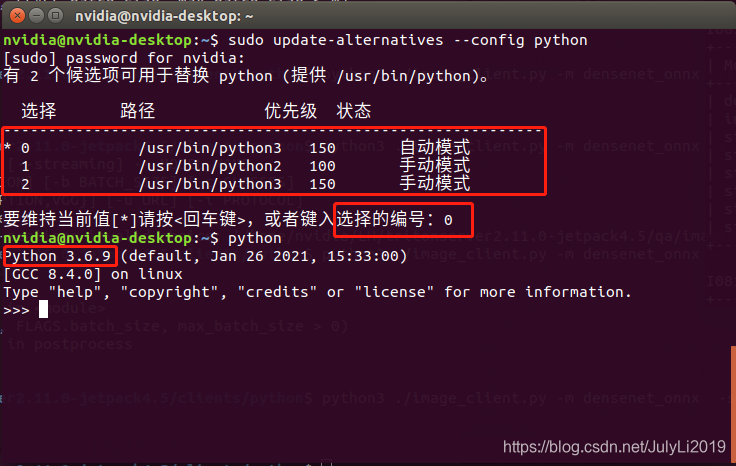
如果要切换到Python3版本,执行:

sudo update-alternatives --config python

按照提示输入选择数字回车即可。
在这里插入图片描述
至此,python版本就切换成功了!!!值得注意的是这个方法同样适用于Ubuntu系统,毕竟jetson系统是由Ubuntu系统魔改而成的。

参考文档:https://www.cnblogs.com/Jeb15/p/6080331.html

### 在 Jetson 平台上配置和使用 TensorRT 的方法 要在 Jetson 平台(如 NVIDIA Jetson TX2 或 Jetson Nano)上使用 Python 3.12 和 TensorRT,需要完成以下几个方面的设置: #### 1. 环境准备 Jetson 设备通常预装了特定版本的操作系统和软件栈。如果目标是支持 Python 3.12,则需要注意以下几点: - **操作系统兼容性**:NVIDIA 提供的 JetPack SDK 是基于 Ubuntu LTS 版本构建的。目前主流的支持版本Ubuntu 18.04 或更高版本[^4]。 - **Python 版本管理**:由于 JetPack 默认可能不提供 Python 3.12 支持,建议通过 `pyenv` 工具来安装并切换到所需的 Python 版本。 ```bash sudo apt update && sudo apt upgrade -y curl https://pyenv.run | bash echo 'export PATH="$HOME/.pyenv/bin:$PATH"' >> ~/.bashrc echo 'eval "$(pyenv init --path)"' >> ~/.bashrc source ~/.bashrc pyenv install 3.12.0 pyenv global 3.12.0 ``` #### 2. 安装依赖库 为了使 TensorRT 能够正常运行,需确保必要的依赖已正确安装。以下是关键步骤: - **CMake 更新**:TensorRT 对 CMake 的最低要求通常是 3.13 及以上版本[^3]。可以通过源码编译的方式更新 CMake 到最新版。 ```bash wget https://github.com/Kitware/CMake/releases/download/v3.27.5/cmake-3.27.5.tar.gz tar xf cmake-3.27.5.tar.gz cd cmake-3.27.5/ ./bootstrap && make -j$(nproc) && sudo make install cmake --version ``` - **其他基础工具**:确保安装了 `gcc`, `g++`, `git` 等开发工具链以及 `libprotobuf-dev`、`protobuf-compiler` 等协议缓冲区相关组件。 ```bash sudo apt-get install build-essential git libgoogle-glog-dev \ libprotobuf-dev protobuf-compiler python3-pip pip3 install numpy matplotlib torch torchvision onnx mxnet[^2] ``` #### 3. 编译与安装 TensorRT NVIDIA 提供了针对不同硬件优化过的 TensorRT 库二进制文件。对于自定义需求,可以按照如下方式操作: - 下载适用于 Jetson 的 TensorRT 开发包,并解压至指定路径。 - 如果需要扩展功能(例如 UFF 解析器),则应手动编译样例项目 `sampleUffMaskRCNN`。 ```bash # 假设 TensorRT tarball 文件名为 tensorrt-<version>.tar.gz tar zxvf tensorrt-*.tar.gz cd TensorRT-* sudo cp -r include/* /usr/include/ sudo cp -r lib/* /usr/lib/aarch64-linux-gnu/ ``` 验证安装是否成功可通过简单测试脚本来确认: ```python import tensorrt as trt print(f"TensorRT version: {trt.__version__}") ``` #### 4. 集成 Python 接口 最后一步是在 Python 中加载 TensorRT 功能模块。这涉及创建序列化引擎 (`ICudaEngine`) 实例并与 GPU 数据流交互。 ```python import pycuda.driver as cuda import pycuda.autoinit import tensorrt as trt def load_engine(engine_file_path): with open(engine_file_path, "rb") as f, trt.Runtime(trt.Logger(trt.Logger.WARNING)) as runtime: return runtime.deserialize_cuda_engine(f.read()) engine = load_engine("/path/to/model.engine") context = engine.create_execution_context() bindings = [None]*len(engine) for binding in engine: idx = engine[binding] bindings[idx] = cuda.mem_alloc(engine.get_binding_shape(binding).prod() * engine.max_workspace_size) # Example inference logic here... ``` --- ###
评论
添加红包

请填写红包祝福语或标题

红包个数最小为10个

红包金额最低5元

当前余额3.43前往充值 >
需支付:10.00
成就一亿技术人!
领取后你会自动成为博主和红包主的粉丝 规则
hope_wisdom
发出的红包

打赏作者

AI小笔记

你的鼓励将是我创作的最大动力

¥1 ¥2 ¥4 ¥6 ¥10 ¥20
扫码支付:¥1
获取中
扫码支付

您的余额不足,请更换扫码支付或充值

打赏作者

实付
使用余额支付
点击重新获取
扫码支付
钱包余额 0

抵扣说明:

1.余额是钱包充值的虚拟货币,按照1:1的比例进行支付金额的抵扣。
2.余额无法直接购买下载,可以购买VIP、付费专栏及课程。

余额充值