


一、Implementation Strategy核心作用
实现策略控制布局(Placement)、物理优化(Phys_Opt) 和布线(Routing) 的算法和参数,直接影响:
-
时序收敛:建立/保持时间裕量
-
资源利用率:LUT、FF、BRAM、DSP使用率
-
功耗:动态和静态功耗
-
编译时间:从几小时到几十小时
-
设计稳定性:是否可重复实现
二、Vivado预设实现策略详解
1. 策略分类与特性对比
| 策略类别 | 代表策略 | 优化目标 | 编译时间 | 适用场景 |
|---|---|---|---|---|
| 性能优先 | Performance_Explore | 最高频率 | ++++ | 时序紧张设计 |
| 面积优化 | Area_Explore | 最小资源 | ++ | 资源受限设计 |
| 收敛优化 | Congestion_SpreadLogic_high | 解决拥塞 | +++ | 高利用率设计 |
| 流程优化 | Flow_RunPhysOpt | 平衡优化 | ++ | 通用设计 |
| 运行时优化 | Flow_RuntimeOptimized | 最快编译 | + | 快速迭代 |
| 功耗优化 | Power_Default | 最低功耗 | ++ | 低功耗设计 |
2. 关键策略深度解析
Performance_Explore(最常用)
# 内部执行的指令序列
place_design -directive Explore
phys_opt_design -directive Explore
route_design -directive Explore
-
特点:使用最激进的优化算法,多次迭代
-
时序改善:通常比其他策略提升10-20%的WNS
-
代价:编译时间增加50-100%
-
最佳使用:时序违例 > 0.5ns的设计
Area_Explore
# 面积优化技术
place_design -directive AltSpreadLogic_high
phys_opt_design -directive AlternateReplication
-
效果:减少5-15%的LUT使用
-
注意:可能轻微降低时序性能
-
适用:LUT使用率 > 80%的设计
Congestion_SpreadLogic_high
# 拥塞优化策略
place_design -directive SpreadLogic_high
-
解决:布线拥塞导致的不可布线问题
-
指标:当
report_design_analysis显示拥塞等级 > 3 -
效果:改善布线成功率,可能增加资源使用
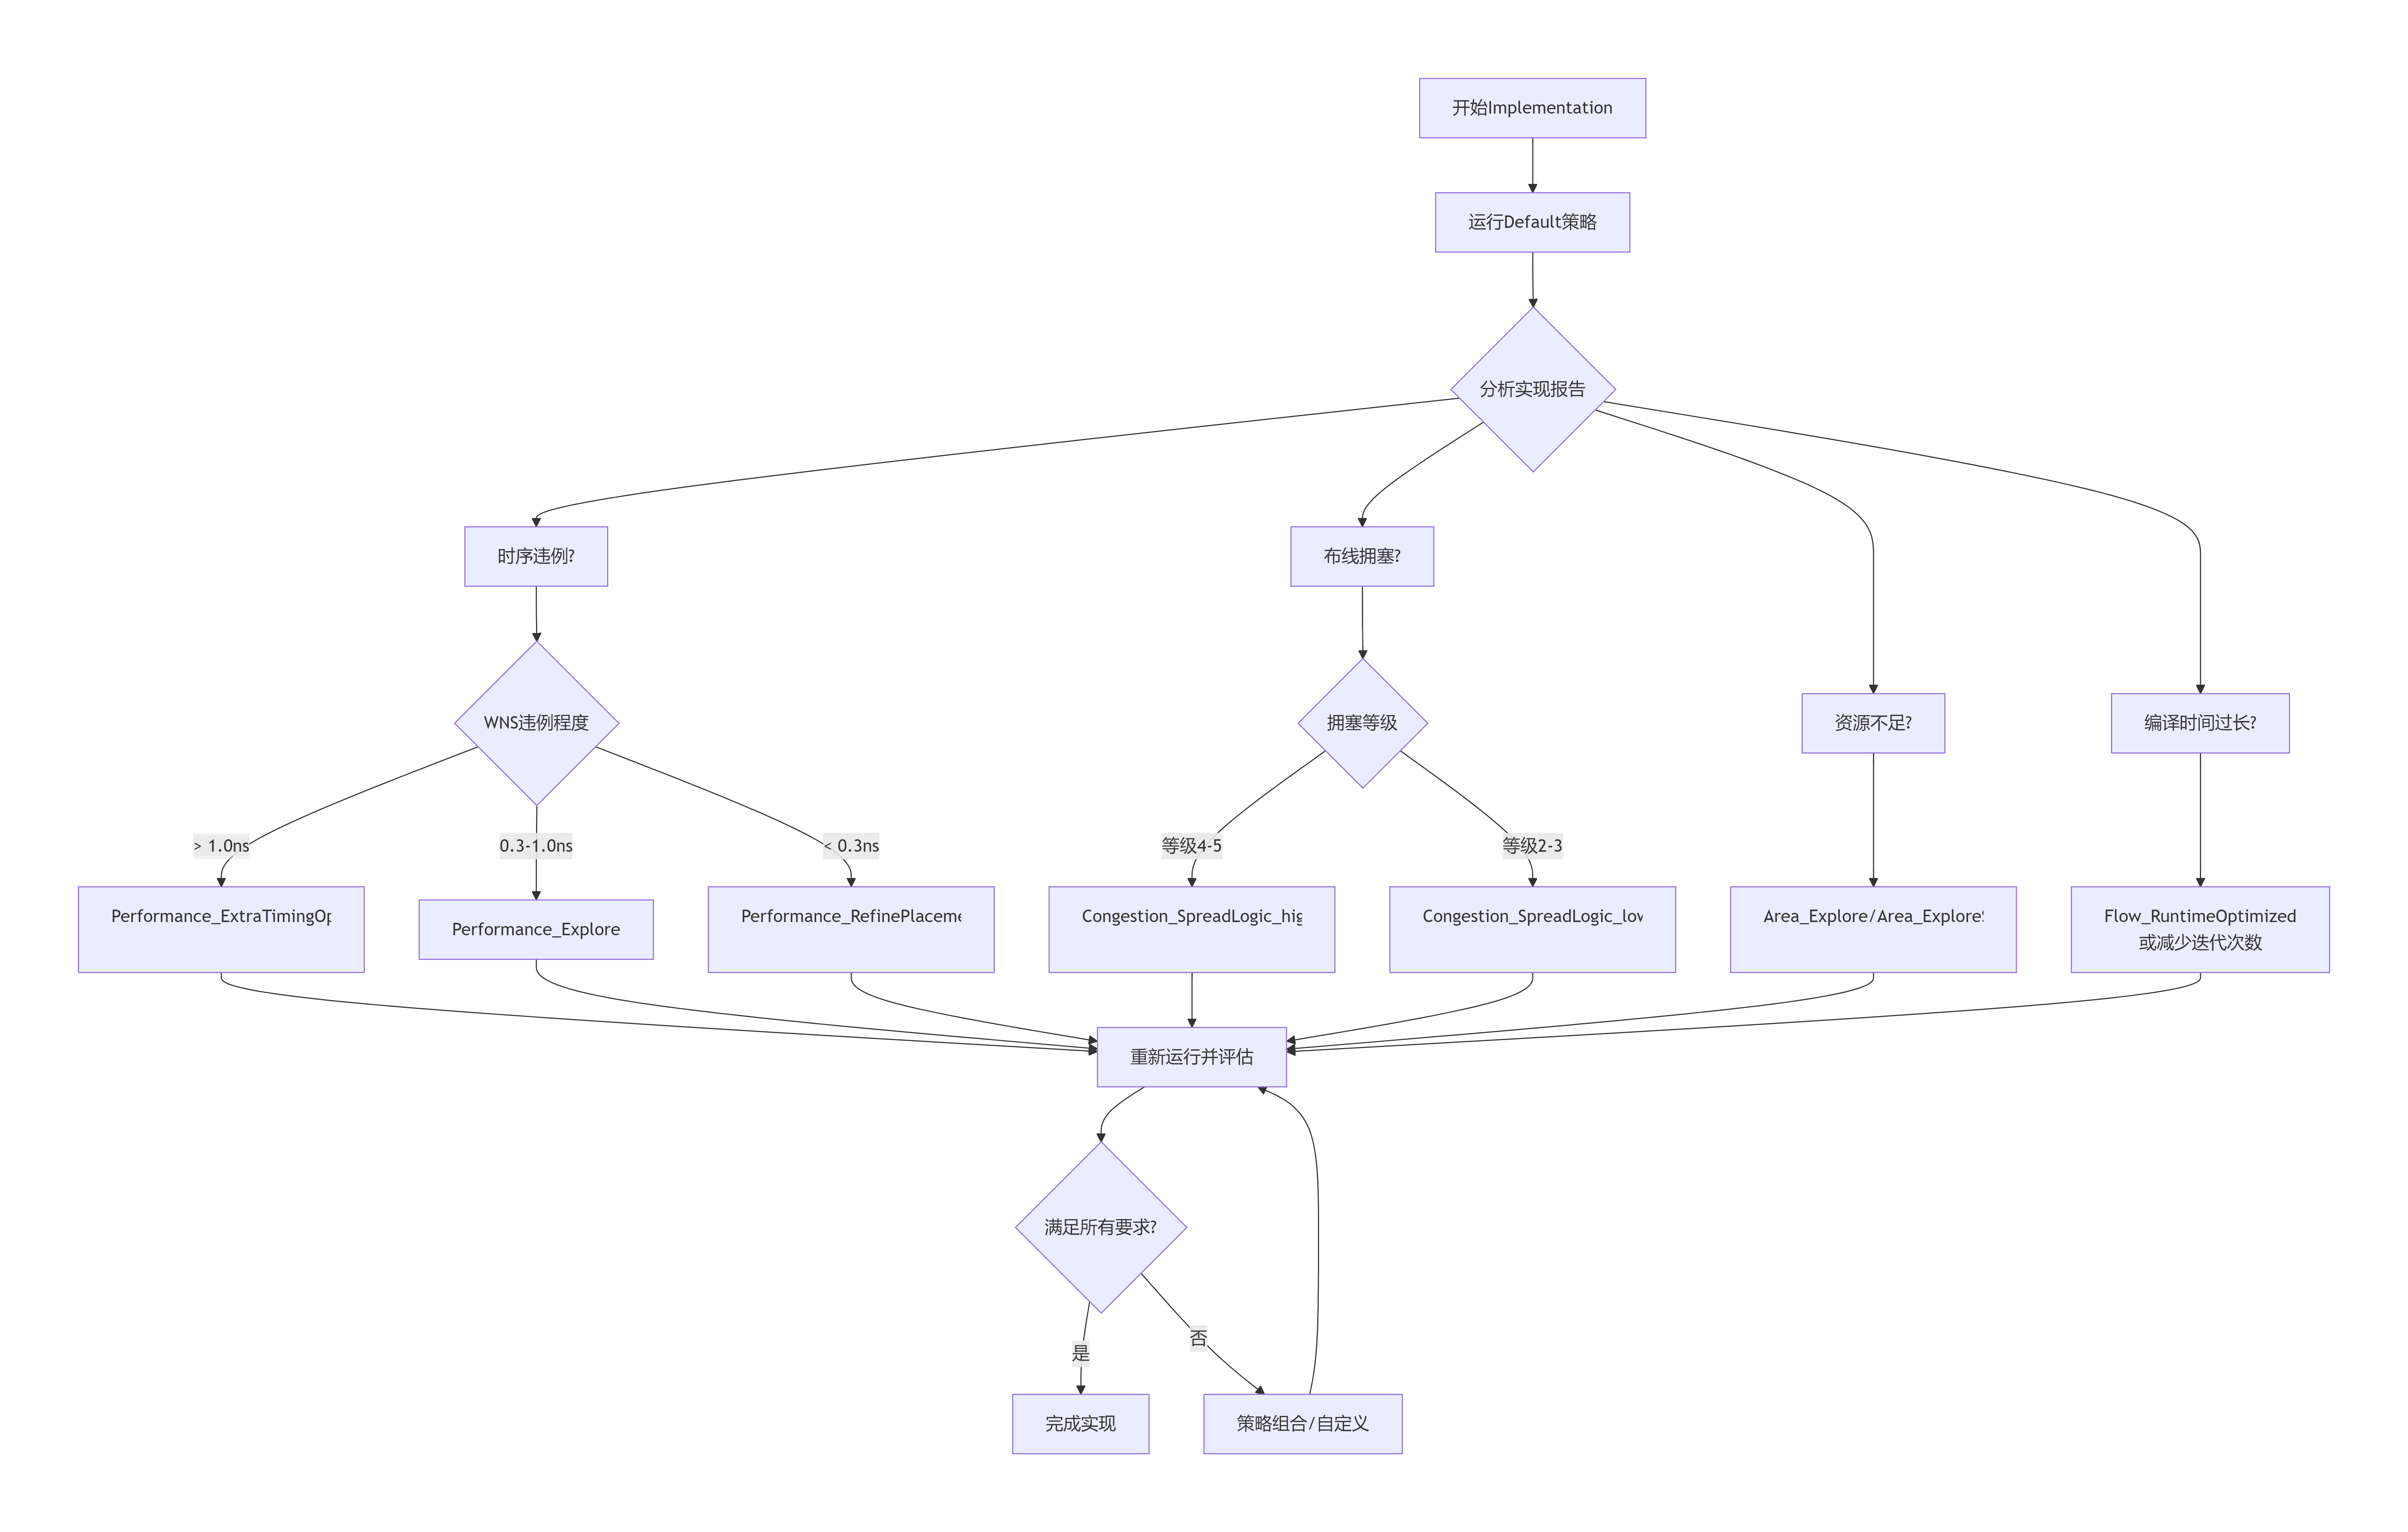
三、策略选择决策流程图
四、按设计特征选择策略
1. 时序关键型设计
# 分层优化策略
# 第一阶段:全局优化
set_property strategy Performance_Explore [get_runs impl_1]

# 第二阶段:关键路径优化(如果需要)
if {[get_timing_paths -max_paths 10 -slack_lesser_than 0] > 0} {
    set_property strategy Performance_RefinePlacement [get_runs impl_1]
    set_property incremental_checkpoint $checkpoint [get_runs impl_1]
}
2. 资源受限型设计
# 监控资源使用率
set util [get_property STATS.SLICE_REGISTERS [get_runs impl_1]]
if {$util > 85} {
    # 高利用率,使用面积优化
    set_property strategy Area_Explore [get_runs impl_1]

    # 检查是否需要拥塞优化
    set congestion [get_property STATS.CONGESTION_LEVEL [get_runs impl_1]]
    if {$congestion > 3} {
        # 组合策略:先面积优化,再解决拥塞
        create_custom_strategy "AreaThenCongestion" {
            place_design -directive AltSpreadLogic_high
            phys_opt_design -directive AlternateReplication
            route_design -directive Explore
        }
    }
}
3. 多时钟域设计
推荐策略:Performance_Explore 或 Performance_NetDelay_high

特别考虑:
1. 跨时钟域路径需要额外约束
2. 使用asynchronous clock groups
3. 考虑Clock_Interaction报告
4. 含复杂IP的设计(如DDR、PCIe)
# 分区优化策略
# 1. 为IP核使用固定位置
set_property HD.PARTPIN_LOCS TRUE [get_cells <ip_instance>]

# 2. 实现策略选择
set_property strategy Performance_NetDelay_high [get_runs impl_1]

# 3. 优化IP接口时序
set_property strategy Performance_WLBlockPlacement [get_runs impl_1]
五、策略参数详解与自定义
1. 核心参数调优
# 创建自定义策略示例
create_strategy "My_Aggressive_Timing" {
    # 布局阶段
    set_property PLACE_DIRECTIVE Explore [get_runs impl_1]
    set_property PLACE_TIMING_DRIVEN true [get_runs impl_1]
    set_property PLACE_EFFORT_LEVEL High [get_runs impl_1]

    # 物理优化
    set_property PHYS_OPT_DIRECTIVE Explore [get_runs impl_1]
    set_property PHYS_OPT_CRITICAL_CELL_OPT true [get_runs impl_1]
    set_property PHYS_OPT_ADDITIONAL_EFFORT High [get_runs impl_1]

    # 布线阶段
    set_property ROUTE_DIRECTIVE Explore [get_runs impl_1]
    set_property ROUTE_TIMING_DRIVEN true [get_runs impl_1]
    set_property ROUTE_OVERFLOW_COST_MARGIN 100 [get_runs impl_1]

    # 迭代控制
    set_property PLACE_ITERATIONS 2 [get_runs impl_1]
    set_property ROUTE_ITERATIONS 2 [get_runs impl_1]
}
2. 关键参数说明
| 参数 | 取值范围 | 影响 |
|---|---|---|
PLACE_DIRECTIVE | Default/Explore/ExtraTimingOpt | 布局优化强度 |
ROUTE_DIRECTIVE | Default/Explore/NoTimingRelaxation | 布线优化强度 |
PLACE_ITERATIONS | 1-3 | 布局迭代次数 |
ROUTE_ITERATIONS | 1-3 | 布线迭代次数 |
PHYS_OPT_ADDITIONAL_EFFORT | Normal/High | 物理优化强度 |
六、策略组合与增量实现
1. 分阶段实现策略
# 阶段1:快速获取初始布局
reset_run impl_1
set_property strategy Flow_RuntimeOptimized [get_runs impl_1]
launch_runs impl_1 -to_step place_design
wait_on_run impl_1
write_checkpoint -force initial_place.dcp

# 阶段2:时序优化
set_property strategy Performance_Explore [get_runs impl_1]
set_property incremental_checkpoint initial_place.dcp [get_runs impl_1]
launch_runs impl_1 -to_step phys_opt_design
wait_on_run impl_1
write_checkpoint -force after_phys_opt.dcp

# 阶段3:最终布线
set_property strategy Performance_ExtraTimingOpt [get_runs impl_1]
set_property incremental_checkpoint after_phys_opt.dcp [get_runs impl_1]
launch_runs impl_1 -to_step route_design
2. 增量实现流程
好处:节省时间,保留已优化的部分
适用场景:
  1. 小范围RTL修改
  2. 约束微调
  3. 尝试不同策略

操作步骤:
  1. write_checkpoint -force design_route.dcp
  2. set_property incremental_checkpoint design_route.dcp
  3. 选择新策略运行
  4. 比较结果
七、调试与问题解决
1. 常见问题与策略选择
# 问题诊断与策略映射
proc diagnose_and_select_strategy {} {
    # 检查时序
    set wns [get_property STATS.WNS [get_runs impl_1]]
    set tns [get_property STATS.TNS [get_runs impl_1]]

    # 检查拥塞
    set congestion [report_design_analysis -congestion]

    # 检查资源
    set lut_util [get_property STATS.SLICE_LUTS [get_runs impl_1]]

    # 根据问题推荐策略
    if {$wns < -1.0} {
        puts "严重时序违例,推荐: Performance_ExtraTimingOpt"
        return "Performance_ExtraTimingOpt"
    } elseif {$wns < -0.3} {
        puts "中等时序违例,推荐: Performance_Explore"
        return "Performance_Explore"
    } elseif {[regexp {Level: 4|5} $congestion]} {
        puts "严重布线拥塞,推荐: Congestion_SpreadLogic_high"
        return "Congestion_SpreadLogic_high"
    } elseif {$lut_util > 85} {
        puts "高资源使用率,推荐: Area_Explore"
        return "Area_Explore"
    } else {
        puts "设计状态良好,使用: Flow_RunPhysOpt"
        return "Flow_RunPhysOpt"
    }
}
2. 策略效果评估脚本
# 对比不同策略效果
set strategies {
    "Flow_RunPhysOpt"
    "Performance_Explore"
    "Area_Explore"
    "Congestion_SpreadLogic_high"
}

foreach strategy $strategies {
    reset_run impl_1
    set_property strategy $strategy [get_runs impl_1]
    launch_runs impl_1
    wait_on_run impl_1

    # 提取关键指标
    set wns [get_property STATS.WNS [get_runs impl_1]]
    set runtime [get_property STATS.ELAPSED [get_runs impl_1]]
    set lut_usage [get_property STATS.SLICE_LUTS [get_runs impl_1]]

    puts [format "%-30s: WNS=%6.3fns, Runtime=%6.1fs, LUTs=%d" \
          $strategy $wns $runtime $lut_usage]
}
八、最佳实践总结
1. 新项目推荐流程
第一阶段:探索期(1-2次运行)
  1. Flow_RuntimeOptimized → 快速验证
  2. Flow_RunPhysOpt → 建立基准

第二阶段:优化期(3-5次运行)
  基于问题选择专用策略:
    - 时序问题 → Performance系列
    - 面积问题 → Area系列
    - 拥塞问题 → Congestion系列

第三阶段:收敛期(增量实现)
  使用最佳策略,配合增量实现微调
2. 策略选择黄金法则
-
从简开始:先用
Flow_RunPhysOpt或Default -
针对性优化:明确问题后再选专用策略
-
权衡利弊:性能 vs 时间 vs 资源
-
记录结果:建立策略效果数据库
-
版本控制:不同设计版本可能需要不同策略
3. 实用TCL脚本集
# 策略管理工具包
proc run_with_strategy {strategy {save_checkpoint true}} {
    set run [current_run]
    set_property strategy $strategy [get_runs $run]

    if {$save_checkpoint} {
        set checkpoint "checkpoint_${strategy}_[clock format [clock seconds] -format %Y%m%d_%H%M%S].dcp"
    }

    launch_runs $run
    wait_on_run $run

    if {$save_checkpoint && [get_property STATUS [get_runs $run]] == "IMPLEMENTED"} {
        write_checkpoint -force $checkpoint
        puts "Checkpoint saved: $checkpoint"
    }

    return [get_property STATUS [get_runs $run]]
}

# 自动策略优化循环
proc auto_optimize_design {target_wns} {
    set current_wns [get_property STATS.WNS [current_run]]
    set iteration 1

    while {$current_wns < $target_wns && $iteration <= 5} {
        puts "Iteration $iteration: Current WNS = $current_wns ns"

        if {$current_wns < -1.0} {
            run_with_strategy "Performance_ExtraTimingOpt"
        } elseif {$current_wns < -0.3} {
            run_with_strategy "Performance_Explore"
        } else {
            run_with_strategy "Performance_RefinePlacement"
        }

        set current_wns [get_property STATS.WNS [current_run]]
        incr iteration
    }

    return $current_wns
}
九、最终建议
建立自己的策略库,针对不同类型的设计积累经验数据。Vivado策略选择既是科学也是艺术,需要结合工具特性和设计特点进行决策。
(感谢您读到这里。如果这篇实现策略对你有启发,希望你能点个赞支持一下。你的鼓励会让我更有动力分享更多深度内容。也欢迎在评论区留下你的想法,我们下次见!)


 2226
2226

 被折叠的 条评论
为什么被折叠?
被折叠的 条评论
为什么被折叠?
 到【灌水乐园】发言


