


目录
- 学习视频地址 —— B站
- 1 pyTorch安装和配置
- 2 python 编辑器的安装
- 3 为什么 返回 false
- 4 python 学习中的两个 法宝函数
- 5 pyCharm 和 Jupyter使用及对比
- 6 pytorch 加载数据
- 7 Dataset 实战
- 8 Tensorboard 使用 数据可视化
- 9 tensorboard使用2
- 10 Transfroms 使用1——主要是对图片进行变换
- 11 Transfroms 使用2——主要是对图片进行变换
- 12 常见transforms使用
- 13 常见transforms使用2
- 14 torchvision数据集使用
- DataLoader 使用
- 17 卷积操作
- 18 神经网络 —— 卷积层
- 19 最大池化层
- 20 非线性激活
- 21 线性层 和 其它层
- 22 神经网络搭建小实战
- 23 损失函数与反向传播
- 24 优化器
- 25 现有网络模型的使用及修改
- 26 网络模型的保存与读取
- 27,28,29 完整的训练 套路
- 30 利用GPU训练
学习视频地址 —— B站
PyTorch深度学习快速入门教程(绝对通俗易懂!)【小土堆】
1 pyTorch安装和配置
彻底卸载anaconda
conda install anaconda-clean
anaconda-clean --yes
再用控制面板
anaconda 卸载环境 :conda uninstall -n yyy --all
- anaconda 安装路径:D:\anaconda3
- 创建环境: conda create -n pytorch python=3.9
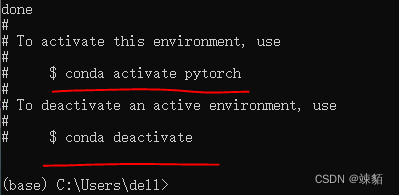
- 切换环境 : conda activate pytorch
- 查看目前已经安装的工具包:pip list
Q 安装pytorch?
- 进入pytorch首页 下拉,https://pytorch.org/
- 查看gpu型号: 任务管理器-性能 - gpu
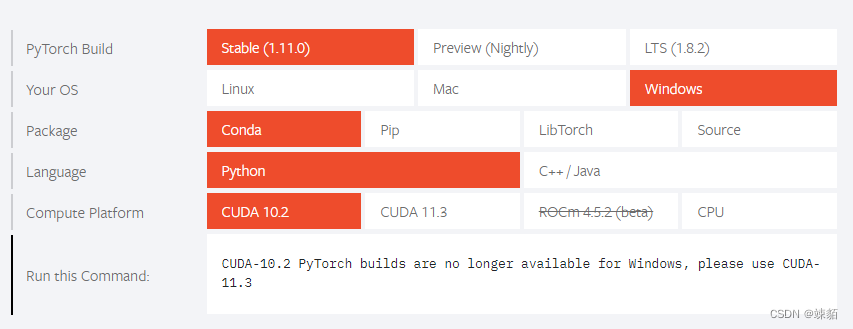
- 首先更改下载源,,然后,使用官网上的指令安装,直接安装torch一直下载不下来
已经测试,速度很慢,30kB/s
 conda create -n pytorch python=3.9
conda activate pytorch

conda config --remove-key channels
conda config --add channels https://mirrors.tuna.tsinghua.edu.cn/anaconda/pkgs/main
conda config --add channels https://mirrors.tuna.tsinghua.edu.cn/anaconda/pkgs/r
conda config --add channels https://mirrors.tuna.tsinghua.edu.cn/anaconda/pkgs/msys2
conda config --add channels https://mirrors.tuna.tsinghua.edu.cn/anaconda/cloud

版权声明:本文为优快云博主「StarryHuangx」的原创文章,遵循CC 4.0 BY-SA版权协议,转载请附上原文出处链接及本声明。
原文链接:https://blog.csdn.net/weixin_46017950/article/details/123280653

pip3 install torch torchvision torchaudio
已经测试,最有效的办法,速度最快,3MB/s
conda create -n pytorch python=3.9
conda activate pytorch


conda config --set show_channel_urls yes
conda config --add channels https://mirrors.tuna.tsinghua.edu.cn/anaconda/pkgs/free/
conda config --add channels https://mirrors.tuna.tsinghua.edu.cn/anaconda/pkgs/main/
conda config --add channels https://mirrors.tuna.tsinghua.edu.cn/anaconda/cloud/conda-forge
conda config --add channels https://mirrors.tuna.tsinghua.edu.cn/anaconda/cloud/pytorch/


#使用的这个 —— 未成功
conda install pytorch==1.9.1 torchvision==0.10.1 torchaudio==0.9.1 -c pytorch

# 用的这——未成功
pip install torch==1.10.1+cu111 torchvision==0.11.2+cu111 torchaudio==0.10.1 -f https://download.pytorch.org/whl/torch_stable.html


# 这个 未成功
pip install torch==1.10.1+cu111 torchvision==0.11.2+cu111 torchaudio==0.10.1 -f https://download.pytorch.org/whl/cu111/torch_stable.html

pip install torch==1.10.1+cu102 torchvision==0.11.2+cu102 torchaudio==0.10.1 -f https://download.pytorch.org/whl/cu102/torch_stable.html


# 这个可以,但是gpu太low, cuda 版本太高,,gpu上无法训练
pip install torch==1.10.2+cu113 torchvision==0.11.3+cu113 torchaudio===0.10.2+cu113 -f https://download.pytorch.org/whl/cu113/torch_stable.html

# 11.1
pip install torch==1.10.1+cu111 torchvision==0.11.2+cu111 torchaudio==0.10.1 -f https://download.pytorch.org/whl/torch_stable.html

pip install torch==1.10.1+cu111 torchvision==0.11.2+cu111 torchaudio==0.10.1 -f https://download.pytorch.org/whl/cu111/torch_stable.html

作者:insightya https://www.bilibili.com/read/cv15186754/ 出处:bilibili
2 python 编辑器的安装
pyCharm 安装注意事项
- 在 Installation Options 中,,勾选 .py
pyCharm 配置
- 打开
- 新建项目 的过程中
- 选择 Existing interpreter
- 手动找到编译器,, 选择 conda Environment ->
- 输入: D:/anaconda/envs/pytroch/python.exe
检测是否正常运行
- 点 “” python console “”
import torch
torch.cuda.is_available()
默认 Jupiter 安装在 base 环境中,,所以,现在 要在 新环境中 在安装一遍 jupiter。
新环境中安装jupyter
# open  anaconda命令行
conda activate pytorch
conda list
conda install nb_conda
jupyter notebook
jupyter 使用指南
import torch
torch.cuda.is_available()
shift + 回车: 表示 创建一个新的代码块,并且运行上一个代码块
3 为什么 返回 false
我的是true ,跳过
4 python 学习中的两个 法宝函数
dir() : 打开
help() : 说明书
dir(pytorch)
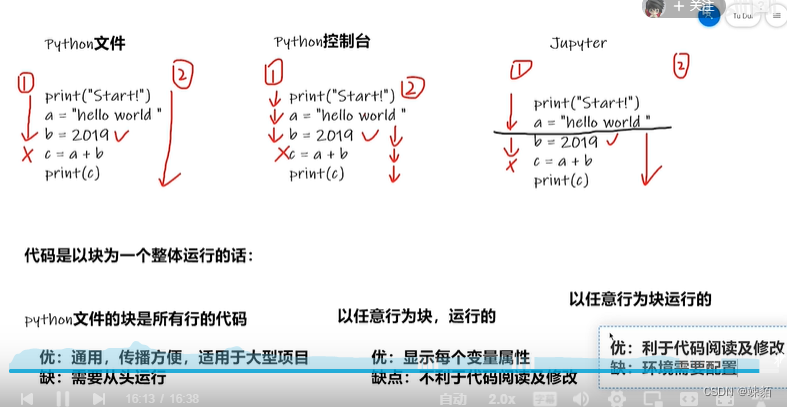
5 pyCharm 和 Jupyter使用及对比
6 pytorch 加载数据
Dataset
提供 获取数据及其lable的方法
能得到 总共有 多少数据
能获取 每一个数据 及其 label
Dataloader
把 数据打包,,方便 后续使用
代开 Jupyter
conda activate pytorch
jupyter notebook
7 Dataset 实战
安装opencv
conda activate pytorch
conda install opencv-python
from torch.utils.data import Dataset
from PIL import Image
import os


class MyData(Dataset):

    def __init__(self, root_dir, label_dir):
        self.root_dir = root_dir
        self.label_dir = label_dir
        self.path = os.path.join(self.root_dir, self.label_dir)
        self.img_path = os.listdir(self.path)

    def __getitem__(self, idx):
        img_name = self.img_path[idx]
        img_item_path = os.path.join( self.root_dir, self.label_dir, img_name )
        img = Image.open(img_item_path)
        label = self.label_dir
        return img, label

    def __len__(self):
        return len(self.img_path)

root_dir = "hymenoptera_data/hymenoptera_data/train"
ants_label_dir = "ants"
bees_label_dir = "bees"
ants_dataset = MyData(root_dir, ants_label_dir)
bees_dataset = MyData(root_dir, bees_label_dir)

train_dataset = ants_dataset + bees_dataset
8 Tensorboard 使用 数据可视化
SummaryWriter使用
- 安装tensorboard
pip install tensorboard
- 报错
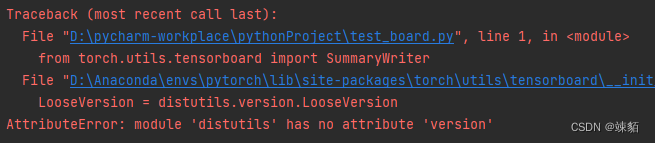
包不匹配,解决办法如下
 pip install setuptools==59.5.0
conda install tensorboard
运行结果是,,多了一个Logs文件夹
数据可视化:
一定要切换到Logs的上一层目录中
conda activate pytorch

D:
cd D:\pycharm-workplace\pythonProject

# 切换到 Logs的上一层目录中
tensorboard --logdir=logs
9 tensorboard使用2
利用opencv读取文件,转化为Numpy数组
pip install opencv-python
from torch.utils.tensorboard import SummaryWriter
import numpy as np
from PIL import Image

writer = SummaryWriter("logs")
image_path = "hymenoptera_data/hymenoptera_data/train/ants/0013035.jpg"
img_PIL = Image.open(image_path)
img_array = np.array(img_PIL)


writer.add_image("lyy", img_array, 1, dataformats='HWC')

for i in range(100):
    writer.add_scalar("y=2x", 3*i, i)

writer.close()

print("end")
10 Transfroms 使用1——主要是对图片进行变换
ToTensor()使用—— 把 imgge 或 numpy 转换为 tensor
from PIL import Image
from torchvision import transforms

img_path = "hymenoptera_data/hymenoptera_data/train/ants/0013035.jpg"
img = Image.open(img_path)

# tensor_trans 是一个类
tensor_trans = transforms.ToTensor() # 吧 imgge 或 numpy 转换为 tensor
tensor_img = tensor_trans(img)

print(tensor_img)
11 Transfroms 使用2——主要是对图片进行变换
from PIL import Image
from torch.utils.tensorboard import SummaryWriter
from torchvision import transforms

img_path = "hymenoptera_data/hymenoptera_data/train/ants/0013035.jpg"
img = Image.open(img_path)


writer = SummaryWriter("logs")


tensor_trans = transforms.ToTensor()
tensor_img = tensor_trans(img)

# print(tensor_img)

writer.add_image("lyy", tensor_img)
writer.close()
12 常见transforms使用
normalize
from PIL import Image
from torch.utils.tensorboard import SummaryWriter
from torchvision import transforms

img_path = "hymenoptera_data/16.jpg"
img = Image.open(img_path)

writer = SummaryWriter("logs")

# totensor使用
tensor_trans = transforms.ToTensor()
tensor_img = tensor_trans(img)
writer.add_image("lyy", tensor_img)

# Normalize 使用
trans_norm
最低0.47元/天 解锁文章


 2288
2288

 被折叠的 条评论
为什么被折叠?
被折叠的 条评论
为什么被折叠?
 到【灌水乐园】发言


