


论文:https://arxiv.org/pdf/2506.05218
代码:https://github.com/Yuliang-Liu/MonkeyOCR
体验地址:http://vlrlabmonkey.xyz:7685/
一. 理论
1. 算法介绍
本文提出“结构-识别-关系”(SRR)三元组范式,实现了高效且精准的文档解析。其3B参数模型在英文文档解析任务中超越了Gemini 2.5 Pro和Qwen2.5-VL-72B。
在对多页文档解析场景下,处理速度达每秒0.84页,显著优于MinerU(0.65页/秒)和Qwen2.5-VL-7B(0.12页/秒)。
三元组范式包含三个模型:
• 布局检测模型(DocLayout-YOLO):检测文档中的布局块,包含:文本、表格、图标、公式等;
• 内容识别模型(Qwen-2.5VL文本提取):将图片中的文本、表格、公式等识别出来;
• 关系预测(阅读排序):排序模型。
 算法流程如上图所示:
实现利用布局检测模型对文档进行检测,然后将每个小块裁剪出来,同时交给内容识别模型和关系预测模型;
内容识别模型识别出每个裁切块的内容,例如:文字、表格、图标、公式;关系预测模型识别出每个裁切块的阅读顺序;最后将前面识别的元素有效的组织成HTML、JSON或Markdown的格式输出。
2. 算法亮点
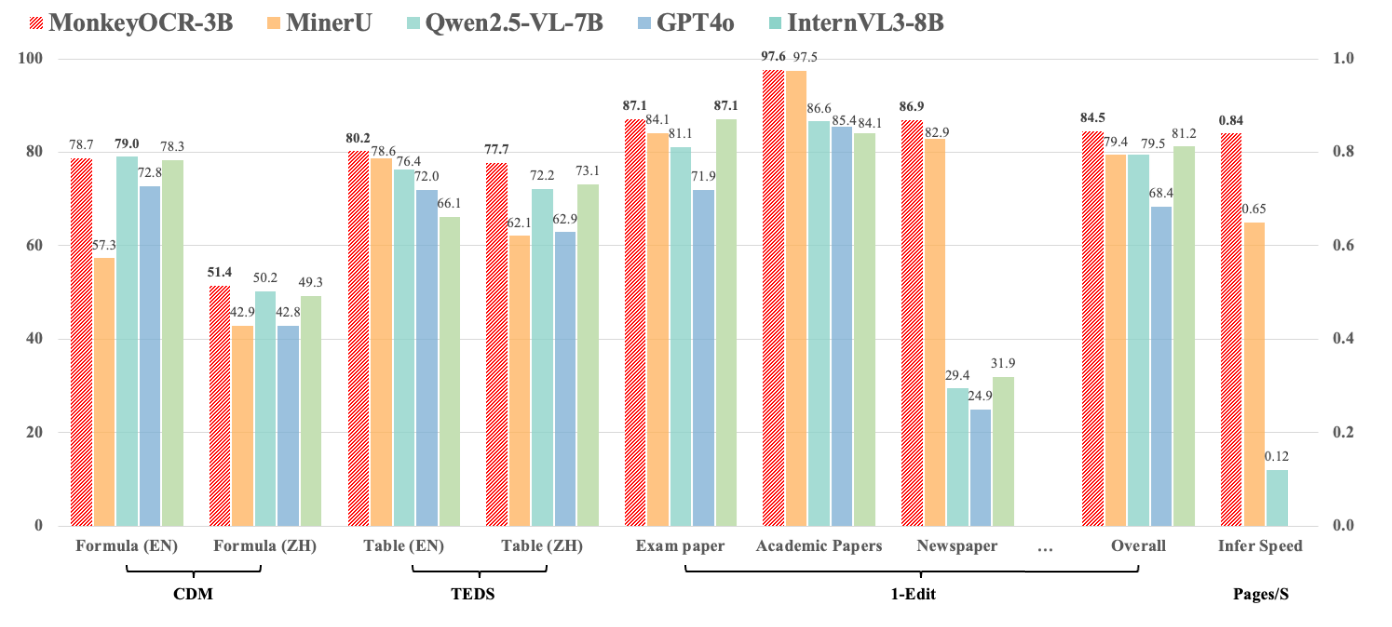
• 轻量高效:3B参数在英文文档解析上超Gemini 2.5 Pro和Qwen2.5-VL-72B。
• 速度快:多页解析0.84页/秒,超MinerU(0.65页/秒)和Qwen2.5-VL-7B(0.12页/秒)。
• 结构化输出:覆盖10+文档类型(如论文、发票、报表),生成markdown或json结构化数据,便于下游处理。
3. 技术架构分析
整体架构设计:MonkeyOCR 采用了多阶段流水线架构,将文档解析任务分解为多个专门的处理阶段。
输入文档 → 布局检测 → 内容识别 → 关系预测 → 后处理 → 输出结果
核心组件架构:
- 数据层 (Data Layer)
• Dataset 抽象基类: 统一处理 PDF 和图像数据
• PymuDocDataset: 专门处理 PDF 文档,基于 PyMuPDF
• ImageDataset: 处理单张图像
• PageableData: 页面级数据抽象,支持绘制和文本插入 - 模型层 (Model Layer)
• MonkeyOCR 主模型: 集成多个子模型的核心类
• 布局检测模型: DocLayout_YOLO (基于 YOLO 架构)
• 阅读顺序模型: LayoutReader (基于 LayoutLMv3)
• 视觉语言模型: Qwen2.5-VL (支持 LMDeploy 和 Transformers 后端) - 处理流水线 (Processing Pipeline)
预处理阶段 (Pre-processing):
• ocr_detect_all_bboxes.py: 检测所有边界框
• ocr_dict_merge.py: 合并和修复检测结果
• cut_image.py: 图像裁剪和预处理
核心处理阶段:
• pdf_parse_union_core_v2_llm.py: 核心解析逻辑
• batch_analyze_llm.py: 批量分析处理
后处理阶段 (Post-processing):
• para_split_v3.py: 段落分割和结构化
二. 实践
1. 算法核心流程
阶段1: 布局检测与分析
# 1. 使用 DocLayout_YOLO 进行布局检测
layout_results = model.layout_model.batch_predict(images)

# 2. 检测文本、表格、公式、图像等不同类型的区域
# 支持的类别: 文本(0,1,2,4,6,7,101), 表格(5), 公式(8,14)
阶段2: 内容识别
# 3. 使用 VLM 进行内容识别
for region in layout_results:
    if region['category_id'] in [8, 14]:  # 公式
        latex_result = vlm_model.inference(region_image, formula_prompt)
    elif region['category_id'] == 5:      # 表格
        html_result = vlm_model.inference(region_image, table_prompt)
    else:                                 # 文本
        text_result = vlm_model.inference(region_image, text_prompt)
阶段3: 阅读顺序预测
# 4. 使用 LayoutReader 预测阅读顺序
reading_order = layoutreader_model.predict(region_boxes)
sorted_regions = [regions[i] for i in reading_order]
阶段4: 结构化输出
# 5. 生成结构化输出
markdown_content = convert_to_markdown(sorted_regions)
json_structure = generate_structure_info(sorted_regions)
2. 本地部署和测试
1. 环境安装
conda create -n MonkeyOCR python=3.10
conda activate MonkeyOCR

git clone https://github.com/Yuliang-Liu/MonkeyOCR.git
cd MonkeyOCR

pip install torch==2.5.1 torchvision==0.20.1 torchaudio==2.5.1 --index-url https://download.pytorch.org/whl/cu124
pip install .
2. 下载模型(推荐ModelScope)
pip install modelscope
python download_model.py -t modelscope
3. 模型推理
# 确保在 MonkeyOCR 目录中
python parse.py path/to/your.pdf
自己拿了一篇论文测试,效果还是非常惊艳的:
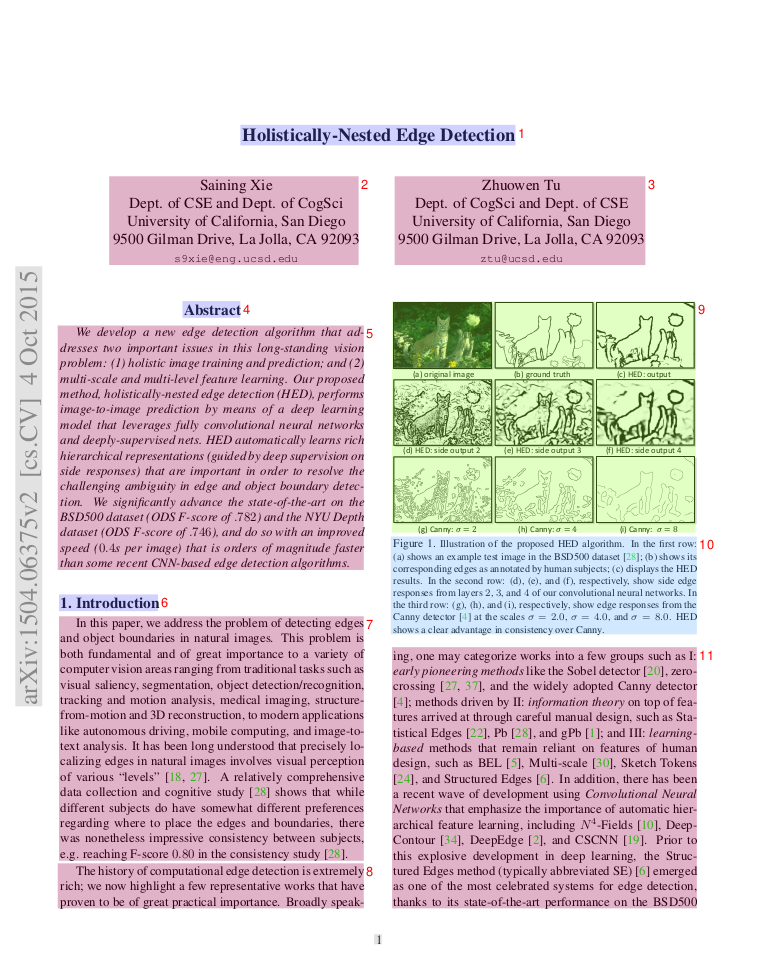
生成JSON部分内容:
    {
        "type": "text",
        "text": "Holistically-Nested Edge Detection ",
        "text_level": 1,
        "page_idx": 0
    },
    {
        "type": "text",
        "text": "Saining Xie\nDept. of CSE and Dept. of CogSci\nUniversity of California, San Diego\n9500 Gilman Drive, La Jolla, CA 92093\ns9xie@eng.ucsd.edu ",
        "page_idx": 0
    },
    {
        "type": "text",
        "text": "Zhuowen Tu\nDept. of CogSci and Dept. of CSE\nUniversity of California, San Diego\n9500 Gilman Drive, La Jolla, CA 92093\nztu@ucsd.edu ",
        "page_idx": 0
    },
    {
        "type": "text",
        "text": "Abstract ",
        "text_level": 1,
        "page_idx": 0
    },
    {
        "type": "text",
        "text": "We develop a new edge detection algorithm that addresses two important issues in this long-standing vision problem: (1) holistic image training and prediction; and (2) multi-scale and multi-level feature learning. Our proposed method, holistically-nested edge detection (HED), performs image-to-image prediction by means of a deep learning model that leverages fully convolutional neural networks and deeply-supervised nets. HED automatically learns rich hierarchical representations (guided by deep supervision on side responses) that are important in order to resolve the challenging ambiguity in edge and object boundary detection. We significantly advance the state-of-the-art on the BSD500 dataset (ODS F-score of .782) and the NYU Depth dataset (ODS F-score of .746), and do so with an improved speed (0.4As per image) that is orders of magnitude faster than some recent CNN-based edge detection algorithms. ",
        "page_idx": 0
    },
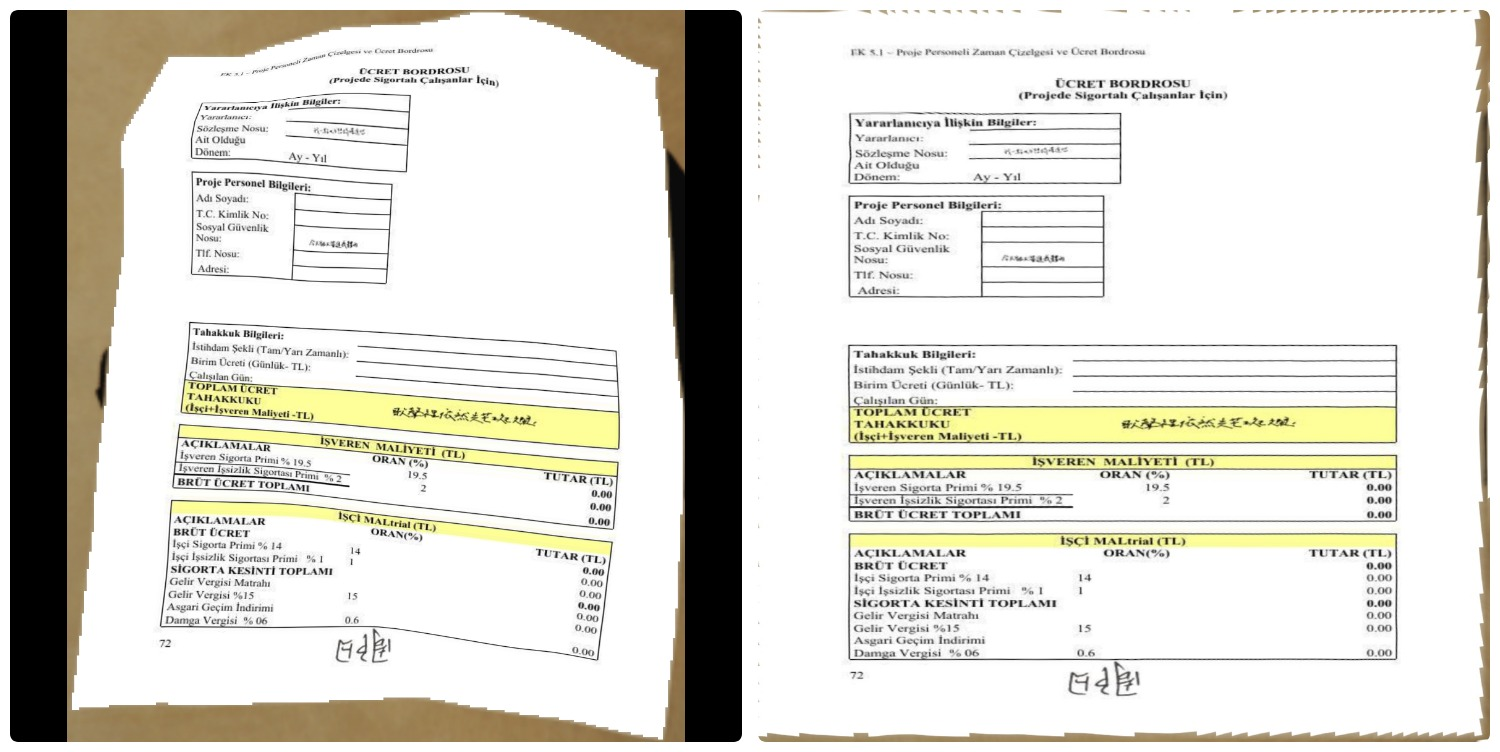
三. 优化方向
论文中也提到,目前在标准文档上效果非常好,但是拍照场景(文档有弯曲变形或者有阴影)效果比较差。没事,我们先用文档矫正算法把图片矫正,然后进行解析就OK啦~
矫正效果:
感谢关注,欢迎技术交流,WeChat:guopeiAI


 433
433


 到【灌水乐园】发言


