


 本文介绍了如何实现带有Icon的Input登录框布局,包括将Icon放入Input、处理聚焦时的嵌套问题、制作圆角以及解决对齐和样式修改等细节,通过实例展示了实现过程。
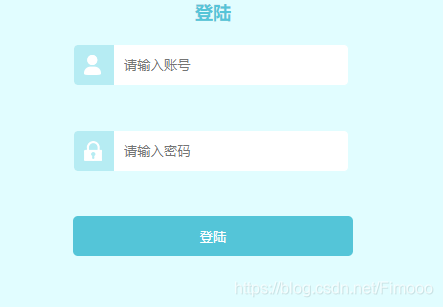
效果

思路
基本思路

细节问题
如何将icon放入input?
——position:relative\absolute
注意position:relative脱离文档流,但是其本身的位置是在文档中占据空间的
如:

运用position:relative调整位置后,达到效果,却有着视觉“空行”的效果

是因为文档流中,仍然为div-icon预留了它本身应有的位置,非手动添加的margin、padding等
如何在input聚焦前后,精准完成嵌套
因效果的需要,我们需要在input聚焦后,单独设置样式。
用outline:none;清除默认的input选中外边线,再设置我们自定义的border
- 错误一:起始input样式设为
border:none,input:focus再设置border:1px .....

好像对齐了…点击后…

因为点击后设置了border的属性,使得input的高度加上了border的宽度,发生了改变,所以div-icon定位,会发生偏移。
解决办法:在初始input样式时,就加入border,改变其颜色(为背景色),使其视觉上不被发现。
也许有人会说为什么不直接用input的outline属性,更方便,可outline就无法使input样式变为圆角。修改圆角是通过border-radius实现的。
修改后,效果


如何制作圆角
我们需要制作的圆角有:input的四个角+div-icon的左上角+div-icon的左下角
需要用到的属性:border-radius,border-top-left-radius,border-bottom-left-radius
理想情况是——圆角都统一设置为5px,一定能完美嵌套!
动手制作后???

行吧,数学知识用起来…(共用一个圆心,半径不一样!画得不咋地~)

border-radius设置的px就是指的半径。
我们现在把外层input的border-radius:5px
里层div-icon的border:radius:4px
看效果,完成!


如果遇到了对齐的问题
可以尝试用vertical-align设置
input聚焦后,修改div-icon样式
我是用js原生实现的
提取dom->监听dom->发生改变时,修改div-icon样式
(多想在原生css里写if判断…)
实现
		<!DOCTYPE html>
<html lang="en">

<head>
    <meta charset="UTF-8">
    <meta name="viewport" content="width=device-width, initial-scale=1.0">
    <meta http-equiv="X-UA-Compatible" content="ie=edge">
    <title>Document</title>
</head>
<style>
    body {
        background-color: #e1fdff
        /* background-attachment: fixed; */
    }

    html * {
        margin: 0;
        padding: 0;
    }

    html,body {
        height: 100%;
    }

    .login {
        height: 340px;
        width: 280px;
        margin: 0 auto;
    }
    .label {
        height: 40px;
        width: 40px;
        background-image: url(./aconut.png);
        background-color: #b6ecf3;
        position: relative;
        top: -41px;
        left: 1px;
        border-top-left-radius: 4px;
        border-bottom-left-radius: 4px;
    }

    button {
        border: none;
        width: 100%;
        height: 40px;
        background-color: #54c5d8;
        color: white;
        border-radius: 5px;
        cursor: pointer;
    }

    button:focus {
        border: none;
        outline: none

    }
    .inline {
        display: inline-block;
    }

    .inline>img {
        margin: 10px;
    }

    input {
        width: 80%;
        border: none;
        padding-left: 50px;
        height: 40px;
        border-radius: 5px;
        border: 1px solid #e1fdff;
        cursor: pointer;
    }

    input:focus {
        outline: none;
        border: 1px solid #54c5d8
    }
    h2{
        color: #54c5d8;
        text-align: center;
        font-size: 18px;
        padding-bottom: 20px;
    }
</style>

<body>
    <header>
        <h1>xxxxxxxxxxxxxxxxx登陆</h1>
    </header>
    <main>
        <section>
            <div class="login">
                <h2>登陆</h2>
                <div>
                    <input placeholder="请输入账号" id="account" />
                     <div class="inline label account">
                        <img src="./account.png">
                     </div>
                </div>
                <div>
                    <input placeholder="请输入密码" id="pwd" />
                    <div class="inline label pwd">
                        <img src="./pwd.png" />
                    </div>
                </div>
                <button>登陆</button>
            </div>
        </section>
    </main>
</body>

</html>

<script>
window.onload=function(){
    document.querySelector("#account").addEventListener("focus",function(){
        document.querySelector(".account").setAttribute("style","background-color:#54c5d8")
    })
    document.querySelector("#account").addEventListener("blur",function(){
        document.querySelector(".account").setAttribute("style","background-color:#b6ecf3")
    })
    document.querySelector("#pwd").addEventListener("focus",function(){
        document.querySelector(".pwd").setAttribute("style","background-color:#54c5d8")
    })
    document.querySelector("#pwd").addEventListener("blur",function(){
        document.querySelector(".pwd").setAttribute("style","background-color:#b6ecf3")
    })
}
</script>
效果图:
完工!


 3991
3991

 被折叠的 条评论
为什么被折叠?
被折叠的 条评论
为什么被折叠?
 到【灌水乐园】发言


