


Vue3项目搭建
整理了一下之前vue3项目工程搭建的一些东西,写篇文章记录一下
初始化项目
我们使用的是vite
为什么要使用vite呢?
请看vcr
啊,不是,请看链接
总之就是vite好啊,vite得学啊,真男人必会vite
** 第一步: ** 使用vite预设的项目脚手架创建一个vue + ts的项目
注:我就是直接使用pnpm了哈,大家可以根据自己调整,直接使用的 vue-ts 模板,其他模板请参考vite官网
最新的 Vite 需要 Node.js 版本 20.19+, 22.12+。
# 创建一个名为 vue3-template-app 的模板项目
pnpm create vite vue3-template-app --template vue-ts
# 1. 最新vite7.0会让我们选择是否使用Rolldown
# 2. 然后选择是否直接安装依赖
创建完成后的目录结构是这样的
项目根目录
├── .vscode/                # VS Code项目专属配置文件夹
│   └── extensions.json     # 推荐安装的VS Code插件(如Volar、ESLint)
├── node_modules/           # 第三方依赖包存放文件夹(由包管理工具自动生成)
├── public/                 # 静态资源文件夹(构建时原封不动复制到dist)
│   └── vite.svg            # 网站图标
├── src/                    # 项目源代码核心文件夹(日常开发主要目录)
│   ├── assets/             # 需编译的静态资源文件夹(如图片、Sass样式)
│   ├── components/         # 可复用Vue组件文件夹(如Button.vue、Dialog.vue)
│   │   └── HelloWorld.vue  # HelloWorld组件文件
│   ├── App.vue             # 项目根组件(所有页面组件挂载的基础)
│   ├── main.ts             # 项目入口文件(初始化Vue实例、引入全局依赖)
│   └── style.css           # 项目根组件(所有页面组件挂载的基础)
├── .gitignore              # Git版本控制忽略文件配置(如node_modules、dist)
├── index.html              # 项目入口HTML文件(Vue实例挂载的载体)
├── package.json            # 项目配置文件(依赖管理、脚本命令如npm run dev/build)
├── pnpm-lock.yaml          # pnpm包管理的依赖版本锁定文件(确保依赖一致性)
├── README.md               # 项目说明文档(如环境搭建、启动命令、功能介绍)
├── tsconfig.app.json       # TypeScript应用代码编译配置
├── tsconfig.json           # TypeScript全局编译配置(统管所有tsconfig子文件)
├── tsconfig.node.json      # TypeScript Node环境编译配置(如vite.config.ts)
└── vite.config.ts          # Vite构建工具配置文件(如插件、打包优化、服务配置)
配置目录别名
配置目录别名可以简化导入路径,避免冗长的相对路径。
-
找到
vite.config.ts添加resolve.alias配置项,类型请查看官网。注意:当使用文件系统路径的别名时,请始终使用绝对路径。相对路径的别名值会原封不动地被使用,因此无法被正常解析。
import { resolve } from 'path' export default defineConfig({ plugins: [vue()], resolve: { alias: [ { find: '@', replacement: resolve(__dirname, 'src') } // 将 @ 映射到 src 目录 ] } }) -
我们的将
HelloWorld组件的引入方式修改成@/的格式<script setup lang="ts"> import HelloWorld from '@/components/HelloWorld.vue' </script>我们可以看到页面显示是没有问题的

但是代码有ts的报错
-
需要在
tsconfig.app.json中添加compilerOptions.paths配置。注意需要添加添加
baseUrl配置,否则不允许使用非相对路径的导入{ /* 其他配置 */ "compilerOptions": { /* 其他配置 */ "baseUrl": ".", "paths": { "@/*": ["src/*"], } }, }完美解决

有其他目录路径别名配置需求的话就按照这种格式在配置就行了。
插件配置
自动导入配置
配置自动导入,可以有效地减少重复代码。
我们这里配置上 Vue API 和 组件的自动导入,分别要用到 unplugin-auto-import 和 unplugin-vue-components 两个插件,这个相当的方便,配置好之后API 和 组件都可以直接用不用自己手动导入。
-
安装依赖
pnpm install unplugin-auto-import unplugin-vue-components -D -
插件引入及配置
主要需要配置两个属性
imports自动导入的库dts生成类型声明文件
我们先在项目根目录创建
presets/plugins和presets/types用于存放项目模板预设的插件配置和类型声明// 在 presets/plugins 目录下新建 index.ts // presets/plugins/index.ts import vue from '@vitejs/plugin-vue' import AutoImport from 'unplugin-auto-import/vite' import Components from 'unplugin-vue-components/vite' import { VueUseComponentsResolver } from 'unplugin-vue-components/resolvers' import { resolve } from 'path' import type { PluginOption } from 'vite' const getPlugins: () => PluginOption[] = () => [ vue(), // 我把 vue 的基础插件也提到了这统一管理 AutoImport({ imports: ['vue', 'pinia', 'vue-router', '@vueuse/core'], // 配置后记得安装这几个包的依赖 dts: resolve(__dirname, './../types/auto-imports.d.ts') }), Components({ dts: resolve(__dirname, './../types/components.d.ts'), resolvers: [VueUseComponentsResolver()] }) ] export default getPlugins然后在
vite.config.ts导入这个插件配置就行了,是不是看着清爽许多。// vite.config.ts import plugins from './presets/plugins' export default defineConfig({ plugins: plugins(), // 其他配置 })后续其他的项目也可以直接复制
presets过去,就能直接使用同款配置,后续的预设配置也都放在这里。 -
然后我们就可以改造一下示例的代码。
<!-- src\App.vue -->
<script setup lang="ts">
// import HelloWorld from '@/components/HelloWorld.vue'
</script>
<!-- src\components\HelloWorld.vue --> <script setup lang="ts"> // import { ref } from 'vue' defineProps<{ msg: string }>() const count = ref(0) </script>页面的展示和功能都是没有问题的
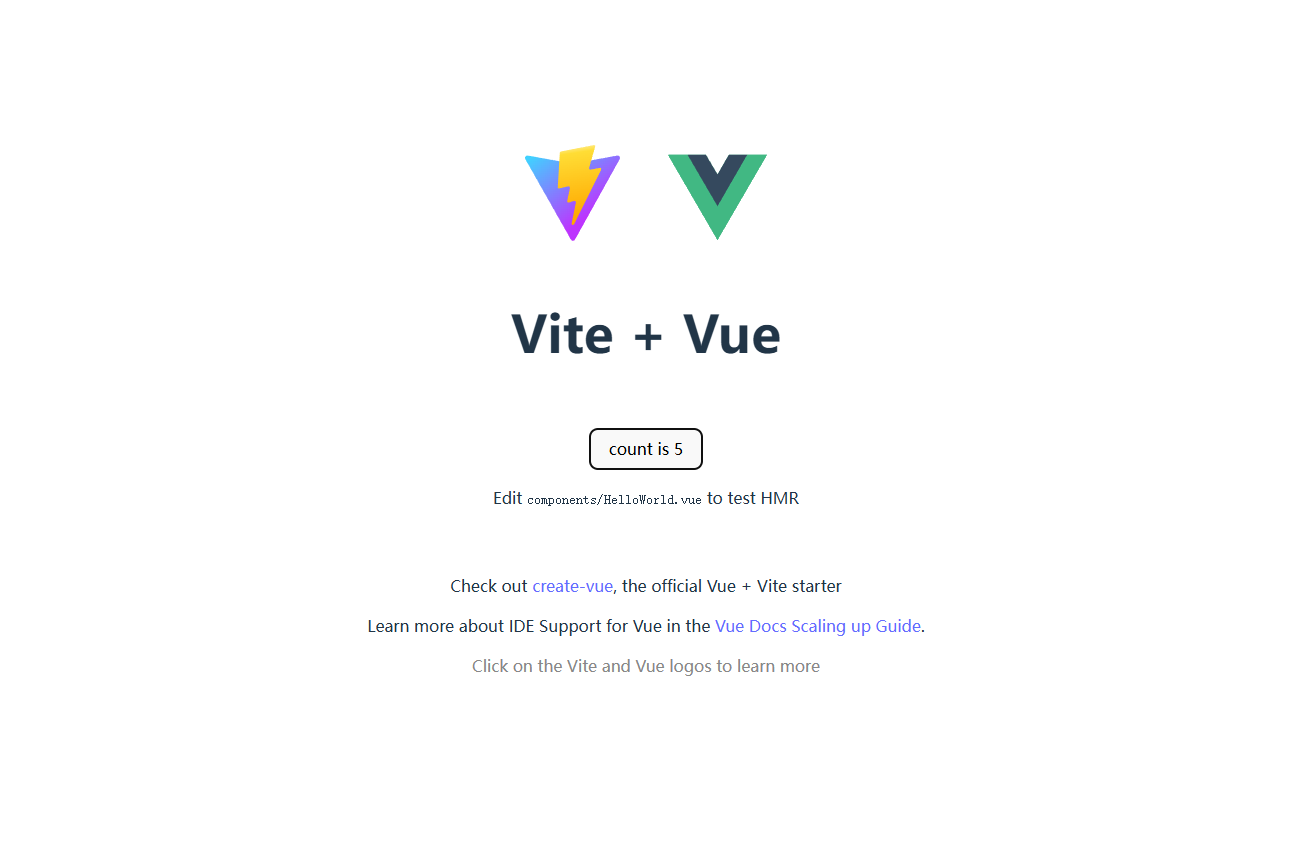
but 有一个
ts的报错,很好解决,我们项目运行后会自动在我们配置dts处生成类型声明文件,将类型声明文件添加到tsconfig.app.json中include选项中即可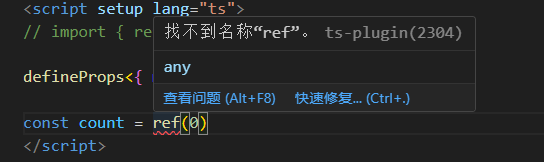
// tsconfig.app.json
{
  /* 其他配置 */
  "include": ["src/**/*.ts", "src/**/*.tsx", "src/**/*.vue", "presets/**/*.d.ts"]
}
UI组件库引入
UI组件库肯定是每个项目都会用的这个必定要搞的(你们有自己的组件库就当我没说),我这里我就随便搞一个组件库做例子哈,谁是这个幸运儿呢?
马上揭晓答案。。。
那么我要宠幸的是 ArcoDesign ,官网还有一套最佳实践,大家可以学习一下。
组件库的引入就很简单了,按着官网的来就行了
-
vue版本要求:vue >= 3.2.0 -
安装依赖
pnpm install @arco-design/web-vue -S -
引入(我们这使用了自动导入配置,所就使用按需加载(模板)的方式)
操作我就直接复制官网了
如果使用模板方式进行开发,可以使用 unplugin-vue-components 和 unplugin-auto-import 这两款插件来开启按需加载及自动导入的支持。
插件会自动解析模板中的使用到的组件,并导入组件和对应的样式文件。
需要组件库version >= 2.11.0。注意:这种方法并不会处理用户在 script 中手动导入的组件,比如 Message 组件,用户仍需要手动导入组件对应的样式文件,例如
@arco-design/web-vue/es/message/style/css.js。具体的代码就是这样的
// presets\plugins\index.ts import { ArcoResolver } from 'unplugin-vue-components/resolvers' const getPlugins: () => PluginOption[] = () => [ // 其他配置 Components({ dts: resolve(__dirname, './../types/components.d.ts'), resolvers: [ // 其他 resolver ArcoResolver({ sideEffect: true }) ] }) ] -
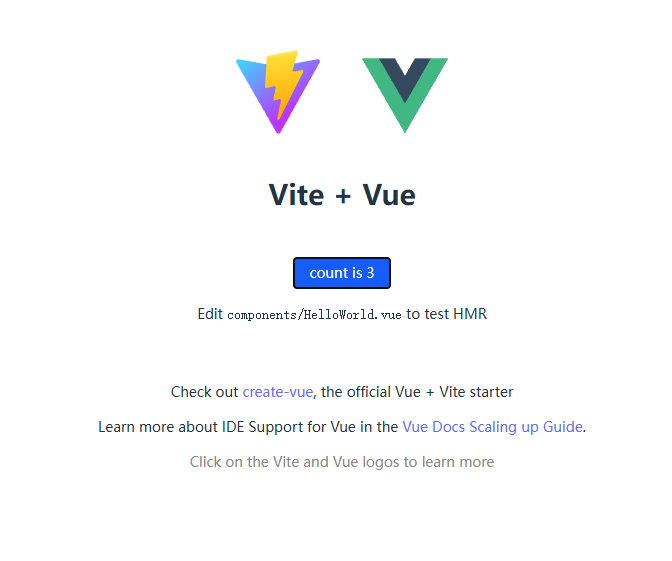
然后就是使用了,我这里就用个简单的把
HelloWorld的count++按钮换成组件库的。<script setup lang="ts"> // import { ref } from 'vue' // 无需引入组件直接使用 defineProps<{ msg: string }>() const count = ref(0) </script> <template> <h1>{{ msg }}</h1> <div class="card"> <a-button type="primary" @click="count++">count is {{ count }}</a-button> <p> Edit <code>components/HelloWorld.vue</code> to test HMR </p> </div> <p> Check out <a href="https://vuejs.org/guide/quick-start.html#local" target="_blank" >create-vue</a >, the official Vue + Vite starter </p> <p> Learn more about IDE Support for Vue in the <a href="https://vuejs.org/guide/scaling-up/tooling.html#ide-support" target="_blank" >Vue Docs Scaling up Guide</a >. </p> <p class="read-the-docs">Click on the Vite and Vue logos to learn more</p> </template> <style scoped> .read-the-docs { color: #888; } </style>效果图:
其他的就不多多说了,看官网组件使用就行了。
Svg图标相关
Svg图标肯定是每个项目都会用到的,这里我们就封装个 svg-icon 的组件,用来加载svg图标
我们使用vite-plugin-svg-icons插件来实现
-
安装依赖
pnpm install vite-plugin-svg-icons -D -
配置插件
我们来到
presets\plugins\index.ts,没有整合的朋友就在vite.config.ts中配置哈。import { resolve } from 'path' import type { PluginOption } from 'vite' import { createSvgIconsPlugin } from 'vite-plugin-svg-icons' const getPlugins: () => PluginOption[] = () => [ // 其他插件配置 createSvgIconsPlugin({ // 指定需要缓存的图标文件夹 iconDirs: [resolve(process.cwd(), 'src/assets/svg')], // 指定symbolId格式 symbolId: 'icon-[name]', }), ] export default getPlugins配置好,运行项目会发现报一个关于
Cannot find package 'fast-glob'的错需要我们安装一下这个包pnpm install fast-glob -D -
在
src/main.ts内引入注册脚本(注意:要安装svg插件的类型依赖 )pnpm install @types/vite-plugin-svg-icons -Dimport 'virtual:svg-icons-register'这里就有一个坑爹的问题出现了,导入这个虚拟模块会报错。官方
README给出了解决方案,就是// tsconfig.json { "compilerOptions": { "types": ["vite-plugin-svg-icons/client"] } }我们添加上发现报错找不到
vite-plugin-svg-icons/client入口。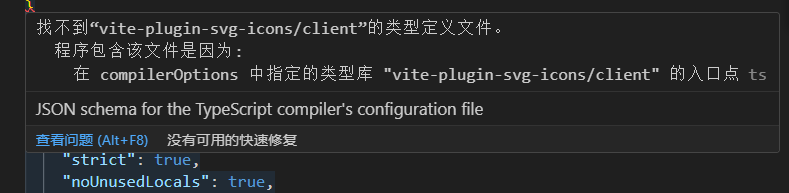
这不坑爹吗?看了下
node_modules\vite-plugin-svg-icons\package.json。里面根本就没有导出./client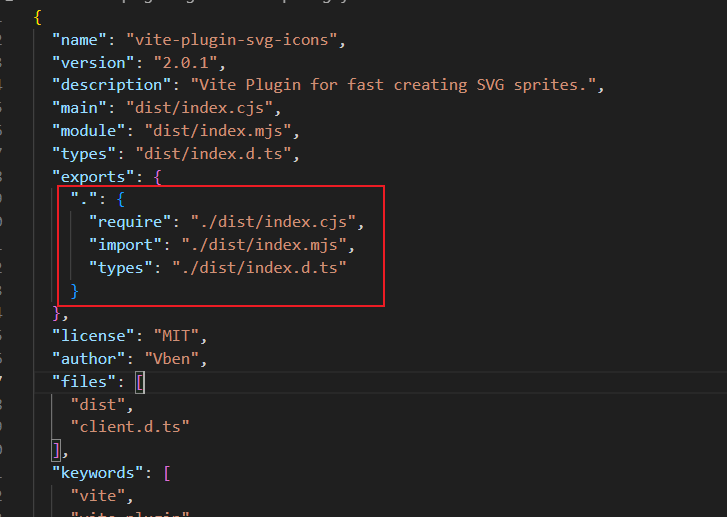
我特么直接裂开,这个项目已经停止维护了,搞补丁包又太麻烦了,我这里直接自定义一个声明这样简单粗暴无报错。
新建一个
presets\types\svg-icons.d.ts文件,在里面添加上虚拟模块的类型声明// presets\types\svg-icons.d.ts // 这里是 client.d.ts 的内容我直接复制过来的 declare module 'virtual:svg-icons-register' { // eslint-disable-next-line const component: any export default component } declare module 'virtual:svg-icons-names' { // eslint-disable-next-line const iconsNames: string[] export default iconsNames }这样虚拟模块
virtual:svg-icons-register的引入报错就解决了 -
封装
svg-icon组件<!-- src\components\SvgIcon\index.vue --> <script setup lang="ts"> const props = defineProps({ prefix: { type: String, default: "icon", }, iconName: { type: String, required: false, }, color: { type: String, }, size: { type: String, default: "1em", }, }); const symbolId = computed(() => `#${props.prefix}-${props.iconName}`) </script> <template> <svg aria-hidden="true" class="svg-icon" :style="'width:' + size + ';height:' + size" > <use :xlink:href="symbolId" /> </svg> </template> <style scoped> .svg-icon { display: inline-block; outline: none; overflow: hidden; vertical-align: -0.15em; } </style> -
使用
svg-icon组件我们把
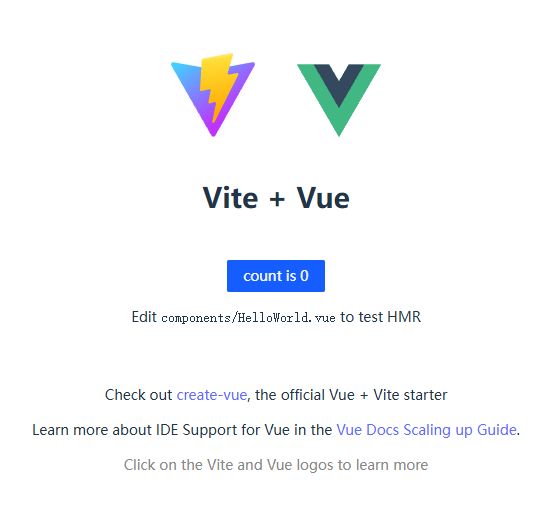
App.vue的vue.svg图片加载替换成我们封装的组件<!-- src\App.vue --> <template> <div> <a href="https://vite.dev" target="_blank"> <img src="/vite.svg" class="logo" alt="Vite logo" /> </a> <a href="https://vuejs.org/" target="_blank"> <SvgIcon class="logo" icon-name="vue" size="6em"></SvgIcon> </a> </div> <HelloWorld msg="Vite + Vue" /> </template>效果如下,完全没有问题啊。
CSS 预处理器
Vite 提供了对 .scss,.sass,.less,.styl 和 .stylus 文件的内置支持。没有必要为它们安装特定的 Vite 插件,但必须安装相应的预处理器依赖。
我们宠幸一下 scss 吧,没有看不起其他人的意思哈。
灰常的简单,安装依赖就能用 (安装嵌入式版本 sass-embedded性能要好些)
pnpm install sass-embedded -D
vite.config.ts的css.preprocessorOptions配置,可以参考官网给的链接,这里咱就不说了哈,需要的自取。
UnoCSS引入
这是一款 css 原子化引擎,css原子化好处的话总就是方便,谁用谁知道。
所以 css 原子化好啊,css 原子化得学啊,因为真男人必会UnoCSS(不是广告,没收钱)
-
安装
pnpm add -D unocss -
插件配置
// presets\plugins\index.ts import UnoCSS from 'unocss/vite' const getPlugins: () => PluginOption[] = () => [ UnoCSS() ] export default getPlugins -
创建
uno.config.ts文件,默认的预设是@unocss/preset-uno,我这里配置了Wind预设// uno.config.ts import { defineConfig } from 'unocss' import presetWind from '@unocss/preset-wind' export default defineConfig({ presets: [presetWind()], rules: [ // 自定义规则根据自己需求来 ] }) -
将
virtual:uno.css添加到您的主入口文件// main.ts import 'virtual:uno.css' -
使用添加预设得类就行,用过原子化得都会用吧,不会的话就去学一下,或者直接不用原子化,没影响的,一样是开发。
大家都会用吧,我就不举例了哈
路由配置
路由的话我们都是使用官方路由 vue-router ,大家应该都会用吧,我就不多讲了哈。
一般我们都是创建组件然后配置路由规则,酱紫操作对不对?
很麻烦对不对?
可曾听闻文件路由生成器?
也就是根据文件目录结构,自动生成路由规则。是不是很高级?是不是没懂?配置完你就懂了。
我们用到的插件是:vite-plugin-pages
-
安装依赖
pnpm install -D vite-plugin-pages pnpm install vue-router -
插件配置
// presets\plugins\index.ts
import Pages from 'vite-plugin-pages'

const getPlugins: () => PluginOption[]  = () => [
  Pages({
    dirs: 'src/view',
    extensions: ['vue'],
    exclude: ['**/components/*.vue', '**/components/*/*.vue'] // 忽略页面的抽离的组件
  })
]
export default getPlugins
这里说一下 Pages 插件的配置参数,我们一般就配置
dirs、extensions、exclude。dirs:指定页面文件所在的目录,支持单目录字符串或多目录配置数组
类型:
string | (string | PageOptions)[]默认值:
'src/pages'interface PageOptions { /** * Page base directory. * @default 'src/pages' */ dir: string /** * Page base route. */ baseRoute: string /** * Page file pattern. * @example `**\/*.page.vue` */ filePattern?: string }-
extensions:指定识别为页面的文件后缀。 -
exclude:指定需要排除的文件 / 目录(支持 glob 模式或正则)。 -
importMode:指定页面组件的导入方式(同步 / 异步)类型:
'sync' | 'async' | ((filepath: string) => 'sync' | 'async')默认值:
'async'(生产环境)/'sync'(开发环境) -
routeBlockLang:指定SFC(单文件组件)中路由块的语言(如json5、yaml)。默认值:
'json5' -
resolver:指定路由解析器,用于适配不同框架的路由规则。类型:Resolver | Resolver[]
默认值:根据项目框架自动选择(如
vueResolver、reactResolver) -
extendRoute:用于自定义修改生成的路由配置(如添加元信息、重写路径)。类型:
(route: Route, parent: Route | undefined) => Route | void -
nuxtStyle:启用Nuxt.js风格的路由规则(如_slug.vue表示动态参数)。类型:boolean
默认值:false
-
onRoutesGenerated:路由生成后触发的回调,可批量修改路由数组。类型:
(routes: Route[]) => Route[] | void -
onClientGenerated:客户端路由代码生成后触发的回调,可修改最终生成的代码。类型:
(clientCode: string) => string | void
-
路由配置入口创建
新建
src\router\index.ts用于创建路由对象接受pages生成的路由规则。// src\router\index.ts import { createRouter, createWebHistory } from 'vue-router' import routes from '~pages' const router = createRouter({ history: createWebHistory('/'), routes }) router.beforeEach(() => {}) router.afterEach(() => {}) export default router这个
~pages是会类型报错的,需要添加类型声明引用指令,新建presets\types\vite-env.d.ts// vite-env.d.ts /// <reference types="vite-plugin-pages/client" /> -
注入路由
// src\main.ts import { createApp } from 'vue' import './style.css' import App from './App.vue' import 'virtual:svg-icons-register' import 'virtual:uno.css' import { createPinia } from 'pinia' import router from '@/router' const pinia = createPinia() createApp(App).use(pinia).use(router).mount('#app') -
然后我们就看看效果
我们首先把
App.vue的内容全部不要(记得拷贝一份或者重新写不要模板自带的示例页面),模板里面添加<RouterView />标签作为路由组件挂载的地方。<!-- src\App.vue --> <template> <RouterView /> </template> <style scoped> </style>然后新建
src\views\index\index.vue,将App.vue之前的内容复制过去。<!-- src\views\index\index.vue --> <script lang="ts" setup> </script> <template> <div> <a href="https://vite.dev" target="_blank"> <img src="/vite.svg" class="logo" alt="Vite logo" /> </a> <a href="https://vuejs.org/" target="_blank"> <SvgIcon class="logo" icon-name="vue" size="6em"></SvgIcon> </a> </div> <HelloWorld msg="Vite + Vue" /> </template> <style scoped> .logo { height: 6em; padding: 1.5em; will-change: filter; transition: filter 300ms; } .logo:hover { filter: drop-shadow(0 0 2em #646cffaa); } .logo.vue:hover { filter: drop-shadow(0 0 2em #42b883aa); } </style>运行项目,完美实现

接着我们加一个登录页,新建
src\views\login\index.vue<!-- src\views\login\index.vue --> <script setup lang="ts"> </script> <template> <div> 登录页 </div> </template> <style scoped> </style>地址栏输入
login路由,没有一点问题哈。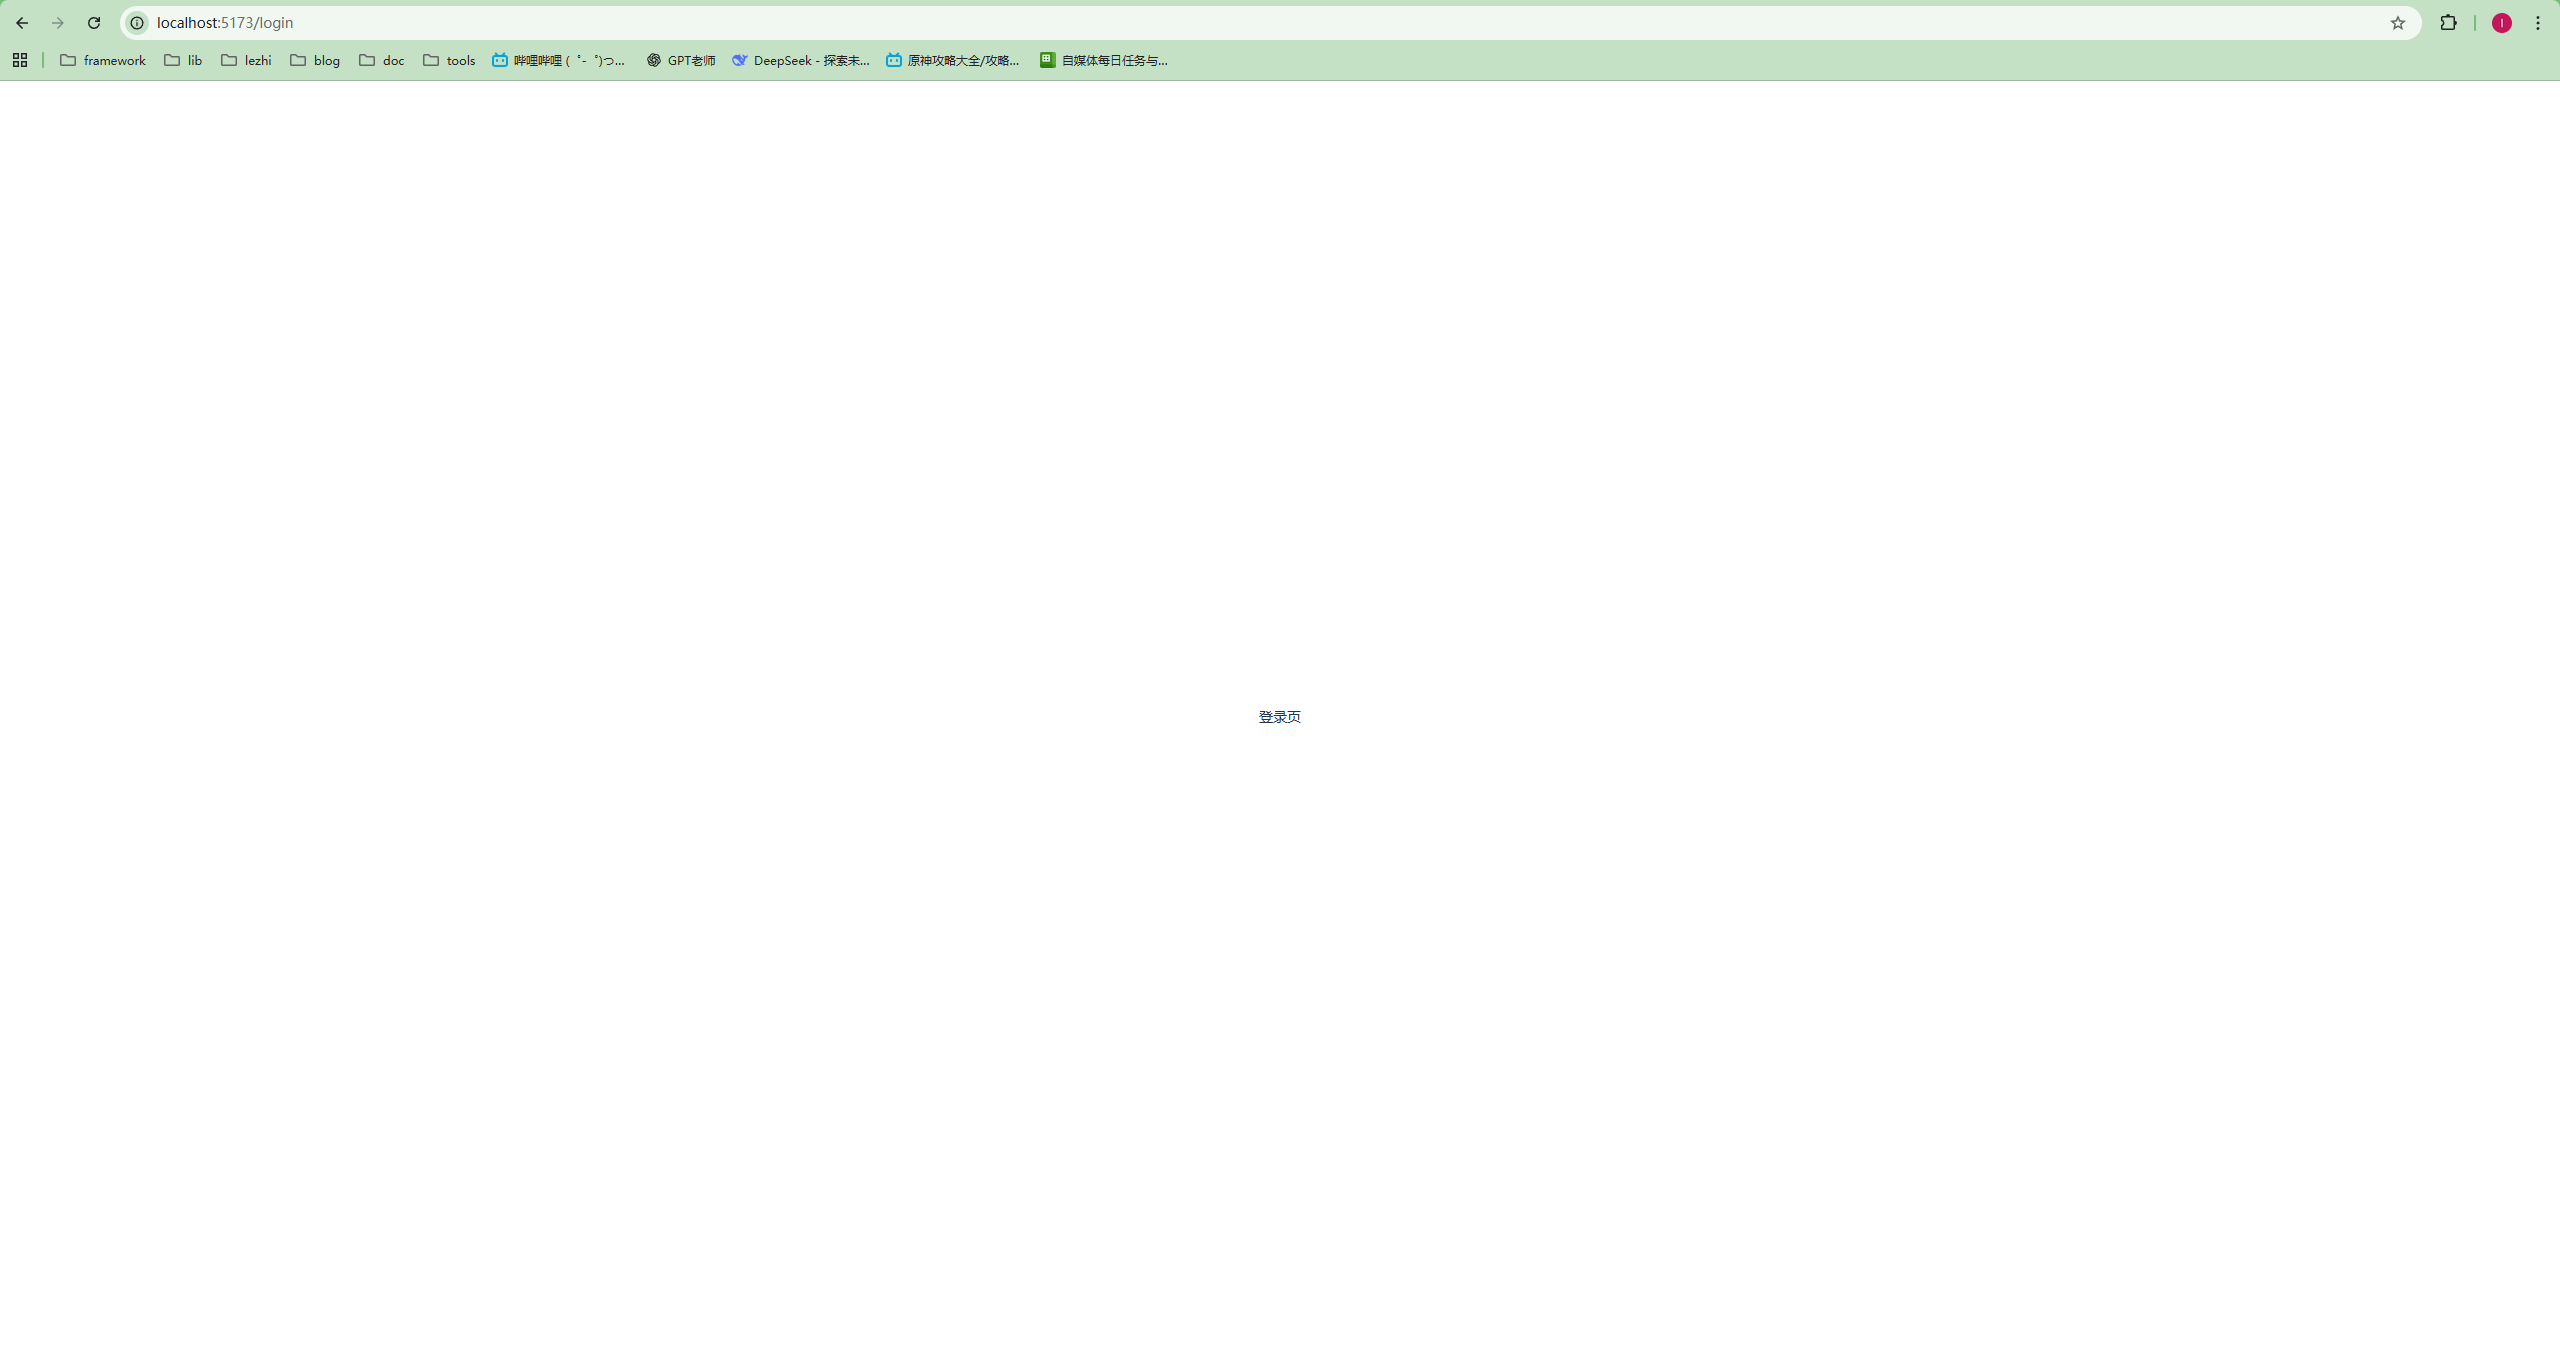
还是有点问题,字有点小,无伤大雅。
这样我们的根据文件系统自动生成路由的功能就配置好了,是不是很方便,觉得方便的把方便打在评论区。
公共布局Layout配置
我们将头部尾部侧边栏在这些功能的部分抽离成组件,可以大大的提升开发效率。
优点多多,相信大家自己的项目也都会做。
这里我们会用到 vite-plugin-vue-layouts ,这是一个基于路由器的 Vue 3 应用布局的插件,而且配合 vite-plugin-pages食用效果更佳哦。
-
老规矩先安装
pnpm install -D vite-plugin-vue-layouts -
插件配置
// presets\plugins\index.ts import Layouts from 'vite-plugin-vue-layouts' const getPlugins: () => PluginOption[] = () => [ Layouts({ layoutsDirs: 'src/layouts', // 布局组件存放目录 defaultLayout: 'index' // 默认的布局组件 }) ] export default getPlugins -
然后就是编写我们布局组件了,里面其他组件我就展示代码了,根据自己情况来就行(主内容区域一定要
<router-view></router-view>入口)。<!-- src\layouts\index.vue --> <template> <div class="layout h-full flex flex-col"> <layout-header></layout-header> <div class="flex-1 flex"> <layout-sidebar></layout-sidebar> <layout-main></layout-main> </div> <layout-footer></layout-footer> </div> </template> <script setup lang="ts"> import { LayoutHeader, LayoutMain, LayoutSidebar, LayoutFooter } from './components' </script> <style scoped> </style><!-- src\layouts\components\Main\index.vue --> <template> <main class="main flex-1"> <router-view></router-view> </main> </template> <script setup lang="ts"> </script> <style scoped> </style> -
在路由中配置布局
import { createRouter, createWebHistory } from 'vue-router'
import routes from '~pages'
import { setupLayouts } from 'virtual:generated-layouts'

const router = createRouter({
  history: createWebHistory('/'),
  routes: setupLayouts(routes) // 将布局组件注入到路由规则中
})

router.beforeEach(() => {
  console.log(routes)
})

router.afterEach(() => {})

export default router
看看效果
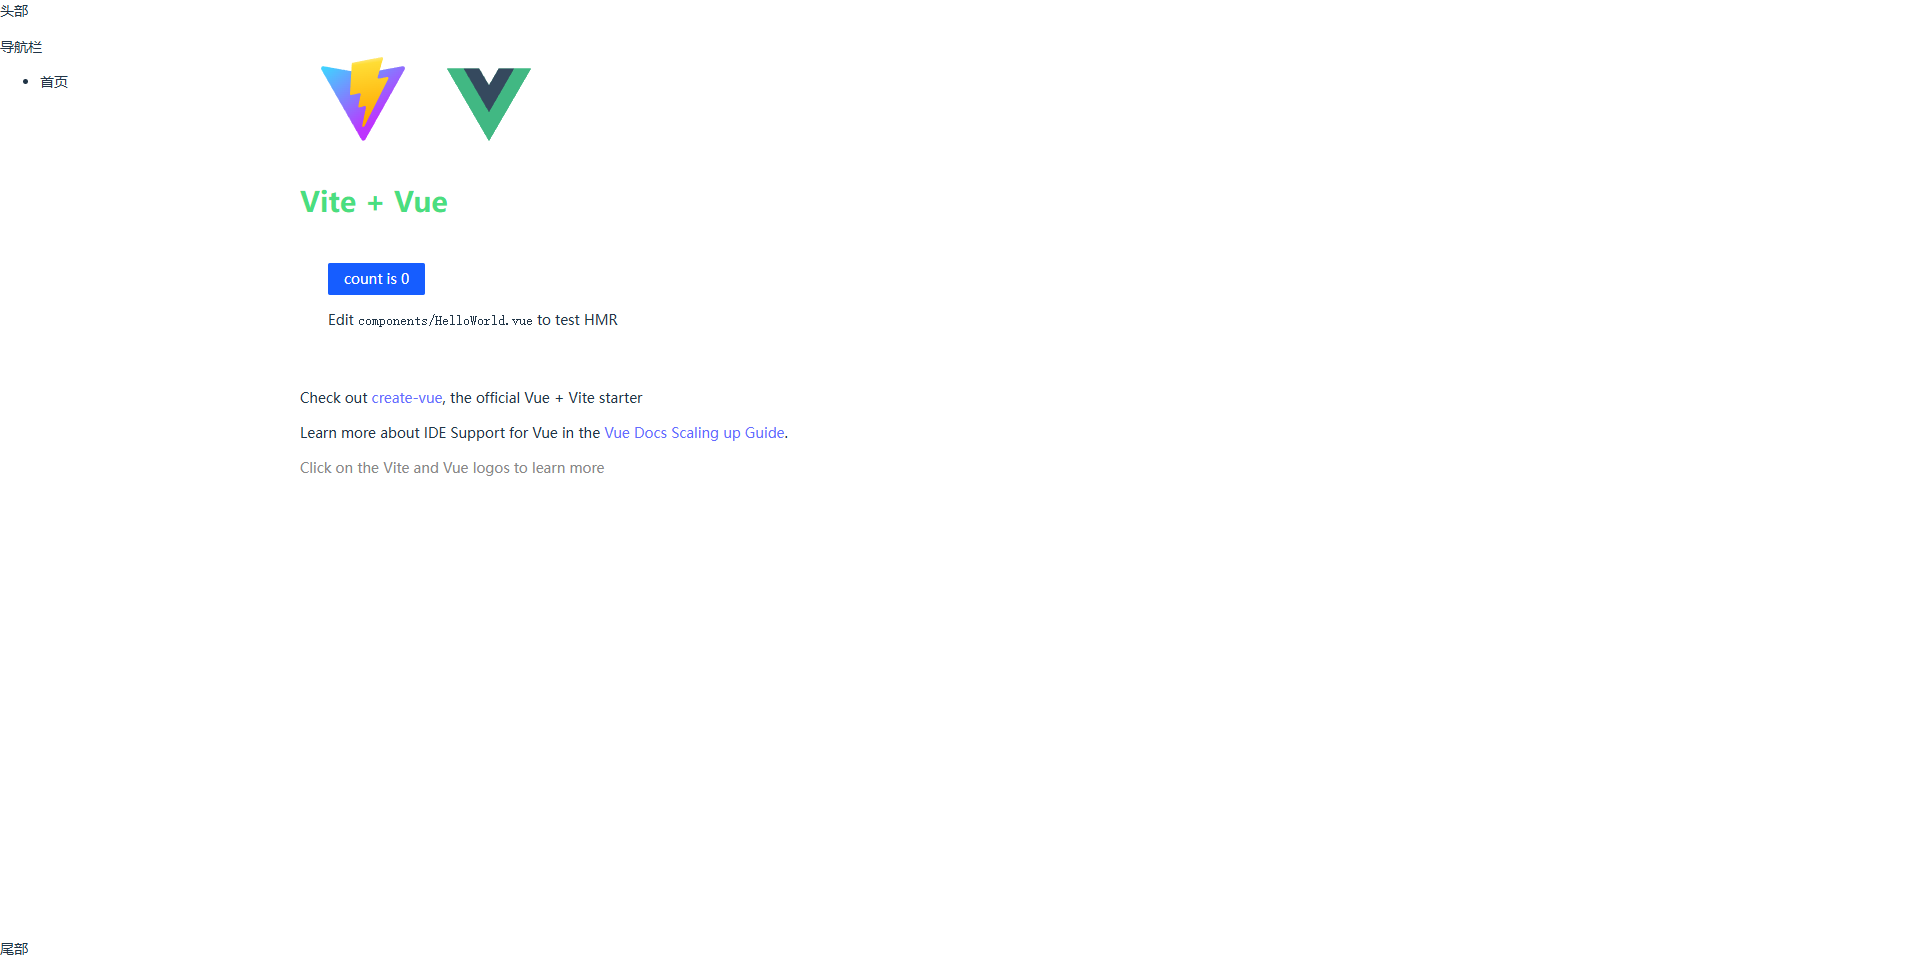
有点粗糙将就着看哈
这个时候有同学就会问了,那我们有些页面如果不想要这个布局,该怎么办呢?
-
好办,我们再写一个布局,在view页面里面加上一个 route 配置即可(比如这个登录页,就会使用
src\layouts\without.vue的布局)。<script setup lang="ts"> </script> <template> <div> 登录页 </div> </template> <style scoped> </style> <route lang="yaml"> meta: layout: without name: without </route>
Pinia状态管理
符合直觉的
Vue.js状态管理库类型安全、可扩展性以及模块化设计。 甚至让你忘记正在使用的是一个状态库。
vue团队新推出的状态管理库虽然也不是很新了,状态管理库知道吧就是之前的vuex
那我们为什么要使用Pinia呢?
请看vcr
看完了吧,我开始配置Pinia了
-
安装
pnpm install pinia -
创建
pinia实例并注入到vue应用中// src\main.ts import { createPinia } from 'pinia' const pinia = createPinia() createApp(App).use(pinia).mount('#app') -
定义Store(我们这里就定义一个user的状态管理器),在
src下新建一个store文件夹,再在里面新建一个user.ts// src\store\user.ts import { defineStore } from 'pinia' export default defineStore('user', { state: () => ({ userName: '', // 用户名状态 }), getters: {}, actions: { setUserName(userName: string) { this.userName = userName }, } }) -
因为我们以后是有很多状态管理器的为了方便引用,我们调整一下目录结构,我们再
store目录下新建一个module文件夹,我们把store状态管理器全部放到module中,再通过index.ts统一导出,like this。// src\store\index.ts export * as useUserStore from './module/user' -
接下来就是使用状态管理器了,我们简单的模拟一下登录和退出登录的过程。
-
首先我们需要配置一下路由守卫,如果没有登录信息的时候直接跳转到登录页。
// src\router\index.ts import { createRouter, createWebHistory } from 'vue-router' import routes from '~pages' import { setupLayouts } from 'virtual:generated-layouts' import { useUserStore } from '@/store' // 导入状态管理器 const router = createRouter({ history: createWebHistory('/'), routes: setupLayouts(routes) }) router.beforeEach((to, from, next) => { const { userName } = storeToRefs(useUserStore()) if (userName.value) { // 已登录 if (to.path === '/login') { next('/') return } } else { // 未登录 if (to.path !== '/login') { next('/login') return } } next() }) router.afterEach(() => {}) export default router -
然后我们在登录页加一个登录按钮,点击就设置一下用户名,就用这个来模拟登录了
<script setup lang="ts">
import { useUserStore } from '@/store'
import router from '@/router'

const { setUserName } = useUserStore()

const handleLogin = () => {
  setUserName('CL')
  router.replace('/')
}
</script>

<template>
  <div>
    登录页
    <a-button @click="handleLogin">登录</a-button>
  </div>
</template>

<style scoped>

</style>

<route lang="yaml">
meta:
  layout: without
  name: without
</route>这样就好了点击登录就会直接跳转到首页
这样就好了,点击登录就能跳转到首页。
-
-
这个时候又有新问题了,我们点击刷新之后,登录信息就没有了,又会跳转到登录页,这肯定不是我们想看到的。
接下来要做就是状态的持久化,这里也要用到一个插件
pinia-plugin-persistedstate。-
引入方法很简单,这是一个
pinia插件只需要用pinia实例调用即可// src\main.ts import { createApp } from 'vue' import './style.css' import App from './App.vue' import 'virtual:svg-icons-register' import 'virtual:uno.css' import { createPinia } from 'pinia' import router from '@/router' import piniaPluginPersistedstate from 'pinia-plugin-persistedstate' const pinia = createPinia().use(piniaPluginPersistedstate) createApp(App).use(pinia).use(router).mount('#app') -
然后我们在状态管理器中配置上允许持久化
import { defineStore } from 'pinia'

export default defineStore('user', {
  state: () => ({
    userName: '', // 用户名
  }),
  getters: {},
  actions: {
    setUserName(userName: string) {
      this.userName = userName
    },
  },
  persist: true, // 持久化配置
})
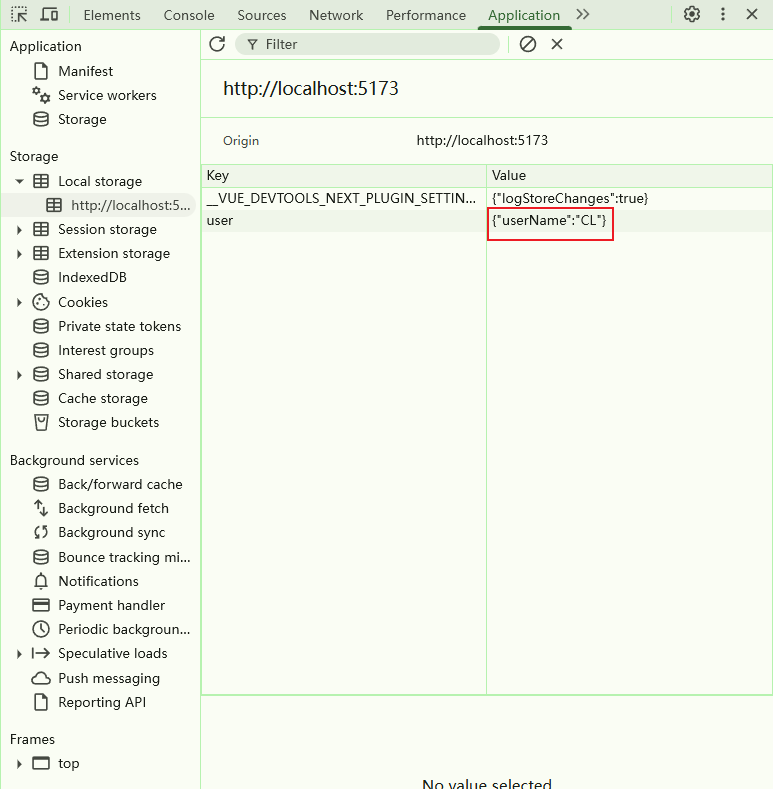
这就就行了,我们点击登录就可以看到
LocalStorage里面有我们状态信息,这样刷新页面状态也是保持着的,退出登录很简单我就不多说了
-
环境变量配置
我们在开发中肯定会遇到各种各样的环境,比如开发环境(本地环境)、测试环境、预发布环境、正式环境
Vite的内置常量
Vite 在特殊的 import.meta.env 对象下暴露了一些常量。这些常量在开发阶段被定义为全局变量,并在构建阶段被静态替换,以使树摇(tree-shaking)更有效。
import.meta.env.MODE: {string} 应用运行的模式。import.meta.env.BASE_URL: {string} 部署应用时的基本 URL。他由base配置项决定。import.meta.env.PROD: {boolean} 应用是否运行在生产环境(使用NODE_ENV='production'运行开发服务器或构建应用时使用NODE_ENV='production')。import.meta.env.DEV: {boolean} 应用是否运行在开发环境 (永远与import.meta.env.PROD相反)。import.meta.env.SSR: {boolean} 应用是否运行在 server 上。
.env 文件
Vite 会从我们的 环境目录 中的下列文件加载额外的环境变量
.env                # 所有情况下都会加载
.env.local          # 所有情况下都会加载,但会被 git 忽略
.env.[mode]         # 只在指定模式下加载
.env.[mode].local   # 只在指定模式下加载,但会被 git 忽略

.env.local(本地覆盖,.gitignore 忽略)> .env.[mode].local > .env.[mode] > .env(通用)   # 优先级
如果只有少量的的环境可以直接在根目录创建.env 文件,如果很多的话可以在根目录创建一个 env 目录管理.env 文件,注意要配置一下环境目录
我这里假设有这些环境
project/
├── env/
│   ├── .env                # 通用配置
│   ├── .env.development    # 开发环境(npm run dev 自动加载)
│   ├── .env.pre            # 预发布环境(需手动指定:vite --mode pre)
│   ├── .env.production     # 生产环境(npm run build 自动加载)
│   ├── .env.test           # 测试环境(需手动指定:vite --mode test)
// vite.config.ts
export default defineConfig({
  // 其他配置...
  envDir: 'env',
})
自定义环境变量
Vite 自动将环境变量暴露在 import.meta.env 对象下,作为字符串。
为了防止意外地将一些环境变量泄漏到客户端,只有以 VITE_ 为前缀的变量才会暴露给经过 vite 处理的代码,以开发环境为例:
# 开发环境
VITE_APP_TITLE = 'vue3-template-app'
VITE_APP_PORT = 3000
VITE_APP_BASE_API = '/dev'
// js/ts 中使用环境变量
console.log(import.meta.env.VITE_APP_TITLE) // "vue3-template-app"
<!-- HTML 文件中替换环境变量 -->
<h1>Vite is running in %MODE%</h1>
TypeScript 的智能提示
根据官网教程添加类型
// presets\types\vite-env.d.ts
interface ViteTypeOptions {
  // 添加这行代码,你就可以将 ImportMetaEnv 的类型设为严格模式,
  // 这样就不允许有未知的键值了。
  // strictImportMetaEnv: unknown
}

interface ImportMetaEnv {
  readonly VITE_APP_TITLE: string
  readonly VITE_APP_PORT: number
  readonly VITE_APP_BASE_API: string
}

interface ImportMeta {
  readonly env: ImportMetaEnv
}
接口请求相关配置
代理
我们在开发环境联调接口时肯定是会跨域的,所以配置代理是必须的,我们需要在 server 配置项添加 proxy 配置,因为要用到环境变量需要用到 mode 参数,需要修改一下配置结构。
//
import { defineConfig, loadEnv } from 'vite'
import { resolve } from 'path'
import plugins from './presets/plugins'


// https://vite.dev/config/
export default defineConfig(({ mode }) => {
  // 加载环境变量
  const env = loadEnv(mode, resolve(process.cwd(), 'env'))

  const {
    VITE_APP_PORT = 5173,
    VITE_APP_BASE_API = '/api',
    VITE_APP_PROXY_TARGET = 'http://127.0.0.1:8000'
  } = env

  // 重写路径匹配正则
  const reg = new RegExp(`\\/${VITE_APP_BASE_API}`);

  return {
    plugins: plugins(),
    resolve: {
      alias: [
        { find: '@', replacement: resolve(process.cwd(), 'src') },
      ]
    },
    envDir: 'env',
    server: {
      port: Number(VITE_APP_PORT), // 开发服务器端口
      proxy: {
        [VITE_APP_BASE_API]: {
          target: VITE_APP_PROXY_TARGET, // 接口地址
          rewrite: (path) => path.replace(reg, ""), // 重写路径
          changeOrigin: true,
        }
      }
    }
  }
})
Axios引入封装
Axios 是一个基于 promise 网络请求库,作用于node.js 和浏览器中。 它是 isomorphic 的(即同一套代码可以运行在浏览器和node.js中)。在服务端它使用原生 node.js http 模块, 而在客户端 (浏览端) 则使用 XMLHttpRequest。
安装
pnpm add axios
用法我这里就不细讲了,参考官网的api文档即可。
统一请求封装
-
创建
axios实例// src\utils\request.ts import axios from 'axios' const service = axios.create({ baseURL: import.meta.env.BASE_URL, timeout: 80 * 1000, }) -
请求拦截器是发起请求前统一处理逻辑的核心环节,本质是 “请求发送前的钩子”,能大幅提升代码复用性、安全性和可维护性。
请求拦截的核心应用场景根据自己的需求添加:
- 统一注入认证信息
- 统一设置请求头
- 处理 Token 过期 / 自动刷新
- 请求参数加密
// src\utils\request.ts // 请求拦截器 我这里只配置了认证信息和统一设置请求头 service.interceptors.request.use((config: InternalAxiosRequestConfig) => { if (!config.headers['Content-Type']) config.headers['Content-Type'] = 'application/json;utf-8' const token = localStorage.getItem('token') config.headers['Authorization'] = token return config }, (error: AxiosError) => { console.error('[Axios请求拦截器错误]', error.message); return Promise.reject(error) } ) -
响应拦截器是请求收到响应后、业务代码处理前的统一处理环节(可理解为 “响应返回的钩子”),核心价值是收口通用逻辑、屏蔽底层细节、统一异常处理,让业务代码只关注 “有效数据” 或 “明确的业务错误”。
响应拦截的核心应用场景根据自己的需求添加:
- 统一解析响应数据
- 统一处理错误
- 响应数据解密
- 下载文件 / 二进制响应处理
还是只配置一些简单的东西,根据自己的项目情况进行调整。
// src\utils\request.ts
// 响应拦截器
service.interceptors.response.use(
  (response: AxiosResponse<any, any>) => {
    const { status, data: Data, config }: { status: number; data: any, config: any } = response
    if (config && config.responseType && config.responseType == 'blob') {
      return Data
    }
    if (status === 200) {
      const { code, data, msg } = Data
      if (code === 200) {
        return data || {}
      }
      if (code === 401) {
        setTimeout(() => (window.location.href = '/'), 1000)
      }
      Message.error(msg || errorMessage)
    }
    if (status === 401) {
      Message.error('登陆失效,请重新登陆')
      setTimeout(() => (window.location.href = '/'), 1000)
    }
    return Promise.reject()
  },
  async (error) => {
    Message.error(error?.response?.data?.msg || errorMessage)
    return Promise.reject(error)
  }
)
代码规范
ESLint代码检测
ESlint是一个插件化的JS代码检查工具,相信大家都是知道的吧
-
首先就是安装依赖,最新版的
ESlint9.0.0版本的采用了扁平配置的默认配置方式pnpm create @eslint/config@latest运行安装配置命令后,系统会询问你一系列问题,以确定你如何使用
ESLint以及应包含哪些选项,根据个人项目情况选择即可。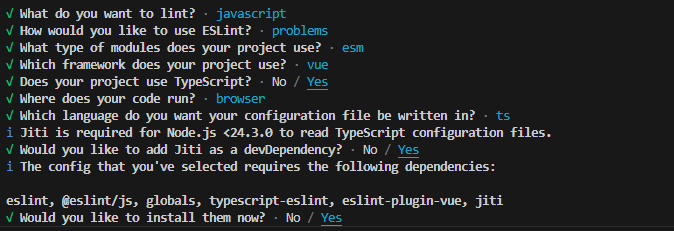
// eslint.config.ts import js from "@eslint/js"; import globals from "globals"; import tseslint from "typescript-eslint"; import pluginVue from "eslint-plugin-vue"; import { defineConfig } from "eslint/config"; export default defineConfig([ { files: ["**/*.{js,mjs,cjs,ts,mts,cts,vue}"], plugins: { js }, extends: ["js/recommended"], languageOptions: { globals: globals.browser } }, tseslint.configs.recommended, pluginVue.configs["flat/essential"], { files: ["**/*.vue"], languageOptions: { parserOptions: { parser: tseslint.parser } } }, ]); -
欧克,配置完成跑一下检测命令看看。
npx eslint
让我们看看是啥问题,来一一解决。

首先是这自动引入的报undefined,我们可以添加自定义规则覆盖掉no-undef的配置export default defineConfig([ // 其他配置, { files: ["**/*.{js,mjs,cjs,ts,mts,cts,vue}"], rules: { // 核心:关闭 ESLint 原生未定义变量检查(AutoImport 变量无需手动声明) "no-undef": "off", }, }, ])
这个是
Vue组件名必须是多个单词组成,最优解决办法肯定是修改组件名,也可以自定规则vue/multi-word-component-names,添加忽略组件名。export default defineConfig([ // 其他配置, { files: ["**/*.vue"], rules: { "vue/multi-word-component-names": [ "error", { ignores: ["index", "without"] }, ], }, }, ]) -
添加忽略文件
export default defineConfig([
  // 其他配置,
  globalIgnores(["dist/", "public/", ".husky/", ".vscode/", ".idea/", "*.sh", "*.md"])
])
Prettier 代码格式化
-
安装
Prettierpnpm add --save-dev --save-exact prettier -
添加
Prettier配置文件,根目录新建.prettierrc.cjs,我们直接复制官网的默认配置,根据自己的习惯更改团队统一就好。// .prettierrc.cjs module.exports = { arrowParens: "always", bracketSameLine: false, objectWrap: "preserve", bracketSpacing: true, semi: false, experimentalOperatorPosition: "end", experimentalTernaries: false, singleQuote: false, jsxSingleQuote: false, quoteProps: "as-needed", trailingComma: "all", singleAttributePerLine: false, htmlWhitespaceSensitivity: "css", vueIndentScriptAndStyle: false, proseWrap: "preserve", endOfLine: "lf", insertPragma: false, printWidth: 80, requirePragma: false, tabWidth: 2, useTabs: false, embeddedLanguageFormatting: "auto", } -
添加忽略文件,根目录新建
.prettierignore// .prettierignore dist node_modules public .husky .vscode .idea *.sh *.md -
配置
vscode保存时自动格式化搜索安装插件

在
setting.json添加保存自动格式化以及默认格式化工具的配置{ "editor.formatOnSave": true, // 保存格式化文件 "editor.defaultFormatter": "esbenp.prettier-vscode" // 指定 prettier 为所有文件默认格式化器 }这样我们保存的时候就自动格式化了。
Git提交规范
Git初始化
-
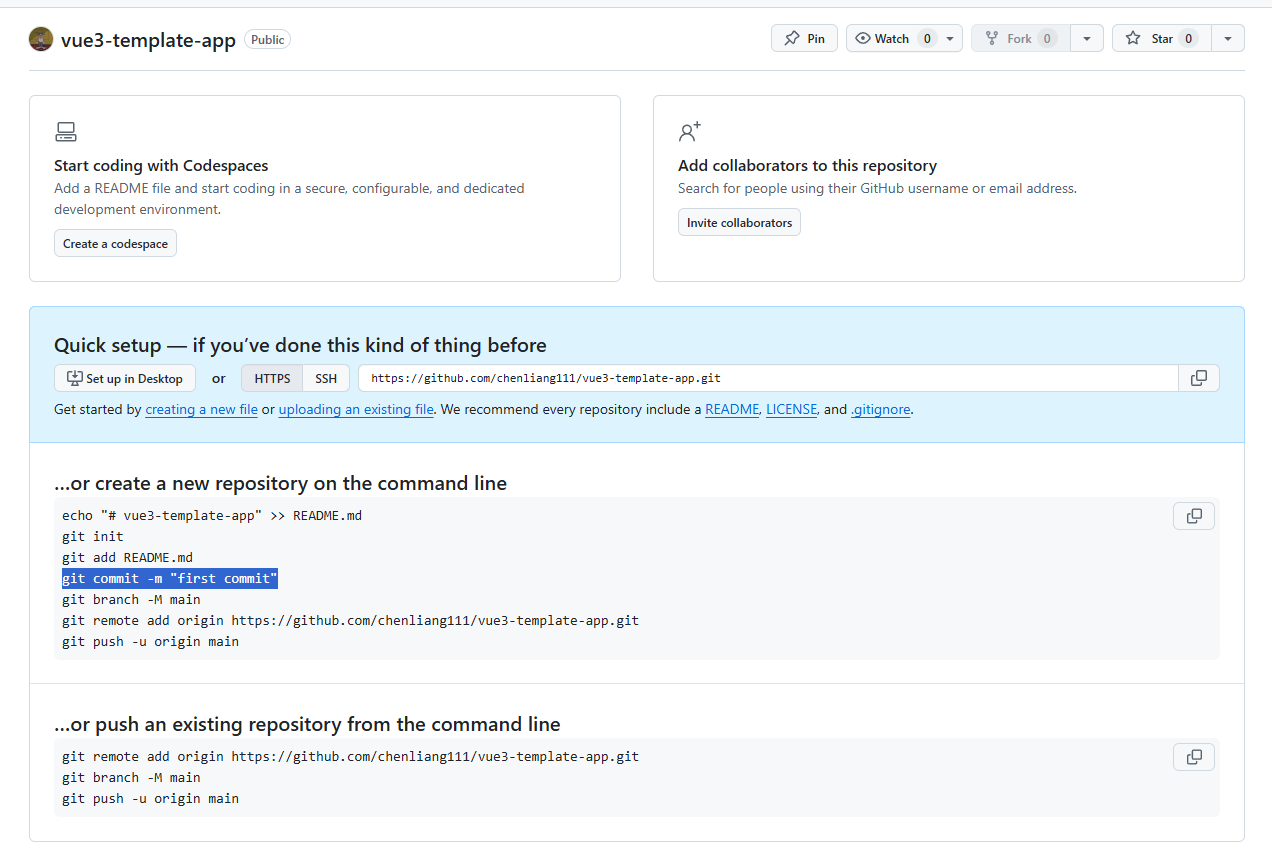
新建仓库,这里我就用Github创建了啊
-
然后按照提示命令操作就可以了,add和commit操作等我们这里先配置好git的钩子再执行。
Hasky
Husky 是一个 Git 钩子工具,在提交或推送时,自动化 检查提交信息、检查代码 和 运行测试。
-
安装
pnpm add --save-dev husky -
执行下面的初始化命令会在
.husky/中创建pre-commit脚本,并更新package.json中的prepare脚本。随后可根据你的工作流进行修改。npx husky init
lint-staged
lint-staged 是一个前端开发工具,核心作用是只对 Git 暂存区(staged)的文件执行指定的校验 / 格式化命令,避免每次校验都扫描整个项目,大幅提升开发效率。
-
安装
pnpm add --save-dev lint-staged -
添加 lint-staged 配置
// package.json { // 其他配置... "lint-staged": { "*.{js,ts,vue,jsx,tsx}": "eslint --fix", "*.{js,jsx,ts,tsx,md,html,css,lees,scss,sass}": "prettier --write" } } -
修改
pre-commit# .husky\pre-commit npx lint-staged -
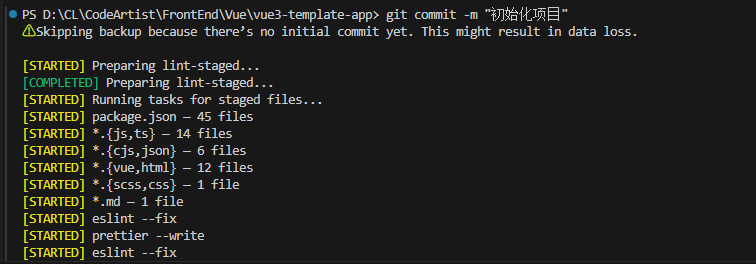
执行 git commit 就会先执行 npx lint-staged
Commitlint
Commitlint帮助您的团队遵循提交规范
-
安装
pnpm add -D @commitlint/cli @commitlint/config-conventional -
添加配置
commitlint.config.js,这里直接复制了官网示例配置,具体的自定义规则请参照Rules configuration。import type { UserConfig } from "@commitlint/types" const Configuration: UserConfig = { /* * 从 node_modules 中解析并加载 @commitlint/config-conventional。 * 所引用的包必须已安装。 */ extends: ["@commitlint/config-conventional"], /* * 从“node_modules”目录中解析并加载“conventional-changelog-atom”模块。 * 所引用的包必须先进行安装。 */ parserPreset: "conventional-changelog-atom", /* * 从“node_modules”目录中解析并加载“conventional-changelog-atom”模块。 * 所引用的包必须先进行安装。 */ formatter: "@commitlint/format", /* * 此处定义的任何规则都将优先于 @commitlint/config-conventional 中的规则。 */ rules: { // "type-enum": [2, "always", ["foo"]], }, /* * Array of functions that return true if commitlint should ignore the given message. * Given array is merged with predefined functions, which consist of matchers like: * * - 'Merge pull request', 'Merge X into Y' or 'Merge branch X' * - 'Revert X' * - 'v1.2.3' (ie semver matcher) * - 'Automatic merge X' or 'Auto-merged X into Y' * * To see full list, check https://github.com/conventional-changelog/commitlint/blob/master/%40commitlint/is-ignored/src/defaults.ts. * To disable those ignores and run rules always, set `defaultIgnores: false` as shown below. */ ignores: [(commit) => commit === ""], /* * Whether commitlint uses the default ignore rules, see the description above. */ defaultIgnores: true, /* * Custom URL to show upon failure */ helpUrl: "https://github.com/conventional-changelog/commitlint/#what-is-commitlint", /* * Custom prompt configs */ prompt: { messages: {}, questions: { type: { description: "please input type:", }, }, }, } export default Configuration -
在“提交消息”钩子中添加提交消息的校验功能
官网是让用下面这个命令去生成
echo "pnpm dlx commitlint --edit `$1`" > .husky/commit-msg结果好像不行,我真服了

他还在等待我输入填充
$1的东西呢,我直接手动添加吧我找到一个其他的生成命令
npx husky add .husky/commit-msg "npx --no -- commitlint --edit $1"注意这个提醒

这个文件必须要是
UTF-8不然执行会出错 -
然后提交一下试试
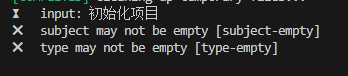
检测没问题
Commitizen
Commitizen是一个交互式提交工具当您使用 Commitizen 进行提交时,系统会在提交时提示您填写任何必要的提交字段。您无需再等到稍后通过 Git 提交钩子来运行并拒绝您的提交(尽管这种做法仍有一定帮助作用)。
-
安装
Commitizenpnpm install commitizen --save-dev -
安装与
commitlint规则对齐的的Commitizen适配器pnpm install cz-conventional-changelog --save-dev -
package.json中添加commitizen配置{ "config": { "commitizen": { "path": "./node_modules/cz-conventional-changelog" } } } -
添加
cz命令脚本{ "scripts": { "commit": "cz" }, } -
执行
pnpm run commit代替git commit命令,开始交互式提交。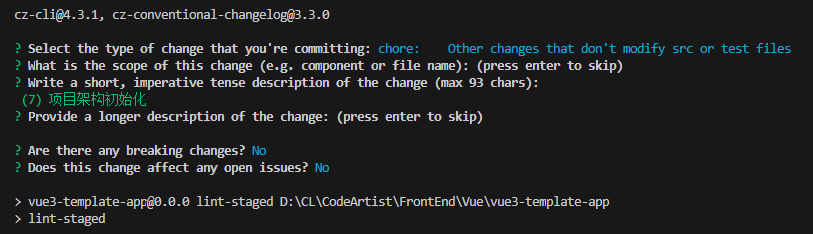
结语
ok,差不多就这样了。后续可能会将一些插件单独写文章细讲(也可能懒就不写了)。
如果文中有问题欢迎各位大佬指正,一起学习一起进步。
如果项目配置遇到问题或者有更多更新的提升开发效率的插件,也欢迎大家一起讨论。


 5320
5320

 被折叠的 条评论
为什么被折叠?
被折叠的 条评论
为什么被折叠?
 到【灌水乐园】发言


