 深度学习应用:图像分类


 这篇博客介绍了如何使用深度神经网络进行图像分类,特别是猫与非猫的区分。作者通过构建2层和L层深度神经网络,展示了模型的构建过程,并在训练后比较了两者的性能。L层网络在测试集上的准确率达到了84%,优于2层网络的72%。文章还提供了错误分类的图像分析,以及如何使用个人图像进行测试的方法。
Deep Neural Network for Image Classification: Application
您将使用您在先前任务中实现的功能来构建深层网络,并将其应用于cat与非cat分类。希望您会看到相对于之前的逻辑回归实现的准确性有所提高。
完成此任务后,您将能够:构建并应用深度神经网络进行监督学习。
让我们首先导入在此分配期间您需要的所有包。
- numpy是使用Python进行科学计算的基础包。
- matplotlib是一个用Python绘制图形的库。
- h5py是与存储在H5文件中的数据集进行交互的通用包。
- 此处使用PIL和scipy来测试您的模型,最后使用您自己的图片。
- dnn_app_utils提供在“构建您的深度神经网络:逐步”中为此笔记本分配的功能。
- np.random.seed(1)用于保持所有随机函数调用一致。它将帮助我们评估您的工作。
import time
import numpy as np
import h5py
import matplotlib.pyplot as plt
import scipy
from PIL import Image
from scipy import ndimage
from dnn_app_utils import *

%matplotlib inline
plt.rcParams['figure.figsize'] = (5.0, 4.0) # set default size of plots
plt.rcParams['image.interpolation'] = 'nearest'
plt.rcParams['image.cmap'] = 'gray'

%load_ext autoreload
%autoreload 2

np.random.seed(1)
2 - 数据集
您将使用与“Logistic回归为神经网络”(作业2)相同的“Cat vs non-Cat”数据集。 您构建的模型在对猫和非猫图像进行分类时具有70%的测试准确度。 希望您的新模型表现更好!
问题陈述:您将获得一个数据集(“data.h5”),其中包含:
- 标记为猫(1)或非猫(0)的m_train图像训练集
- 标记为猫和非猫的m_test图像的测试集
- 每个图像的形状(num_px,num_px,3),其中3表示3个通道(RGB)。
让我们更熟悉数据集。 通过运行下面的单元格加载数据。
train_x_orig, train_y, test_x_orig, test_y, classes = load_data()
以下代码将显示数据集中的图像。 随意更改索引并重复运行单元格以查看其他图像。
# Example of a picture
index = 10
plt.imshow(train_x_orig[index])
print ("y = " + str(train_y[0,index]) + ". It's a " + classes[train_y[0,index]].decode("utf-8") +  " picture.")
# Explore your dataset
m_train = train_x_orig.shape[0]
num_px = train_x_orig.shape[1]
m_test = test_x_orig.shape[0]

print ("Number of training examples: " + str(m_train))
print ("Number of testing examples: " + str(m_test))
print ("Each image is of size: (" + str(num_px) + ", " + str(num_px) + ", 3)")
print ("train_x_orig shape: " + str(train_x_orig.shape))
print ("train_y shape: " + str(train_y.shape))
print ("test_x_orig shape: " + str(test_x_orig.shape))
print ("test_y shape: " + str(test_y.shape))
像往常一样,您在将图像送入网络之前对图像进行整形和标准化。 代码在下面的单元格中给出。
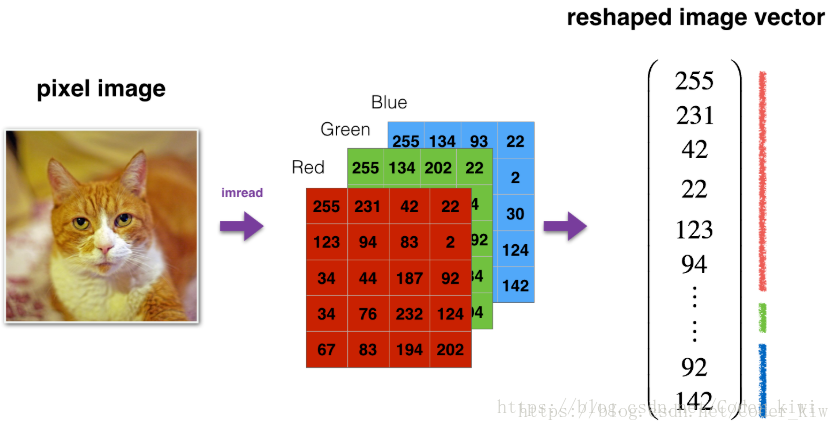
# Reshape the training and test examples
train_x_flatten = train_x_orig.reshape(train_x_orig.shape[0], -1).T   # The "-1" makes reshape flatten the remaining dimensions
test_x_flatten = test_x_orig.reshape(test_x_orig.shape[0], -1).T

# Standardize data to have feature values between 0 and 1.
train_x = train_x_flatten/255.
test_x = test_x_flatten/255.

print ("train_x's shape: " + str(train_x.shape))
print ("test_x's shape: " + str(test_x.shape))
最低0.47元/天 解锁文章


 697
697

 被折叠的 条评论
为什么被折叠?
被折叠的 条评论
为什么被折叠?
 到【灌水乐园】发言


