


引言:
在当今人工智能领域,语言模型的应用日益广泛。如何在本地环境中高效、安全地部署该模型,是许多用户面临的一大挑战。本文将聚焦于使用SGLang框架在单机和集群环境下对DeepSeek-R1模型进行私有化部署的实践,旨在为用户提供一套简洁高效的部署指南。
1. SGlang框架简介
SGlang是一个专为混合专家(MoE)语言模型设计的高性能推理引擎,其中DeepSeek-R1便是其支持的模型之一。它具备多节点张量并行计算的能力,可实现多台机器的协同作业,进而满足大规模模型部署的需求。SGlang还支持FP8(W8A8)以及KV缓存优化,并借助Torch Compile技术进一步提升推理效率。
2、安装部署
a: Docker方式安装
Using Docker (Recommended)
# Pull latest image# https://hub.docker.com/r/lmsysorg/sglang/tagsdocker pull lmsysorg/sglang:latest# Launchdocker run --gpus all --shm-size 32g -p 30000:30000 -v ~/.cache/huggingface:/root/.cache/huggingface --ipc=host --network=host --privileged lmsysorg/sglang:latest \python3 -m sglang.launch_server --model deepseek-ai/DeepSeek-V3 --tp 8 --trust-remote-code --port 30000
If you are using RDMA, please note that:
--network hostand--privilegedare required by RDMA. If you don't need RDMA, you can remove them.- You may need to set
NCCL_IB_GID_INDEXif you are using RoCE, for example:export NCCL_IB_GID_INDEX=3.
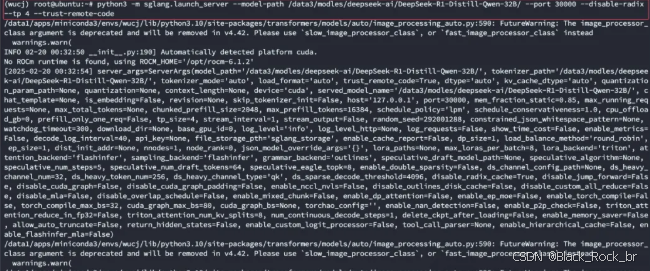
b:conda 的 pip方式安装
on ubuntu 22.04-使用阿里云镜像站点,也可以用清华源
# 安装# pip install --upgrade pip#pip install sgl-kernel --force-reinstall --no-deps -i https://mirrors.aliyun.com/pypi/simple#pip install "sglang[all]>=0.4.3.post2" --find-links https://flashinfer.ai/whl/cu124/torch2.5/flashinfer-python -i https://mirrors.aliyun.com/pypi/simple默认会安装最新版本的transformers,启动有问题,需要安装transformers==4.48.2root@ubuntu:~# pip remove transformers #卸载已经安装的transformersroot@ubuntu:~# pip install transformers==4.48.2 -i https://mirrors.aliyun.com/pypi/simple#重新安装4.48.2# Launch 启动root@ubuntu:~# python3 -m sglang.launch_server --model-path /data3/modles/deepseek-ai/DeepSeek-R1-Distill-Qwen-32B/ --port 30000 --disable-radix --tp 4 --trust-remote-code
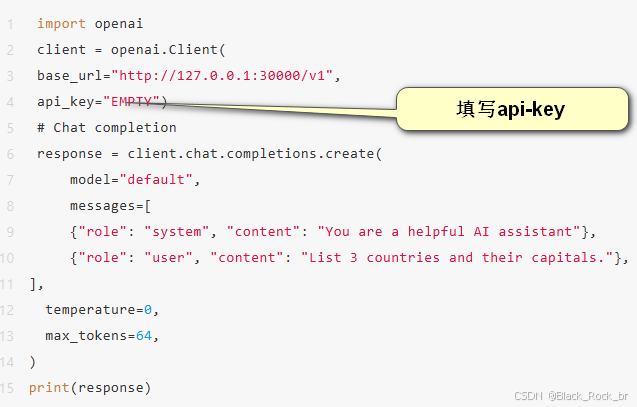
3、使用 OpenAI API 发送请求-示例
4、多节点部署
普通部署,假设使用两个 H20*8 节点服务
# node 1python3 -m sglang.launch_server --model-path deepseek-ai/DeepSeek-V3 --tp 16 --dist-init-addr 10.0.0.1:5000 --nnodes 2 --node-rank 0 --trust-remote-code# node 2python3 -m sglang.launch_server --model-path deepseek-ai/DeepSeek-V3 --tp 16 --dist-init-addr 10.0.0.1:5000 --nnodes 2 --node-rank 1 --trust-remote-code
多节点的docker,本人没有试过所以不在这里举例。
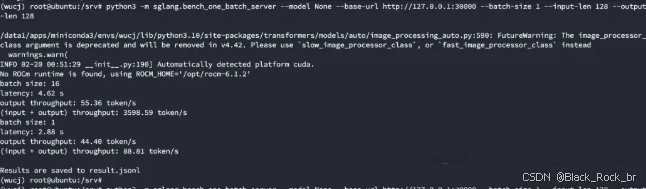
5、压测
root@ubuntu:/srv# python3 -m sglang.bench_one_batch_server --model None --base-url http://127.0.0.1:30000 --batch-size 1 --input-len 128 --output-len 128root@ubuntu:/srv# python3 -m sglang.bench_one_batch_server --model None --base-url http://127.0.0.1:30000 --batch-size 10 --input-len 1280 --output-len 1280
就实际举例就到这里,我们来总结一下:
通过上述实践,我们详细介绍了在单机和集群环境下使用SGLang框架对个别模型进行私有化部署的简单过程。从环境准备到模型加载,再到性能优化和监控,能够满足用户在不同硬件环境下的需求。希望本文提供的部署指南能够帮助更多用户私有化部署,充分发挥其强大的语言处理能力,为相关应用场景带来更大的体验。


 1520
1520

 被折叠的 条评论
为什么被折叠?
被折叠的 条评论
为什么被折叠?
 到【灌水乐园】发言


