


一、元组的基本概念
元组 ( t u p l e ) (tuple) (tuple),在 C + + 11 C++11 C++11标准加入标准库,是一个类模板,可以将不同类型的数据保存(组合)在一起,换句话说, t u p l e tuple tuple是一个能够存储不同类型的容器。
关于 t u p l e tuple tuple的使用和展开,在之前这篇文章有讲过:【可变参模板】可变参类模板,使用的是继承的方式展开的可变参模板。
二、元组的实现
2.1 元组的基本定义
这里,我们使用另一种方法实现std::tuple,使用的是作为成员变量递归展开的方式,称为递归组合展开。
参考下方代码,其中特化版本1是递归的开始,特化版本2用于递归的终止:
//递归展开tuple
//泛化版本
template<typename... Types>
class tuple;
//特化版本1
template<typename First, typename... Others>
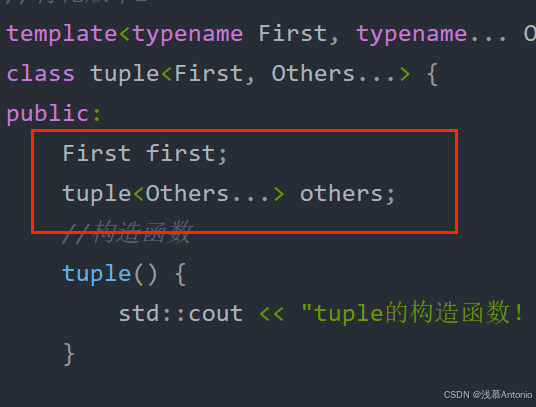
class tuple<First, Others...> {
public:
First first;
tuple<Others...> others;
};
//特化版本2
template<>
class tuple<> {
public:
};
通过对成员变量的初始而不断展开模板:
2.2 元组的构造函数实现
2.2.1 tuple的默认构造
tuple的默认构造很简单,这里不过多介绍:
tuple() {
	std::cout << "空参版本的tuple构造函数!" << std::endl;
}
2.2.2 tuple的拷贝构造函数
t u p l e tuple tuple的拷贝构造函数也可以直接使用初始化列表进行拷贝:
	//拷贝构造函数实现
	tuple(const tuple<First, Others...>& tmptpl)
		:first(tmptpl.first), others(tmptpl.others) {
		std::cout << "tuple的拷贝构造函数!" << std::endl;
	}
2.2.3 tuple的构造函数模板
如果一开始就需要传入一包参数进行初始化呢,我们这里使用万能引用+完美转发来实现这个构造函数模板。
这样,如果遇到tuple<std::string>("123")这样的情况,可以保留参数的属性,转发调用相应的构造函数,减少额外的的拷贝开销:
template<typename C_First, typename... C_Others>
tuple(C_First&& parf, C_Others&&... paro)
	:first(std::forward<C_First>(parf)), others(std::forward<C_Others>(paro)...) {

	std::cout << "tuple的构造函数模板!" << std::endl;
}
2.2.4 拷贝构造函数模板的实现
有时,如果我们想让tuple<long long,double>的类型接受tuple<int,float>的类型,在逻辑上是完全可以的,因为不会类型转换是合法的,而拷贝构造函数没有这样的匹配,因此需要实现一个拷贝构造函数模板:
代码如下:
//拷贝构造函数模板
template<typename C_First,typename... C_Others>
tuple(const tuple<C_First, C_Others...>& tmptpl)
	:first(tmptpl.first), others(tmptpl.others) {
	std::cout << "tupld的拷贝构造函数模板!" << std::endl;
}
2.2.5 解决构造模板匹配的问题
当我们写下下方代码时,本意上是希望编译器调用拷贝构造函数的,但实际上编译器会认为调用构造函数模板更为合适,那么此时就会发生编译错误
//拷贝构造函数
tuple<int, double, float, char>tp4(tp2);
std::cout << "type = " << typeid(decltype(tp4)).name() << std::endl << std::endl;
这里的解决方法是,如果是调用构造函数模板的话,C_Frist的类型一定是tuple类型。
利用这一点,我们在tuple的类内设置一个函数,然后再利用std::declval在意义上调用这个函数,成功调用与否可以得到一个
b
o
o
l
bool
bool类型的
v
a
l
u
e
value
value值,利用这个值我们可以使用std::enable_if来判断是否合法。
对于std::enable_if可以参考这个文章:std:enable_if的实现。
而对于 d e c l v a l declval declval实现类内是否有某个函数,参考下方代码:
//HasMemFunc类

//泛化版本
template<typename T,typename U = std::void_t<>>
struct HasMemFunc :std::false_type {

};

//特化版本
template<typename T>
struct HasMemFunc<T,std::void_t<decltype(std::declval<T>().myfunc_MTL())>> :std::true_type {

};
也可以参考这篇文章:【模板进阶】std::void_t 。
最终改造后的构造函数模板如下:
class tuple<First, Others...> {
public:
	First first;
	tuple<Others...> others;

	//特殊的成员函数,用于防止构造函数模板误用
	void myfunc_MTL() {};

	//构造函数模板
	template<typename C_First, typename... C_Others,
		typename = std::enable_if_t<!HasMemFunc<C_First>::value>>
	tuple(C_First&& parf, C_Others&&... paro)
		:first(std::forward<C_First>(parf)), others(std::forward<C_Others>(paro)...) {

		std::cout << "tuple的构造函数模板!" << std::endl;
	}
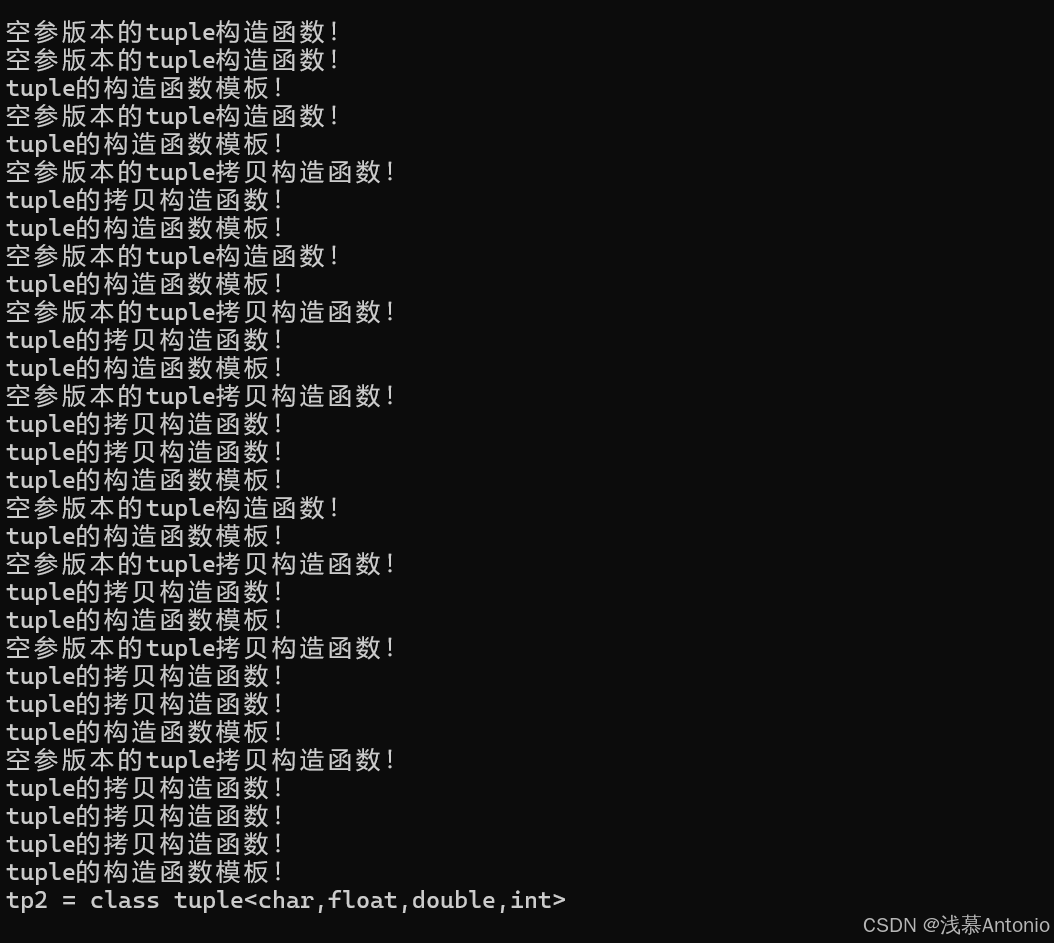
下面是对构造函数的测试:
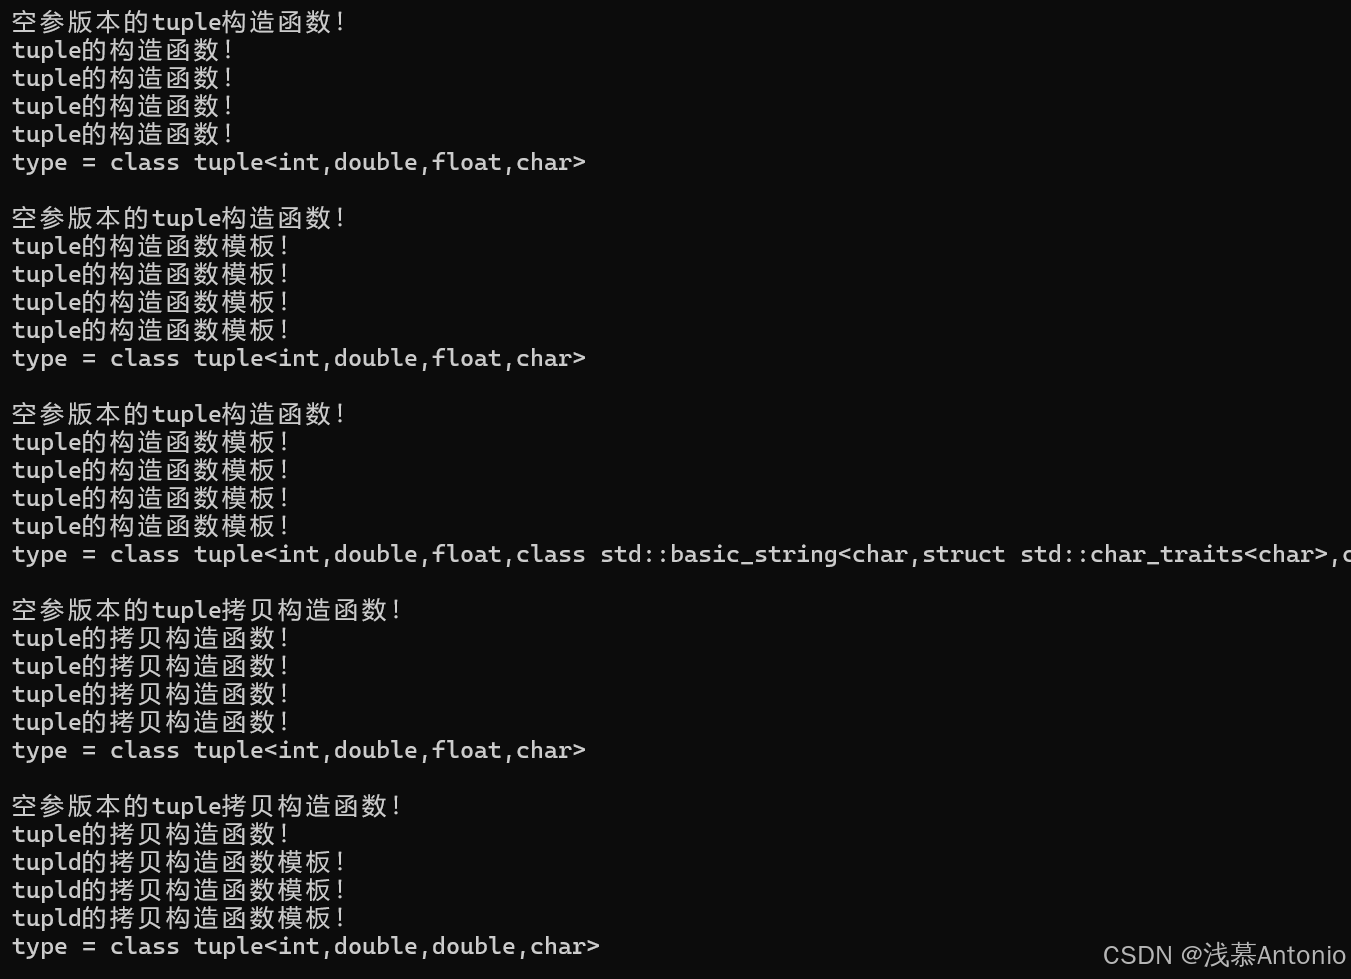
void Test1() {
//默认构造
tuple<int, double, float, char>tp1;
std::cout << "type = " << typeid(decltype(tp1)).name() << std::endl << std::endl;
//构造函数模板
tuple<int, double, float, char>tp2(1, 1.0, 1.0f, '1');
std::cout << "type = " << typeid(decltype(tp2)).name() << std::endl << std::endl;
//构造函数模板
tuple<int, double, float, std::string>tp3(1, 1.0, 1.0f, "1");
std::cout << "type = " << typeid(decltype(tp3)).name() << std::endl << std::endl;
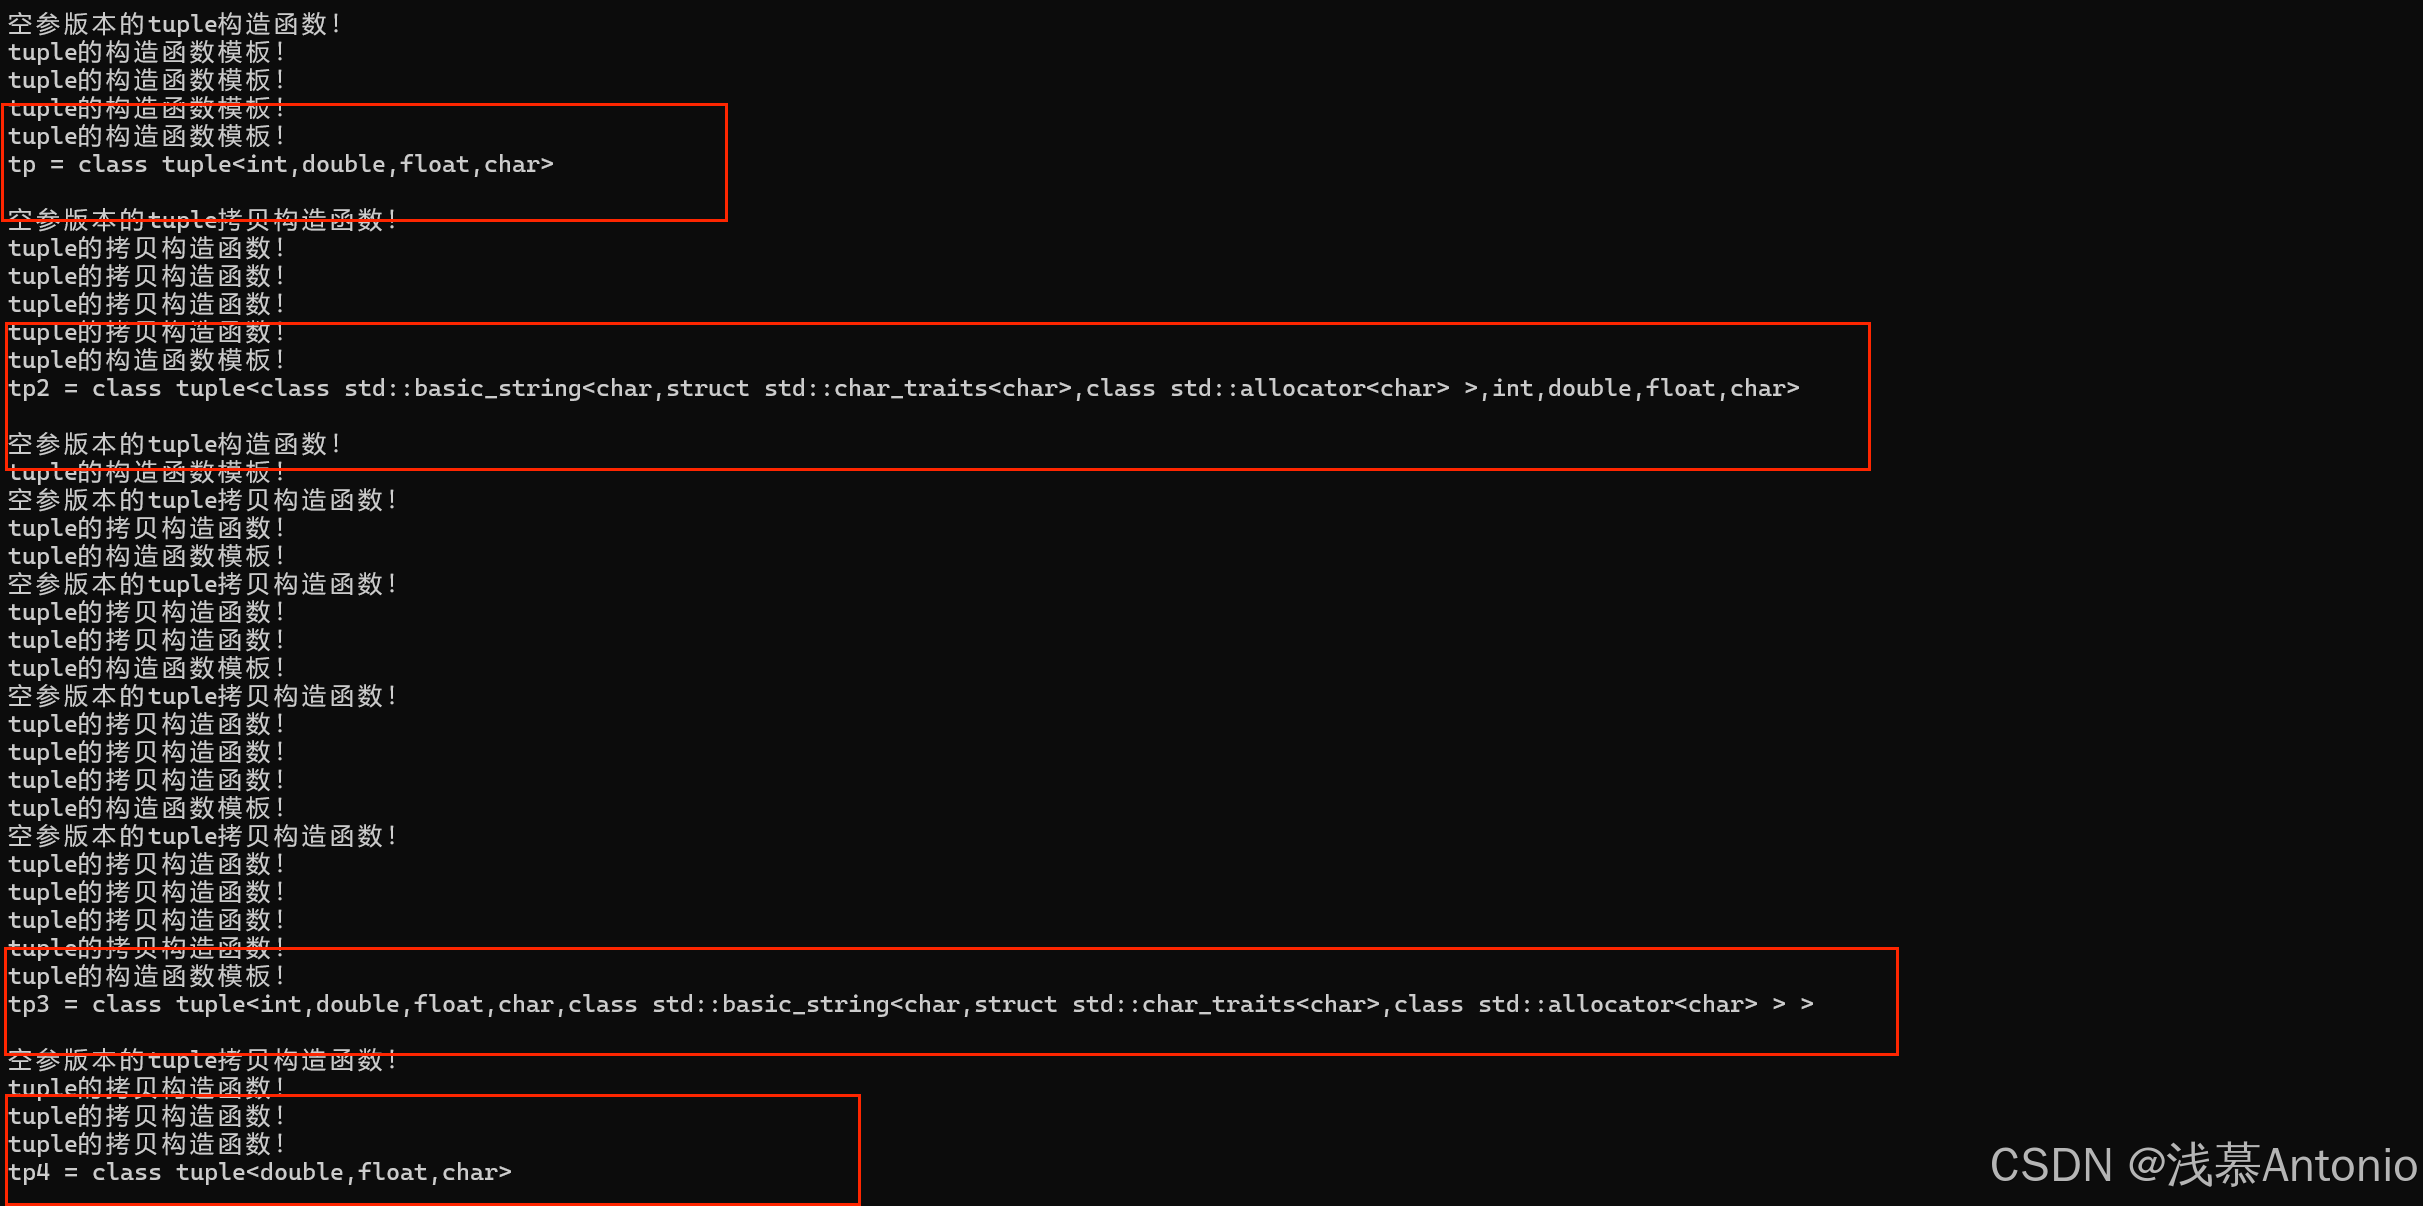
//拷贝构造函数
tuple<int, double, float, char>tp4(tp2);
std::cout << "type = " << typeid(decltype(tp4)).name() << std::endl << std::endl;
//拷贝构造函数模板
tuple<int, double, double, char>tp5(tp4);
std::cout << "type = " << typeid(decltype(tp5)).name() << std::endl << std::endl;
}
结果如下:
三、 g e t get get函数模板的实现
通过 g e t get get这个函数模板,可以得到指定索引的元素的值。
不过在实现这个之前,还需要实现一个萃取的类模板,通过递归调用展开可变参模板,直到索引为 0 0 0时返回相应的值:
//泛化版本
template<size_t index_v>
class TplGet {
public:
	template<typename First,typename... Others>
	static auto myget(const tuple<First, Others...>& tmptpl) {
		return TplGet<index_v - 1>::myget(tmptpl.others);
	}
};

//特化版本
template<>
class TplGet<0> {
public:
	template<typename First,typename ...Others>
	static auto myget(const tuple<First, Others...>& tmptpl) {
		return tmptpl.first;
	}
};
然后,我们的 g e t get get函数模板直接调用它即可了:
//get函数模板
template<size_t index_v,typename ...Types>
auto get(const tuple<Types...>& tmptpl) {
return TplGet<index_v>::myget(tmptpl);
}
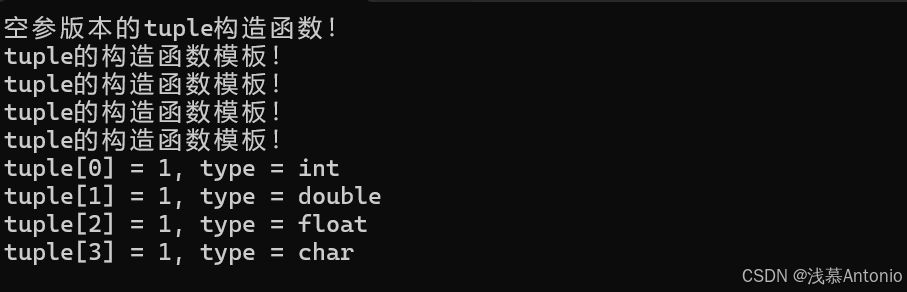
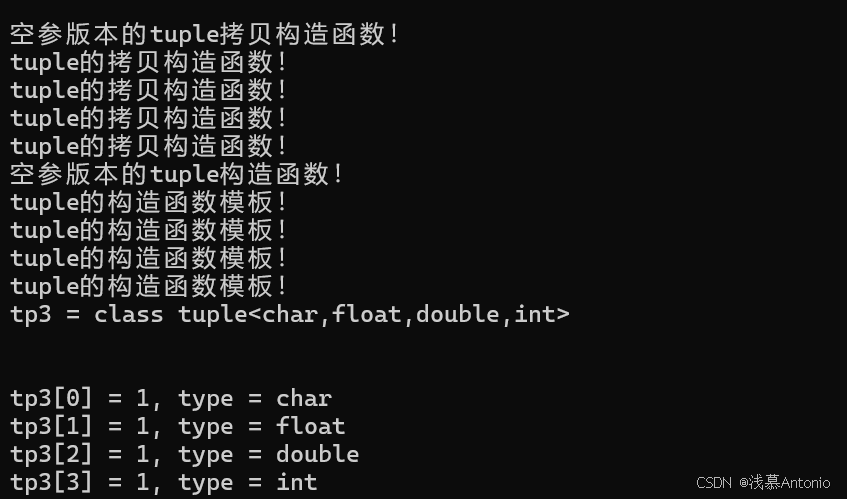
void Test2() {
tuple<int, double, float, char>tp(1, 1.0, 1.0f, '1');
std::cout << "tuple[0] = " << get<0>(tp) << ", type = " << typeid(decltype(get<0>(tp))).name() << std::endl;
std::cout << "tuple[1] = " << get<1>(tp) << ", type = " << typeid(decltype(get<1>(tp))).name() << std::endl;
std::cout << "tuple[2] = " << get<2>(tp) << ", type = " << typeid(decltype(get<2>(tp))).name() << std::endl;
std::cout << "tuple[3] = " << get<3>(tp) << ", type = " << typeid(decltype(get<3>(tp))).name() << std::endl;
//越界则会编译失败,因为不存在匹配的参数列表
//std::cout << "tuple[4] = " << get<4>(tp) << ", type = " << typeid(decltype(get<4>(tp))).name() << std::endl;
}
结果如下:
四、std::make_tuple的实现
使用std::make_tuple可以辅助创建一个
t
u
p
l
e
tuple
tuple对象,使用
a
u
t
o
auto
auto接收比较方便。
考虑存在转发的,因此我们使用万能引用和完美转发来提升效率:
因为传参进来的类型带有左值、右值、const限定等,我们可以先将其退化了,然后再作为
t
u
p
l
e
tuple
tuple的类型:
//std::make_tupld的实现

template<typename ...Types>
auto make_tuple(Types&&...Args) {
	return tuple <std::decay_t<Types>...>(std::forward<Types>(Args)...);
}
五、操作接口的实现
5.1 移除tuple的第一个元素类型
这个之前用过很多次,在typelist实现中用过,直接在可变参分离的时候,萃取出后面的部分作为类型即可:
//从tuple中移除第一个元素类型

//泛化版本
template<typename TPLE>
class pop_front_type;

//特化版本
template<typename FirstElem,typename...OtherElem>
class pop_front_type<tuple<FirstElem, OtherElem...>> {
public:
	using type = tuple<OtherElem...>;
};
其他类型接口都和typelist相似,感兴趣可以看看这篇文章:
【元编程】typelist的实现
5.2 向tuple的开头和结尾插入元素
首先,向开头插入元素很简单,直接返回新的tuple并且将开头的元素放在第一个位置,之前可变参放在最后即可:
//从tuple开头插入一个数据

template<typename... ElemsTypes, typename NewType>
auto push_front(const tuple<ElemsTypes...>&tmptpl, const NewType& tmpvalue){
	return tuple<NewType, ElemsTypes...>(tmpvalue, tmptpl);
}
而对结尾进行插入比较复杂,因为没有可变参放在第一个位置的构造函数模板,因此需要递归到空的tuple,然后再回溯的时候向后放:
//向tuple结尾插入一个数据,递归实现

//向空的tuple插入
template<typename NewType>
auto push_back(const tuple<>&, const NewType& tmpvalue) {
	return tuple<NewType>(tmpvalue);
}

//向非空的tuple插入
template<typename FirstType,typename... OtherType,typename NewType>
auto push_back(const tuple<FirstType, OtherType...>& tmptpl, const NewType& tmpvalue) {
	return tuple<FirstType, OtherType..., NewType>
		(tmptpl.first, push_back(tmptpl.others, tmpvalue));
}
运行下方测试代码:
void Test5() {
	auto tp = make_tuple(1, 1.0, 1.0f, '1');
	std::cout << "tp = " << typeid(decltype(tp)).name() << std::endl << std::endl;

	auto tp2 = push_front(tp, std::string("1"));
	std::cout << "tp2 = " << typeid(decltype(tp2)).name() << std::endl<<std::endl;

	auto tp3 = push_back(tp, std::string("1"));
	std::cout << "tp3 = " << typeid(decltype(tp3)).name() << std::endl<<std::endl;

	auto tp4 = pop_front(tp);
	std::cout << "tp4 = " << typeid(decltype(tp4)).name() << std::endl << std::endl;


}
结果符合预期:
5.3 从tuple中移除第一个元素
这个容易,直接返回剩余部分的可变参,构造出tuple即可:
//移除tuple第一个数据

template<typename FirstElem,typename... OtherType>
auto pop_front(const tuple<FirstElem, OtherType...>& tmptuple) {
	return tuple<OtherType...>(tmptuple.others);
}
5.4 反转tuple的顺序
反转顺序可以看做是一遍递归一遍向后插入的过程,因此需要在特化版本终止递归:
//移除tuple第一个数据
template<typename FirstElem,typename... OtherType>
auto pop_front(const tuple<FirstElem, OtherType...>& tmptuple) {
	return tuple<OtherType...>(tmptuple.others);
}

void Test6() {
	auto tp = make_tuple(1, 1.0, 1.0f, '1');
	std::cout << "tp = " << typeid(decltype(tp)).name() << std::endl << std::endl<<std::endl;


	std::cout << "\n\n\n";
	auto tp2 = reverse(tp);
	std::cout << "tp2 = " << typeid(decltype(tp2)).name() << std::endl << std::endl << std::endl;
}
这样写很简单,但是开销实在是太大了:
有没有一种开销小的方法呢? 其实我们可以使用反转的索引,然后每次取出索引的第一个,使用make_tuple 和get直接构造出来:
反转的索引可以使用std::integer_sequence来实现,参考这篇文章:【模板进阶】std::integer_sequence。
反转索引的具体代码如下:
//向前插入元素
template<typename INTSEQ, unsigned int NewElem>
struct IntSeq_PushFront;

//特化版本
template<typename T, unsigned int...Elems, unsigned int NewElem>
struct IntSeq_PushFront<std::integer_sequence<T, Elems...>, NewElem> {
	using type = std::integer_sequence<T, NewElem, Elems...>;
};

//泛化版本
template<typename T, unsigned int N, unsigned int Count = 1>
struct Integer_Sequence_Reverse {
	using type = typename IntSeq_PushFront<typename Integer_Sequence_Reverse<T, N - 1>::type, N - Count>::type;

//别名模板
template<typename T, unsigned int N>
using Integer_Sequence_Reverse_T = typename Integer_Sequence_Reverse<T, N>::type;

};
其实就是一个不断向前插入递归的过程。
利用这个模板,我们就可以直接实现出来开销小的反转序列模板了:
//中间模板
template<typename...Elems,std::size_t... Index>
auto TPL_LastReverse(const tuple<Elems...>& tmptpl, std::integer_sequence<size_t, Index...>) {
	return make_tuple(get<Index>(tmptpl)...);
}

//最终模板
template<typename... Elems>
auto Reverse(const tuple<Elems...>tmptpl) {
	return TPL_LastReverse(tmptpl, Integer_Sequence_Reverse_T<size_t, sizeof...(Elems)>());
}
注意这里使用的是临时变量:

在get<Index>(tmptpl)...中
I
n
d
e
x
Index
Index是一包参数,意味着
g
e
t
get
get会进行多次调用,最终返回一堆数值,通过make_tuple构造出最终反转的tuple

测试函数如下:
void Test6() {
	auto tp = make_tuple(1, 1.0, 1.0f, '1');
	std::cout << "tp = " << typeid(decltype(tp)).name() << std::endl << std::endl<<std::endl;

	auto tp3 = Reverse(tp);
	std::cout << "tp3 = " << typeid(decltype(tp3)).name() << std::endl << std::endl << std::endl;

	std::cout << "tp3[0] = " << get<0>(tp3) << ", type = " << typeid(decltype(get<0>(tp3))).name() << std::endl;
	std::cout << "tp3[1] = " << get<1>(tp3) << ", type = " << typeid(decltype(get<1>(tp3))).name() << std::endl;
	std::cout << "tp3[2] = " << get<2>(tp3) << ", type = " << typeid(decltype(get<2>(tp3))).name() << std::endl;
	std::cout << "tp3[3] = " << get<3>(tp3) << ", type = " << typeid(decltype(get<3>(tp3))).name() << std::endl;


}
显然,少了很多递归构造的开销:


 729
729

 被折叠的 条评论
为什么被折叠?
被折叠的 条评论
为什么被折叠?
 到【灌水乐园】发言


