


15 – 16. java学习 – 多线程、优化单例模式、AtomicInteger类、Lock锁、线程的通讯
文章目录
一、多线程
1. 多线程相关概念
1.1. 程序、进程、线程
程序:固定的逻辑和数据集合,一堆静态的代码,一般存储在硬盘上
进程:正在运行的程序,是动态的,一般在内存中,通过操作系统来调度
线程:进程的最小单位,一进城包含了多个线程,通过CPU来调度
- CPU分时调度:线程轮流使用CPU调度权,每个线程使用的时间相等
- CPU抢占调度:会设置线程优先级,谁优先级高,谁获得CPU的概率高
1.2. 并行、并发
并行:在同一时刻,同时执行多个任务
并发:在同一时间段,执行多个任务
2. 线程的创建和启动
2.1. 创建
- 继承Thread类
步骤如下:
- 定义一个类,继承Thread类,并重写run方法,因为run方法中需要定义线程需要执行的任务逻辑
- 创建当前线程类的对象
- 通过创建的线程对象调用start方法,来启动线程
public class MyThreadDemo1 extends Thread {
    // region Constructor
    public MyThreadDemo1() {
    }

    public MyThreadDemo1(String name) {
        super(name);
    }
    // endregion


    @Override
    public void run() {
        for (int i = 1; i <= 100; i++) {
            System.out.println(Thread.currentThread().getName() + " 正在输出数字: " + i);
        }
    }
}

class ThreadTest {
    public static void main(String[] args) {
        MyThreadDemo1 t1 = new MyThreadDemo1("线程1");
        MyThreadDemo1 t2 = new MyThreadDemo1("线程2");
        MyThreadDemo1 t3 = new MyThreadDemo1("线程3");

        // 启动线程 一个线程只能被启动一次,重复启动会报错
        t1.start();
        t2.start();
        t3.start();

        for (int i = 0; i < 100; i++) {
            System.out.println("主线程 输出数字: " + (i + 1));
        }
    }
}
- 实现Runnable接口
实现步骤:
- 定义一个类实现Runnable接口,并重写里面的run方法,在run方法里面定义线程执行的业务逻辑
- 创建Runnable实现类的对象,并将该对象作为参数传递到Thread对象中
- 通过Thread对象,调用start方法,来启动线程
public class MyThreadDemo3 implements Runnable{
    @Override
    public void run() {
        for (int i = 1; i <= 100; i++) {
            System.out.println(Thread.currentThread().getName() + " 正在输出数字: " + i);
        }
    }
}
class ThreadTest3{
    public static void main(String[] args) {
        MyThreadDemo3 mt = new MyThreadDemo3();

        Thread t1=new Thread(mt,"线程1");
        Thread t2=new Thread(mt,"线程2");
        Thread t3=new Thread(mt,"线程3");

        t1.start();
        t2.start();
        t3.start();
    }
}
- 通过匿名内部类来实现以上两种方法
继承Thread类的变形写法:
public class MyThreadDemo3 {
    public static void main(String[] args) {
        //继承Thread类的变形写法
        new Thread("线程1"){
            @Override
            public void run() {
                for(int i = 1;i<=10;i++){
                    System.out.println(Thread.currentThread().getName() + ":" + i);
                }
            }
        }.start();
    }
}
实现Runnable接口的变形写法:
public class MyThreadDemo3 {
    public static void main(String[] args) {
        //实现Runnable接口的变形写法
        new Thread(new Runnable() {
            public void run() {
                for(int i = 10;i<=20;i++){
                    System.out.println(Thread.currentThread().getName() + ":" + i);
                }
            }
        },"线程2").start();
    }
}
相对于继承Thread类,实现Runnable接口会更具优势。由于java单继承的特性,继承Thread类之后,不能再去继承其他的类了,程序的扩展性很差。但是实现了Runnable接口之后,我们还可以继承其他的类,程序的健壮性,可扩展性更好。
2.2. 启动
想要启动线程,有两个方法需要实现:
- run():用来定义线程执行的任务逻辑
- start():用来启动线程
3. 线程的生命周期
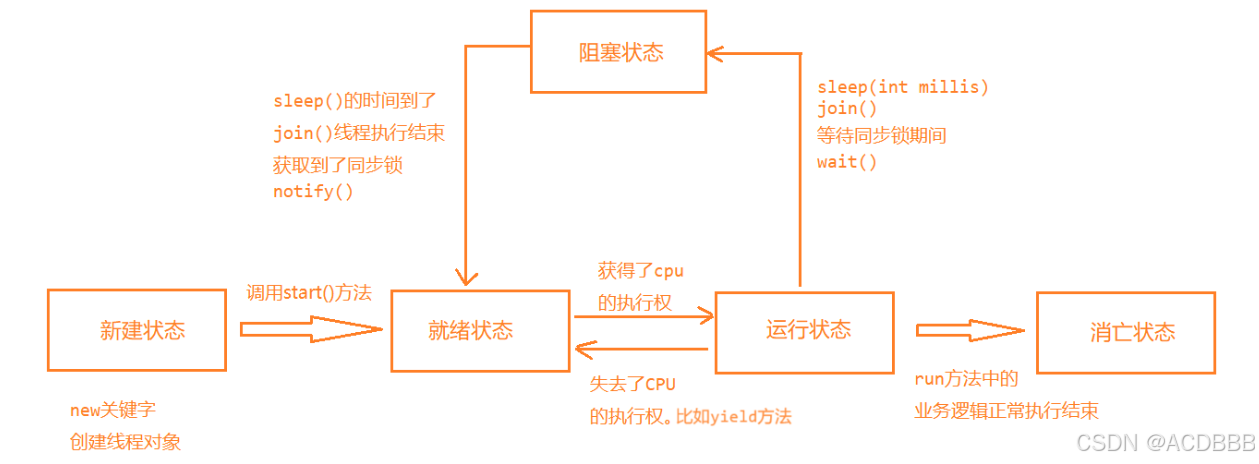
3.1. JDK1.5之前
线程的生命周期有5种状态:
- 新建状态(new):new关键字创建线程对象
- 就绪状态(runnable):调用了start方法,当前线程可以抢占到CPU的执行权
- 运行状态(running) :占到了CPU的执行权
- 阻塞状态(blocked)
- 消亡状态(dead)
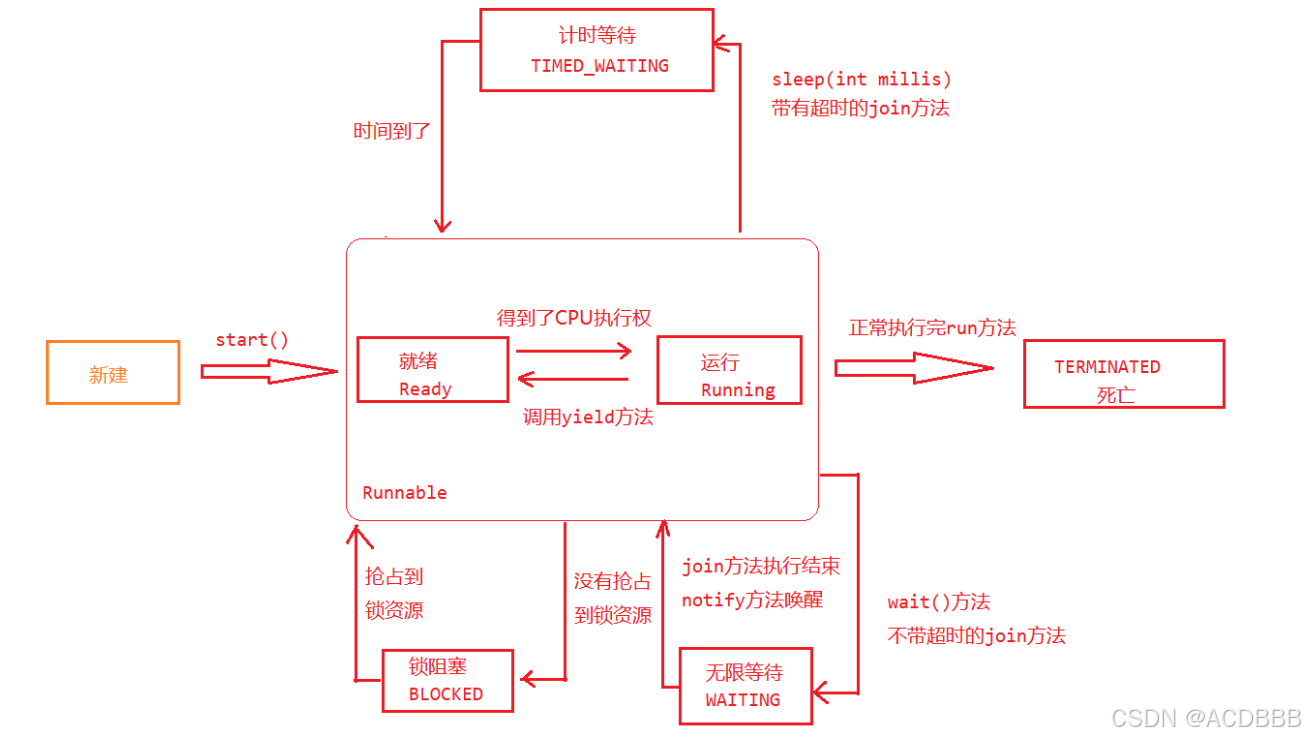
3.2. JDK1.5之后
JDK1.5前后的改变不算大,只是将就绪状态和运行状态合并成了可运行状态。并且细分了阻塞状态,将其分为锁阻塞、计时等待、无限等待。
新建状态(New)
可运行状态(Runnable):包含了就绪状态和运行状态
消亡状态(Terminated)
锁阻塞状态(Blocked)
计时等待(Timed-Waiting)
无限等待(Waiting)
4.常用方法
4.1. 构造函数
- 无参构造函数
public class MyThreadDemo2 extends Thread {
    public MyThreadDemo2() {
    }

    @Override
    public void run() {
        for (int i = 0; i < 100; i++) {
            if ((i + 1) % 2 == 0) {
                System.out.println(Thread.currentThread().getName() + " 在输出偶数: " + (i + 1));
            }
        }
    }
}
class ThreadTest2{
    public static void main(String[] args) {
        MyThreadDemo2 t1 = new MyThreadDemo2();

        t1.start();
    }
}
- 参数为String类型:可以设定线程名称
public class MyThreadDemo2 extends Thread {
    public MyThreadDemo2(String name) {
        super(name);
    }

    @Override
    public void run() {
        for (int i = 0; i < 100; i++) {
            if ((i + 1) % 2 == 0) {
                System.out.println(Thread.currentThread().getName() + " 在输出偶数: " + (i + 1));
            }
        }
    }
}
class ThreadTest2{
    public static void main(String[] args) {
        MyThreadDemo2 t1 = new MyThreadDemo2("线程1");

        t1.start();
    }
}
- 参数为Runnable类型:基于Runnable接口来创建线程
public class MyThreadDemo3 implements Runnable{
    @Override
    public void run() {
        for (int i = 1; i <= 100; i++) {
            System.out.println(Thread.currentThread().getName() + " 正在输出数字: " + i);
        }
    }
}
class ThreadTest3{
    public static void main(String[] args) {
        MyThreadDemo3 mt = new MyThreadDemo3();

        Thread t1=new Thread(mt);

        t1.start();
    }
}
- 参数为Runnable和String:基于接口创建线程并且可以给线程命名
public class MyThreadDemo3 implements Runnable{
    @Override
    public void run() {
        for (int i = 1; i <= 100; i++) {
            System.out.println(Thread.currentThread().getName() + " 正在输出数字: " + i);
        }
    }
}
class ThreadTest3{
    public static void main(String[] args) {
        MyThreadDemo3 mt = new MyThreadDemo3();

        Thread t1=new Thread(mt,"线程1");

        t1.start();
    }
}
4.2. 常用方法
- run(): 编写的线程业务逻辑,需要定义在run方法中
- start():启动线程的方法,只有线程启动了,才会被CPU进行调度
- getName() :获取当前线程的名称
- setName(): 设置当前线程对象的名称
- setPriority(int newPriority): 设置线程的优先级(1-10),数字越大,优先级越高,默认的线程优先级是5。线程的优先级越高,优先被CPU调度的概率就越高
- getPriority(): 获取当前线程的优先级
- currentThread():获取当前的线程对象
- sleep(long millis):将正在运行的线程按照指定的时间(毫秒值)睡眠(暂停)
- yield():线程的礼让,将当前的线程暂停一下,下一次执行需要CPU重新调度
- isAlive():判断当前线程是否是存活的状态
- join() : 当前线程插队执行,执行结束之后,别的线程才执行
// 例子:
public class MyThreadDemo5 extends Thread {
    public MyThreadDemo5() {
    }

    public MyThreadDemo5(String name) {
        super(name);
    }

    @Override
    public void run() {
        for (int i = 0; i < 100; i++) {

            if ((i + 1) % 2 == 0) {
                System.out.println(Thread.currentThread().getName() + ", " +
                        "优先级: " + Thread.currentThread().getPriority() + " : " + (i + 1));
            }
            if ((i + 1) % 20 == 0) {
                try {
                    Thread.sleep(100);
                } catch (InterruptedException e) {
                    throw new RuntimeException(e);
                }
            }

        }
    }
}

class ThreadTest5 {
    public static void main(String[] args) {
        MyThreadDemo5 thread01 = new MyThreadDemo5("Thread01 ");
        thread01.start();
        thread01.setPriority(2);
        System.out.println("thread01: " + thread01.isAlive());

        Thread.currentThread().setName("main ");
//        System.out.println(Thread.currentThread().getName());
        Thread.currentThread().setPriority(8);
        for (int i = 0; i < 100; i++) {
            if ((i + 1) % 2 != 0) {
                System.out.println(Thread.currentThread().getName() + ", " +
                        "优先级: " + Thread.currentThread().getPriority() + " : " + (i + 1));
            }
            if ((i + 1) % 7 == 0) {
                Thread.yield();
            }
            if ((i + 1) % 11 == 0) {
                try {
                    thread01.join();
                } catch (InterruptedException e) {
                    throw new RuntimeException(e);
                }
            }
        }


    }
}
4.3. 守护线程
守护线程是在后台运行的,其作用就是给其他非守护线程提供服务,比如垃圾回收处理器进程,就是一个守护线程。如果所有的非守护线程全部死亡,那么守护线程也会消亡。守护线程的特点是:守护线程拥有自动结束自己生命周期的特性,而非守护线程不具备这个特点。
设置守护线程的方法:
setDaemon(boolean on):true就是守护线程
public static void main(String[] args) {
    ShowNumberThread t1 = new ShowNumberThread();
    // 设置当前线程对象的名称
    t1.setName("线程1");
    t1.setDaemon(true); //设置守护线程
    t1.start();
}
5. 线程安全问题及解决方案
当多个线程对象对同一份资源(可能是变量、记录等)进行写操作。就会容易出现线程安全问题,即写操作之后,得到的实际结果和预期结果不一致。但是,读操作是不会有线程安全问题的。
5.1. 线程安全问题演示
案例:
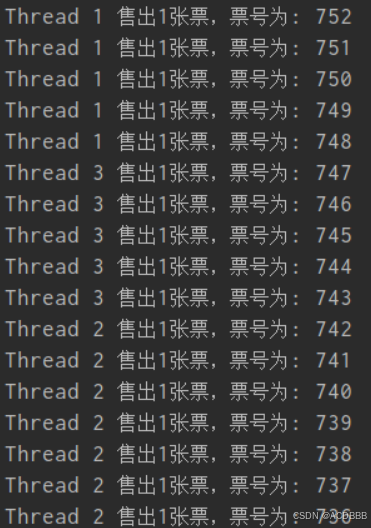
模拟火车站卖票,假设总票数是1000张,有三个窗口同时进行售票,要求不能卖出重复的车票,不能超卖车票
实现方式一:继承Thread类
public class SaleTicketsThread extends Thread {

    // static 保证tickets是唯一的
    private  static int tickets = 1000;

    public SaleTicketsThread(){}

    public SaleTicketsThread(String name){
        super(name);
    }

    @Override
    public void run() {
        while(tickets > 0){
            System.out.println(Thread.currentThread().getName() + "卖出了一张票,票号是:" + tickets);
            tickets--;
        }
    }
}

class TestSaleTickets{
    public static void main(String[] args) {
        // 模拟3个售票窗口
        SaleTicketsThread t1 = new SaleTicketsThread("窗口1");
        SaleTicketsThread t2 = new SaleTicketsThread("窗口2");
        SaleTicketsThread t3 = new SaleTicketsThread("窗口3");
        //开启线程
        t1.start();
        t2.start();
        t3.start();
    }
}
结果:

很明显不符合题目要求,票存在卖重的现象。
实现方式二:实现Runnable接口
public class SaleTicketsRunnable implements Runnable{

    // 不需要加static,因为tickets已经唯一
    private int tickets = 100;

    public void run() {
        while (tickets > 0){
            System.out.println(Thread.currentThread().getName() + "卖出了一张票,票号是:" + tickets);
            tickets--;
        }
    }
}

class TestSaleTicketsRunnable{
    public static void main(String[] args) {
        SaleTicketsRunnable sr = new SaleTicketsRunnable();
        Thread t1 = new Thread(sr,"窗口1");
        Thread t2 = new Thread(sr,"窗口2");
        Thread t3 = new Thread(sr,"窗口3");

        t1.start();
        t2.start();
        t3.start();
    }
}
结果:

很明显也不符合题目要求,票存在卖重的现象。
两种线程创建方式都存在线程安全问题,但是我们可以通过同步方法和同步代码块来解决线程安全问题。
5.2. 线程安全问题解决方案
5.2.1. 同步代码块
同步代码块格式:
synchronized(锁对象){
	// 定义需要被同步的代码块,可能出现线程安全问题的代码才写在这里
}
注意:锁对象内容不固定,但是必须唯一
只要被同步代码块包裹的代码,具有互斥性。某一线程在执行同步代码块中的代码时,不会被其他线程打断。
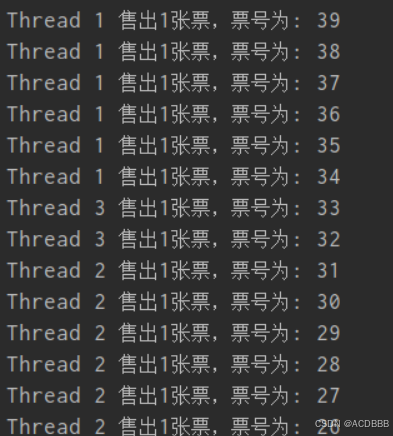
例子:我们将上个例子中继承Thread类的代码,用同步代码块改造一下
public class SaleTicketsThread extends Thread {
    private static int ticketsNum = 10;
    public int count;

    // region Constructor
    public SaleTicketsThread() {
    }

    public SaleTicketsThread(String name) {
        super(name);
    }
    // endregion


    @Override
    public void run() {
        while (ticketsNum > 0) {
            synchronized (SaleTicketsThread.class) {
                if (ticketsNum > 0) {
                    System.out.println(Thread.currentThread().getName() + "售出1张票,票号为: " + ticketsNum);
                    ticketsNum--;
                }
            }
        }
    }
}
class SaleTicketsThreadTest{
    public static void main(String[] args) {
        SaleTicketsThread saleTicketsThread1 = new SaleTicketsThread("Thread 1 ");
        SaleTicketsThread saleTicketsThread2 = new SaleTicketsThread("Thread 2 ");
        SaleTicketsThread saleTicketsThread3 = new SaleTicketsThread("Thread 3 ");

        saleTicketsThread1.start();
        saleTicketsThread2.start();
        saleTicketsThread3.start();
    }
}
结果:
现在的代码就保证了线程的安全性。
5.2.2. 同步方法
同步方法的格式:
public synchronized 返回值 方法名(){
     // 定义需要被同步的代码块,可能出现线程安全问题的代码才写在这里
}
例子:我们将上个例子中实现Runnable接口的代码,用同步方法改造一下
public class SaleTicketsRunnable implements Runnable {
    private int ticketsNum = 1000;

    @Override
    public void run() {
        while (ticketsNum > 0) {
            synchronized (SaleTicketsRunnable.class) /*填什么都可以,只要唯一就好*/{
                if (ticketsNum > 0) {
                    saleTickets();
                }
            }
        }
    }

    // region 同步方法解决线程安全问题
    /**
     * 定义一个同步方法 保证售票的代码是线程安全的
     * 如果线程实现了Runnable接口,同步方法的锁对象是this  此时this是唯一的。所以没有必要加上static关键字
     */
    public synchronized void saleTickets() {
        if (ticketsNum > 0) {
            System.out.println(Thread.currentThread().getName() + "售出1张票,票号为: " + ticketsNum);
            ticketsNum--;
        }
    }
    // endregion
}

class SaleTicketsRunnableTest {
    public static void main(String[] args) {
        SaleTicketsRunnable saleTicketsRunnable = new SaleTicketsRunnable();

        Thread thread1 = new Thread(saleTicketsRunnable, "Thread 1 ");
        Thread thread2 = new Thread(saleTicketsRunnable, "Thread 2 ");
        Thread thread3 = new Thread(saleTicketsRunnable, "Thread 3 ");

        thread1.start();
        thread2.start();
        thread3.start();
    }
}
结果:
售票逻辑也没有出现线程安全问题。
注意:售票的逻辑由于售票的代码会出现线程安全的问题,所以必须要进行同步
如果一个同步方法是非静态的方法,那么同步方法的锁对象就是this。
- 例如:线程实现了Runnable接口,同步方法的锁对象是this
如果一个同步方法的静态的方法,那么同步方法的锁对象就是当前类的Class对象。
- 例如:线程继承了Thread类,不是用同步代码块,而是用同步方法来实现的,那同步方法的锁对象是SaleTicketsThread.class
5.3. 死锁(了解)
多个线程需要占用同样的资源,双方都在等待对方释放自己需要的那部分资源,然后一直互相僵持,就形成了死锁。一旦出现死锁,整个程序是不会抛出异常。多个线程一直处于阻塞的状态,无法进一步执行。
例子:这里只是为了演示死锁,正常来说锁套锁是一定要避免的
public class Deadlock extends Thread{
    public Deadlock(){}

    public Deadlock(String name) {
        super(name);
    }

    @Override
    public void run() {
        if(Thread.currentThread().getName().equals("ZS")){
            synchronized ("DC"){
                System.out.println("ZS have DC");
                synchronized ("YKQ"){
                    System.out.println("ZS have YKQ");
                }
            }
        }else {
            synchronized ("YKQ"){
                System.out.println("LS hava YKQ");
                synchronized ("DC"){
                    System.out.println("LS hava DC");
                }
            }
        }
    }
}

class DeadlockTest{
    public static void main(String[] args) {
        Deadlock zs = new Deadlock("ZS");
        Deadlock ls = new Deadlock("LS");

        zs.start();
        ls.start();
    }
}
结果:程序没有结束,但也不会往下继续执行

死锁条件:
-
多线程
-
互斥条件:一个资源每次只能被一个线程使用
-
请求与保持条件:一个线程在申请资源的同时保持对已有资源的占有 (锁套锁)
-
不剥夺条件:线程已获得的资源在未使用完之前,不能被其他线程强行剥夺,只能由该线程自己释放
-
循环等待条件:若干线程之间形成一种头尾相接的循环等待资源关系
避免死锁:
- 避免嵌套锁的循环
- 锁对象一定要合适
5.4. 优化单例模式 – 基于线程安全问题
单例模式是一种常用的设计模式,用于确保一个类只有一个实例,并提供全局访问点。单例模式有两种 饿汉式 和 懒汉式。
饿汉式由于在类加载时就创建了单例模式,因此不会出现线程安全问题。
举个例子:
public class TestLazyAndHungry {

    static HungrySingleton instance3 = null;
    static HungrySingleton instance4 = null;

    @Test
    public void HungryTest() {
        Thread t1 = new Thread() {
            @Override
            public void run() {
                instance3 = HungrySingleton.getInstance();
            }
        };
        Thread t2 = new Thread() {
            @Override
            public void run() {
                instance4 = HungrySingleton.getInstance();
            }
        };

        t1.start();
        t2.start();

        try {
            t1.join();
        } catch (InterruptedException e) {
            throw new RuntimeException(e);
        }
        try {
            t2.join();
        } catch (InterruptedException e) {
            throw new RuntimeException(e);
        }

        System.out.println(instance3);
        System.out.println(instance4);
        System.out.println(instance3 == instance4);
    }
}

class HungrySingleton {
    private HungrySingleton() {
    }

    private static final HungrySingleton instance = new HungrySingleton();

    public static HungrySingleton getInstance() {
        return instance;
    }
}
结果:

懒汉式在第一次调用 getInstance() 方法时才会创建单例对象,避免了资源浪费,但是可能会产生线程安全问题。
举个例子:
public class TestLazyAndHungry {
    static LazySingleton instance1 = null;
    static LazySingleton instance2 = null;

    @Test
    public void lazyTest() {
        Thread t1 = new Thread() {
            @Override
            public void run() {
                instance1 = LazySingleton.getInstance();
            }
        };
        Thread t2 = new Thread() {
            @Override
            public void run() {
                instance2 = LazySingleton.getInstance();
            }
        };

        t1.start();
        t2.start();

        try {
            t1.join();
        } catch (InterruptedException e) {
            throw new RuntimeException(e);
        }
        try {
            t2.join();
        } catch (InterruptedException e) {
            throw new RuntimeException(e);
        }

        System.out.println(instance1);
        System.out.println(instance2);
        System.out.println(instance1 == instance2);
    }
}

class LazySingleton {
    // 私有构造函数
    private LazySingleton() {
    }

    static LazySingleton instance = null;

    public static LazySingleton getInstance() {
        if (instance == null) {
            instance = new LazySingleton();
        }
        return instance;
    }
}
结果:

单例模式的目的就是确保一个类存在一个实例,但是懒汉单例模式有概率结果为false。因此每次调用getInstance() 方法时都需要进行同步操作,而这会带来性能的损失。
5.4.1. 同步方法优化懒汉模式
例子:
class LazySingleton {
    private LazySingleton(){}

    static LazySingleton instance = null;

    //第一种方式: 使用同步方法解决线程安全的问题
    public static synchronized LazySingleton getInstance(){
        if(instance == null){
            instance = new LazySingleton();
        }
        return instance;
    }

}

public class Singleton {
    static LazySingleton instance1 = null;
    static LazySingleton instance2 = null;

    public static void main(String[] args) {
        //创建线程1
        Thread t1 = new Thread(){
            @Override
            public void run() {
                instance1 = LazySingleton.getInstance();
            }
        };

        //创建线程2
        Thread t2 = new Thread(){
            @Override
            public void run() {
                instance2 = LazySingleton.getInstance();
            }
        };

        t1.start();
        t2.start();

        try {
            t1.join();
        } catch (InterruptedException e) {
            throw new RuntimeException(e);
        }

        try {
            t2.join();
        } catch (InterruptedException e) {
            throw new RuntimeException(e);
        }

        System.out.println(instance1);
        System.out.println(instance2);
        System.out.println(instance1 == instance2);
    }
}
结果:

5.4.2. 同步代码块优化懒汉模式
例子:
class LazySingleton {
    private LazySingleton() {
    }

    static LazySingleton instance = null;

    //第二种方式: 使用同步代码块解决线程安全的问题
   public static  LazySingleton getInstance(){
        synchronized (LazySingleton.class){
            if(instance == null){
                instance = new LazySingleton();
            }
        }
        return instance;
    }

}

public class Singleton {
    static LazySingleton instance1 = null;
    static LazySingleton instance2 = null;

    public static void main(String[] args) {
        //创建线程1
        Thread t1 = new Thread() {
            @Override
            public void run() {
                instance1 = LazySingleton.getInstance();
            }
        };

        //创建线程2
        Thread t2 = new Thread() {
            @Override
            public void run() {
                instance2 = LazySingleton.getInstance();
            }
        };

        t1.start();
        t2.start();

        try {
            t1.join();
        } catch (InterruptedException e) {
            throw new RuntimeException(e);
        }

        try {
            t2.join();
        } catch (InterruptedException e) {
            throw new RuntimeException(e);
        }

        System.out.println(instance1);
        System.out.println(instance2);
        System.out.println(instance1 == instance2);
    }
}
结果:

5.4.3. 双重检查锁
双重检查锁是三种优化中最重要的一种,要明白两层if的作用。
例子:
class LazySingleton {
    private LazySingleton() {
    }

    volatile static LazySingleton instance = null;

    // 双重检查锁
    public static LazySingleton getInstance() {
        if (instance == null) { // 第一重判空的目的
            synchronized (LazySingleton.class) {
                if (instance == null) {  // 第二重判空的目的
                    instance = new LazySingleton();
                }
            }
        }
        return instance;
    }
}

public class Singleton {
    static LazySingleton instance1 = null;
    static LazySingleton instance2 = null;

    public static void main(String[] args) {
        //创建线程1
        Thread t1 = new Thread() {
            @Override
            public void run() {
                instance1 = LazySingleton.getInstance();
            }
        };

        //创建线程2
        Thread t2 = new Thread() {
            @Override
            public void run() {
                instance2 = LazySingleton.getInstance();
            }
        };

        t1.start();
        t2.start();

        try {
            t1.join();
        } catch (InterruptedException e) {
            throw new RuntimeException(e);
        }

        try {
            t2.join();
        } catch (InterruptedException e) {
            throw new RuntimeException(e);
        }

        System.out.println(instance1);
        System.out.println(instance2);
        System.out.println(instance1 == instance2);
    }
}
结果:

双重检查锁的两次判空主要是为了确保在多线程的环境下保证单例模式的正确性和优化性能。
第一次判空:让线程不必竞争锁就可以检查实例是否初始化,减少不必要的锁竞争和同步开销,提高了性能
第二次判空:为了确保第一次判空和竞争锁的期间没有其他线程创建实例,双重保险,确保了不会创建多个实例
双重检查锁通过这种方式减少了不必要的锁竞争和同步开销,提升了并发环境下的性能。但是,这种模式依赖于JVM的内存模型和指令重排规则,在某些情况下需要使用volatile关键字来确保可见性和禁止指令重排
5.4.3.1. volatile关键字
volatile关键字有三个作用:
-
保证可见性:所有的线程都能看到共享内存的最新状态
-
不保证原子性:volatile关键字仅在变量(包括引用)的读写时具有原子性,而无法涵盖变量上的其他任何操作。例如:自增自减操作就不是原子性
-
原子的意思代表着 ——“不可分”
-
在整个操作过程中不会被线程调度器中断的操作,都可认为是原子性。原子性是拒绝多线程交叉操作的,不论是多核还是单核,具有原子性的量,同一时刻只能有一个线程来对它进行操作
- 例如 a=1 是原子性操作,但是 a++ 和 a += 1 就不是原子性操作
-
-
禁止指令重排:通过在适当位置插入内存屏障来禁止处理器对指令的重新排序
- 指令重排:写程序的时候,都是要把代码从上往下写,默认的认为程序是自顶向下顺序执行的。但是CPU为了提高效率,在保证最终结果准确的情况下,会对指令进行重新排序。就是说写在前的代码不一定先执行,在后面的也不一定晚执行
6. AtomicInteger类
AtomicInteger类是一个通过对int类型的数据进行封装,用于处理整数类型数据的原子类。主要用于解决多线程并发问题和修改共享整数变量时可能出现的数据不一致的问题。
比如,在Java操作中,自增自减在多线程环境下就是不安全的。Java会将算式分解成三部分,取值、运算、赋值。这个操作明显不具备原子性,多线程并发共享这个变量时就可能会出现问题。那么想让线程安全,往往会采用加锁的方式来保证安全,但是,加锁会对性能造成很大影响。而AtomicInteger类就可以让程序在不加锁的时候也能保障线程安全。
例如:
static int b = 0;

    @Test
    public void test2() {
        AtomicInteger a = new AtomicInteger(0);
        Thread t1 = new Thread() {
            @Override
            public void run() {
                for (int i = 0; i < 1000; i++) {
                    a.getAndIncrement();
                    b++;
                }
            }
        };
        Thread t2 = new Thread() {
            @Override
            public void run() {
                for (int i = 0; i < 1000; i++) {
                    a.incrementAndGet();
                    ++b;
                }
            }
        };

        t1.start();
        t2.start();

        try {
            Thread.sleep(1000);
        } catch (InterruptedException e) {
            throw new RuntimeException(e);
        }

        System.out.println("a = " + a);
        System.out.println("b = " + b);
    }
结果:

6.1. 乐观锁和悲观锁
AtomicInteger底层基于CAS的乐观锁实现。
什么是乐观锁:
- 乐观锁就是持比较乐观态度的锁。在操作同一数据时,都认为他人不会对数据进行操作,所以不会对数据进行上锁,但是在做数据更新的时候会判断是否有其他人已经同时更新或已经更新完这个数据。常常使用CAS(Compare-And-Swap)操作来实现。
- CAS机制:CAS操作包括了三个操作数,分别是内存位置(V)、旧的预期值(A)和准备设置的新值(B),操作逻辑是,如果内存位置V的值等于预期值A,则将该位置更新为新值B,否则不进行操作。
什么是悲观锁:
- 比较悲观的锁,总是想着最坏的情况。认为其他人一定会对数据进行操作更改,因此在获取数据的时候会先加锁,其他线程想拿这个数据就会被阻塞,直到该线程拿到锁。
6.2. 常用方法
- addAndGet():以原子方式将给定值添加到当前值,返回新值
- getAndAdd():以原子方式将给定值添加到当前值,返回旧值
@Test
    public void test2(){
        AtomicInteger atomicInteger = new AtomicInteger(0);
        // 以原子方式将给定值添加到当前值,返回新值
        System.out.println(atomicInteger.addAndGet(2));
        // 以原子方式将给定值添加到当前值,返回旧值
        System.out.println(atomicInteger.getAndAdd(4));
    }
结果:

- incrementAndGet():相当于++i,但该操作是原子的
- getAndIncrement():相当于i++,但该操作是原子的
@Test
    public void test1() {
        AtomicInteger atomicInteger = new AtomicInteger(0);
        // 相当于i++
        System.out.println(atomicInteger.getAndIncrement());
        // 相当于++i
        System.out.println(atomicInteger.incrementAndGet());
    }
结果:

- decrementAndGet():相当于–i,但该操作是原子的
- getAndDecrement():相当于i–,但该操作是原子的
@Test
    public void test3(){
        AtomicInteger atomicInteger = new AtomicInteger(0);
        // 相当于i--
        System.out.println(atomicInteger.getAndDecrement());
        // 相当于--i
        System.out.println(atomicInteger.decrementAndGet());
    }
结果:

7. Lock锁
Lock位于java.util.concurrent.locks里面,是一个接口,里面有两个核心的方法:
- lock() 加锁的方法
- unlock() 释放锁的方法
Lock有一个实现类:ReentrantLock。它和synchronized不同的是,加锁和释放锁的动作需要我们手动完成。
Lock的基本使用格式:
public class A {

    //创建一个锁对象 必须使用final关键字修饰
    private final ReentrantLock lock = new ReentrantLock();

    public void show(){
        //上锁
        lock.lock();	// 上锁建议放在try外
        try{
            // 需要保证线程安全的代码
        }finally {
            //释放锁 不管程序执行有没有异常,锁最终都要释放。
            lock.unlock();
        }
    }
}
使用Lock锁,来改造前面卖票的案例,保证线程的安全性。
public class SaleTicketsLockDemo implements Runnable{
    //票数
    int tickets = 1000;
    //创建Lock锁对象
    private final ReentrantLock lock = new ReentrantLock();


    public void run() {
        while(true){
        //加锁
        lock.lock();
            try{
                if(tickets > 0){
                    try {
                        Thread.sleep(10);
                    } catch (InterruptedException e) {
                        throw new RuntimeException(e);
                    }
                    System.out.println(Thread.currentThread().getName() + "卖票,票号是:" + tickets);
                    tickets --;
                }else{
                    break;
                }
            }finally {
                // finally保证即使有意外情况,锁也能被及时回收
                lock.unlock();
            }
        }
    }
}
class TestSaleTicketsLockDemo{
    public static void main(String[] args) {
        SaleTicketsLockDemo r = new SaleTicketsLockDemo();
        Thread t1 = new Thread(r,"窗口1");
        Thread t2 = new Thread(r,"窗口2");
        Thread t3 = new Thread(r,"窗口3");
        t1.start();
        t2.start();
        t3.start();
    }
}
lock.lock()加锁操作建议放在try外面,因为如果放在try外面,如果由于try抛出异常而没能执行加锁操作,那么一定执行的lock.unlock()也会报错。
Lock和synchronized之间的区别:
- Lock是显式的加锁,synchronized是隐式的加锁。
- 从性能上讲,synchronized加锁释放锁耗费的性能比Lock更高。
8. 线程的通讯
多个线程需要共同协作才能完成一件任务,在这个过程中就会涉及到线程的通信。线程通信涉及到的几个核心的方法:
- wait():将当前正在运行的线程阻塞,一旦一个线程调用了wait方法,那么这个线程持有的锁对象也会释放。此时当前线程无法竞争到锁对象了,除非另一个线程调用notify方法将其唤醒。
- notify():将一个wait方法阻塞的线程唤醒,将其变成可运行状态。此时被唤醒的线程可以竞争到锁对象。
- notifyAll():唤醒所有被wait方法阻塞的线程。
8.1. 生产者和消费者案例
定义生产者,生成商品,定义一个消费者消费商品,两者交替进行:
- Product类
public class Product {
    String name;
    double price;
    boolean flag = false; //产品处于未生产的状态
}
- 生产者
public class ProducerThread extends Thread { //生产者线程

    Product p;
    public ProducerThread(){}

    public ProducerThread(Product p){
        this.p = p;
    }

    @Override
    public void run() {
        int i = 0;
        while(true){
            synchronized (p){
                if(p.flag == false){
                    if(i % 2 == 0){
                        p.name = "苹果";
                        p.price = 2.2;
                    }else{
                        p.name = "橘子";
                        p.price = 5.5;
                    }
                    try {
                        Thread.sleep(1000);
                    } catch (InterruptedException e) {
                        throw new RuntimeException(e);
                    }
                    System.out.println("生产者生产了" + p.name + ",价格是:" + p.price);
                    i++;
                    //改变当前产品的状态
                    p.flag = true; // true表示产品处于生成完成的状态
                    //通知消费者进行消费
                    p.notify();
                }else{
                    // 产品已经生产 当前生产者线程对象需要进入阻塞状态
                    try {
                        p.wait();
                    } catch (InterruptedException e) {
                        throw new RuntimeException(e);
                    }
                }
            }
        }
    }
}
- 消费者
public class ConsumerThread extends Thread { //小消费者

    Product p;

    public ConsumerThread(){}

    public ConsumerThread(Product p){
        this.p = p;
    }

    @Override
    public void run() {
        while(true){
            synchronized (p){
                if(p.flag == true){
                    System.out.println("消费者消费了" + p.name + ",价格是:" + p.price);
                    p.flag = false;
                    p.notify(); //唤醒生产者 进行产品的生产
                }else{ // flag = false
                    try {
                        p.wait();
                    } catch (InterruptedException e) {
                        throw new RuntimeException(e);
                    }
                }
            }
        }
    }
}
- 测试类
public class TestProductAndConsumer {
    public static void main(String[] args) {
        Product product = new Product();
        ProducerThread producer = new ProducerThread(product);
        ConsumerThread consumer = new ConsumerThread(product);
        //启动线程
        producer.start();
        consumer.start();
    }
}
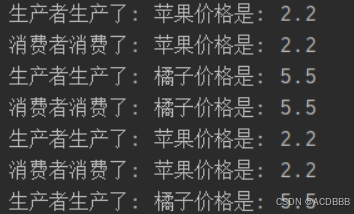
结果:


 10万+
10万+

 被折叠的 条评论
为什么被折叠?
被折叠的 条评论
为什么被折叠?
 到【灌水乐园】发言


