


from ufont import BMFont
from ahtx0 import AHT20
import time
spi = SPI(2,baudrate=80_000_000,polarity = 0,sck = Pin(18),mosi = Pin(23))
tft = ST7735(spi,rst=4, dc=2, cs=5,bl=19,width=128,height=160, rotate=0)
i2c = I2C(1,scl = Pin(25),sda = Pin(26),freq = 400_000) # 默认I2C1是25和26Pin
aht = AHT20(i2c)
font = BMFont(“font.bmf”)
def ahtxx():
temp = aht.temperature
humi = aht.relative_humidity

font.text(tft,"温度= %.2f ℃"%(temp),10,36,color(255,255,255),font_size=16,reverse=False,clear=False,show=True,auto_wrap=True)
font.text(tft,"湿度= %.2f %s" %(humi,'%'),10,56,color(255,255,255),font_size=16,reverse=False,clear=False,show=True,auto_wrap=True)

time.sleep(0.1)
def main():
tft.init()
#tft.fill(color(0,0,0))
#tft.show()
font.text(tft,“温湿度”,36,0,color(0,255,0),font_size=16,reverse=False,clear=True,show=True,auto_wrap=True)
tft.hline(0,25,160,color(255,255,255))
tft.show()
#font.text(tft,"%#x"%i2c.scan()[0],0,50,color(0,255,0),font_size=32,reverse=False,clear=False,show=True,auto_wrap=True)

while True:
    ahtxx()
if name == “main”:
main()
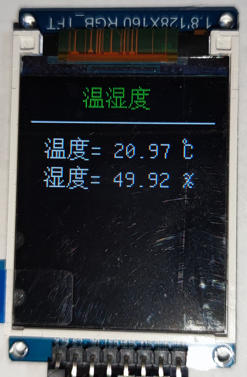
显示效果:
**四、示例代码2**
温湿度横屏显示.py
from machine import Pin,SPI,I2C,PWM
from st7735s import ST7735,color
from ufont import BMFont
from ahtx0 import AHT20
import time
spi = SPI(2,baudrate=80_000_000,polarity = 0,sck = Pin(18),mosi = Pin(23))
tft = ST7735(spi,rst=4, dc=2, cs=5,bl=19,width=160,height=128, rotate=1)
i2c = I2C(1,scl = Pin(25),sda = Pin(26),freq = 400_000) # 默认I2C1是25和26Pin
aht = AHT20(i2c)
font = BMFont(“font.bmf”)
def ahtxx():
temp = aht.temperature
humi = aht.relative_humidity

font.text(tft,"温度= %.2f ℃"%(temp),10,36,color(255,255,255),font_size=16,reverse=False,clear=False,show=True,auto_wrap=True)
font.text(tft,"湿度= %.2f %s" %(humi,'%'),10,56,color(255,255,255),font_size=16,reverse=False,clear=False,show=True,auto_wrap=True)

time.sleep(0.1)
def main():
tft.init()
#tft.fill(color(0,0,0))
#tft.show()
font.text(tft,“温湿度”,36,0,color(0,255,0),font_size=16,reverse=False,clear=True,show=True,auto_wrap=True)
tft.hline(0,25,160,color(255,255,255))
tft.show()
#font.text(tft,"%#x"%i2c.scan()[0],0,50,color(0,255,0),font_size=32,reverse=False,clear=False,show=True,auto_wrap=True)

while True:
    ahtxx()
if name == “main”:
main()
显示效果:

**五、st7735s屏幕驱动**
st7735s.py
“”"
合宙 Air10x 系列屏幕扩展板驱动
160(H)RGB x 80(V)
使用方法(以合宙ESP32C3为例):
from machine import SPI, Pin
from st7735 import ST7735
spi = SPI(1, 30000000, sck=Pin(2), mosi=Pin(3))
ST7735(spi, rst=10, dc=6, cs=7, bl=11, width=160, height=80, rotate=1)  # 直插横屏显示
ST7735(spi, rst=10, dc=6, cs=7, bl=11, width=160, height=80, rotate=0)  # 直插竖屏显示
本款LCD使用的内置控制器为ST7735S,是一款162 x RGB x 132像素的LCD控制器,而本LCD本身的像素为160(H)RGB x 80(V)。由于LCD的显示
起始位置与控制器的原点不一致,因此在使用控制器初始化显示全屏显示区域时需要对做偏移处理:水平方向从第二个像素点开始显示,垂直方向从第27个像素点
开始。这样就可以保证显示的LCD中RAM对应的位置与实际一致。(https://www.waveshare.net/wiki/Pico-LCD-0.96)
屏幕详细信息: https://wiki.luatos.com/peripherals/lcd_air10x/index.html
ST7735S文档: https://www.waveshare.net/w/upload/e/e2/ST7735S_V1.1_20111121.pdf
FrameBuf文档: https://docs.micropython.org/en/latest/library/framebuf.html
“”"
import gc
import time
import math
import machine
import framebuf
from micropython import const
SWRESET = const(0x01)
SLPOUT = const(0x11)
NORON = const(0x13)
INVOFF = const(0x20)
DISPON = const(0x29)
CASET = const(0x2A)
RASET = const(0x2B)
 最低0.47元/天 解锁文章


 被折叠的 条评论
为什么被折叠?
被折叠的 条评论
为什么被折叠?
 到【灌水乐园】发言


