


我们在前文中介绍过,MCP是一种类似于USB-C接口一样的标准化协议,能够让LLM以结构化的方式与外部工具及资源进行交互。
该协议支持多种传输机制,可在不同环境下提供灵活的适配能力。
而基于Spring AI实现的MCP协议,与Spring Boot进行了集成,提供客户端和服务器端两种启动器Starter,可快速搭建具备 MCP 支持能力的 AI 应用。
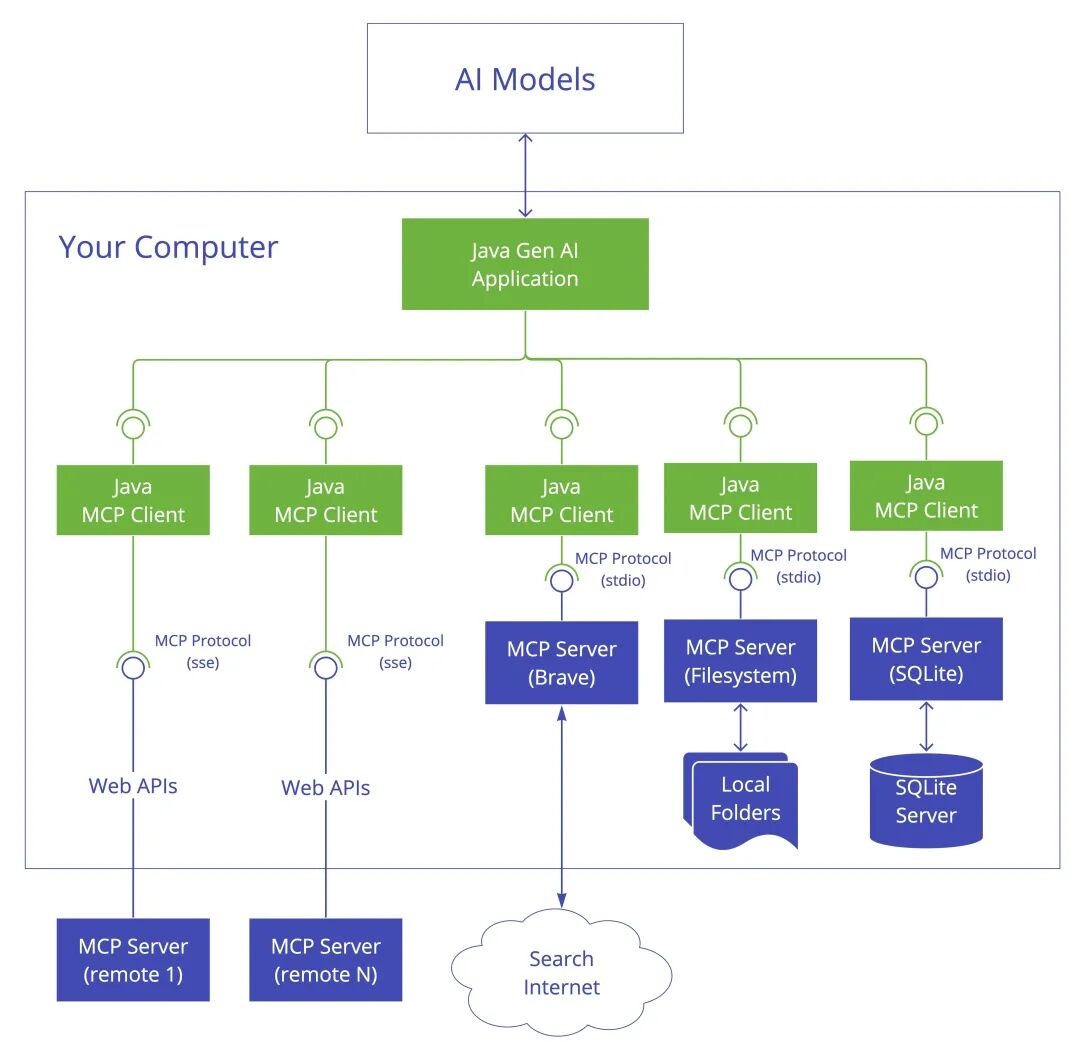
在上图中,MCP Client的核心作用在于与MCP Server建立并管理连接,并对其所提供的工具和能力进行发现、协商和执行,并与LLM的提示词系统进行交互。
而MCP Server则是以提示词模板匹配的方式,为MCP Client提供工具和能力。
接下来,我们基于Spring AI来实现MCP Client + Server的Demo,让大家感受一下MCP的神奇之处。
准备工作
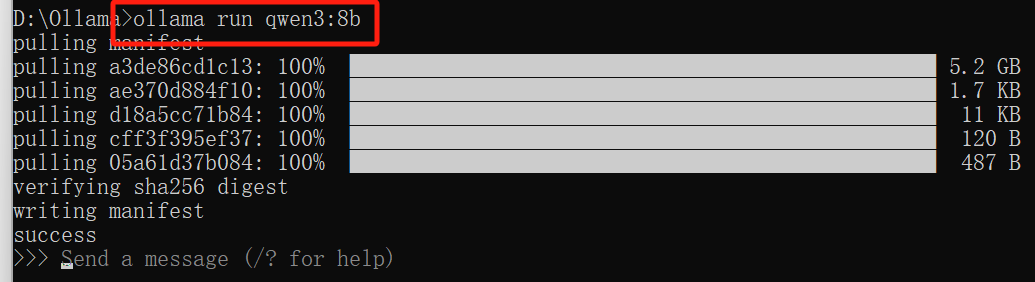
首先,我们需要在本地安装Ollama框架,这样各类LLM就可以在我们的电脑上跑起来,下载地址为:https://ollama.com/
下载之后,可以通过ollama run命令来安装我们想要的LLM,图中下载的是通义大模型Qwen3。
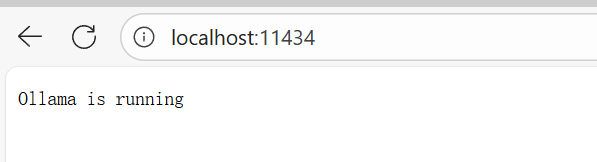
也可以通过这种方式来测试连通性,为Spring AI工程的引入做准备。
Spring AI构建MCP Client和MCP Server
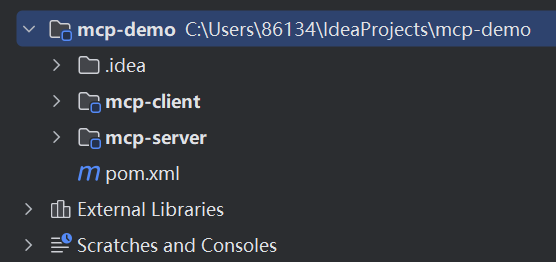
接下来步入正题,我们开始进行Spring AI的工程构建,需要在工程中分为mcp-client和mcp-server两个module。
1、mcp-server构建
pom.xml
<dependencyManagement><dependencies><dependency><groupId>org.springframework.ai</groupId><artifactId>spring-ai-bom</artifactId><version>1.0.0-M7</version><type>pom</type><scope>import</scope></dependency></dependencies></dependencyManagement><dependencies><dependency><groupId>org.springframework.ai</groupId><artifactId>spring-ai-starter-mcp-server-webmvc</artifactId></dependency></dependencies>
我们在这里用的是1.0.0-M7版本,并引入 spring-ai-starter-mcp-server-webmvc jar包实现sse传输。
MCPService.java
package com.tony.mcpserver.service;import org.springframework.ai.tool.annotation.Tool;import org.springframework.stereotype.Service;@Servicepublic class MCPService {@Tool(description = "中国最宜居的城市")public String livingCity() {return "最宜居的城市是天津,风景秀美,美食众多,消费不贵。";}}
在 Spring AI 中,@Tool 注解是实现 AI 模型与外部工具(如函数、服务、API 等)交互的核心机制。
它允许将普通 Java 方法标记为 “可被 AI 模型调用的工具”,从而让LLM能够根据用户请求自动选择并执行相应工具,扩展 AI 的能力边界(数据库查询、API调用、文件处理等)。
ToolCallbackProviderConfig.java
package com.tony.mcpserver;import com.tony.mcpserver.service.MCPService;import org.springframework.ai.tool.ToolCallbackProvider;import org.springframework.ai.tool.method.MethodToolCallbackProvider;import org.springframework.context.annotation.Bean;import org.springframework.context.annotation.Configuration;@Configurationpublic class ToolCallbackProviderConfig {@Beanpublic ToolCallbackProvider livingCityTools(MCPService mcpService) {return MethodToolCallbackProvider.builder().toolObjects(mcpService).build();}}
将指定的工具对象( mcpService)注册为可被 AI 模型调用的工具集。
MCPServerApplication.java
package com.tony.mcpserver;import org.springframework.boot.SpringApplication;import org.springframework.boot.autoconfigure.SpringBootApplication;@SpringBootApplicationpublic class MCPServerApplication {public static void main(String[] args) {SpringApplication.run(MCPServerApplication.class, args);}}
application.properties
server.port=8080spring.ai.mcp.server.name=city-mcp-serverspring.ai.mcp.server.sse-message-endpoint=/mcp/city
至此,我们终于将MCP Server工程搭建完成,下面来访问一下,看看效果。
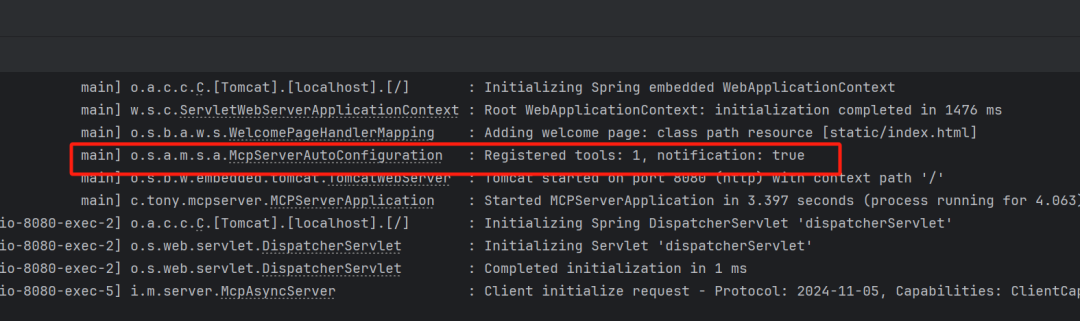
我们可以在启动日志中看到这条日志,代表已经将工具对象注册成功。
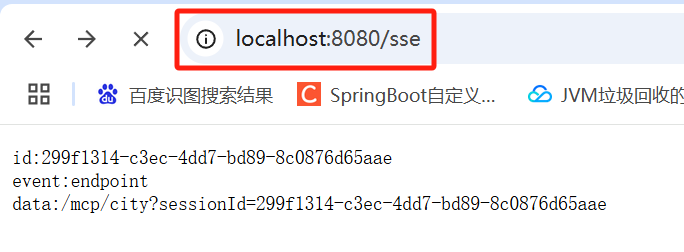
通过访问上述URL证明,SSE服务端已正确启动并监听端口。
2、mcp-client构建
pom.xml
<dependencyManagement><dependencies><dependency><groupId>org.springframework.ai</groupId><artifactId>spring-ai-bom</artifactId><version>1.0.0-M7</version><type>pom</type><scope>import</scope></dependency></dependencies></dependencyManagement><dependencies><dependency><groupId>org.springframework.ai</groupId><artifactId>spring-ai-starter-mcp-client</artifactId></dependency><dependency><groupId>org.springframework.ai</groupId><artifactId>spring-ai-starter-model-ollama</artifactId></dependency></dependencies>
在这里,我们需要将Spring AI的版本与server端对应上,并引入mcp-client和ollama的依赖jar包。
MCPController.java
package com.tony.mcp.client;import org.springframework.ai.chat.client.ChatClient;import org.springframework.ai.ollama.OllamaChatModel;import org.springframework.ai.tool.ToolCallbackProvider;import org.springframework.beans.factory.annotation.Autowired;import org.springframework.web.bind.annotation.GetMapping;import org.springframework.web.bind.annotation.RequestParam;import org.springframework.web.bind.annotation.RestController;@RestControllerpublic class MCPController {@Autowiredprivate OllamaChatModel ollamaChatModel;@Autowiredprivate ToolCallbackProvider toolCallbackProvider;@GetMapping("/mcp")public String MCPGenerate(@RequestParam(value = "message", defaultValue = "推荐宜居的城市") String message) {ChatClient chatClient = ChatClient.builder(ollamaChatModel).defaultTools(toolCallbackProvider.getToolCallbacks()).build();return chatClient.prompt(message).call().content();}}
该类用于接收用户请求,与MCP Server建立连接并发现其所提供的带@Tool注解的对象和方法,以及与LLM的提示词系统进行交互。
MCPClientApplication.java
package com.tony.mcp.client;import org.springframework.boot.SpringApplication;import org.springframework.boot.autoconfigure.SpringBootApplication;@SpringBootApplicationpublic class MCPClientApplication {public static void main(String[] args) {SpringApplication.run(MCPClientApplication.class, args);}}
application.properties
server.port=8081spring.ai.ollama.base-url=http://127.0.0.1:11434/spring.ai.ollama.chat.model=qwen3:8bspring.ai.ollama.chat.options.temperature=0.7spring.ai.mcp.client.name=mcp-clientspring.ai.mcp.client.sse.connections.server1.url=http://localhost:8080spring.ai.mcp.client.toolcallback.enabled = true
在该文件中,包括与MCP Server和Ollama的连接配置项。
至此,我们也将MCP Client工程搭建完成了,接下来我们把MCP Client和MCP Server的服务全部启动起来,看看运行效果。

从输出的这些内容可以看出来,这条请求确实到了MCP Server,并根据@Tool方法的内容返回了结果,实验成功。
结语
我这段时间写Spring AI代码最直观的感受是,LLM在讲究因果的工程代码中增加了智能因素。
AI大模型从0到精通全套学习大礼包
我在一线互联网企业工作十余年里,指导过不少同行后辈。帮助很多人得到了学习和成长。
只要你是真心想学AI大模型,我这份资料就可以无偿共享给你学习。大模型行业确实也需要更多的有志之士加入进来,我也真心希望帮助大家学好这门技术,如果日后有什么学习上的问题,欢迎找我交流,有技术上面的问题,我是很愿意去帮助大家的!
如果你也想通过学大模型技术去帮助就业和转行,可以点扫描下方👇👇
大模型重磅福利:入门进阶全套104G学习资源包免费分享!

01.从入门到精通的全套视频教程
包含提示词工程、RAG、Agent等技术点
02.AI大模型学习路线图(还有视频解说)
全过程AI大模型学习路线

03.学习电子书籍和技术文档
市面上的大模型书籍确实太多了,这些是我精选出来的

04.大模型面试题目详解
05.这些资料真的有用吗?
这份资料由我和鲁为民博士共同整理,鲁为民博士先后获得了北京清华大学学士和美国加州理工学院博士学位,在包括IEEE Transactions等学术期刊和诸多国际会议上发表了超过50篇学术论文、取得了多项美国和中国发明专利,同时还斩获了吴文俊人工智能科学技术奖。目前我正在和鲁博士共同进行人工智能的研究。
所有的视频由智泊AI老师录制,且资料与智泊AI共享,相互补充。这份学习大礼包应该算是现在最全面的大模型学习资料了。
资料内容涵盖了从入门到进阶的各类视频教程和实战项目,无论你是小白还是有些技术基础的,这份资料都绝对能帮助你提升薪资待遇,转行大模型岗位。

智泊AI始终秉持着“让每个人平等享受到优质教育资源”的育人理念,通过动态追踪大模型开发、数据标注伦理等前沿技术趋势,构建起"前沿课程+智能实训+精准就业"的高效培养体系。
课堂上不光教理论,还带着学员做了十多个真实项目。学员要亲自上手搞数据清洗、模型调优这些硬核操作,把课本知识变成真本事!
如果说你是以下人群中的其中一类,都可以来智泊AI学习人工智能,找到高薪工作,一次小小的“投资”换来的是终身受益!
应届毕业生:无工作经验但想要系统学习AI大模型技术,期待通过实战项目掌握核心技术。
零基础转型:非技术背景但关注AI应用场景,计划通过低代码工具实现“AI+行业”跨界。
业务赋能 突破瓶颈:传统开发者(Java/前端等)学习Transformer架构与LangChain框架,向AI全栈工程师转型。
👉获取方式:
😝有需要的小伙伴,可以保存图片到wx扫描二v码免费领取【保证100%免费】🆓


 1268
1268

 被折叠的 条评论
为什么被折叠?
被折叠的 条评论
为什么被折叠?
 到【灌水乐园】发言


