


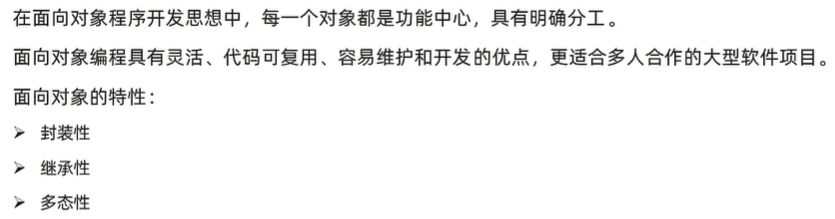
1、面向对象编程(oop)思想

![]()
面向过程,就是按照我们分析好的步骤,按照步骤解决问题。
面向对象是以功能来划分问题,而不是步骤。

2、构造函数

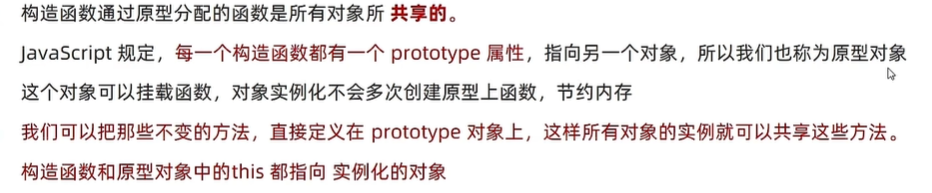
3、原型
1)原型
  <script>
    // function Star(uname, age) {
    //   this.uname = uname
    //   this.age = age
    //   this.sing = function () {
    //     console.log('唱歌')
    //   }
    // }
    // const peo1 = new Star('张三', 18)
    // const peo2 = new Star('李四', 18)
    // console.log(peo1.sing === peo2.sing); // false
    function Star(uname, age) {
      this.uname = uname
      this.age = age
      // this.sing = function () {
      //   console.log('唱歌')
      // }
    }
    Star.prototype.sing = function () {
      console.log('唱歌')
    }
    const peo1 = new Star('张三', 18)
    const peo2 = new Star('李四', 18)
    peo1.sing()
    peo2.sing()
    console.log(peo1.sing === peo2.sing); // true

  </script>
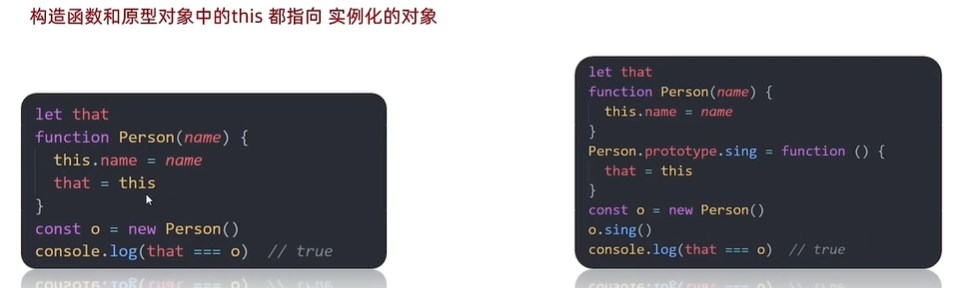
  <script>
    let that
    function Star(uname, age) {
      // that = this
      // console.log(that)
      this.uname = uname
      this.age = age
    }
    // 原型对象里面的函数 this 指向的还是实例对象 peo
    Star.prototype.sing = function () {
      that = this
      console.log('唱歌')
    }
    // 构造函数里面的 this 就是实例对象 peo
    const peo = new Star('张三', 18)
    peo.sing()
    console.log(that === peo); // true

  </script>
例子:给数组扩展方法
  <script>
    // 给数组扩展求最大值方法和求和方法
    // 最大值
    const arr = [1, 2, 3]
    Array.prototype.max = function () {
      // 展开运算符
      return Math.max(...this)
      // this 指向实例对象
    }
    console.log(arr.max())  // 3

    // 求和方法
    Array.prototype.sum = function () {
      return this.reduce((prev, item) => prev + item, 0)
    }
    console.log(arr.sum())  //6
    console.log([11, 22, 33].sum()) // 66

  </script>
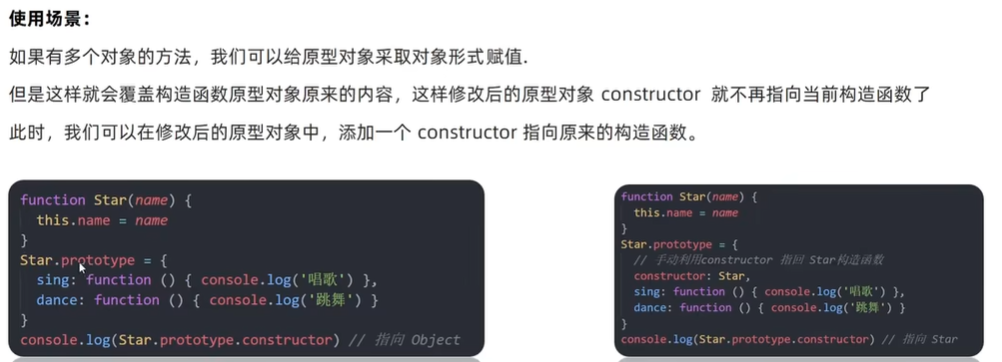
2)constructor属性
每个原型对象里面都有个constructor属性(constructor构造函数)
作用:该属性指向该原型对象的构造函数

  <script>
    function hs() { }
    const res = new hs()
    console.log(hs.prototype)
    console.log(hs.prototype.constructor === hs)  // true

  </script>
  <script>
    function hs() { }
    // hs.prototype.name = function () {
    //   console.log('张三')
    // }
    // hs.prototype.age = function () {
    //   console.log(18)
    // }
    console.log(hs.prototype) // 有constructor
    hs.prototype = {
      // 重新指回这个原型对象的构造函数
      constructor: hs,
      name: function () {
        console.log('张三')
      },
      age: function () {
        console.log(18)
      }
    }
    console.log(hs.prototype) // 如果不加 constructor: hs 无constructor,不清楚原型对象了

  </script>
3)对象原型 __proto__
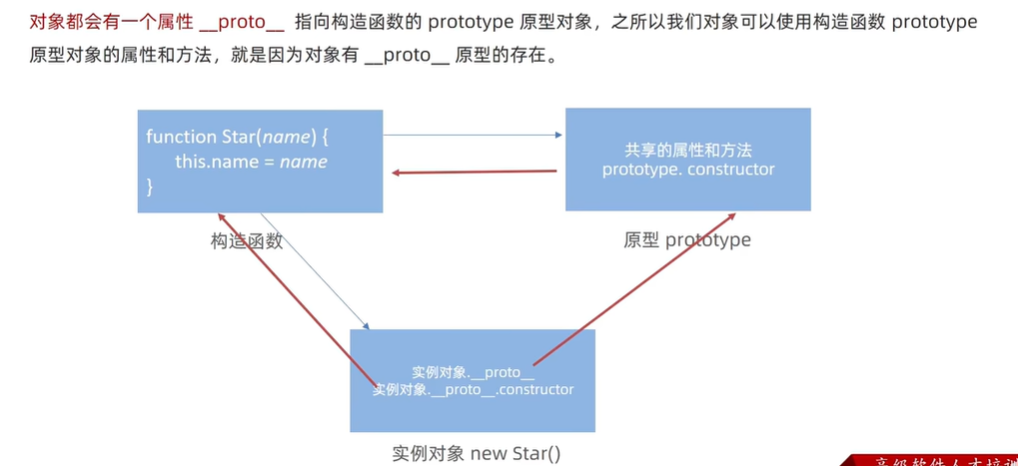

  <script>
    function hs() { }
    const res = new hs()
    console.log(res)
    // 对象原型 __proto__ 指向该构造函数的原型对象
    console.log(res.__proto__ === hs.prototype) // true
        // 对象原型里面有 constructor 指向 构造函数 hs
    console.log(res.__proto__.constructor === hs.prototype.constructor) // true
    console.log(res.__proto__.constructor === hs) // true

  </script>
4)原型继承
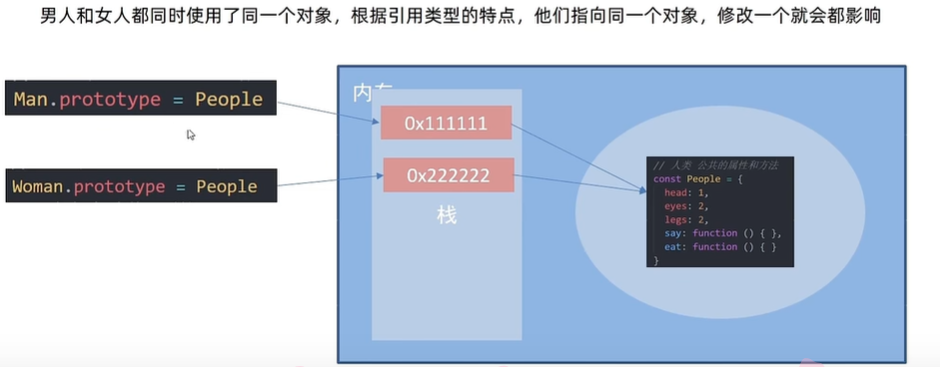
  <script>
    // 公共部分放到原型上
    // const hs = {
    //   eyes: 2,
    //   head: 1
    // }
    // 构造函数 new 出来的对象 结构一样,但是对象不一样
    function hs() {
      this.eyes = 2
      this.head = 1
    }
    // hx构造函数 想继承hs
    function hx() {

    }
    // hx通过原型来继承hs
    // 子类的原型 = new 父类
    hx.prototype = new hs()
    // 指回原来的构造函数
    hx.prototype.constructor = hs
    hx.prototype.name = function () {
      console.log('abc')

    }
    const res = new hx()
    console.log(res)

    // hy构造函数 想继承hs
    function hy() {

    }
    // 通过原型来继承hs
    hy.prototype = new hs()
    // 指回原来的构造函数
    hy.prototype.constructor = hy

    const cnt = new hy()
    console.log(cnt)

  </script>
5)原型链
__proto__串起来的链
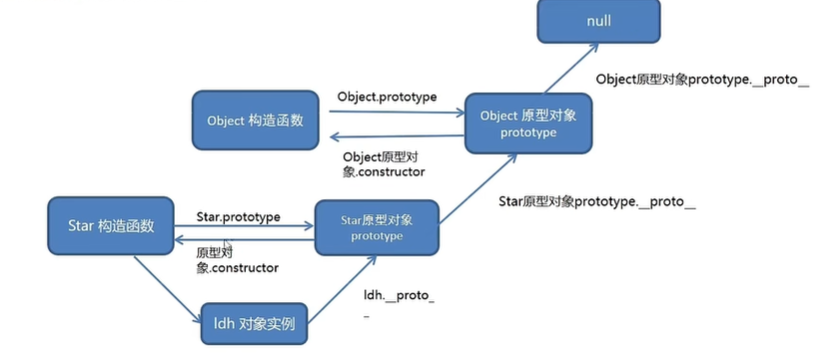
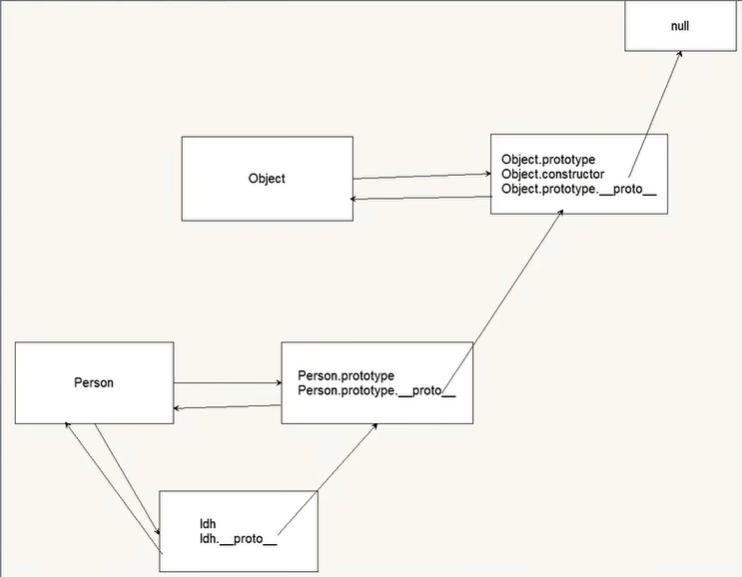
  <script>
    console.log(Object)
    console.log(Object.prototype)
    console.log(Object.prototype.__proto__) // 指向 null
    function peo() {

    }
    const res = new peo()
    // console.log(res.__proto__ === peo.prototype)  // true
    console.log(peo.prototype.__proto__ === Object.prototype) // true

  </script>

instanceof 作用
  <script>
    console.log(Object)
    console.log(Object.prototype)
    console.log(Object.prototype.__proto__) // 指向 null
    function peo() {

    }
    const res = new peo()
    // console.log(res.__proto__ === peo.prototype)  // true
    console.log(peo.prototype.__proto__ === Object.prototype) // true
    console.log(res instanceof peo) // true
    console.log(res instanceof Object) // true
    console.log(res instanceof Array) // false
    console.log([1, 2, 3] instanceof Array) // true
    console.log(Array instanceof Object) // true

  </script>
4、案例
<!DOCTYPE html>
<html lang="en">

<head>
  <meta charset="UTF-8" />
  <meta http-equiv="X-UA-Compatible" content="IE=edge" />
  <meta name="viewport" content="width=device-width, initial-scale=1.0" />
  <title>面向对象封装消息提示</title>
  <style>
    .modal {
      width: 300px;
      min-height: 100px;
      box-shadow: 0 0 10px rgba(0, 0, 0, 0.2);
      border-radius: 4px;
      position: fixed;
      z-index: 999;
      left: 50%;
      top: 50%;
      transform: translate3d(-50%, -50%, 0);
      background-color: #fff;
    }

    .modal .header {
      line-height: 40px;
      padding: 0 10px;
      position: relative;
      font-size: 20px;
    }

    .modal .header i {
      font-style: normal;
      color: #999;
      position: absolute;
      right: 15px;
      top: -2px;
      cursor: pointer;
    }

    .modal .body {
      text-align: center;
      padding: 10px;
    }

    .modal .footer {
      display: flex;
      justify-content: flex-end;
      padding: 10px;
    }

    .modal .footer a {
      padding: 3px 8px;
      background: #ccc;
      text-decoration: none;
      color: #fff;
      border-radius: 2px;
      margin-right: 10px;
      font-size: 14px;
    }

    .modal .footer a.submit {
      background-color: #369;
    }
  </style>
</head>

<body>
  <button id="delete">删除</button>
  <button id="login">登录</button>

  <!-- <div class="modal">
    <div class="header">温馨提示 <i>x</i></div>
    <div class="body">您没有删除权限操作</div>
  </div> -->


  <script>
    // 模态框
    function Modal(title = '', message = '') {
      // 创建modal 模态框盒子
      // 创建div标签
      this.modalBox = document.createElement('div')
      // 给div标签添加类名为modal
      this.modalBox.className = 'modal'
      // modal盒子内部填充2个div标签并且修改文字内容
      this.modalBox.innerHTML = `
          <div class="header">${title} <i>x</i></div>
          <div class="body">${message}</div>
      `
      console.log(this.modalBox)

    }
    // new Modal('温馨提示', '你没有权限删除')
    // new Modal('友情提示', '你还没有注册账号')

    Modal.prototype.open = function () {
      // 先判断页面中是否有modal盒子
      const box = document.querySelector('.modal')
      box && box.remove()
      // 注意这个方法不要用箭头函数 因为我们需要用到 this
      // 把刚才创建的modalBox 显示到页面body中
      document.body.append(this.modalBox)
      // 盒子显示后,可以绑定点击事件
      this.modalBox.querySelector('i').addEventListener('click', () => {
        // 这个this指向实例对象
        this.close()
      })
    }
    Modal.prototype.close = function () {
      this.modalBox.remove()
    }
    document.querySelector('#delete').addEventListener('click', () => {
      // 先调用Modal构造函数
      const del = new Modal('温馨提示', '你没有权限删除')
      // 实例对象调用open方法
      del.open()
    })
    document.querySelector('#login').addEventListener('click', () => {
      // 先调用Modal构造函数
      const login = new Modal('友情提示', '你还没有注册账号')
      // 实例对象调用open方法
      login.open()
    })
  </script>
</body>

</html>


 966
966

 被折叠的 条评论
为什么被折叠?
被折叠的 条评论
为什么被折叠?
 到【灌水乐园】发言


