


目录
项目技术栈:create-vue+Pinia+ElementPlus+Vue3+setup+Vue-Router+VueUse
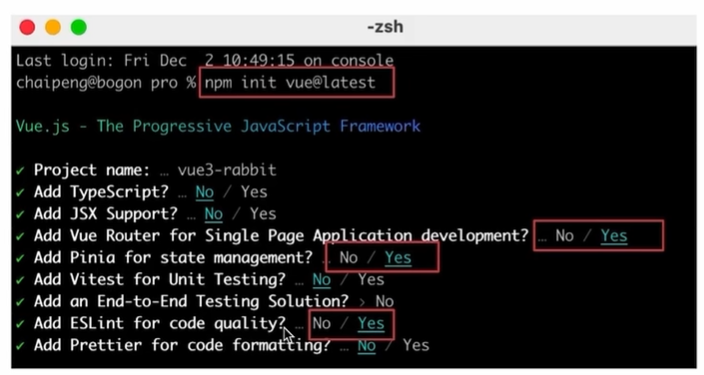
1、项目准备
创建项目
ElementPlus引入
1. 安装 Element Plus
npm install element-plus --save2. 按需导入
安装
unplugin-vue-components和unplugin-auto-import这两款插件npm install -D unplugin-vue-components unplugin-auto-import把下列代码插入到
Vite的配置文件中//vite.config.js import { defineConfig } from 'vite' import AutoImport from 'unplugin-auto-import/vite' import Components from 'unplugin-vue-components/vite' import { ElementPlusResolver } from 'unplugin-vue-components/resolvers' export default defineConfig({ // ... plugins: [ // ... AutoImport({ resolvers: [ElementPlusResolver()], }), Components({ resolvers: [ElementPlusResolver()], }), ], })
定制
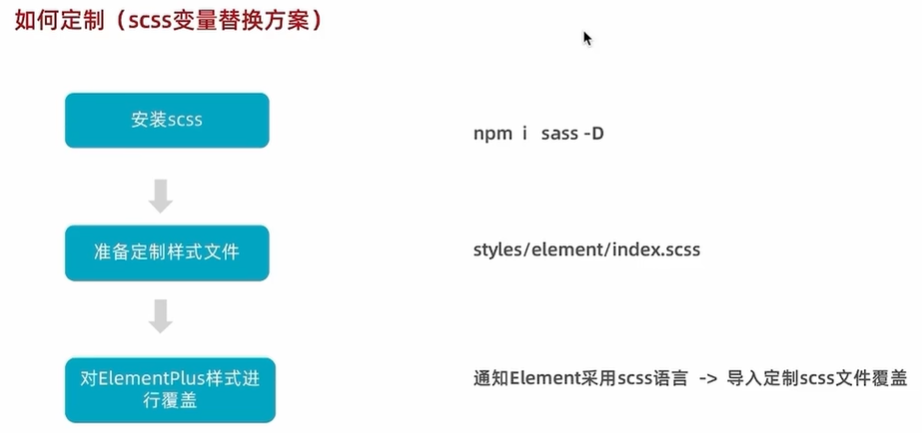
安装sass:npm i sass -D
定制样式文件,在style创建element文件夹放入index.scss:
/* 只需要重写你需要的即可 */
@forward 'element-plus/theme-chalk/src/common/var.scss' with (
  $colors: (
    'primary': (
      // 主色
      'base': #27ba9b,
    ),
    'success': (
      // 成功色
      'base': #1dc779,
    ),
    'warning': (
      // 警告色
      'base': #ffb302,
    ),
    'danger': (
      // 危险色
      'base': #e26237,
    ),
    'error': (
      // 错误色
      'base': #cf4444,
    ),
  )
)
在vite.config.js中对elementPlus样式进行覆盖:
import { fileURLToPath, URL } from 'node:url'

import { defineConfig } from 'vite'
import vue from '@vitejs/plugin-vue'
import vueDevTools from 'vite-plugin-vue-devtools'
import AutoImport from 'unplugin-auto-import/vite'
import Components from 'unplugin-vue-components/vite'
import { ElementPlusResolver } from 'unplugin-vue-components/resolvers'
// https://vite.dev/config/
export default defineConfig({
  plugins: [
    vue(),
    vueDevTools(),
    AutoImport({
      resolvers: [ElementPlusResolver()],
    }),
    Components({
      // 1.配置 elementPlus 采用 sass 样式配色系统
      resolvers: [ElementPlusResolver({ importStyle: "sass" })],
    }),
  ],
  resolve: {
    alias: {
      '@': fileURLToPath(new URL('./src', import.meta.url))
    },
  },
  css: {
    preprocessorOptions: {
      scss: {
        // 2.自动导入定制化样式文件进行样式覆盖
        additionalData: `
          @use "@/styles/element/index.scss" as *;
        `,
      }
    }
  }
})
axios基础配置
在终端安装axios
npm install axios
在utils文件夹下创建http.js文件,对axios进行基础的封装
import axios from 'axios'

// 创建axios实例
const http = axios.create({
  baseURL: 'http://pcapi-xiaotuxian-front-devtest.itheima.net',
  timeout: 5000
})

// axios请求拦截器
http.interceptors.request.use(config => {
  return config
}, e => Promise.reject(e))

// axios响应式拦截器
http.interceptors.response.use(res => res.data, e => {
  return Promise.reject(e)
})

export default http
在apis文件夹下创建testAPI.js文件测试接口
import http from '@/utils/http'

export function getCategoryAPI() {
  return http({
    url: 'home/category/head'
  })
}
在main.js中调用
import { getCategoryAPI } from '@/apis/testAPI'
getCategoryAPI().then(res => {
  console.log(res)
})
路由设计
原则:找内容切换的区域,如果是页面整体切换,则为一级路由;如果是在一级路由页的内部切换,则为二级路由。
一级路由
在router文件夹下的index.js中配置:
// createRouter:创建router实例对象
// createWebHistory:创建history模式的路由
import { createRouter, createWebHistory } from 'vue-router'
import Login from '@/views/login/index.vue'
import Layout from '@/views/Layout/index.vue'

const router = createRouter({
  history: createWebHistory(import.meta.env.BASE_URL),
  routes: [
    {
      path: '/',
      component: Layout
    },
    {
      path: '/login',
      component: Login
    }
  ],
})

export default router
在App.vue中给出路由出口
<template>
    <router-view></router-view>
</template>
二级路由

在上面router文件夹下的index.js的代码中修改:
import Home from '@/views/Home/index.vue'
import Category from '@/views/Category/index.vue'
const router = createRouter({
  history: createWebHistory(import.meta.env.BASE_URL),
  routes: [
    {
      path: '/',
      component: Layout,
      children: [
        {
          path: '',
          component: Home
        },
        {
          path: 'category',
          component: Category
        }
      ]
    },
    {
      path: '/login',
      component: Login
    }
  ],
})
静态资源初始化
将images放在assets文件夹下,将common.scss放在styles文件夹下,在 main.js 中导入初始化样式文件:
import '@/styles/common.scss'scss变量自动导入
在项目里一些组件共享的色值会以 scss 变量的方式统一放到一个名为 var.scss 的文件中,正常组件中使用,需要先导入 scss 文件,再使用内部的变量,比较繁琐,自动导入可以免去手动导入的步骤,直接使用内部的变量。自动导入配置步骤如下:
新增一个 var.scss 文件,存入色值变量:
$xtxColor: #27ba9b;
$helpColor: #e26237;
$sucColor: #1dc779;
$warnColor: #ffb302;
$priceColor: #cf4444;
通过 vite.config.js 配置自动导入文件:
css: {
    preprocessorOptions: {
      scss: {
        // 自动导入scss文件
        additionalData: `
          @use "@/styles/element/index.scss" as *;
          @use "@/styles/var.scss" as *;
        `,
      }
    }
}
2、Layout模块静态模板搭建
LayoutNav导航栏
在Layout文件夹下创建components文件夹,用来存放Layout相关组件,创建LayoutNav.vue组件。
<script setup>

</script>

<template>
  <nav class="app-topnav">
    <div class="container">
      <ul>
        <template v-if="true">
          <li><a href="javascript:;"><i class="iconfont icon-user"></i>周杰伦</a></li>
          <li>
            <el-popconfirm title="确认退出吗?" confirm-button-text="确认" cancel-button-text="取消">
              <template #reference>
                <a href="javascript:;">退出登录</a>
              </template>
            </el-popconfirm>
          </li>
          <li><a href="javascript:;">我的订单</a></li>
          <li><a href="javascript:;">会员中心</a></li>
        </template>
        <template v-else>
          <li><a href="javascript:;">请先登录</a></li>
          <li><a href="javascript:;">帮助中心</a></li>
          <li><a href="javascript:;">关于我们</a></li>
        </template>
      </ul>
    </div>
  </nav>
</template>


<style scoped lang="scss">
.app-topnav {
  background: #333;
  ul {
    display: flex;
    height: 53px;
    justify-content: flex-end;
    align-items: center;
    li {
      a {
        padding: 0 15px;
        color: #cdcdcd;
        line-height: 1;
        display: inline-block;

        i {
          font-size: 14px;
          margin-right: 2px;
        }

        &:hover {
          color: $xtxColor;
        }
      }

      ~li {
        a {
          border-left: 2px solid #666;
        }
      }
    }
  }
}
</style>
LayoutHeader头部模块
在Layout文件夹下的components文件夹中创建LayoutHeader.vue组件。
<script setup>

</script>

<template>
    <header class='app-header'>
        <div class="container">
            <h1 class="logo">
                <RouterLink to="/">小兔鲜</RouterLink>
            </h1>
            <ul class="app-header-nav">
                <li class="home">
                    <RouterLink to="/">首页</RouterLink>
                </li>
                <li>
                    <RouterLink to="/">居家</RouterLink>
                </li>
                <li>
                    <RouterLink to="/">美食</RouterLink>
                </li>
                <li>
                    <RouterLink to="/">服饰</RouterLink>
                </li>
            </ul>
            <div class="search">
                <i class="iconfont icon-search"></i>
                <input type="text" placeholder="搜一搜">
            </div>
            <!-- 头部购物车 -->

        </div>
    </header>
</template>


<style scoped lang='scss'>
.app-header {
    background: #fff;

    .container {
        display: flex;
        align-items: center;
    }

    .logo {
        width: 200px;

        a {
            display: block;
            height: 132px;
            width: 100%;
            text-indent: -9999px;
            background: url('@/assets/images/logo.png') no-repeat center 18px / contain;
        }
    }

    .app-header-nav {
        width: 820px;
        display: flex;
        padding-left: 40px;
        position: relative;
        z-index: 998;

        li {
            margin-right: 40px;
            width: 38px;
            text-align: center;

            a {
                font-size: 16px;
                line-height: 32px;
                height: 32px;
                display: inline-block;

                &:hover {
                    color: $xtxColor;
                    border-bottom: 1px solid $xtxColor;
                }
            }

            .active {
                color: $xtxColor;
                border-bottom: 1px solid $xtxColor;
            }
        }
    }

    .search {
        width: 170px;
        height: 32px;
        position: relative;
        border-bottom: 1px solid #e7e7e7;
        line-height: 32px;

        .icon-search {
            font-size: 18px;
            margin-left: 5px;
        }

        input {
            width: 140px;
            padding-left: 5px;
            color: #666;
        }
    }

    .cart {
        width: 50px;

        .curr {
            height: 32px;
            line-height: 32px;
            text-align: center;
            position: relative;
            display: block;

            .icon-cart {
                font-size: 22px;
            }

            em {
                font-style: normal;
                position: absolute;
                right: 0;
                top: 0;
                padding: 1px 6px;
                line-height: 1;
                background: $helpColor;
                color: #fff;
                font-size: 12px;
                border-radius: 10px;
                font-family: Arial;
            }
        }
    }
}</style>
LayoutFooter底部模块
在Layout文件夹下的components文件夹中创建LayoutFooter.vue组件。
<template>
    <footer class="app_footer">
        <!-- 联系我们 -->
        <div class="contact">
            <div class="container">
                <dl>
                    <dt>客户服务</dt>
                    <dd><i class="iconfont icon-kefu"></i> 在线客服</dd>
                    <dd><i class="iconfont icon-question"></i> 问题反馈</dd>
                </dl>
                <dl>
                    <dt>关注我们</dt>
                    <dd><i class="iconfont icon-weixin"></i> 公众号</dd>
                    <dd><i class="iconfont icon-weibo"></i> 微博</dd>
                </dl>
                <dl>
                    <dt>下载APP</dt>
                    <dd class="qrcode"><img src="@/assets/images/qrcode.jpg" /></dd>
                    <dd class="download">
                        <span>扫描二维码</span>
                        <span>立马下载APP</span>
                        <a href="javascript:;">下载页面</a>
                    </dd>
                </dl>
                <dl>
                    <dt>服务热线</dt>
                    <dd class="hotline">400-0000-000 <small>周一至周日 8:00-18:00</small></dd>
                </dl>
            </div>
        </div>
        <!-- 其它 -->
        <div class="extra">
            <div class="container">
                <div class="slogan">
                    <a href="javascript:;">
                        <i class="iconfont icon-footer01"></i>
                        <span>价格亲民</span>
                    </a>
                    <a href="javascript:;">
                        <i class="iconfont icon-footer02"></i>
                        <span>物流快捷</span>
                    </a>
                    <a href="javascript:;">
                        <i class="iconfont icon-footer03"></i>
                        <span>品质新鲜</span>
                    </a>
                </div>
                <!-- 版权信息 -->
                <div class="copyright">
                    <p>
                        <a href="javascript:;">关于我们</a>
                        <a href="javascript:;">帮助中心</a>
                        <a href="javascript:;">售后服务</a>
                        <a href="javascript:;">配送与验收</a>
                        <a href="javascript:;">商务合作</a>
                        <a href="javascript:;">搜索推荐</a>
                        <a href="javascript:;">友情链接</a>
                    </p>
                    <p>CopyRight © 小兔鲜儿</p>
                </div>
            </div>
        </div>
    </footer>
</template>

<style scoped lang='scss'>
.app_footer {
    overflow: hidden;
    background-color: #f5f5f5;
    padding-top: 20px;

    .contact {
        background: #fff;

        .container {
            padding: 60px 0 40px 25px;
            display: flex;
        }

        dl {
            height: 190px;
            text-align: center;
            padding: 0 72px;
            border-right: 1px solid #f2f2f2;
            color: #999;

            &:first-child {
                padding-left: 0;
            }

            &:last-child {
                border-right: none;
                padding-right: 0;
            }
        }

        dt {
            line-height: 1;
            font-size: 18px;
        }

        dd {
            margin: 36px 12px 0 0;
            float: left;
            width: 92px;
            height: 92px;
            padding-top: 10px;
            border: 1px solid #ededed;

            .iconfont {
                font-size: 36px;
                display: block;
                color: #666;
            }

            &:hover {
                .iconfont {
                    color: $xtxColor;
                }
            }

            &:last-child {
                margin-right: 0;
            }
        }

        .qrcode {
            width: 92px;
            height: 92px;
            padding: 7px;
            border: 1px solid #ededed;
        }

        .download {
            padding-top: 5px;
            font-size: 14px;
            width: auto;
            height: auto;
            border: none;

            span {
                display: block;
            }

            a {
                display: block;
                line-height: 1;
                padding: 10px 25px;
                margin-top: 5px;
                color: #fff;
                border-radius: 2px;
                background-color: $xtxColor;
            }
        }

        .hotline {
            padding-top: 20px;
            font-size: 22px;
            color: #666;
            width: auto;
            height: auto;
            border: none;

            small {
                display: block;
                font-size: 15px;
                color: #999;
            }
        }
    }

    .extra {
        background-color: #333;
    }

    .slogan {
        height: 178px;
        line-height: 58px;
        padding: 60px 100px;
        border-bottom: 1px solid #434343;
        display: flex;
        justify-content: space-between;

        a {
            height: 58px;
            line-height: 58px;
            color: #fff;
            font-size: 28px;

            i {
                font-size: 50px;
                vertical-align: middle;
                margin-right: 10px;
                font-weight: 100;
            }

            span {
                vertical-align: middle;
                text-shadow: 0 0 1px #333;
            }
        }
    }

    .copyright {
        height: 170px;
        padding-top: 40px;
        text-align: center;
        color: #999;
        font-size: 15px;

        p {
            line-height: 1;
            margin-bottom: 20px;
        }

        a {
            color: #999;
            line-height: 1;
            padding: 0 10px;
            border-right: 1px solid #999;

            &:last-child {
                border-right: none;
            }
        }
    }
}
</style>
在index.vue中放入组件
<script setup>
import LayoutNav from './components/LayoutNav.vue'
import LayoutHeader from './components/LayoutHeader.vue'
import LayoutFooter from './components/LayoutFooter.vue'
</script>
<template>
  <LayoutNav/>
  <LayoutHeader/>
  <router-view/>
  <LayoutFooter/>
</template>
字体图标引入
在index.html中引入字体图标
<link rel="stylesheet" href="//at.alicdn.com/t/font_2143783_iq6z4ey5vu.css">一级导航渲染
封装接口函数
在 src/apis 目录下创建 layout.js 文件:
import http from '@/utils/http'

export function getCategoryAPI() {
  return http({
    url: '/home/category/head'
  })
}
渲染数据
在 LayoutHeader.vue 文件的 <script> 标签中引入 getCategoryAPI() 方法获取分类信息,将返回的数据存储到 categoryList 数组中:
import { getCategoryAPI } from '@/apis/layout'
import { onMounted,ref } from 'vue'
const categoryList =ref([])
const getCategory = async() => {
  const res=await getCategoryAPI()
  console.log(res)
  categoryList.value = res.result
}
onMounted(()=>{
  getCategory()
})
使用v-for渲染数据8
            <ul class="app-header-nav">
                <li class="home">
                  <RouterLink to="/">首页</RouterLink>
                </li>
                <li class="home" v-for="item in categoryList" :key="item.id">
                    <RouterLink to="/">{{ item.name }}</RouterLink>
                </li>
            </ul>
Layout吸顶导航交互
准备吸顶导航组件 --> 获取滚动距离 --> 以滚动距离做判断条件控制组件盒子展示隐藏
安装 VueUser 插件
VueUse 是一个基于 Composition API 的实用程序函数集合。
npm i @vueuse/core
创建LayoutFixed.vue
给app-header-sticky这个类加上show类
<script setup>

</script>

<template>
  <div class="app-header-sticky">
    <div class="container">
      <RouterLink class="logo" to="/" />
      <!-- 导航区域 -->
      <ul class="app-header-nav ">
        <li class="home">
          <RouterLink to="/">首页</RouterLink>
        </li>
        <li>
          <RouterLink to="/">居家</RouterLink>
        </li>
        <li>
          <RouterLink to="/">美食</RouterLink>
        </li>
        <li>
          <RouterLink to="/">服饰</RouterLink>
        </li>
        <li>
          <RouterLink to="/">母婴</RouterLink>
        </li>
        <li>
          <RouterLink to="/">个护</RouterLink>
        </li>
        <li>
          <RouterLink to="/">严选</RouterLink>
        </li>
        <li>
          <RouterLink to="/">数码</RouterLink>
        </li>
        <li>
          <RouterLink to="/">运动</RouterLink>
        </li>
        <li>
          <RouterLink to="/">杂项</RouterLink>
        </li>
      </ul>

      <div class="right">
        <RouterLink to="/">品牌</RouterLink>
        <RouterLink to="/">专题</RouterLink>
      </div>
    </div>
  </div>
</template>


<style scoped lang='scss'>
.app-header-sticky {
  width: 100%;
  height: 80px;
  position: fixed;
  left: 0;
  top: 0;
  z-index: 999;
  background-color: #fff;
  border-bottom: 1px solid #e4e4e4;
  // 此处为关键样式!!!
  // 状态一:往上平移自身高度 + 完全透明
  transform: translateY(-100%);
  opacity: 0;

  // 状态二:移除平移 + 完全不透明
  &.show {
    transition: all 0.3s linear;
    transform: none;
    opacity: 1;
  }

  .container {
    display: flex;
    align-items: center;
  }

  .logo {
    width: 200px;
    height: 80px;
    background: url("@/assets/images/logo.png") no-repeat right 2px;
    background-size: 160px auto;
  }

  .right {
    width: 220px;
    display: flex;
    text-align: center;
    padding-left: 40px;
    border-left: 2px solid $xtxColor;

    a {
      width: 38px;
      margin-right: 40px;
      font-size: 16px;
      line-height: 1;

      &:hover {
        color: $xtxColor;
      }
    }
  }
}

.app-header-nav {
  width: 820px;
  display: flex;
  padding-left: 40px;
  position: relative;
  z-index: 998;

  li {
    margin-right: 40px;
    width: 38px;
    text-align: center;

    a {
      font-size: 16px;
      line-height: 32px;
      height: 32px;
      display: inline-block;

      &:hover {
        color: $xtxColor;
        border-bottom: 1px solid $xtxColor;
      }
    }

    .active {
      color: $xtxColor;
      border-bottom: 1px solid $xtxColor;
    }
  }
}
</style>
添加组件
在 index.vue 中添加吸顶导航栏组件:
<script setup>
import LayoutNav from './components/LayoutNav.vue'
import LayoutHeader from './components/LayoutHeader.vue'
import LayoutFooter from './components/LayoutFooter.vue'
import LayoutFixed from './components/LayoutFixed.vue'
</script>
<template>
  <LayoutFixed/>
  <LayoutNav/>
  <LayoutHeader/>
  <router-view/>
  <LayoutFooter/>
</template>
实现吸顶交互
<script setup>
import { useScroll } from '@vueuse/core'
const { y } = useScroll(window)
</script>
<template>
  <div class="app-header-sticky" :class="{ show: y>78}">
    <!-- 省略部分代码 -->
  </div>
</template>
Pinia优化重复请求
通过Pinia集中管理数据,再把数据给组件使用
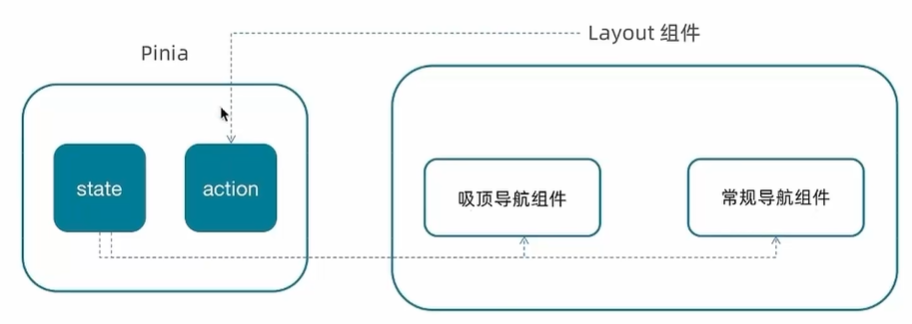
state管理数据下发给这两个组件,由Layout组件触发action(因为两个组件触发还是重复请求,因此由他们的父组件触发)。
在stores文件中创建category.js文件:
import { ref } from 'vue'
import { defineStore } from 'pinia'
import { getCategoryAPI } from '@/apis/layout'

export const useCategoryStore = defineStore('category', () => {
  // state 导航列表数据
  const categoryList = ref([])
  // action 获取导航数据的方法
  const getCategory = async () => {
    const res = await getCategoryAPI()
    console.log(res)
    categoryList.value = res.result
  }
  return { categoryList, getCategory }
})
在 Layout/index.vue 中调用 useCategoryStore 获取数据:
// 触发获取导航列表的action
import { useCategoryStore } from '@/stores/category'
import { onMounted } from 'vue'
const categoryStore = useCategoryStore()
onMounted(() => categoryStore.getCategory())
在 LayoutHeader.vue 中导入方法直接访问 useCategoryStore 中存储数据的 categoryList 即可。LayoutFixed.vue 同理:
// 使用pinia中的数据
import { useCategoryStore } from '@/stores/category'
const categoryStore=useCategoryStore()
<ul class="app-header-nav">
<li class="home">
<RouterLink to="/">首页</RouterLink>
</li>
<li class="home" v-for="item in categoryStore.categoryList" :key="item.id">
<RouterLink to="/">{{ item.name }}</RouterLink>
</li>
</ul>
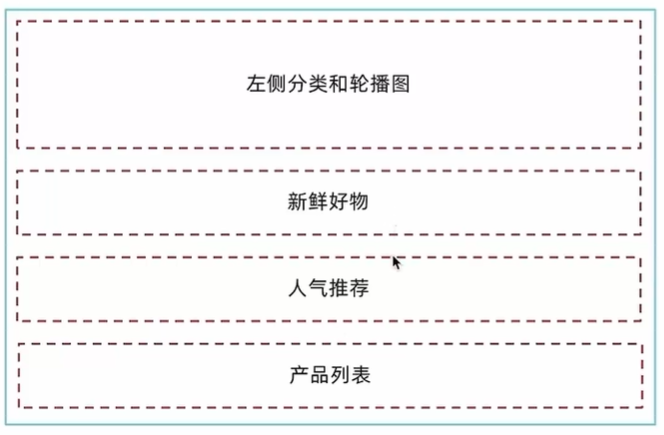
3、Home整体结构搭建和分类实现
按照结构新增五个组件:左侧分类、Banner、新鲜好物、人气推荐、产品列表。在 src/views/Home/components 路径下依次创建 HomeCategory.vue、HomeBanner.vue、HomeNew.vue、HomeHot.vue、HomeProduct.vue
Home 模块中引入组件
在 Home 的 index.vue 模块入口组件中引入各个组件并渲染:
<script setup>
import HomeCategory from './components/HomeCategory.vue'
import HomeBanner from './components/HomeBanner.vue'
import HomeNew from './components/HomeNew.vue'
import HomeHot from './components/HomeHot.vue'
import homeProduct from './components/HomeProduct.vue'
</script>

<template>
  <div class="container">
    <HomeCategory />
    <HomeBanner />
  </div>
  <HomeNew />
  <HomeHot />
  <homeProduct />
</template>
分类实现
html+css静态结构代码
<script setup>

</script>

<template>
  <div class="home-category">
    <ul class="menu">
      <li v-for="item in 9" :key="item">
        <RouterLink to="/">居家</RouterLink>
        <RouterLink v-for="i in 2" :key="i" to="/">南北干货</RouterLink>
        <!-- 弹层layer位置 -->
        <div class="layer">
          <h4>分类推荐 <small>根据您的购买或浏览记录推荐</small></h4>
          <ul>
            <li v-for="i in 5" :key="i">
              <RouterLink to="/">
                <img alt="" />
                <div class="info">
                  <p class="name ellipsis-2">
                    男士外套
                  </p>
                  <p class="desc ellipsis">男士外套,冬季必选</p>
                  <p class="price"><i>¥</i>200.00</p>
                </div>
              </RouterLink>
            </li>
          </ul>
        </div>
      </li>
    </ul>
  </div>
</template>


<style scoped lang='scss'>
.home-category {
  width: 250px;
  height: 500px;
  background: rgba(0, 0, 0, 0.8);
  position: relative;
  z-index: 99;

  .menu {
    li {
      padding-left: 40px;
      height: 55px;
      line-height: 55px;

      &:hover {
        background: $xtxColor;
      }

      a {
        margin-right: 4px;
        color: #fff;

        &:first-child {
          font-size: 16px;
        }
      }

      .layer {
        width: 990px;
        height: 500px;
        background: rgba(255, 255, 255, 0.8);
        position: absolute;
        left: 250px;
        top: 0;
        display: none;
        padding: 0 15px;

        h4 {
          font-size: 20px;
          font-weight: normal;
          line-height: 80px;

          small {
            font-size: 16px;
            color: #666;
          }
        }

        ul {
          display: flex;
          flex-wrap: wrap;

          li {
            width: 310px;
            height: 120px;
            margin-right: 15px;
            margin-bottom: 15px;
            border: 1px solid #eee;
            border-radius: 4px;
            background: #fff;

            &:nth-child(3n) {
              margin-right: 0;
            }

            a {
              display: flex;
              width: 100%;
              height: 100%;
              align-items: center;
              padding: 10px;

              &:hover {
                background: #e3f9f4;
              }

              img {
                width: 95px;
                height: 95px;
              }

              .info {
                padding-left: 10px;
                line-height: 24px;
                overflow: hidden;

                .name {
                  font-size: 16px;
                  color: #666;
                }

                .desc {
                  color: #999;
                }

                .price {
                  font-size: 22px;
                  color: $priceColor;

                  i {
                    font-size: 16px;
                  }
                }
              }
            }
          }
        }
      }

      // 关键样式  hover状态下的layer盒子变成block
      &:hover {
        .layer {
          display: block;
        }
      }
    }
  }
}
</style>
获取数据并进行遍历输出:
<script setup>
import { useCategoryStore } from '@/stores/category'
const categoryStore = useCategoryStore()
</script>

<template>
  <div class="home-category">
    <ul class="menu">
      <li v-for="item in categoryStore.categoryList" :key="item.id">
        <RouterLink to="/">{{ item.name }}</RouterLink>
        <RouterLink v-for="i in item.children.slice(0,2)" :key="i" to="/">{{ i.name }}</RouterLink>
        <!-- 弹层layer位置 -->
        <div class="layer">
          <h4>分类推荐 <small>根据您的购买或浏览记录推荐</small></h4>
          <ul>
            <li v-for="i in item.goods" :key="i.id">
              <RouterLink to="/">
                <img :src="i.picture" alt="" />
                <div class="info">
                  <p class="name ellipsis-2">
                    {{ i.name }}
                  </p>
                  <p class="desc ellipsis">{{ i.desc }}</p>
                  <p class="price"><i>¥</i>{{ i.price }}</p>
                </div>
              </RouterLink>
            </li>
          </ul>
        </div>
      </li>
    </ul>
  </div>
</template>


<style scoped lang='scss'>
.home-category {
  width: 250px;
  height: 500px;
  background: rgba(0, 0, 0, 0.8);
  position: relative;
  z-index: 99;

  .menu {
    li {
      padding-left: 40px;
      height: 55px;
      line-height: 55px;

      &:hover {
        background: $xtxColor;
      }

      a {
        margin-right: 4px;
        color: #fff;

        &:first-child {
          font-size: 16px;
        }
      }

      .layer {
        width: 990px;
        height: 500px;
        background: rgba(255, 255, 255, 0.8);
        position: absolute;
        left: 250px;
        top: 0;
        display: none;
        padding: 0 15px;

        h4 {
          font-size: 20px;
          font-weight: normal;
          line-height: 80px;

          small {
            font-size: 16px;
            color: #666;
          }
        }

        ul {
          display: flex;
          flex-wrap: wrap;

          li {
            width: 310px;
            height: 120px;
            margin-right: 15px;
            margin-bottom: 15px;
            border: 1px solid #eee;
            border-radius: 4px;
            background: #fff;

            &:nth-child(3n) {
              margin-right: 0;
            }

            a {
              display: flex;
              width: 100%;
              height: 100%;
              align-items: center;
              padding: 10px;

              &:hover {
                background: #e3f9f4;
              }

              img {
                width: 95px;
                height: 95px;
              }

              .info {
                padding-left: 10px;
                line-height: 24px;
                overflow: hidden;

                .name {
                  font-size: 16px;
                  color: #666;
                }

                .desc {
                  color: #999;
                }

                .price {
                  font-size: 22px;
                  color: $priceColor;

                  i {
                    font-size: 16px;
                  }
                }
              }
            }
          }
        }
      }

      // 关键样式  hover状态下的layer盒子变成block
      &:hover {
        .layer {
          display: block;
        }
      }
    }
  }
}
</style>
轮播图实现
准备模板 --> elementPlus相关组件 --> 获取接口数据 --> 渲染组件
html+css静态结构代码
<script setup>

</script>

<template>
  <div class="home-banner">
    <!--使用 ElementPlus 的轮播图组件-->
    <el-carousel height="500px">
      <el-carousel-item v-for="item in 4" :key="item">
        <img src="http://yjy-xiaotuxian-dev.oss-cn-beijing.aliyuncs.com/picture/2021-04-15/6d202d8e-bb47-4f92-9523-f32ab65754f4.jpg" alt="">
      </el-carousel-item>
    </el-carousel>
  </div>
</template>


<style scoped lang='scss'>
.home-banner {
  width: 1240px;
  height: 500px;
  position: absolute;
  left: 0;
  top: 0;
  z-index: 98;

  img {
    width: 100%;
    height: 500px;
  }
}
</style>
封装接口
在apis文件夹中创建home.js文件:
import http from '@/utils/http'

export function getBannerAPI() {
  return http({
    url: 'home/banner'
  })
}
渲染数据
<script setup>
import { getBannerAPI } from '@/apis/home'
import { onMounted,ref } from 'vue'

const bannerList = ref([])
const getBanner = async () => {
  const res = await getBannerAPI()
  console.log(res)
  bannerList.value = res.result
}

onMounted(() => getBanner())
</script>

<template>
  <div class="home-banner">
    <!--使用 ElementPlus 的轮播图组件-->
    <el-carousel height="500px">
      <el-carousel-item v-for="item in bannerList" :key="item.id">
        <img :src="item.imgUrl" alt="">
      </el-carousel-item>
    </el-carousel>
  </div>
</template>


<style scoped lang='scss'>
.home-banner {
  width: 1240px;
  height: 500px;
  position: absolute;
  left: 0;
  top: 0;
  z-index: 98;

  img {
    width: 100%;
    height: 500px;
  }
}
</style>
面板组件封装
组件封装解决的问题:复用问题和业务维护问题
由于新鲜好物和人气推荐模块,在结构上非常相似,只是内容不同,通过组件封装可以实现复用结构的效果。
核心思路:把可复用的结构只写一次,把可能发生变化的部分抽象成组件参数(props/插槽)

不同:主标题、副标题、主体内容
主标题和副标题是纯文本,可以抽象成 props 传入
主体内容是复杂的模版,抽象成插槽传入
创建公共组件复用
在 Home/components 路径下创建 HomePanel.vue 文件,代码如下:
<script setup>

</script>


<template>
  <div class="home-panel">
    <div class="container">
      <div class="head">
         <!-- 主标题和副标题 -->
        <h3>
          新鲜好物<small>新鲜出炉 品质靠谱</small>
        </h3>
      </div>
      <!-- 主体内容区域 -->
      <div> 主体内容 </div>
    </div>
  </div>
</template>

<style scoped lang='scss'>
.home-panel {
  background-color: #fff;

  .head {
    padding: 40px 0;
    display: flex;
    align-items: flex-end;

    h3 {
      flex: 1;
      font-size: 32px;
      font-weight: normal;
      margin-left: 6px;
      height: 35px;
      line-height: 35px;

      small {
        font-size: 16px;
        color: #999;
        margin-left: 20px;
      }
    }
  }
}
</style>
抽取可变部分
<script setup>
// 定义props
defineProps({
  // 主标题
  title:{
    type:String
  },
  // 副标题
  subTitle:{
    type:String
  }
})
</script>


<template>
  <div class="home-panel">
    <div class="container">
      <div class="head">
         <!-- 主标题和副标题 -->
        <h3>
          {{ title }}<small>{{ subTitle }}</small>
        </h3>
      </div>
      <!-- 主体内容区域 -->
      <slot/>
    </div>
  </div>
</template>
新鲜好物实现
准备模板(HomePanel组件)--> 定制props --> 定制插槽内容(接口 + 渲染模板)
模板代码
在Home/components目录下的HomeNew.vue中,添加以下代码:
<script setup>
</script>
<template>
<div></div>
<!-- 下面是插槽主体内容模版
<ul class="goods-list">
<li v-for="item in newList" :key="item.id">
<RouterLink to="/">
<img :src="item.picture" alt="" />
<p class="name">{{ item.name }}</p>
<p class="price">¥{{ item.price }}</p>
</RouterLink>
</li>
</ul>
-->
</template>
<style scoped lang='scss'>
.goods-list {
display: flex;
justify-content: space-between;
height: 406px;
li {
width: 306px;
height: 406px;
background: #f0f9f4;
transition: all .5s;
&:hover {
transform: translate3d(0, -3px, 0);
box-shadow: 0 3px 8px rgb(0 0 0 / 20%);
}
img {
width: 306px;
height: 306px;
}
p {
font-size: 22px;
padding-top: 12px;
text-align: center;
text-overflow: ellipsis;
overflow: hidden;
white-space: nowrap;
}
.price {
color: $priceColor;
}
}
}
</style>
封装接口
在apis/home.js中,添加下面的代码:
/**
 * @description: 获取新鲜好物
 * @param {*}
 * @return {*}
 */
export function findNewAPI() {
  return http({
    url: '/home/new'
  })
}
渲染数据
<script setup>
import { onMounted,ref } from 'vue'
import HomePanel from './HomePanel.vue'
import { findNewAPI } from '@/apis/home'
const newList =ref([])
const getNewList = async()=>{
const res=await findNewAPI()
newList.value=res.result
}
onMounted(() => getNewList())
</script>
<template>
<HomePanel title="新鲜好物" subTitle="新鲜出炉 品质靠谱">
<ul class="goods-list">
<li v-for="item in newList" :key="item.id">
<RouterLink to="/">
<img :src="item.picture" alt="" />
<p class="name">{{ item.name }}</p>
<p class="price">¥{{ item.price }}</p>
</RouterLink>
</li>
</ul>
</HomePanel>
</template>人气推荐
模板代码
在Home/components目录下的HomeHot.vue中,添加以下代码:
<script setup>

</script>

<template>
  <div></div>
  <!-- 下面是插槽主体内容模版
  <ul class="goods-list">
    <li v-for="item in newList" :key="item.id">
      <RouterLink to="/">
        <img :src="item.picture" :alt="item.alt" />
        <p class="name">{{ item.title }}</p>
      </RouterLink>
    </li>
  </ul>
  -->
</template>

<style scoped lang='scss'>
.goods-list {
  display: flex;
  justify-content: space-between;
  height: 406px;

  li {
    width: 306px;
    height: 406px;

    background: #f0f9f4;
    transition: all .5s;

    &:hover {
      transform: translate3d(0, -3px, 0);
      box-shadow: 0 3px 8px rgb(0 0 0 / 20%);
    }

    img {
      width: 306px;
      height: 306px;
    }

    p {
      font-size: 22px;
      padding-top: 12px;
      text-align: center;
      text-overflow: ellipsis;
      overflow: hidden;
      white-space: nowrap;
    }

    .price {
      color: $priceColor;
    }
  }
}
</style>
封装接口
/**
 * @description: 获取人气推荐
 * @param {*}
 * @return {*}
 */
export const findHotAPI = () => {
  return http.get('home/hot')
}
渲染数据
<script setup>
import HomePanel from './HomePanel.vue';
import { ref, onMounted } from 'vue'
import { findHotAPI } from '@/apis/home'

const hotList = ref([])
const getHotList = async() => {
    const res = await findHotAPI()
    console.log(res)
    hotList.value = res.result
}

onMounted(() => {
    getHotList()
})
</script>

<template>
    <HomePanel title="人气推荐" sub-title="人气爆款 不容错过">
        <!-- 下面是插槽主体内容模版 -->
        <ul class="goods-list">
            <li v-for="item in hotList" :key="item.id">
                <RouterLink to="/">
                    <img :src="item.picture" :alt="item.alt" />
                    <p class="name">{{ item.title }}</p>
                </RouterLink>
            </li>
        </ul>
    </HomePanel>
</template>
图片懒加载指令
应用场景:电商网站的首页通常会很长,用户不一定能访问到页面靠下面的图片,这类图片通过懒加载优化手段可以做到只有进入视口区域才发送图片请求。
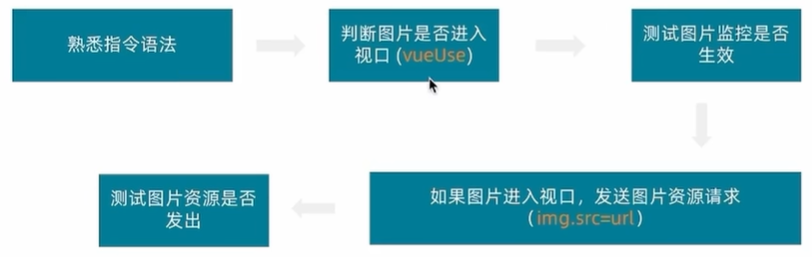
自定义指令
在main.js中定义全局指令
import { useIntersectionObserver } from '@vueuse/core'
// 定义全局指令
app.directive('img-lazy', {
  mounted(el, binding) {
    // el: 指定绑定的元素 img
    // binding: binding.value 指令等于号后面绑定的表达式的值 图片url
    console.log(el, binding.value)
    useIntersectionObserver(el, ([{ isIntersecting }]) => {
      console.log(isIntersecting)
      if (isIntersecting) {
        // 进入视口区域
        el.src = binding.value
      }
    })
  }
})
组件中使用---HomeHot.vue
<img v-img-lazy="item.picture" :src="item.picture" alt="" />懒加载指令优化
书写位置不合理
懒加载指令的逻辑直接写到入口文件中是不合理的,因为入口文件通常只做一些初始化的事情,不应该包含太多的逻辑代码,可以通过插件的方法把懒加载指令封装为插件,main.js入口文件只需要负责注册插件即可。
在directives文件夹下创建index.js文件:
// 定义懒加载插件
import { useIntersectionObserver } from '@vueuse/core'

export const lazyPlugin = {
  install(app) {
    // 懒加载指令逻辑
    app.directive('img-lazy', {
      mounted(el, binding) {
        // el: 指定绑定的元素 img
        // binding: binding.value 指令等于号后面绑定的表达式的值 图片url
        // console.log(el, binding.value)
        useIntersectionObserver(el, ([{ isIntersecting }]) => {
          // console.log(isIntersecting)
          if (isIntersecting) {
            // 进入视口区域
            el.src = binding.value
          }
        })
      }
    })
  }
}
重复监听
useIntersectionObserver对于元素的监听是一直存在的,除非手动停止监听,存在内存浪费。
// 定义懒加载插件
import { useIntersectionObserver } from '@vueuse/core'

export const lazyPlugin = {
  install(app) {
    // 懒加载指令逻辑
    app.directive('img-lazy', {
      mounted(el, binding) {
        // el: 指定绑定的元素 img
        // binding: binding.value 指令等于号后面绑定的表达式的值 图片url
        // console.log(el, binding.value)
        const { stop } = useIntersectionObserver(el, ([{ isIntersecting }]) => {
          // console.log(isIntersecting)
          if (isIntersecting) {
            // 进入视口区域
            el.src = binding.value
            stop()
          }
        })
      }
    })
  }
}
Product产品列表
静态模板
<script setup>
import HomePanel from './HomePanel.vue'
</script>
<template>
<div class="home-product">
<!-- <HomePanel :title="cate.name" v-for="cate in goodsProduct" :key="cate.id">
<div class="box">
<RouterLink class="cover" to="/">
<img :src="cate.picture" />
<strong class="label">
<span>{{ cate.name }}馆</span>
<span>{{ cate.saleInfo }}</span>
</strong>
</RouterLink>
<ul class="goods-list">
<li v-for="good in cate.goods" :key="good.id">
<RouterLink to="/" class="goods-item">
<img :src="good.picture" alt="" />
<p class="name ellipsis">{{ good.name }}</p>
<p class="desc ellipsis">{{ good.desc }}</p>
<p class="price">¥{{ good.price }}</p>
</RouterLink>
</li>
</ul>
</div>
</HomePanel> -->
</div>
</template>
<style scoped lang='scss'>
.home-product {
background: #fff;
margin-top: 20px;
.sub {
margin-bottom: 2px;
a {
padding: 2px 12px;
font-size: 16px;
border-radius: 4px;
&:hover {
background: $xtxColor;
color: #fff;
}
&:last-child {
margin-right: 80px;
}
}
}
.box {
display: flex;
.cover {
width: 240px;
height: 610px;
margin-right: 10px;
position: relative;
img {
width: 100%;
height: 100%;
}
.label {
width: 188px;
height: 66px;
display: flex;
font-size: 18px;
color: #fff;
line-height: 66px;
font-weight: normal;
position: absolute;
left: 0;
top: 50%;
transform: translate3d(0, -50%, 0);
span {
text-align: center;
&:first-child {
width: 76px;
background: rgba(0, 0, 0, 0.9);
}
&:last-child {
flex: 1;
background: rgba(0, 0, 0, 0.7);
}
}
}
}
.goods-list {
width: 990px;
display: flex;
flex-wrap: wrap;
li {
width: 240px;
height: 300px;
margin-right: 10px;
margin-bottom: 10px;
&:nth-last-child(-n + 4) {
margin-bottom: 0;
}
&:nth-child(4n) {
margin-right: 0;
}
}
}
.goods-item {
display: block;
width: 220px;
padding: 20px 30px;
text-align: center;
transition: all .5s;
&:hover {
transform: translate3d(0, -3px, 0);
box-shadow: 0 3px 8px rgb(0 0 0 / 20%);
}
img {
width: 160px;
height: 160px;
}
p {
padding-top: 10px;
}
.name {
font-size: 16px;
}
.desc {
color: #999;
height: 29px;
}
.price {
color: $priceColor;
font-size: 20px;
}
}
}
}
</style>
封装接口
/**
 * @description: 获取所有商品模块
 * @param {*}
 * @return {*}
 */
export function getGoodsAPI() {
  return http({
    url: '/home/goods'
  })
}
数据渲染
<script setup>
import HomePanel from './HomePanel.vue'
import { getGoodsAPI } from '@/apis/home'
import { onMounted,ref } from 'vue'
const goodsProduct = ref([])
const getGoods = async () => {
const res = await getGoodsAPI()
// console.log(res)
goodsProduct.value = res.result
}
onMounted(()=>getGoods())
</script>
<template>
<div class="home-product">
<HomePanel :title="cate.name" v-for="cate in goodsProduct" :key="cate.id">
<div class="box">
<RouterLink class="cover" to="/">
<img v-img-lazy="cate.picture" />
<strong class="label">
<span>{{ cate.name }}馆</span>
<span>{{ cate.saleInfo }}</span>
</strong>
</RouterLink>
<ul class="goods-list">
<li v-for="good in cate.goods" :key="good.id">
<RouterLink to="/" class="goods-item">
<img v-img-lazy="good.picture" alt="" />
<p class="name ellipsis">{{ good.name }}</p>
<p class="desc ellipsis">{{ good.desc }}</p>
<p class="price">¥{{ good.price }}</p>
</RouterLink>
</li>
</ul>
</div>
</HomePanel>
</div>
</template>GoodsItem组件封装
多个业务模块中都需要用。
核心思想:把要显示的数据对象设计为props参数,传入什么数据对象就显示什么数据
创建GoodsItem.vue文件:
<script setup>
defineProps({
goods:{
type:Object,
default:()=>{}
}
})
</script>
<template>
<RouterLink to="/" class="goods-item">
<img v-img-lazy="goods.picture" alt="" />
<p class="name ellipsis">{{ goods.name }}</p>
<p class="desc ellipsis">{{ goods.desc }}</p>
<p class="price">¥{{ goods.price }}</p>
</RouterLink>
</template>
<style lang="scss">
.goods-item {
display: block;
width: 220px;
padding: 20px 30px;
text-align: center;
transition: all 0.5s;
&:hover {
transform: translate3d(0, -3px, 0);
box-shadow: 0 3px 8px rgb(0 0 0 / 20%);
}
img {
width: 160px;
height: 160px;
}
p {
padding-top: 10px;
}
.name {
font-size: 16px;
}
.desc {
color: #999;
height: 29px;
}
.price {
color: $priceColor;
font-size: 20px;
}
}
</style>在HomeProduct.vue文件中修改代码:
<script setup>
import HomePanel from './HomePanel.vue'
import { getGoodsAPI } from '@/apis/home'
import { onMounted,ref } from 'vue'
import GoodsItem from './GoodsItem.vue'
const goodsProduct = ref([])
const getGoods = async () => {
  const res = await getGoodsAPI()
  // console.log(res)
  goodsProduct.value = res.result
}
onMounted(()=>getGoods())
</script>

<template>
  <div class="home-product">
    <HomePanel :title="cate.name" v-for="cate in goodsProduct" :key="cate.id">
      <div class="box">
        <RouterLink class="cover" to="/">
          <img v-img-lazy="cate.picture" />
          <strong class="label">
            <span>{{ cate.name }}馆</span>
            <span>{{ cate.saleInfo }}</span>
          </strong>
        </RouterLink>
        <ul class="goods-list">
          <li v-for="goods in cate.goods" :key="goods.id">
            <GoodsItem :goods="goods" />
          </li>
        </ul>

      </div>
    </HomePanel>
  </div>
</template>


 969
969

 被折叠的 条评论
为什么被折叠?
被折叠的 条评论
为什么被折叠?
 到【灌水乐园】发言


