


 本文深入解析Android中的Handler机制,包括其工作原理、关键组件及如何正确使用。文章介绍了Handler、Looper和MessageQueue之间的关系,提供了实用示例,并讨论了HandlerThread的用法。
一起来聊聊Android基础之Handler
标签(空格分隔): Android基础知识 Android开发
参考资料:
Understanding Android Core: Looper, Handler, and HandlerThread
扯闲篇
众所周知的Android黄金法则:
- 主线程可以刷新UI,但不能执行耗时操作
- 子线程可以执行耗时操作 ,但是不能直接刷新UI
Handler机制很好地解决了这个矛盾。
A Handler allows you to send and process Message and Runnable objects associated with a thread’s MessageQueue. Each Handler instance is associated with a single thread and that thread’s message queue. When you create a new Handler, it is bound to the thread / message queue of the thread that is creating it – from that point on, it will deliver messages and runnables to that message queue and execute them as they come out of the message queue.
概括起来就是:
1. 可以通过Handler来发送处理Message和Runnable。
2. Handler运行在创建它的进程中。
基本元素:
1. MessageQueue :接收消息的消息队列
2. Handler :发送和处理消息
3. Looper :死循环,不断从MessageQueue中抽取messages交给对应的Handler进行处理。
Handler的两个主要用途:
1. 在未来某个时间点按计划执行messages和runnables
2. 在非当前线程按顺序执行action(例如,当前为子线程,而子线程不应该作UI操作。如果需要执行UI操作,则可以使用Handler在主线程执行。)
一个线程只能含有唯一的Lopper和MessageQueue,但可以含有多个Hanlder。
Handler使用示例
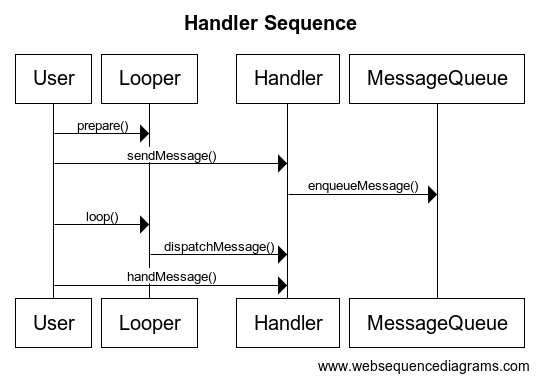
A thread gets a Looper and MessageQueue by calling Looper.prepare() after its running. Looper.prepare() identifies the calling thread, creates a Looper and MessageQueue object and associate the thread with them in ThreadLocal storage class. Looper.loop() must be called to start the associated looper. Similarly, the looper must be terminated explicitly through looper.quit().
先上一张时序图:
class LooperThread extends Thread {
    public Handler mHandler;


    @Override
    public void run() {
        Log.d(TAG, "run: ");
        Looper.prepare();

        mHandler = new Handler(Looper.myLooper()) {
            @Override
            public void handleMessage(Message msg) {
                Log.d(TAG, "handleMessage: looper thread id = " + Thread.currentThread().getId());
                // process incoming messages here
                // this will run in non-ui/background thread
            }
        };

        Looper.loop();
    }
}
Handler类常用的方法:
- post(Runnable)
- postAtTime(Runnable, long)
- postDelayed(Runnable, long)
- sendEmptyMessage(int)
- sendMessage(Message)
- sendMessageAtTime(Message, long)
- sendMessageDelayed(Message, long) methods
The post versions allow you to enqueue Runnable objects to be called by the message queue when they are received; the sendMessage versions allow you to enqueue a Message object containing a bundle of data that will be processed by the Handler’s handleMessage(Message) method (requiring that you implement a subclass of Handler).
post方法带的参数是Runnable,sendMessage方法带的参数是Message,通过handleMessage(Message)方法来处理。
- Message
Message msg = new Message();
msg.obj = "Ali send message";
handler.sendMessage(msg);- Runnable
new Handler(Looper.getMainLooper()).post(new Runnable() {
    @Override
    public void run() {
        // this will run in the main thread
    }
});
Handler源码简析
构造方法Handler()
Handler.java
public Handler() {
    this(null, false);
}
public Handler(Callback callback, boolean async) {
    mLooper = Looper.myLooper();
    if (mLooper == null) {
        throw new RuntimeException(
            "Can't create handler inside thread that has not called Looper.prepare()");
    }
    mQueue = mLooper.mQueue;
    mCallback = callback;
    mAsynchronous = async;
}
public Handler(Looper looper, Callback callback, boolean async) {
    mLooper = looper;
    mQueue = looper.mQueue;
    mCallback = callback;
    mAsynchronous = async;
}
Handler默认提供了7个构造方法,从上面三个典型的构造方法可以看出,每一个Handler对象都会有一个对应的Looper和MessageQueue。
那么,首先来看一下Looper.myLooper()。
Looper.myLooper()
Looper.java
/**
 * Return the Looper object associated with the current thread.  Returns
 * null if the calling thread is not associated with a Looper.
 */
public static @Nullable Looper myLooper() {
    return sThreadLocal.get();
}

// sThreadLocal.get() will return null unless you've called prepare().
static final ThreadLocal<Looper> sThreadLocal = new ThreadLocal<Looper>();
可见,Looper是从sThreadLocal对象中获取的,而且在获取之前必须调用prepare()方法。
ThreadLocal是一个线程内部的数据存储类。通过使用ThreadLocal,能够让同一个数据对象在不同的线程中存在多个副本,而这些副本互不影响。
那么,再来看一下prepare()做了什么操作。
Looper.prepare()
Looper.java
 /** Initialize the current thread as a looper.
  * This gives you a chance to create handlers that then reference
  * this looper, before actually starting the loop. Be sure to call
  * {@link #loop()} after calling this method, and end it by calling
  * {@link #quit()}.
  */
public static void prepare() {
    prepare(true);
}

private static void prepare(boolean quitAllowed) {
    if (sThreadLocal.get() != null) {
        throw new RuntimeException("Only one Looper may be created per thread");
    }
    sThreadLocal.set(new Looper(quitAllowed));
}
SDK源码中的注释真是给了我们非常多的信息,所以贴代码的时候我都忍不住会把注释也贴上,实在没有比源码注释更直白的参考了。
第15行,新建了一个Looper对象并放入sThreadLocal,并且整个Looper.java中只有这一处调用了sThreadLocal.get()方法。
这说明,每个线程中只有一个Looper对象。
private Looper(boolean quitAllowed) {
    mQueue = new MessageQueue(quitAllowed);
    mThread = Thread.currentThread();
}
Looper的构造方法实例化mQueue和mThread,结合Handler的构造方法,可以得出结论:一个线程中只有一个Looper对象和一个MessageQueue对象,但可以有多个Handler对象。
注意:主线程中我们无需调用loop方法,因为ActivityThread的main方法中已经为我们调用了.
接下来了解一些Handler中常用的方法
obtainMessage/post/sendMessage
- obtainMessage()
Handler.java
/**
 * Returns a new {@link android.os.Message Message} from the global message pool. More efficient than
 * creating and allocating new instances. The retrieved message has its handler set to this instance (Message.target == this).
 *  If you don't want that facility, just call Message.obtain() instead.
 */
public final Message obtainMessage()
{
    return Message.obtain(this);
}
obtainMessage方法实际调用的是Message.obtain(this),所以我们这么用:
mHandler.obtainMessage().sendToTarget();

Message.java
public void sendToTarget() {
    target.sendMessage(this);
}
第5行,target等于Message.obtain(this)中的this。
所以这两种Handler发送消息方法实质是一样的:
方法一:
Message msg = Message.obtain();
mHandler.sendMessage(msg);

方法二:
mHandler.obtainMessage().sendToTarget();
可以看出,方法二更简洁高效。
- post()
Handler.java
public final boolean post(Runnable r)
{
   return  sendMessageDelayed(getPostMessage(r), 0);
}

private static Message getPostMessage(Runnable r) {
    Message m = Message.obtain();
    m.callback = r;
    return m;
}
post和sendMessage是Handler机制中最常用的两种方法,但从post()方法的实现看出,最终都是调用的sendMessage()方法。
详细流程:
post()->sendMessageDelayed()->sendMessageAtTime()->enqueueMessage()
MessageQueue.enqueueMessage()
MessageQueue.java
boolean enqueueMessage(Message msg, long when) {
    if (msg.target == null) {
        throw new IllegalArgumentException("Message must have a target.");
    }
    if (msg.isInUse()) {
        throw new IllegalStateException(msg + " This message is already in use.");
    }

    // ...
}- 第2行,”Message must have a target.”表示Message必须有一个Handler来接收处理。
- 第5行,表示同一个Message不能被同时重复使用。因为所以的消息都是发送到MessageQueue存放,然后等待处理的。如果一个Message对象在MessageQueue里,再次把它存到MessageQueue时就会报错。当我们调用Looper.quit()方法就会清除掉所有的Messages。
- 接下来将该消息加入到MessageQueue中。之后Looper发现有新消息会取出,并把它交给Handler处理。
Looper.loop()
把Message加入到MessageQueue之后,就可以调用Looper.loop()方法来进入消息循环了。
Looper.java
/**
 * Run the message queue in this thread. Be sure to call
 * {@link #quit()} to end the loop.
 */
public static void loop() {
    final Looper me = myLooper();
    if (me == null) {
        throw new RuntimeException("No Looper; Looper.prepare() wasn't called on this thread.");
    }
    final MessageQueue queue = me.mQueue;

    for (;;) {
        Message msg = queue.next(); // might block
        if (msg == null) {
            // No message indicates that the message queue is quitting.
            return;
        }
        // ...

        msg.target.dispatchMessage(msg);

        // ...
    }
}
第12行,loop()方法是一个死循环,不断从MessageQueue中取出Message,然后通过Handler.dispatchMessage()方法进行派发,走到MessageQueue中的Message为空。
dispatchMessage()
Handler.java
/**
 * Handle system messages here.
 */
public void dispatchMessage(Message msg) {
    if (msg.callback != null) {
        handleCallback(msg);
    } else {
        if (mCallback != null) {
            if (mCallback.handleMessage(msg)) {
                return;
            }
        }
        handleMessage(msg);
    }
}
最后,回调handleMessage()方法来处理Message。
Handler使用注意事项
- 在子线程中使用Handler,必须先调用Looper.prepare()创建Looper。
- 在同一个线程中只允许有一个Looper,所以Looper.prepare在同一个线程不能调用两次。
- 调用Looper.loop()才能使Handler机制运行起来,并且Looper.loop()要在Looper.prepare()之后调用。
- 主线程默认已经创建了Looper,所以不要在主线程中调用Looper.prepare()。
- 当我们在子线程使用Handler时,如果Handler不再需要发送和处理消息,那么一定要退出子线程的消息轮询。因为Looper.loop()方法里是一个死循环,如果我们不主动结束它,那么它就会一直运行,子线程也会一直运行而不会结束。退出消息轮询的方法是:
Looper.myLooper().quit();
Looper.myLooper().quitsafely();
HandlerThread
介绍:HandlerThread继承自Thread,通俗点说就是自带Handler的Thread。当线程开启时,也就是它run方法运行起来后,线程同时创建了一个含有消息队列的Looper,并对外提供自己这个Looper对象的get方法,这就是它和普通Thread唯一不同的地方。
用法:
1.开发中如果多次使用类似new Thread(){…}.start()这种方式开启一个子线程,会创建多个匿名线程,使得程序运行起来越来越慢,而HandlerThread自带Looper使他可以通过消息来多次重复使用当前线程,节省开支;2.android系统提供的Handler类内部的Looper默认绑定的是UI线程的消息队列,对于非UI线程又想使用消息机制,那么HandlerThread内部的Looper是最合适的,它不会干扰或阻塞UI线程。
方法一:
    1. 创建一个HandlerThread,即创建了一个包含Looper的线程。
    HandlerThread handlerThread = new HandlerThread("leochin.com");
    //创建HandlerThread后一定要记得start()
    handlerThread.start();

    2. 获取HandlerThread的Looper
    Looper looper = handlerThread.getLooper();

    3. 创建Handler,通过Looper初始化
    Handler handler = new Handler(looper);
通过以上三步我们就成功创建HandlerThread。通过handler发送消息,就会在子线程中执行。如果想让HandlerThread退出,则需要调用handlerThread.quit();。
- 方法二:
private class MyHandlerThread extends HandlerThread {

    Handler handler;

    public MyHandlerThread(String name) {
        super(name);
    }

    @Override
    protected void onLooperPrepared() {
        handler = new Handler(getLooper()) {
            @Override
            public void handleMessage(Message msg) {
                // process incoming messages here
                // this will run in non-ui/background thread
            }
        };
    }
}


 3509
3509

 被折叠的 条评论
为什么被折叠?
被折叠的 条评论
为什么被折叠?
 到【灌水乐园】发言


