


Android系统进程Zygote启动过程分析
标签(空格分隔): 开关机流程
- Android系统进程Zygote启动过程分析
- Step 1. app_main.cpp
- Step 2. AndroidRuntime.start
- Step 3. ZygoteInit.main
- Step 4. ZygoteInit.registerZygoteSocket
- Step 5. ZygoteInit.startSystemServer
- Step 6. ZygoteInit.handleSystemServerProcess
- Step 7. RuntimeInit.zygoteInit
- Step 8. AndroidRuntime.com_android_internal_os_RuntimeInit_nativeZygoteInit
- Step 9. SystemServer.main
- Step 10. SystemServer.startBootstrapServices
- Step 11. startCoreServices
- Step 12. startOtherServices
- 总结:
我们知道,Android系统是基于Linux内核的,而在linux系统中,所有的进程都是init进程的子孙进程,也就是说,所有的进程都是直接或者间接地由init进程fork出来的。Zygote进程也不例外,它是在系统启动的过程,由init进程创建的。在系统启动脚本system/core/rootdir/init.rc文件中,我们可以看到启动Zygote进程的脚本命令(MSM8937平台启动Zygote进程的脚本命令放在system/core/rootdir/init.zygote32.rc):
service zygote /system/bin/app_process -Xzygote /system/bin --zygote --start-system-server
    class main
    priority -20
    user root
    group root readproc
    socket zygote stream 660 root system
    onrestart write /sys/android_power/request_state wake
    onrestart write /sys/power/state on
    onrestart restart audioserver
    onrestart restart cameraserver
    onrestart restart media
    onrestart restart netd
    onrestart restart wificond
writepid /dev/cpuset/foreground/tasks- 关键字
service: 告诉init进程创建一个名为”zygote”的进程,这个zygote进程要执行的程序是/system/bin/app_process,后面是要传给app_process的参数。
Zygote进程可以执行文件是app_process。app_process模块的源文件在frameworks/base/cmds/app_process下,只有一个文件app_main.cpp
// 详见frameworks/base/cmds/app_process/app_main.cpp:
// arguments :
//
// --zygote : Start in zygote mode
// --start-system-server : Start the system server.
// --application : Start in application (stand alone, non zygote) mode.
// --nice-name : The nice name for this process.- -Xzygote是传递给虚拟机的参数
- /system/bin 是 parent dir(程序运行目录)
- –zygote表示以zygote模式启动
class main: It belongs to the main class and will start along with any other service that belongs with that classOnrestart: Execute a command when service restarts
最后的一系列onrestart关键字表示这个zygote进程重启时需要执行的命令。
关于init.rc文件的更多信息,请参考system/core/init/readme.txt文件。
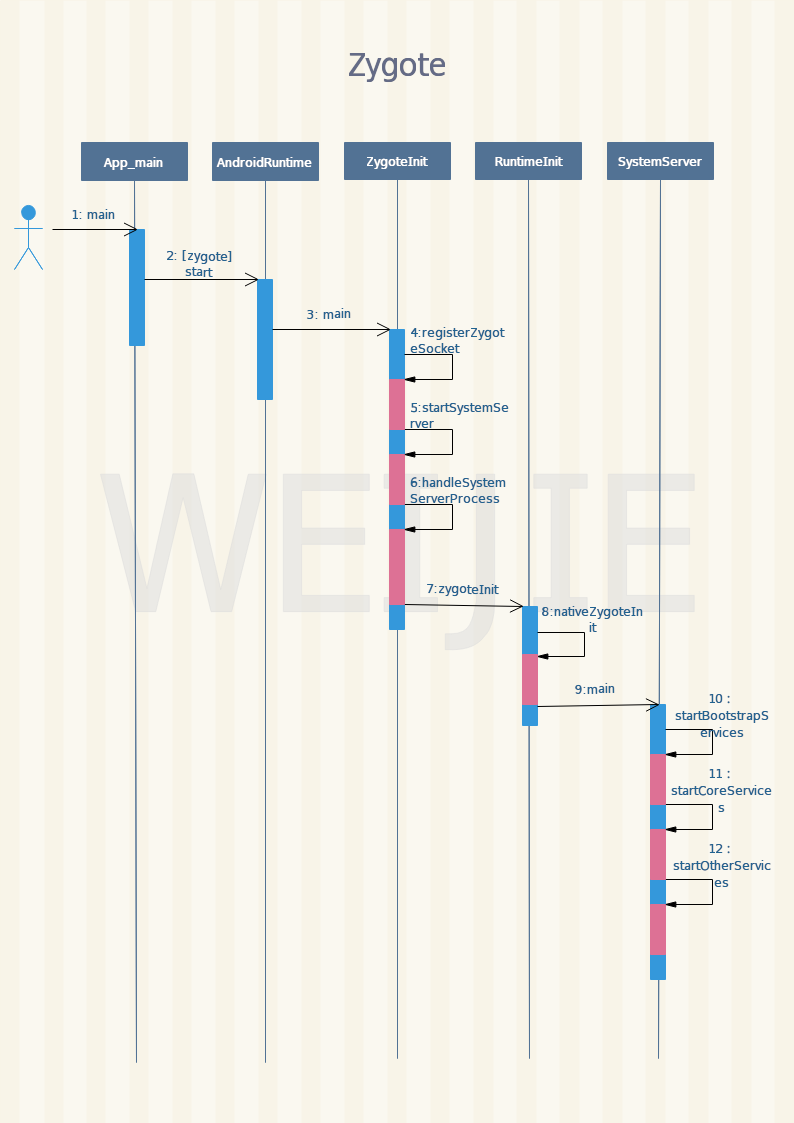
了解了这个信息之后,我们就知道Zygote进程要执行的程序便是system/bin/app_process了,它的源代码位于frameworks/base/cmds/app_process/app_main.cpp文件中,入口函数是main。在继续分析Zygote进程启动的过程之前,我们先来看看它的启动序列图:
本文源码版本为Android7.1
进入Zygote启动的C篇
Step 1. app_main.cpp
这个函数定义在frameworks/base/cmds/app_process/app_main.cpp文件中:
int main(int argc, char* const argv[])
{
    ...
    // 1. 隐式创建一个AppRuntime对象:runtime
    AppRuntime runtime(argv[0], computeArgBlockSize(argc, argv));
    // Process command line arguments
    // ignore argv[0]
    argc--;
    argv++;

    int i;
    for (i = 0; i < argc; i++) {
        if (argv[i][0] != '-') {
            break;
        }
        if (argv[i][1] == '-' && argv[i][2] == 0) {
            ++i; // Skip --.
            break;
        }
        runtime.addOption(strdup(argv[i]));
    }

    // Parse runtime arguments.  Stop at first unrecognized option.
    bool zygote = false;
    bool startSystemServer = false;
    bool application = false;
    String8 niceName;
    String8 className;

    // 2. 处理输入参数
    ++i;  // Skip unused "parent dir" argument.
    while (i < argc) {
        const char* arg = argv[i++];
        if (strcmp(arg, "--zygote") == 0) {
            zygote = true;
            niceName = ZYGOTE_NICE_NAME;
        } else if (strcmp(arg, "--start-system-server") == 0) {
            startSystemServer = true;
        } else if (strcmp(arg, "--application") == 0) {
            application = true;
        } else if (strncmp(arg, "--nice-name=", 12) == 0) {
            niceName.setTo(arg + 12);
        } else if (strncmp(arg, "--", 2) != 0) {
            className.setTo(arg);
            break;
        } else {
            --i;
            break;
        }
    }

    ...

    if (zygote) {
        // 3. 最终走到这里
        runtime.start("com.android.internal.os.ZygoteInit", args, zygote);
    } else if (className) {
        runtime.start("com.android.internal.os.RuntimeInit", args, zygote);
    } else {
        fprintf(stderr, "Error: no class name or --zygote supplied.\n");
        app_usage();
        LOG_ALWAYS_FATAL("app_process: no class name or --zygote supplied.");
        return 10;
    }
}1.AppRuntime
AppRuntime继承了AndroidRuntime
class AppRuntime : public AndroidRuntime
{
    ......
};
由于AppRuntime没有实现自己的start函数,它继承了父类AndroidRuntime的start函数,因此,最终会执行AndroidRuntime类的start函数
2.处理输入参数
以-Xzygote /system/bin –zygote –start-system-server为例,结果如下:
- parentDir 等于/system/bin
- niceName 等于 zyoget
- startSystemServer 等于 true
- zygote 等于 true
3.启动ZygoteInit
Step 2. AndroidRuntime.start
这个函数定义在frameworks/base/core/jni/AndroidRuntime.cpp文件中:
void AndroidRuntime::start(const char* className, const Vector<String8>& options, bool zygote)
{
    ALOGD(">>>>>> START %s uid %d <<<<<<\n",
            className != NULL ? className : "(unknown)", getuid());

    // 1. 启动SystemServer
    static const String8 startSystemServer("start-system-server");

    // 2. 调用函数startReg注册JNI方法
    /*
     * Register android functions.
     */
    if (startReg(env) < 0) {
        ALOGE("Unable to register all android natives\n");
        return;
    }

    /*
     * We want to call main() with a String array with arguments in it.
     * At present we have two arguments, the class name and an option string.
     * Create an array to hold them.
     */
    jclass stringClass;
    jobjectArray strArray;
    jstring classNameStr;

    stringClass = env->FindClass("java/lang/String");
    assert(stringClass != NULL);
    strArray = env->NewObjectArray(options.size() + 1, stringClass, NULL);
    assert(strArray != NULL);
    classNameStr = env->NewStringUTF(className);
    assert(classNameStr != NULL);
    env->SetObjectArrayElement(strArray, 0, classNameStr);

    for (size_t i = 0; i < options.size(); ++i) {
        jstring optionsStr = env->NewStringUTF(options.itemAt(i).string());
        assert(optionsStr != NULL);
        env->SetObjectArrayElement(strArray, i + 1, optionsStr);
    }

    /*
     * Start VM.  This thread becomes the main thread of the VM, and will
     * not return until the VM exits.
     */
    char* slashClassName = toSlashClassName(className);
    jclass startClass = env->FindClass(slashClassName);
    if (startClass == NULL) {
        ALOGE("JavaVM unable to locate class '%s'\n", slashClassName);
        /* keep going */
    } else {
        jmethodID startMeth = env->GetStaticMethodID(startClass, "main",
            "([Ljava/lang/String;)V");
        if (startMeth == NULL) {
            ALOGE("JavaVM unable to find main() in '%s'\n", className);
            /* keep going */
        } else {
            env->CallStaticVoidMethod(startClass, startMeth, strArray);

    ...

}
这个函数的作用是启动Android系统运行时库,它主要做了三件事情,一是调用函数startVM启动虚拟机,二是调用函数startReg注册JNI方法,三是调用了com.android.internal.os.ZygoteInit类的main函数。
进入Zygote启动的java阶段
Step 3. ZygoteInit.main
这个函数定义在frameworks/base/core/Java/com/android/internal/os/ZygoteInit.java文件中:
public static void main(String argv[]) {
     ...

    // 1. 调用registerZygoteSocket函数创建了一个socket接口,用来和ActivityManagerService通讯
    registerZygoteSocket(socketName);

   // 2. 加载公共java类和部分framework资源
   preload(bootTimingsTraceLog);

   // 3. 调用startSystemServer函数来启动SystemServer组件
    if (startSystemServer) {
        startSystemServer(abiList, socketName);
    }

    // 4. 调用runSelectLoopMode函数
    runSelectLoop(abiList);

}- 调用registerZygoteSocket函数创建了一个socket接口,用来和ActivityManagerService通讯。
- 调用preload函数加载公共java类和部分framework资源
- 调用startSystemServer函数来启动SystemServer组件。
- 调用runSelectLoopMode函数进入一个无限循环在前面创建的socket接口上等待ActivityManagerService请求创建新的应用程序进程。
Step 4. ZygoteInit.registerZygoteSocket
这个函数定义在frameworks/base/core/java/com/android/internal/os/ZygoteInit.java文件中:
public class ZygoteInit {
......

/**
* Registers a server socket for zygote command connections
*
* @throws RuntimeException when open fails
*/
private static void registerZygoteSocket() {
    if (sServerSocket == null) {
        int fileDesc;
        try {
            String env = System.getenv(ANDROID_SOCKET_ENV);
            fileDesc = Integer.parseInt(env);
        } catch (RuntimeException ex) {
            ......
        }

        try {
            sServerSocket = new LocalServerSocket(
                createFileDescriptor(fileDesc));
        } catch (IOException ex) {
            .......
        }
    }
}

......
} 这个socket接口是通过文件描述符来创建的,这个文件描符代表的就是我们前面说的/dev/socket/zygote文件了。这个文件描述符是通过环境变量ANDROID_SOCKET_ENV得到的。
Step 5. ZygoteInit.startSystemServer
这个函数定义在frameworks/base/core/java/com/android/internal/os/ZygoteInit.java文件中:
private static boolean startSystemServer(String abiList, String socketName)
        throws MethodAndArgsCaller, RuntimeException {
    ...
    /* Hardcoded command line to start the system server */
    String args[] = {
        "--setuid=1000",
        "--setgid=1000",
        "--setgroups=1001,1002,1003,1004,1005,1006,1007,1008,1009,1010,1018,1021,1032,3001,3002,3003,3006,3007,3009,3010",
        "--capabilities=" + capabilities + "," + capabilities,
        "--nice-name=system_server",
        "--runtime-args",
        "com.android.server.SystemServer",
    };
    ZygoteConnection.Arguments parsedArgs = null;

    int pid;

    try {
        parsedArgs = new ZygoteConnection.Arguments(args);
        ZygoteConnection.applyDebuggerSystemProperty(parsedArgs);
        ZygoteConnection.applyInvokeWithSystemProperty(parsedArgs);

        /* Request to fork the system server process */
        pid = Zygote.forkSystemServer(
                parsedArgs.uid, parsedArgs.gid,
                parsedArgs.gids,
                parsedArgs.debugFlags,
                null,
                parsedArgs.permittedCapabilities,
                parsedArgs.effectiveCapabilities);
    } catch (IllegalArgumentException ex) {
        throw new RuntimeException(ex);
    }

    /* For child process */
    if (pid == 0) {
        if (hasSecondZygote(abiList)) {
            waitForSecondaryZygote(socketName);
        }

        handleSystemServerProcess(parsedArgs);
    }

    return true;
}
这里我们可以看到,Zygote进程通过Zygote.forkSystemServer函数来创建一个新的进程来启动SystemServer组件,返回值pid等0的地方就是新的进程要执行的路径,即新创建的进程会执行handleSystemServerProcess函数。
Step 6. ZygoteInit.handleSystemServerProcess
这个函数定义在frameworks/base/core/java/com/android/internal/os/ZygoteInit.java文件中:
public class ZygoteInit {
    ......

    private static void handleSystemServerProcess(
            ZygoteConnection.Arguments parsedArgs)
            throws ZygoteInit.MethodAndArgsCaller {
        closeServerSocket();

        /*
        * Pass the remaining arguments to SystemServer.
        * "--nice-name=system_server com.android.server.SystemServer"
        */
        RuntimeInit.zygoteInit(parsedArgs.remainingArgs);
        /* should never reach here */
    }

    ......
}
由于由Zygote进程创建的子进程会继承Zygote进程在前面Step 4中创建的Socket文件描述符,而这里的子进程又不会用到它,因此,这里就调用closeServerSocket函数来关闭它。这个函数接着调用RuntimeInit.zygoteInit函数来进一步执行启动SystemServer组件的操作。
Step 7. RuntimeInit.zygoteInit
这个函数定义在frameworks/base/core/java/com/android/internal/os/RuntimeInit.java文件中:
public static final void zygoteInit(int targetSdkVersion, String[] argv, ClassLoader classLoader)
        throws ZygoteInit.MethodAndArgsCaller {
    if (DEBUG) Slog.d(TAG, "RuntimeInit: Starting application from zygote");

    Trace.traceBegin(Trace.TRACE_TAG_ACTIVITY_MANAGER, "RuntimeInit");
    redirectLogStreams();

    commonInit();
    nativeZygoteInit();
    applicationInit(targetSdkVersion, argv, classLoader);
}
nativeZygoteInit()是一个Native函数,实现在frameworks/base/core/jni/AndroidRuntime.cpp文件中。
Step 8. AndroidRuntime.com_android_internal_os_RuntimeInit_nativeZygoteInit
Step 9. SystemServer.main
这个函数定义在frameworks/base/services/java/com/android/server/SystemServer.java文件中:
/**
 * The main entry point from zygote.
 */
public static void main(String[] args) {
    new SystemServer().run();
}
private void run() {
try {
...
// Here we go!
Slog.i(TAG, "Entered the Android system server!");
...
// Initialize the system context.
createSystemContext();
// Create the system service manager.
mSystemServiceManager = new SystemServiceManager(mSystemContext);
mSystemServiceManager.setRuntimeRestarted(mRuntimeRestart);
LocalServices.addService(SystemServiceManager.class, mSystemServiceManager);
} finally {
Trace.traceEnd(Trace.TRACE_TAG_SYSTEM_SERVER);
}
// Start services.
try {
Trace.traceBegin(Trace.TRACE_TAG_SYSTEM_SERVER, "StartServices");
startBootstrapServices();
startCoreServices();
startOtherServices();
} catch (Throwable ex) {
Slog.e("System", "******************************************");
Slog.e("System", "************ Failure starting system services", ex);
throw ex;
} finally {
Trace.traceEnd(Trace.TRACE_TAG_SYSTEM_SERVER);
}
...
// Loop forever.
Looper.loop();
throw new RuntimeException("Main thread loop unexpectedly exited");
}里面主要涉及了是三个方法:
startBootstrapServices() 主要用于启动系统Boot级服务
startCoreServices() 主要用于启动系统核心的服务
startOtherServices() 主要用于启动一些非紧要或者是非需要及时启动的服务
Step 10. SystemServer.startBootstrapServices
private void startBootstrapServices() {
    // 1. start Installer
    Installer installer = mSystemServiceManager.startService(Installer.class);

    // 2. start ActivityManagerService
    // Activity manager runs the show.
    mActivityManagerService = mSystemServiceManager.startService(
            ActivityManagerService.Lifecycle.class).getService();
    mActivityManagerService.setSystemServiceManager(mSystemServiceManager);
    mActivityManagerService.setInstaller(installer);

    // 3. start PowerManagerService
    mPowerManagerService = mSystemServiceManager.startService(PowerManagerService.class);

    // 4. initialize power management features.
    mActivityManagerService.initPowerManagement();

    // 5. start LightsService
    mSystemServiceManager.startService(LightsService.class);

    // 6. start DisplayManagerService
    // starts up.
    mDisplayManagerService = mSystemServiceManager.startService(DisplayManagerService.class);

    // 7. Start the package manager.
    mPackageManagerService = PackageManagerService.main(mSystemContext, installer,
            mFactoryTestMode != FactoryTest.FACTORY_TEST_OFF, mOnlyCore);
    mFirstBoot = mPackageManagerService.isFirstBoot();
    mPackageManager = mSystemContext.getPackageManager();

    ...

    // 8. start UserManagerService
    mSystemServiceManager.startService(UserManagerService.LifeCycle.class);

    // 9. Initialize attribute cache used to cache resources from packages.
    AttributeCache.init(mSystemContext);

    // 10. Set up the Application instance for the system process and get started.
    mActivityManagerService.setSystemProcess();

    // 11. start SensorService
    startSensorService();
}
可见,BootstrapServices中启动了:
1. ActivityManagerService
2. PowerManagerService
3. LightsService
4. DisplayManagerService
5. UserManagerService
6. SensorService
Step 11. startCoreServices
/**
 * Starts some essential services that are not tangled up in the bootstrap process.
 */
private void startCoreServices() {
    // Tracks the battery level.  Requires LightService.
    mSystemServiceManager.startService(BatteryService.class);

    // Tracks application usage stats.
    mSystemServiceManager.startService(UsageStatsService.class);
    mActivityManagerService.setUsageStatsManager(
            LocalServices.getService(UsageStatsManagerInternal.class));

    // Tracks whether the updatable WebView is in a ready state and watches for update installs.
    mWebViewUpdateService = mSystemServiceManager.startService(WebViewUpdateService.class);
}
CoreServices中启动了:
- BatteryService
- UsageStatsService
- WebViewUpdateService
Step 12. startOtherServices
try {
    // 1. add SchedulingPolicyService
    ServiceManager.addService("scheduling_policy", new SchedulingPolicyService());

    // 2. start TelecomLoaderService
    mSystemServiceManager.startService(TelecomLoaderService.class);

    // 3. add telephonyRegistry
    telephonyRegistry = new TelephonyRegistry(context);
    ServiceManager.addService("telephony.registry", telephonyRegistry);

    if (!disableCameraService) {
        // 4. start CameraService
        mSystemServiceManager.startService(CameraService.class);
    }

    // The AccountManager must come before the ContentService
    // 5. start AccountManager
    mSystemServiceManager.startService(ACCOUNT_SERVICE_CLASS);

    // 6. start ContentService
    mSystemServiceManager.startService(CONTENT_SERVICE_CLASS);

    // 7. InstallSystemProviders
    mActivityManagerService.installSystemProviders();

    // 8. start VibratorService
    vibrator = new VibratorService(context);
    ServiceManager.addService("vibrator", vibrator);

    if (!disableConsumerIr) {
        // 9. start ConsumerIrService
        consumerIr = new ConsumerIrService(context);
        ServiceManager.addService(Context.CONSUMER_IR_SERVICE, consumerIr);
    }

    // 10. start AlarmManagerService
    mSystemServiceManager.startService(AlarmManagerService.class);

    // 11. init InitWatchdog
    final Watchdog watchdog = Watchdog.getInstance();
    watchdog.init(context, mActivityManagerService);

    // 12. start InputManagerService
    inputManager = new InputManagerService(context);

    // 13. start WindowManagerService
    wm = WindowManagerService.main(context, inputManager,
            mFactoryTestMode != FactoryTest.FACTORY_TEST_LOW_LEVEL,
            !mFirstBoot, mOnlyCore);
    ServiceManager.addService(Context.WINDOW_SERVICE, wm);
    ServiceManager.addService(Context.INPUT_SERVICE, inputManager);

    if (!disableVrManager) {
        // 14. start VrManagerService
        mSystemServiceManager.startService(VrManagerService.class);
    }

    mActivityManagerService.setWindowManager(wm);

    inputManager.setWindowManagerCallbacks(wm.getInputMonitor());
    inputManager.start();

    // 15. start BluetoothService
    mSystemServiceManager.startService(BluetoothService.class);

    // 16. start MetricsLoggerService
    mSystemServiceManager.startService(MetricsLoggerService.class);

    // 17. start IpConnectivityMetrics
    mSystemServiceManager.startService(IpConnectivityMetrics.class);

    // 18. start PinnerService
    mSystemServiceManager.startService(PinnerService.class);
} catch (RuntimeException e) {
    ...
}
// TODO
可以看出,otherServices中启动了大量的Services,后续再详细分析。
1. CameraService
2. ContentService
3. AlarmManagerService
4. InputManagerService
5. WindowManagerService
6. BluetoothService
…
总结:
SystemServer进程是android中一个很重要的进程由Zygote进程启动;
SystemServer进程主要用于启动系统中的服务;
SystemServer进程启动服务的启动函数为main函数;
SystemServer进程将系统服务分为三类:boot服务,core服务和other服务,并逐步启动
当我们需要启动一个Android应用程序时,ActivityManagerService会通过Socket进程间通信机制,通知Zygote进程为这个应用程序创建一个新的进程。


 1870
1870

 被折叠的 条评论
为什么被折叠?
被折叠的 条评论
为什么被折叠?
 到【灌水乐园】发言


