安装rotors出现“raw.githubusercontent.com (raw.githubusercontent.com)|::|:443... 失败:拒绝连接。“问题

本文介绍了解决连接raw.githubusercontent.com失败的问题方法。通过查询IP地址并修改Ubuntu系统的hosts文件,最终成功安装了ROS及相关依赖。

出现以下错误:
正在连接 raw.githubusercontent.com (raw.githubusercontent.com)|0.0.0.0|:443… 失败:拒绝连接。
正在连接 raw.githubusercontent.com (raw.githubusercontent.com)|:😐:443… 失败:拒绝连接。
在这里插入图片描述

步骤

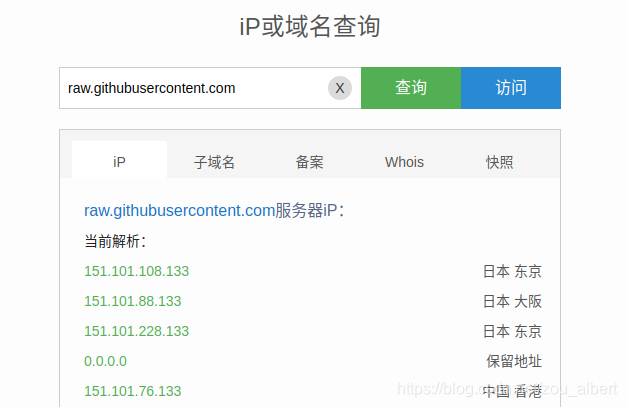
进入网站:https://site.ip138.com/raw.Githubusercontent.com/

输入raw.githubusercontent.com
查询其相关的IP地址:
在这里插入图片描述
在Ubuntu终端输入:
sudo vi /etc/hosts

选择上面一个添加内容即可:
比如:
151.101.76.133 raw.githubusercontent.com
或者
151.101.228.133 raw.githubusercontent.com

在这里插入图片描述
注意:使用VIM的方法
保存之后退出

然后再次进行命令:


在 ROS 中使用 `.xacro` 文件启动自定义无人机模型并与 PX4 SITL 配合运行,需要完成以下几个关键步骤: --- ### ✅ 步骤 1:创建 `.xacro` 文件描述无人机模型 `.xacro` 是一种基于 XML 的宏语言,用于简化 URDF 的编写。 **示例 `custom_drone.xacro`:** ```xml <?xml version="1.0"?> <robot xmlns:xacro="http://www.ros.org/wiki/xacro" name="custom_drone"> <!-- 包含标准无人机宏 --> <xacro:include filename="$(find rotors_description)/urdf/common_macro.xacro"/> <xacro:include filename="$(find rotors_description)/urdf/$(arg model)/$(arg model).xacro"/> <!-- 定义自定义无人机 --> <xacro:drone_model prefix="" name="custom_drone"> <!-- 可选:添加额外传感器 --> <sensor name="camera" type="camera"> <origin xyz="0 0 0.1 0 0 0" /> </sensor> </xacro:drone_model> </robot> ``` --- ### ✅ 步骤 2:创建 `.launch` 文件加载模型并启动 PX4 SITL 和 Gazebo **示例 `custom_drone.launch`:** ```xml <launch> <!-- 设置模型参数 --> <arg name="model" default="$(find your_package)/urdf/custom_drone.xacro"/> <arg name="namespace" default="custom_drone"/> <!-- 将 xacro 转换为 urdf 并发布到 /robot_description --> <param name="robot_description" command="$(find xacro)/xacro $(arg model)"/> <!-- 启动 Gazebo --> <include file="$(find gazebo_ros)/launch/empty_world.launch"> <arg name="use_sim_time" value="true"/> <arg name="gui" value="true"/> </include> <!-- 在 Gazebo 中生成无人机模型 --> <node name="spawn_urdf" pkg="gazebo_ros" type="spawn_model" args="-urdf -model $(arg namespace) -param robot_description"/> <!-- 启动 PX4 SITL 和 MAVROS --> <include file="$(find px4)/launch/posix_sitl.launch"> <arg name="vehicle" value="custom_drone"/> <arg name="world" value="$(find your_package)/worlds/empty.world"/> </include> <include file="$(find mavros)/launch/px4.launch"> <arg name="fcu_url" value="udp://:14540@localhost:14557"/> </include> </launch> ``` --- ### ✅ 步骤 3:配置 PX4 以支持自定义无人机 1. **创建 PX4 模型配置目录:** 在 PX4 源码中创建自定义模型配置目录: ``` PX4-Autopilot/ROMFS/px4fmu_common/init.d-posix/custom_drone ``` 2. **添加启动脚本(如 `1000_custom_drone`):** ```bash #!/bin/sh # @name: custom_drone # @type: quadrotor # @class: drone # @output: actuator_output0 # @output: actuator_output1 echo "Starting custom drone" if [ $1 -eq 1 ]; then param set SYS_AUTOSTART 4001 param set SYS_MC_EST_GROUP 2 fi # 加载混控器 mixer load /dev/pwm_output0 /etc/mixers/custom_quad.mix mixer select /dev/pwm_output0 ``` 3. **编译 PX4 并指定使用自定义模型:** ```bash make px4_sitl_default none_iris ``` 或者使用自定义模型名称: ```bash make px4_sitl_default none_custom_drone ``` --- ### ✅ 步骤 4:运行 launch 文件 ```bash roslaunch your_package custom_drone.launch ``` --- ### 🧪 验证是否成功 - 检查 Gazebo 是否加载了自定义模型。 - 检查 QGroundControl 是否连接到 PX4。 - 使用 `rostopic list` 查看是否有关于无人机状态的消息。 ---
评论 2
添加红包

请填写红包祝福语或标题

红包个数最小为10个

红包金额最低5元

当前余额3.43前往充值 >
需支付:10.00
成就一亿技术人!
领取后你会自动成为博主和红包主的粉丝 规则
hope_wisdom
发出的红包
实付
使用余额支付
点击重新获取
扫码支付
钱包余额 0

抵扣说明:

1.余额是钱包充值的虚拟货币,按照1:1的比例进行支付金额的抵扣。
2.余额无法直接购买下载,可以购买VIP、付费专栏及课程。

余额充值