 SpringMVC @RequestMapping详解与请求参数处理


 本文详细介绍了SpringMVC中@RequestMapping注解的使用,包括注解的位置、value、method、params、headers等参数的作用。此外,文章还讲解了SpringMVC获取请求参数的七种方式,如通过ServletAPI、形参、@RequestParam、@RequestHeader、@CookieValue和POJO。同时,文中探讨了如何通过CharacterEncodingFilter解决请求参数乱码问题。
目录
@RequestMapping注解的位置放置不同的位置也有不同的功能
@RequestMapping的成员参数value、method、params、headers的作用
当请求参数有重复,且请求控制器的方法的形参也是非数组而是String类型
@RequestParam三个属性value、required、defaultValue的介绍
(补充)通过CharacterEncodingFilter解决获取请求参数的乱码问题
@RequestMapping注解
说明:框架是由配置文件+jar包组成的
(前置工作)搭建springMVC-demo2模块(Maven工程+web模块)
1.创建新的Maven工程模块

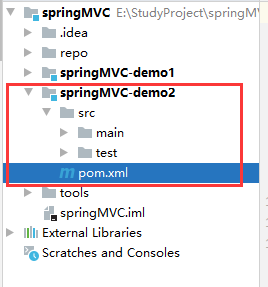
2.在Pom.xml中引入依赖
<?xml version="1.0" encoding="UTF-8"?>
<project xmlns="http://maven.apache.org/POM/4.0.0"
         xmlns:xsi="http://www.w3.org/2001/XMLSchema-instance"
         xsi:schemaLocation="http://maven.apache.org/POM/4.0.0 http://maven.apache.org/xsd/maven-4.0.0.xsd">
    <modelVersion>4.0.0</modelVersion>

    <groupId>com.atguigu.mvc</groupId>
    <artifactId>springMVC-demo2</artifactId>
    <version>1.0-SNAPSHOT</version>
    <!--工程打包方式,默认是jar,如果这是一个web工程,打包方式为war
        当前是一个web工程,因此我们需要为这个Maven工程添加web模块,
        模块里面有webapp及webapp里面的web.xml-->
    <packaging>war</packaging>

    <!--添加依赖群,当导报成war包时,这些依赖都会被放到webapp目录的
    WEB-INF目录中的lib目录下-->
    <dependencies>
        <!--添加单个依赖SpringMVC,下面同理.由于 Maven 的传递性,
        我们不必将所有需要的包全部配置依赖,而是配置最顶端的依赖,其他靠传递性导入,
        意味着只要导入了这个SpringMVC依赖,那么
        SpringMVC依赖的依赖也会导入进来,其中就有spring的基础框架jar包:
        aop、beans、context、core、expression,还有自身web框架jar包
        传递性对于其他依赖同理-->
        <dependency>
            <groupId>org.springframework</groupId>
            <artifactId>spring-webmvc</artifactId>
            <version>5.3.1</version>
        </dependency>
        <!-- 日志,用于日志输出 -->
        <dependency>
            <groupId>ch.qos.logback</groupId>
            <artifactId>logback-classic</artifactId>
            <version>1.2.3</version>
        </dependency>
        <!-- ServletAPI,之前没导入是因为Tomcat自带了Servlet和JSP的jar包,
        因此只要配置了tomcat就能使用Servlet,java不自带Servlet的-->
        <dependency>
            <groupId>javax.servlet</groupId>
            <artifactId>javax.servlet-api</artifactId>
            <version>3.1.0</version>
            <!--依赖范围,表示我们什么地方可以使用这个jar包,
            这里设置成provided就是该依赖已被服务器提供,因此编译时
            这个依赖都会被放到webapp目录的WEB-INF目录中的lib目录下-->
            <scope>provided</scope>
        </dependency>
        <!-- Spring5和Thymeleaf整合包,是视图技术,控制页面显示内容 -->
        <dependency>
            <groupId>org.thymeleaf</groupId>
            <artifactId>thymeleaf-spring5</artifactId>
            <version>3.0.12.RELEASE</version>
        </dependency>
    </dependencies>
</project>
3.刷新Maven,为项目配置依赖
4.为Maven项目配置Web模块

5.在web.xml中注册SpringMVC的前端控制器DispatcherServlet
<?xml version="1.0" encoding="UTF-8"?>
<web-app xmlns="http://xmlns.jcp.org/xml/ns/javaee"
         xmlns:xsi="http://www.w3.org/2001/XMLSchema-instance"
         xsi:schemaLocation="http://xmlns.jcp.org/xml/ns/javaee http://xmlns.jcp.org/xml/ns/javaee/web-app_4_0.xsd"
         version="4.0">
    <!-- 配置SpringMVC的前端控制器DispatcherServlet,对浏览器发送的请求统一进行处理 -->
    <servlet>
        <servlet-name>DispatcherServlet</servlet-name>
        <servlet-class>org.springframework.web.servlet.DispatcherServlet</servlet-class>
        <!--通过初始化参数(属性)contextConfigLocation配置Spring配置文件的位置和名称,
        该属性随着DispatcherServlet初始化而初始化,
        是DispatcherServlet是DispatcherServlet定义好的-->
        <init-param>
            <!--属性名 = contextConfigLocation,如果忘了可以参考一下:
            http://t.csdn.cn/UuVZl这个文章-->
            <param-name>contextConfigLocation</param-name>
            <!--属性值 = 配置文件路径
            classpath:对应的是编译后的java目录和resources目录的路径-->
            <param-value>classpath:springMVC.xml</param-value>
        </init-param>
        <!--设置该Servlet的生命周期,该前端控制器需要在程序启动时启动,来确保程序的性能,
        而不是第一次访问该DispatcherServlet时候才初始化,
        因此设置成该servlet的参数load-on-startup值为1-->
        <load-on-startup>1</load-on-startup>
    </servlet>
    <servlet-mapping>
        <!--保持servlet和servlet-mapping的servlet名字一致,表示要注册的Servlet是DispatcherServlet-->
        <servlet-name>DispatcherServlet</servlet-name>
        <!--
        设置springMVC的核心的前端控制器所能处理的请求的请求路径,
        这里"/"所匹配的请求可以是表示该Servlet可以处理除了.jsp以外的请求,
        .jsp文件在Tomcat中有专门名为"jspServlet"去处理
        当我们设置了前端控制器的请求映射规则为"/"时,
        那么原有的Tomcat的默认Servlet就会被该前端控制器取代
        -->
        <url-pattern>/</url-pattern>
    </servlet-mapping>
</web-app>
6.在resources目录下创建SpringMVC的配置文件,添加IOC组件扫描及Thymeleaf视图解析器
<?xml version="1.0" encoding="UTF-8"?>
<beans xmlns="http://www.springframework.org/schema/beans"
       xmlns:xsi="http://www.w3.org/2001/XMLSchema-instance"
       xmlns:context="http://www.springframework.org/schema/context"
       xsi:schemaLocation="http://www.springframework.org/schema/beans http://www.springframework.org/schema/beans/spring-beans.xsd http://www.springframework.org/schema/context https://www.springframework.org/schema/context/spring-context.xsd">

    <!--添加扫描组件,让spring注解生效-->
    <context:component-scan base-package="com.atguigu.mvc.controller"/>
    <!-- 配置Thymeleaf视图解析器,负责页面跳转 -->
    <bean id="viewResolver"
          class="org.thymeleaf.spring5.view.ThymeleafViewResolver">
        <!--设置视图解析器的优先级,视图解析器可以有多个-->
        <property name="order" value="1"/>
        <!--视图解析器使用的编码-->
        <property name="characterEncoding" value="UTF-8"/>
        <!--视图解析器的模板-->
        <property name="templateEngine">
            <!--内部Bean-->
            <bean class="org.thymeleaf.spring5.SpringTemplateEngine">
                <!--内部Bean中的内部Bean-->
                <property name="templateResolver">
                    <bean class="org.thymeleaf.spring5.templateresolver.SpringResourceTemplateResolver">
                        <!-- 视图前缀 -->
                        <property name="prefix" value="/WEB-INF/templates/"/>
                        <!-- 视图后缀,设置好视图前缀和后缀,
                        当后端请求控制器的方法返回"index"字符串时,
                        访问的就是服务器src\main\webapp\WEB-INF\templates\index.html页面-->
                        <property name="suffix" value=".html"/>
                        <!--设置模板模型-->
                        <property name="templateMode" value="HTML5"/>
                        <!--页面编码-->
                        <property name="characterEncoding" value="UTF-8" />
                    </bean>
                </property>
            </bean>
        </property>
    </bean>
</beans>
7.在 src\main\java\com\atguigu\mvc\controller\TestController.java 创建请求控制器,内容如下
package com.atguigu.mvc.controller;

import org.springframework.stereotype.Controller;
import org.springframework.web.bind.annotation.RequestMapping;

/*
该注解标识该类为IOC容器的控制层组件,通过包扫描讲这个类变成Bean交给Spring IOC容器管理,
SpringMVC才知道这里面的方法是处理控制器接收的请求,并作出响应.此时该类就变成了一个请求控制器
*/
@Controller
public class TestController {

    /**
     * 目的:当浏览器访问"http://域名:端口/程序上下文路径"时,
     * 应该是访问服务器的"src\main\webapp\WEB-INF\templates\index.html"页面
     * 方法名是无所谓的,因为主要还是通过该方法的方法体进行业务处理,
     * RequestMapping是一个请求映射注解,
     * value参数成员的值是对应请求资源路径(只用一个参数成员value可以不写),
     * 二者结合用于匹配访问服务器资源路径仅带有"/"的请求与请求控制器对应的方法
     * @return 返回值返回的是视图名称,是请求控制器返回给前端控制器,
     * 告知前端控制器的视图解析器解析要执行哪一个页面
     */
    @RequestMapping(value = "/")
    public String index(){
        return "index";
    }

}
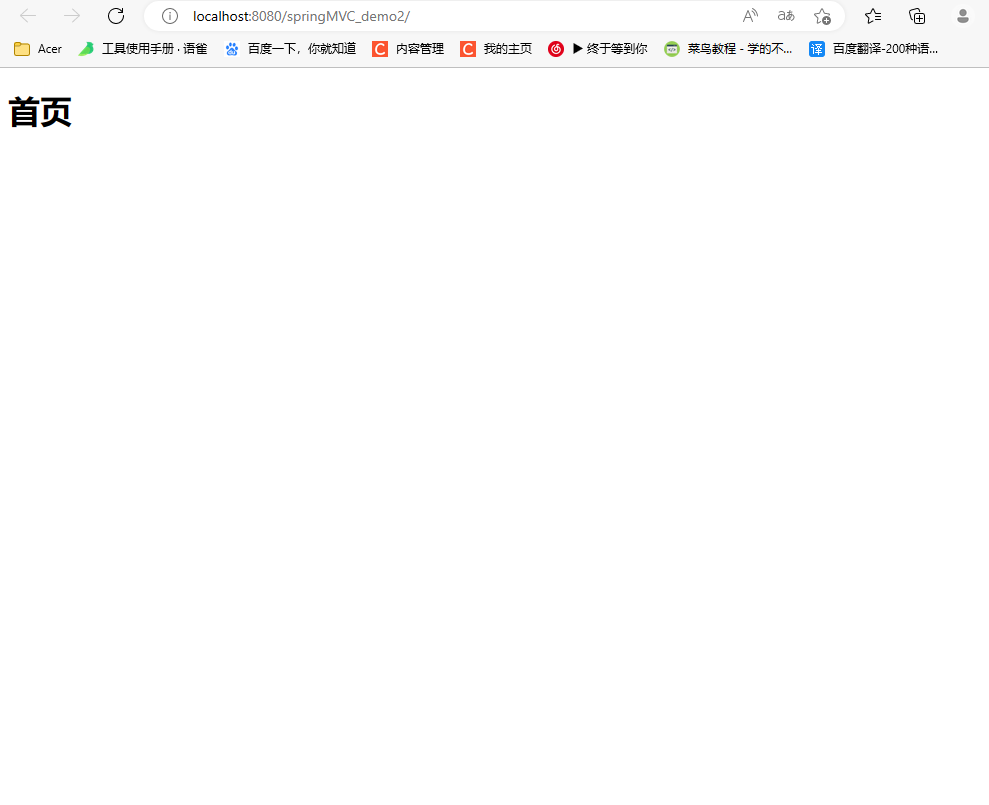
8.创建通过视图解析器解析视图名称,得到的视图src\main\webapp\WEB-INF\templates\index.html,页面还要通过Thymeleaf视图渲染器进行渲染,内容如下
<!DOCTYPE html>
<!--添加一个Thymeleaf的命名空间-->
<html lang="en" xmlns:th="http://www.thymeleaf.org">
<head>
    <meta charset="UTF-8">
    <title>首页</title>
</head>
<body>
<h1>首页</h1>
</body>
</html>
9.修改Tomcat配置,配置springMVC-demo2模块,也可以再创建一个
10.启动Tomcat服务器,访问测试
@RequestMapping注解的功能
说明:从注解名称上我们可以看到,@RequestMapping注解的作用就是将请求和处理请求的请求控制器的方法关联起来,建立映射关系,SpringMVC 接收到指定的请求,就会来找到在映射关系中对应的控制器方法来处理这个请求
- 也因此@RequestMapping在一个项目中设置的地址是不能重复的,否则在启动时候会出现映射错误,参考下图

@RequestMapping注解的位置放置不同的位置也有不同的功能
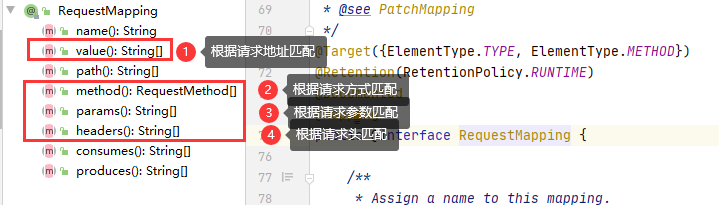
- 说明:深入@RequestMapping注解源码发现@RequestMapping注解可以用在类上,也可以用在方法上
- @RequestMapping标识一个类:设置映射请求的请求路径的初始信息
- @RequestMapping标识一个方法:设置映射请求请求路径的具体信息
- 结论:SpringMVC接收到指定请求,先会找到映射关系中初始信息进行匹配(请求控制器),再者会匹配具体信息(请求控制器的方法),是一个1+1的过程
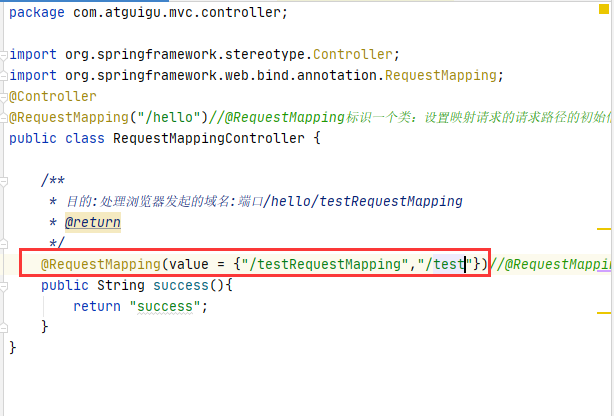
1.在 src\main\java\com\atguigu\mvc\controller\RequestMappingController.java 创建请求控制器,添加请求方法,将@RequestMapping表示在类和方法上,实现“处理浏览器发起的域名:端口/hello/testRequestMapping” 内容如下
package com.atguigu.mvc.controller;

import org.springframework.stereotype.Controller;
import org.springframework.web.bind.annotation.RequestMapping;
@Controller
@RequestMapping("/hello")//@RequestMapping标识一个类:设置映射请求的请求路径的初始信息
public class RequestMappingController {

    /**
     * 目的:处理浏览器发起的域名:端口/hello/testRequestMapping
     * @return
     */
    @RequestMapping(value = "/testRequestMapping")//@RequestMapping标识一个方法:设置映射请求请求路径的具体信息
    public String success(){
        return "success";
    }
}
2.添加成功页面 src\main\webapp\WEB-INF\templates\success.html
<!DOCTYPE html>
<html lang="en" xmlns:th="http://www.thymeleaf.org">
<head>
    <meta charset="UTF-8">
    <title>Title</title>
</head>
<body>
success
</body>
</html>
3.编辑首页页面 src\main\webapp\WEB-INF\templates\index.html ,设置超链接访问 http://localhost:8080/springMVC_demo2/hello/testRequestMapping
<!DOCTYPE html>
<!--添加一个Thymeleaf的命名空间-->
<html lang="en" xmlns:th="http://www.thymeleaf.org">
<head>
    <meta charset="UTF-8">
    <title>首页</title>
</head>
<body>
<h1>首页</h1>
<a th:href="@{/hello/testRequestMapping}">测试RequestMapping注解的位置</a>
</body>
</html>
4.重启Tomcat服务器,通过主页访问 http://localhost:8080/springMVC_demo2/hello/testRequestMapping
@RequestMapping的成员参数value、method、params、headers的作用
- 深入源码分析
- 以下代码操作都是在
请求控制器为:
src\main\java\com\atguigu\mvc\controller\RequestMappingController.java
视图为:
src\main\webapp\WEB-INF\templates\index.html - value:value的类型是一个String数组,意味着他的请求控制器/请求控制器的请求方法可以处理多种地址的请求,只要请求地址满足映射value数组里面任意一个具体的请求路径信息,还有重要一点就是vlaue值在RequestMapping中必须赋予,说明value是所有成员参数中最首要先匹配的,映射时不仅必须有她,映射时还必须先判断他
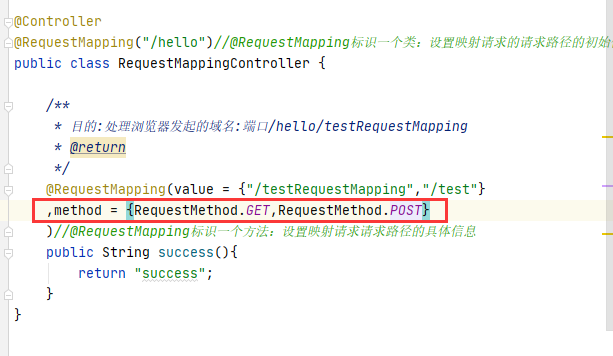
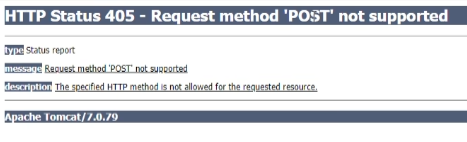
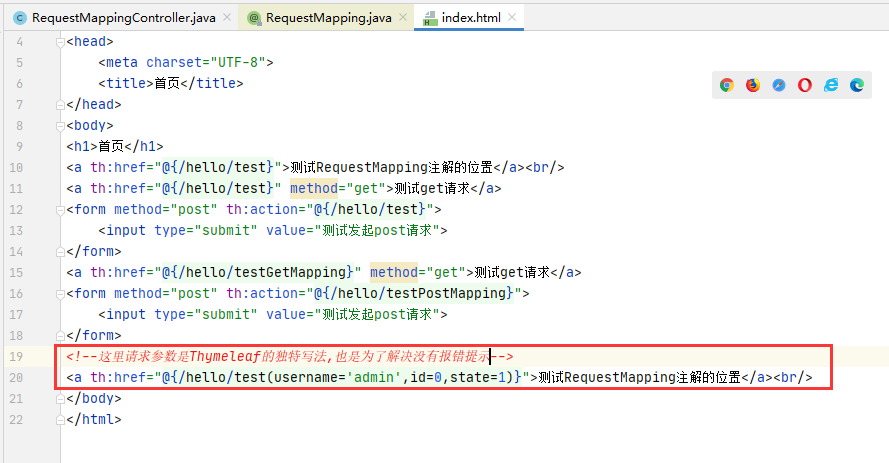
<!DOCTYPE html> <!--添加一个Thymeleaf的命名空间--> <html lang="en" xmlns:th="http://www.thymeleaf.org"> <head> <meta charset="UTF-8"> <title>首页</title> </head> <body> <h1>首页</h1> <a th:href="@{/hello/test}">测试RequestMapping注解的位置</a><br/> </body> </html> - method:常用的请求方式是get、post(可以回顾下这两个请求方式的不同),如果不设置method成员参数值,默认值不为get,而是所有请求方式都能处理。且method的类型是一个RequestMethod数组,意味着他的请求控制器的请求方法可以处理多种请求方式的请求。如果请求地址匹配上了,但是请求方式没有一个匹配的不匹配,就会报出405错误,并提示请求方式不被支持(参考最下图)
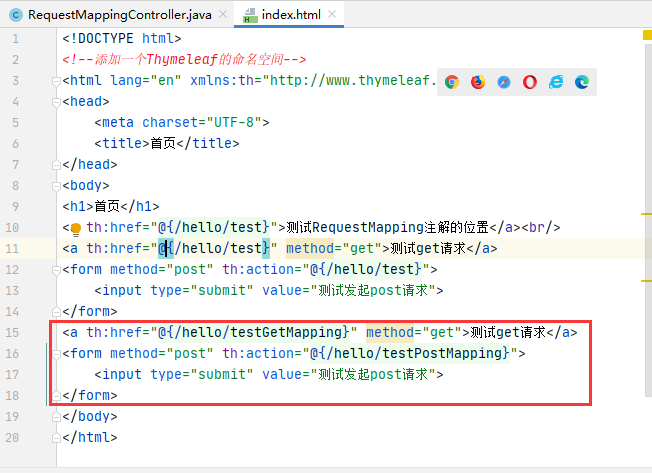
<!DOCTYPE html>
<!--添加一个Thymeleaf的命名空间-->
<html lang="en" xmlns:th="http://www.thymeleaf.org">
<head>
    <meta charset="UTF-8">
    <title>首页</title>
</head>
<body>
<h1>首页</h1>
<a th:href="@{/hello/testRequestMapping}">测试RequestMapping注解的位置</a><br/>
<a th:href="@{/hello/test}" method="get">测试get请求</a>
<form method="post" th:action="@{/hello/test}">
    <input type="submit" value="测试发起post请求">
</form>
</body>
</html>
补充说明:
1.当我们用到Restful时候,才会同时用到成员参数method和value两个组。其中get请求用来查询、post用来添加、delete用来删除、put用来修改,因此就会根据@RequstMapping衍生出根据不同请求方式的注解,使用了以下注解之后就不再需要设置method参数成员,只需要设置必要的value参数成员:
处理get请求的映射-->@GetMapping
处理post请求的映射-->@PostMapping
处理put请求的映射-->@PutMapping
处理delete请求的映射-->@DeleteMapping
2.但是目前浏览器只支持发送get和post,若在form表单提交时,为method设置了其他请求方式例如put或delete,则按照默认的请求方式get处理,若要发送put和delete请求,在RestFul部分会讲到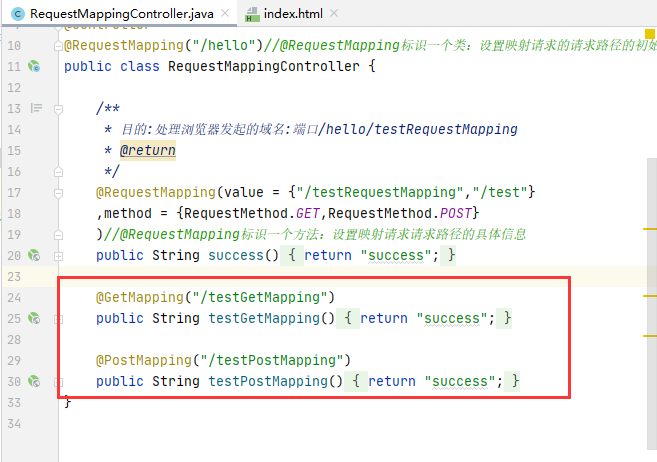
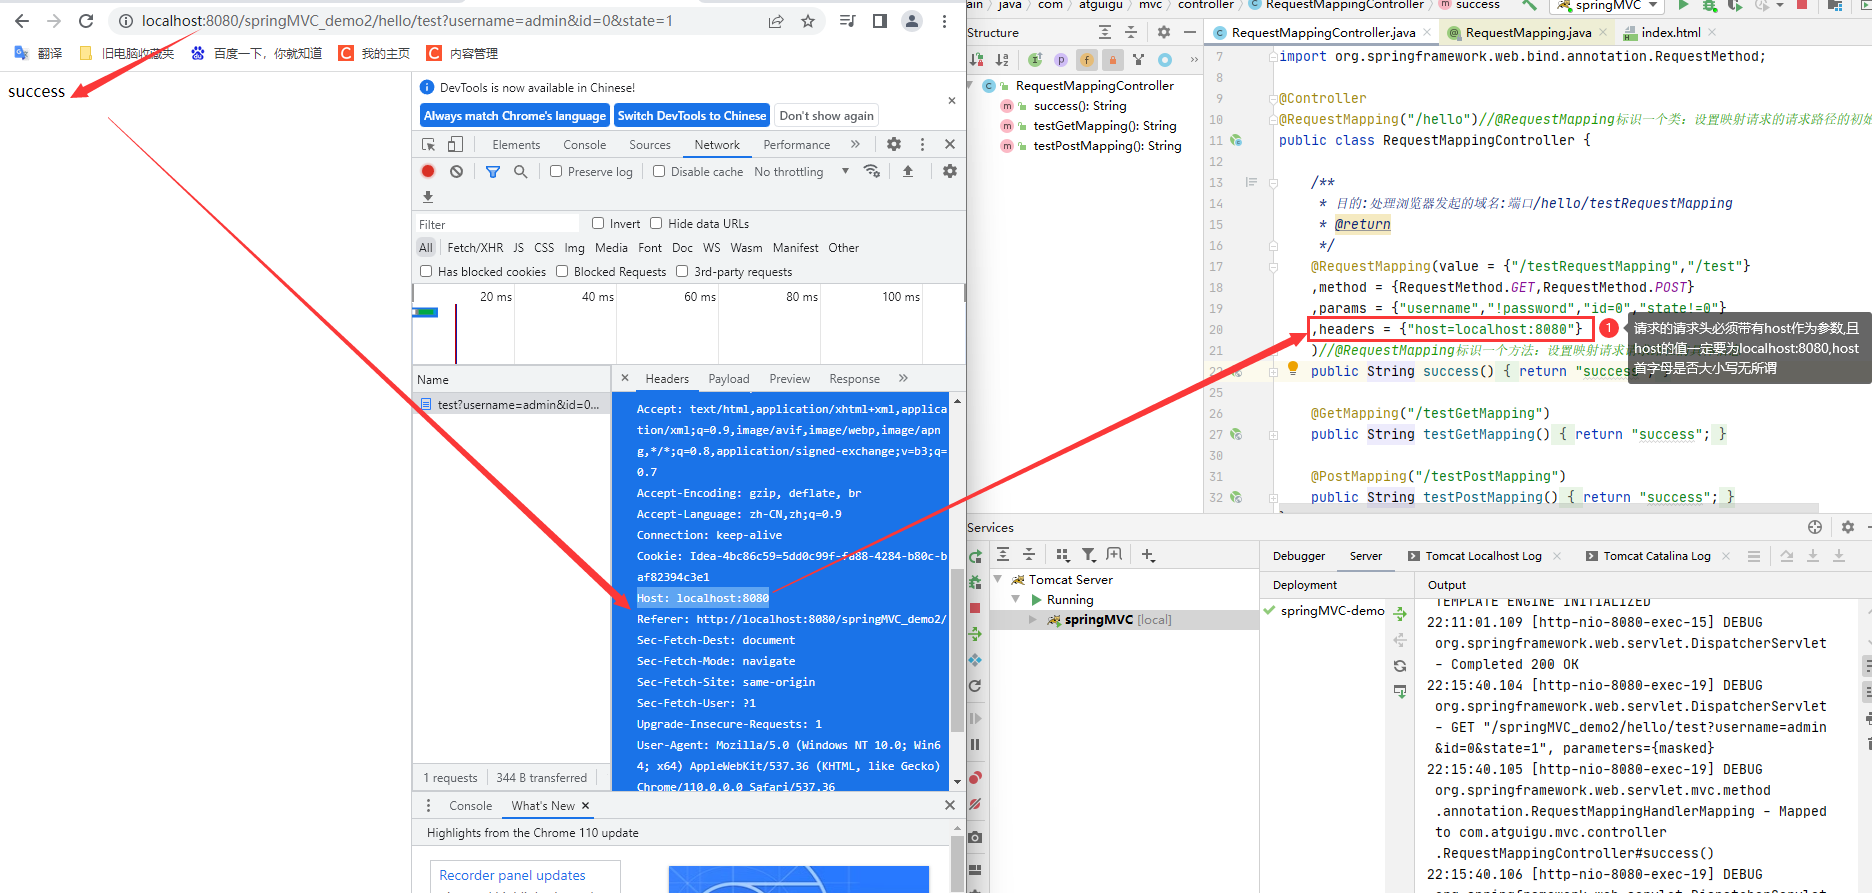
- params(了解):params根据请求参数进行匹配,成员参数params的数据类型是String数组,意味着可以支持添加多个值作为参数。但与method和value成员参数不同,请求必须同时满足成员参数params设置的所有值才能匹配成功,否则会报400错误(提示不满足实际请求参数)

1.如果成员参数params的值中有指定的一个元素,表示请求参数集必须有该参数
2.如果成员参数params的值中的其中一个元素的最前面是一个感叹号,表示请求参数集不能有该参数
3.如果成员参数params的值中的其中一个元素等于一个固定的值,表示请求参数集中的必须有该参数且该参数必须等于这个值
4.如果成员参数params的值中的其中一个元素不等于一个固定的值,表示请求参数集中的必须有该参数且该参数必须不等于这个值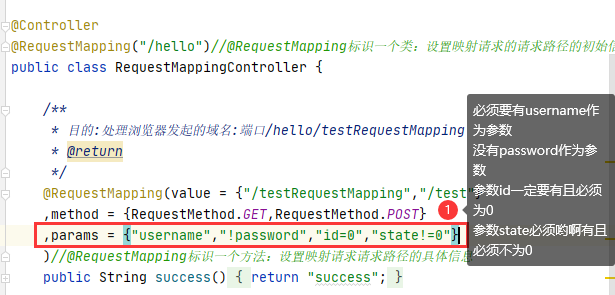
- headers(了解):根据请求头信息进行匹配请求映射,是字符串数组,意味着可以支持请求头携带的多种参数,例如Host(IP地址),如果匹配不上,就会弹出404错误,提示资源未找到
1.如果成员参数headers的值中有指定的一个元素,表示请求参数集必须有该参数
2.如果成员参数headers的值中的其中一个元素的最前面是一个感叹号,表示请求参数集不能有该参数
3.如果成员参数headers的值中的其中一个元素等于一个固定的值,表示请求参数集中的必须有该参数且该参数必须等于这个值
4.如果成员参数headers的值中的其中一个元素不等于一个固定的值,表示请求参数集中的必须有该参数且该参数必须不等于这个值 - 成员参数多个时,需要同时满足多个成员参数;成员参数值有多个时只需满足其中一个即可(这句话的意思可以参考下面详细介绍成员参数时回顾)
SpringMVC支持ant风格的路径
说明:实现@RequestMapping路径映射的模糊匹配,注意:只对路径,也就是@RequstMapping的成员参数value的值有效!!!!!
- 以下代码操作都是在
请求控制器为:
src\main\java\com\atguigu\mvc\controller\RequestMappingController.java
视图为:
src\main\webapp\WEB-INF\templates\index.html - ? :表示任意的单个字符,注意的是斜线“/”“?”分别是分隔符和拼接请求参数,因此不能使用
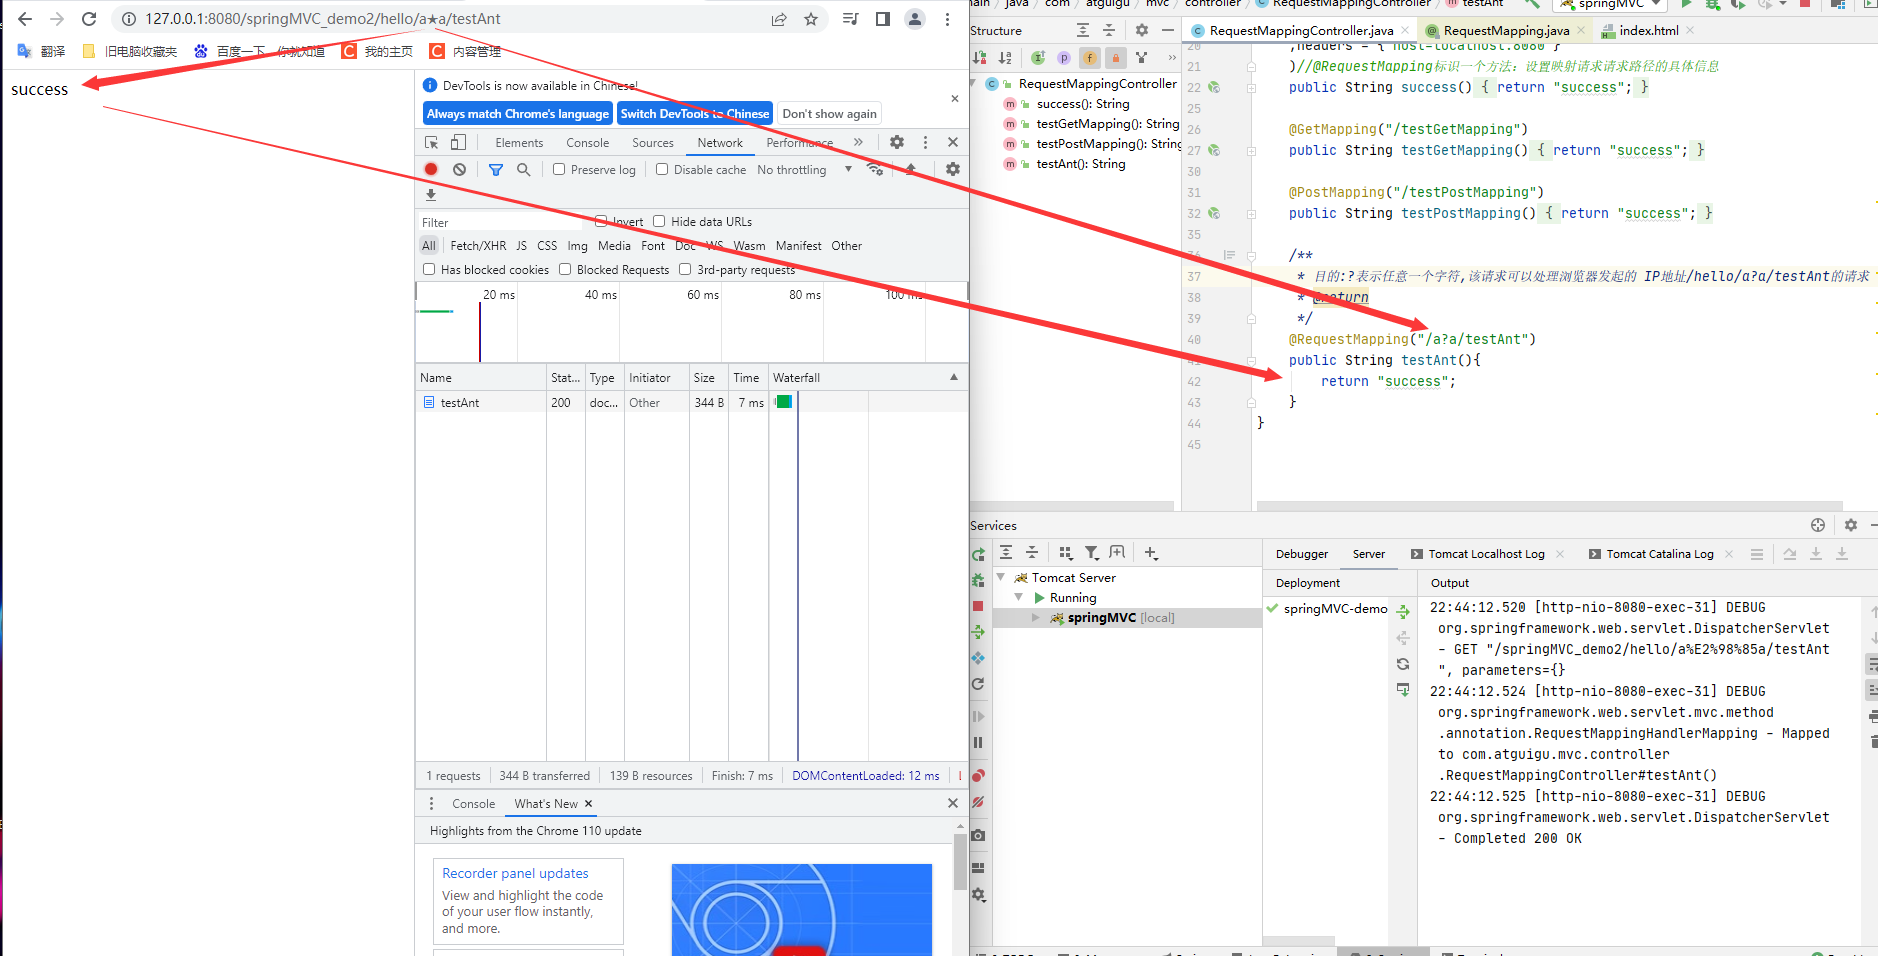
- * :表示任意的0个或多个字符,注意的是斜线“/”“?”分别是分隔符和拼接请求参数,因此不能使用
- ** :**表示任意层目录 ,但是注意在使用**时,只能使用/**/xxx的方式,因为目录是用分隔符表示的,如果**不单独是用在“/**/”里面,就只有上面“*”的功效,也就是表示任意的0个或者多个字符
SpringMVC支持路径中的占位符(重点)
说明:
传统传输方式是:IP/资源路径?参数Key=参数Value&......
而到了restFul的传输方式就变成了:IP/资源路径/参数Value/参数Value/......。通过restFul方式的请求地址来告诉别人你要访问的资源、传输的参数,通过请求方式来告诉别人你要执行增删改查什么方式,两者相互配合,当请求路径中将某些数据通过路径的方式传输到服务器中,就可以在相应的@RequestMapping注解的value属性中通过占位符{xxx}表示传输的数据,再通过在请求控制器的方法的形参列表中使用@PathVariable注解修饰形参,@PathVariable注解的成员参数value值就是对应@RequsetMapping注解的value的值的占位符{xxx}表示的数据,将占位符{xxx}所表示的数据赋值给控制器方法的形参列表的使用@PathVariable注解修饰形参
例如:通过get的方式发送一个请求,请求地址为:IP/user/springMVC/to/controller/1,表示访问user资源、通过SpringMVC去到控制层controller、携带参数“1”进行查询操作
- 如果浏览器传入的参数与服务器处理的参数不匹配,就会出现400错误
- 如果浏览器没有通过路径传输参数,也就是占位符没有数据,那么就匹配不上,报告404错误
- 以下代码操作都是在
请求控制器为:
src\main\java\com\atguigu\mvc\controller\RequestMappingController.java
视图为:
src\main\webapp\WEB-INF\templates\index.html
SpringMVC获取请求参数(七种方式)
1.通过ServletAPI获取(了解)
说明:因为DispatcherServlet前端控制器本质上就是一个前段控制器,因此底层是DispatcherServlet前端控制器为请求控制方法的不同类型形参、被不同注解标识的形参进赋值。例如DispatcherServlet前端控制器为下面的一个请求控制器的一个方法的HttpServletRequest类型的形参赋值。
这里只做演示,在实际中能不用原生的ServletAPI就不用,因为SpringMVC已经提供了其他更简单更直观的方式为我们获取请求参数,参考除了方法1以外的6种方法。
- 创建一个新的参数超链接目录页面
src\main\webapp\WEB-INF\templates\test_param.html ,内容如下,发送携带请求参数的请求<!DOCTYPE html> <html lang="en" xmlns:th="http://www.thymeleaf.org"> <head> <meta charset="UTF-8"> <title>测试请求参数</title> </head> <body> <a th:href="@{/testServletAPI(username='admin',password=123456)}">测试SpringMVC的ServletAPI</a> </body> </html> - 在 src\main\java\com\atguigu\mvc\controller\TestController.java 请求控制器中创建跳转到参数超链接目录页面
src\main\webapp\WEB-INF\templates\test_param.html的处理请求方法@RequestMapping("/param") public String param(HttpServletRequest request){ return "test_param"; } - 在 src\main\java\com\atguigu\mvc\controller\ParamController.java 创建一个请求控制器,编写如下请求处理方法
package com.atguigu.mvc.controller; import org.springframework.stereotype.Controller; import org.springframework.web.bind.annotation.RequestMapping; import javax.servlet.http.HttpServletRequest; @Controller public class ParamController { /** * * @param request 该参数是由DispatcherServlet前端控制器赋予的, * 表示的是当前请求 * @return */ @RequestMapping("/testServletAPI") public String testServletAPI(HttpServletRequest request){ String username = request.getParameter("username"); String password = request.getParameter("password"); System.out.println("username:"+username+",password:"+password); return "success"; } } - 重启服务器,测试访问 http://localhost:8080/springMVC_demo2/param
2.通过控制器方法的形参获取请求参数
说明:当请求参数字段名与请求控制器的方法的形参列表的形参的参数名相互匹配,就会将请求参数的值赋予给请求控制器对应的形参的值。
提示:请求参数多了少了或者请求控制器的方法的形参多了少了都不影响处理请求,(回顾)请求参数是否匹配是看@RequstMapping的成员参数params的设置
当请求参数是单个,且请求控制器的方法的形参也是非数组
- 在 src\main\java\com\atguigu\mvc\controller\ParamController.java 请求控制器中添加请求方法,请求方法内容如下
/** * 通过控制器方法的形参匹配获取请求参数KEY * @param username 当请求参数中的KEY有username,他就会被前端控制器底层赋值给该username形参 * @param password 当请求参数中的KEY有username,他就会被前端控制器底层赋值给该password形参 * @return */ @RequestMapping("/testParam") public String testParam(String username, String password){ System.out.println("username:"+username+",password:"+password); return "success"; } - 在视图 src\main\webapp\WEB-INF\templates\test_param.html 中添加如下超链接发起携带参数的get请求给服务器
<a th:href="@{/testParam(username='admin',password=123456)}">测试SpringMVC的请求参数与请求控制器方法形参匹配</a> - 重启服务器,访问 http://localhost:8080/springMVC_demo2/param 测试,发现请求参数能够被正常接收处理
当请求参数有重复,且请求控制器的方法的形参也是非数组而是String类型
- 修改 src\main\java\com\atguigu\mvc\controller\ParamController.java 请求控制器中的该请求方法,内容如下
/** * 通过控制器方法的形参匹配获取请求参数KEY * @param username 当请求参数中的KEY有username,他就会被前端控制器底层赋值给该username形参 * @param password 当请求参数中的KEY有username,他就会被前端控制器底层赋值给该password形参 * @param hobby 复选框下hobby的值会被用逗号隔开 * @return */ @RequestMapping("/testParam") public String testParam(String username, String password,String hobby){ System.out.println("username:"+username+",password:"+password+",hobby:"+hobby); return "success"; } - 在页面 src\main\webapp\WEB-INF\templates\test_param.html 中添加如下超链接发起携带参数的get请求给服务器
<form th:action="@{/testParam}" method="get"> 用户名:<input type="text" name="username"><br/> 密码:<input type="password" name="password"><br/> 爱好:<input type="checkbox" name="hobby" value="a">a <input type="checkbox" name="hobby" value="b">b <input type="checkbox" name="hobby" value="c">c <input type="submit" value="测试使用请求控制器的形参获取请求参数"> </form> -
重启服务器,访问 http://localhost:8080/springMVC_demo2/param 测试,发现请求参数能够被正常接收处理,并且复选框下hobby的值会被用逗号隔开
当请求参数有重复,且请求控制器的方法的形参是数组时
说明:仅测试数组可以,集合不行,存不进集合内
- 修改 src\main\java\com\atguigu\mvc\controller\ParamController.java 请求控制器中的该请求方法,内容如下
/** * 通过控制器方法的形参匹配获取请求参数KEY * @param username 当请求参数中的KEY有username,他就会被前端控制器底层赋值给该username形参 * @param password 当请求参数中的KEY有username,他就会被前端控制器底层赋值给该password形参 * @param hobby 复选框下hobby的值会被存入到数组当中 * @return */ @RequestMapping("/testParam") public String testParam(String username, String password,String[] hobby){ System.out.println("username:"+username+",password:"+password+",hobby:"+ Arrays.toString(hobby)); return "success"; } - 重启服务器,访问 http://localhost:8080/springMVC_demo2/param 测试,发现请求参数能够被正常接收处理,并且复选框下hobby的值会被数组接收
3.@RequestParam
说明:
是通过@RequsetParam标识请求控制器的方法的形参,@RequsetParam的value设置的值与请求参数KEY相同的,就可以建立请求参数与请求控制器的方法的形参的映射关系
@RequestParam三个属性value、required、defaultValue的介绍
- 注意区别@PathVariable,@PathVariable是用在restFul请求上的,而@RequestParam则相反。
- @RequestParam里面有一个required的成员参数,默认为true,也就是必须装配,意思就是被@RequestParam标识的形参必须有一个请求参数与其匹配,否则就会400错误,提示某某某请求参数不存在,这里不像SpringMVC请求参数和形参匹配一样可以可有可无。
- @RequestParam里面还有一个defaultValue成员参数,用于设置被这个注解标识的形参默认值是什么,当没有请求参数或者请求参数为空串时,与请求参数匹配的请求控制器的方法的形参她的默认值就为@RequestParam的成员参数defaultValue设置的值,因此不用担心因为某个请求参数没有携带值传输而导致报错,因为无论@RequestParam的required成员参数设置true还是false都是无关的
- 修改 src\main\java\com\atguigu\mvc\controller\ParamController.java 请求控制器中的该请求方法,内容如下
/** * 通过控制器方法的形参匹配获取请求参数KEY * @param username 当请求参数中的KEY有username,他就会被前端控制器底层赋值给该username形参 * @param password 当请求参数中的KEY有username,他就会被前端控制器底层赋值给该password形参 * @param hobby 复选框下hobby的值会被存入到数组当中 * @return */ @RequestMapping("/testParam") public String testParam(String username, String password,@RequestParam("hobby") String[] hobby){ System.out.println("username:"+username+",password:"+password+",hobby:"+ Arrays.toString(hobby)); return "success"; } - 重启服务器,访问 http://localhost:8080/springMVC_demo2/param 测试,发现请求参数能够被正常接收处理,并且复选框下hobby的值会被数组接收,也就是@RequestParam生效了,效果与之前测试的一样
4.@RequestHeader
说明:是将请求头信息和控制器方法的形参创建映射关系;其三个属性value、required、defaultValue与@RequestParam一样
- 修改 src\main\java\com\atguigu\mvc\controller\ParamController.java 请求控制器中的该请求方法,内容如下
/** * 通过控制器方法的形参匹配获取请求参数KEY * @param username 当请求参数中的KEY有username,他就会被前端控制器底层赋值给该username形参 * @param password 当请求参数中的KEY有username,他就会被前端控制器底层赋值给该password形参 * @param hobby 复选框下hobby的值会被存入到数组当中,并且因为@RequestParam注解可以让实现特定的请求 * 参数与请求控制器的方法产生映射关系,从而被赋值 * @param host 该形参通过@RequestHeader注解标识,是的指定请求的请求头Key对应的值被赋予给该形参 * @return */ @RequestMapping("/testParam") public String testParam(String username, String password, @RequestParam(value = "hobby",defaultValue = "不知道") String[] hobby, @RequestHeader("host") String host){ System.out.println("username:"+username+",password:"+password+",hobby:"+ Arrays.toString(hobby)); System.out.println("请求地址为:"+host); return "success"; } - 重启服务器,访问 http://localhost:8080/springMVC_demo2/param 测试,发现请求头的参数能够被正常接收处理,也就是@RequestHeader生效了
5.@CookieValue
说明:
是将cookie数据和控制器方法的形参创建映射关系;其三个属性value、required、defaultValue与@RequestParam一样。
Cookie知识回顾:
客户端第一次向服务端发送请求时,如果请求控制器的请求方法有request.getsession方法,就会为浏览器配置一个类似UUID的JavaSessionID(很长一个字符串)作为Key存放在服务器Session(Map集合)中,然后响应这个JavaSessionID的值存储到浏览器的Cookie(类似Map集合)中,然后就是JSEESIONID=JavaSessionID的值,每次浏览器响应都是携带这个JSEESIONID=JavaSessionID作为Cookie来访问服务器
- 修改 src\main\java\com\atguigu\mvc\controller\ParamController.java 请求控制器中的该请求方法,内容如下,添加了创建Session,存放该浏览器的CookieID,响应给浏览器JavaSessionID
package com.atguigu.mvc.controller; import org.springframework.stereotype.Controller; import org.springframework.web.bind.annotation.CookieValue; import org.springframework.web.bind.annotation.RequestHeader; import org.springframework.web.bind.annotation.RequestMapping; import org.springframework.web.bind.annotation.RequestParam; import javax.servlet.http.HttpServletRequest; import javax.servlet.http.HttpSession; import java.util.ArrayList; import java.util.Arrays; @Controller public class ParamController { /** * 通过ServletAPI获取请求参数 * @param request 该参数是由DispatcherServlet前端控制器赋予的, * 表示的是当前请求 * @return */ @RequestMapping("/testServletAPI") public String testServletAPI(HttpServletRequest request){ request.getSession(); String username = request.getParameter("username"); String password = request.getParameter("password"); System.out.println("username:"+username+",password:"+password); return "success"; } /** * 通过控制器方法的形参匹配获取请求参数KEY * @param username 当请求参数中的KEY有username,他就会被前端控制器底层赋值给该username形参 * @param password 当请求参数中的KEY有username,他就会被前端控制器底层赋值给该password形参 * @param hobby 复选框下hobby的值会被存入到数组当中,并且因为@RequestParam注解可以让实现特定的请求 * 参数与请求控制器的方法产生映射关系,从而被赋值 * @param host 该形参通过@RequestHeader注解标识, * 是的指定请求的请求头Key对应的值被赋予给该形参 * @param sessionID 该形参通过@CookieValue注解表示, * 是指定请求的cookie的指定key对应的value赋予给该形参 * @return */ @RequestMapping("/testParam") public String testParam(String username, String password, @RequestParam(value = "hobby",defaultValue = "不知道") String[] hobby, @RequestHeader("host") String host, @CookieValue("JSEESIONID")String sessionID){ System.out.println("username:"+username+",password:"+password+",hobby:"+ Arrays.toString(hobby)); System.out.println("请求地址为:"+host); System.out.println("浏览器的cookie存档的SessionID为:"+sessionID); return "success"; } } -
重启服务器,访问 http://localhost:8080/springMVC_demo2/param 测试,浏览器先获取服务器赋予给浏览器的JavaSessionID,然后携带JavaSessionID进行请求访问,被服务器的请求控制器的请求方法的形参获取到cookie对应Key的value值,也就是说@CookieValue生效了
6.通过POJO获取请求参数
说明:
如果请求发出的参数KEY与我们的实体类的Set方法名相互对应(已经测试过了),那么就可以通过实体类收集请求参数的数据,否则就获取不到。如果请求参数有的KEY对应的value为null或者空串,也不会影响实体类接收其他的请求参数
- 在 src\main\webapp\WEB-INF\templates\test_param.html 视图中添加如下内容,向服务器发送post请求
<form th:action="@{/testBean}" method="post"> 用户名:<input type="text" name="username"><br> 密码:<input type="password" name="password"><br> 性别:<input type="radio" name="sex" value="男">男<input type="radio" name="sex" value="女">女<br> 年龄:<input type="text" name="age"><br> 邮箱:<input type="text" name="email"><br> <input type="submit" value="测试使用实体类接收请求参数"> </form> - 创建实体类 src\main\java\com\atguigu\mvc\bean\User.java ,用于接收请求参数的所有数据,要设置无参构造器(用于底层调用反射创建对象),设置getter setter方法(请求发出的参数KEY与我们的实体类的Set方法名相互对应)
package com.atguigu.mvc.bean; public class User { private Integer id; private String username; private String password; private Integer age; private String sex; private String email; public User() {//使用实体类接收参数时,底层会调用反射,反射会调用无参构造进行创建对象 } public Integer getId() { return id; } public void setId(Integer id) {//请求发出的参数KEY与我们的实体类的Set方法名相互对应 this.id = id; } public String getUsername() { return username; } public void setUsername(String username) { this.username = username; } public String getPassword() { return password; } public void setPassword(String password) { this.password = password; } public Integer getAge() { return age; } public void setAge(Integer age) { this.age = age; } public String getSex() { return sex; } public void setSex(String sex) { this.sex = sex; } public String getEmail() { return email; } public void setEmail(String email) { this.email = email; } @Override public String toString() { return "User{" + "id=" + id + ", username='" + username + '\'' + ", password='" + password + '\'' + ", age=" + age + ", sex='" + sex + '\'' + ", email='" + email + '\'' + '}'; } } - 修改 src\main\java\com\atguigu\mvc\controller\ParamController.java 请求控制器中的该请求方法,内容如下,通过实体类获取请求参数
/** * 通过实体类获取请求参数 * @param user 实体类,用于接收客户端发起的请求参数数据 * @return */ @RequestMapping("/testBean") public String testBean(User user){ System.out.println(user); return "success"; } - 重启服务器,测试效果,发现实体类可以接收到请求参数的数据,但是如果请求参数发送的数据是中文,且是post请求,就会出现乱码问题(下图展示的是性别出现乱码了),后面会有解决办法
(补充)通过CharacterEncodingFilter解决获取请求参数的乱码问题
说明:
请求参数已经被DispatcherServlet前端控制器接收了,再去通过resp.setContentType("text/html; charset=UTF-8")已经没有意义了,那就需要在Servlet执行之前进行编码设置。JavaWeb三大组件初始化执行顺序为:Listener 监听器-->Filter 过滤器-->Servlet 程序。listener监听servletContext的创建于销毁,只执行一次,编写加载配置文件的代码;fillter过滤指定请求,可以执行无数次,用于设置编码。只要有请求访问到指定地址,就会被过滤器进行处理,因此选择过滤器。
注意:
服务器在接收Post请求类型的参数时候会出现乱码问题,但是Get请求类型一般不会,因为Tomcat设置了Tomcat配置文件apache-tomcat-版本号\conf\server.xml 造成的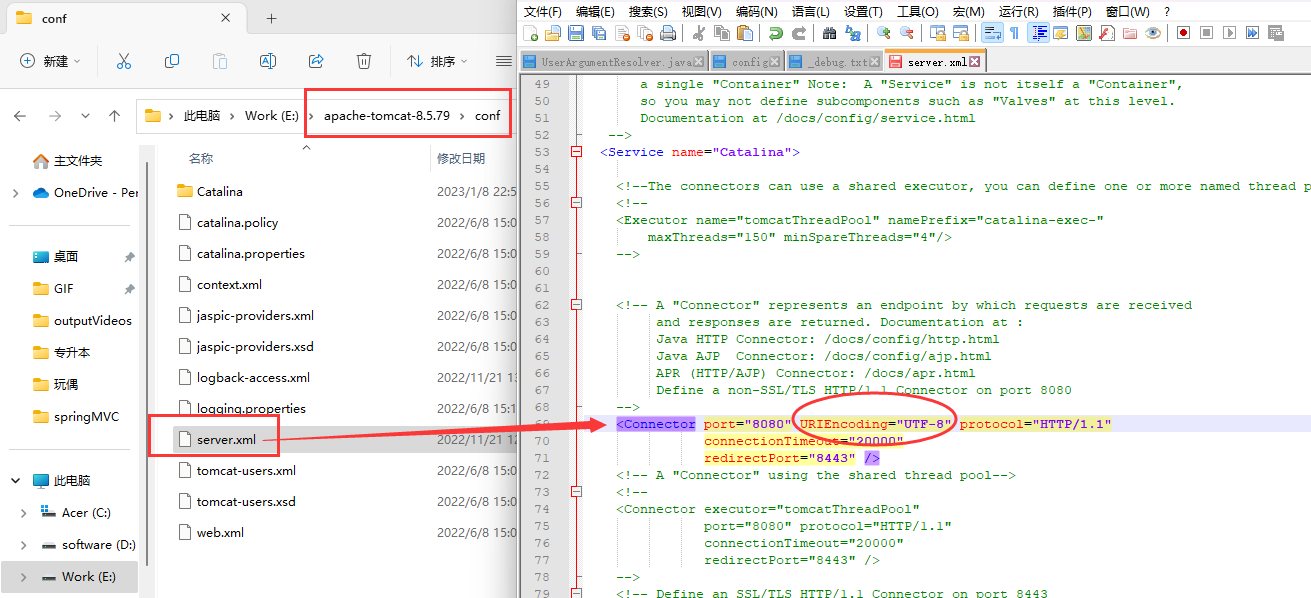
但Tomcat8已经解决了Get请求乱码问题——默认Get请求就是UTF-8
- 解决获取请求参数的乱码问题,可以使用SpringMVC提供的编码过滤器CharacterEncodingFilter,但是 必须在web.xml中添加如下配置进行springMVC的编码过滤器CharacterEncodingFilter
<!--配置springMVC的编码过滤器CharacterEncodingFilter--> <filter> <filter-name>CharacterEncodingFilter</filter-name> <filter-class>org.springframework.web.filter.CharacterEncodingFilter</filter-class> <!--设置要使用UTF-8编码--> <init-param> <param-name>encoding</param-name> <param-value>UTF-8</param-value> </init-param> <!--强制服务器响应请求为如上所设置的编码,不设置接收请求为true是因为底层代码在 request并没有设置,因此肯定为true,也就是接收请求编码的一定是强制用如上 所设置的编码--> <init-param> <param-name>forceResponseEncoding</param-name> <param-value>true</param-value> </init-param> </filter> <filter-mapping> <filter-name>CharacterEncodingFilter</filter-name> <!--"/*"表示所有请求都需要设置特定的彪马格式格式--> <url-pattern>/*</url-pattern> </filter-mapping> - 重启服务器发送请求,发现即使发送Post请求,也没有出现乱码问题,证明springMVC的编码过滤器CharacterEncodingFilter生效了


 3951
3951

 被折叠的 条评论
为什么被折叠?
被折叠的 条评论
为什么被折叠?
 到【灌水乐园】发言


