


ELK是由一家elastic公司开发的三个开源项目的首字母缩写,即是三个相关的项目组成的系统
这三个项目分别是:Elasticsearch、Logstash 和 Kibana。三个项目各有不同的功能
Elasticsearch 是一个实时的全文搜索,存储库和分析引擎。
Logstash 是数据处理的管道,能够同时从多个来源采集数据,转换数据,然后将数据发送到诸如Elasticsearch 等存储库中。
Kibana 则可以让用户在 Elasticsearch 中使用图形和图表对数据进行可视化。
官方文档
https://www.elastic.co/guide/en/elastic-stack/index.html
https://www.elastic.co/guide/en/elasticsearch/reference/master/installelasticsearch.html
部署方式
包安装
二进制安装
Docker 部署
Ansible 批量部署
ES支持操作系统版本和 Java 版本官方说明
https://www.elastic.co/cn/support/matrix
安装前准备
内存:4G以上
主机名
#各服务器配置自己的主机名
[root@ubuntu2204 ~]#hostnamectl set-hostname es-node1
关闭防火墙和SELinux
#RHEL系列的系统执行下以下配置
[root@es-node1 ~]# systemctl disable firewalld
[root@es-node1 ~]# systemctl disable NetworkManager
[root@es-node1 ~]# sed -i '/SELINUX/s/enforcing/disabled/' /etc/selinux/config
[root@es-node1 ~]# reboot
各服务器配置本地域名解析
#配置本地域名解析
[root@es-node1 ~]# vim /etc/hosts
10.0.0.206 es-node1
10.0.0.207 es-node2
10.0.0.208 es-node3
优化资源限制配置
内核参数 vm.max_map_count 用于限制一个进程可以拥有的最大内存资源
使用默认系统配置,二进制安装时会提示下面错误,包安装会自动修改此配置

#查看默认值
[root@es-node1 ~]#sysctl -a |grep vm.max_map_count
vm.max_map_count =65530
#修改配置
[root@es-node1 ~]#echo "vm.max_map_count = 262144" >> /etc/sysctl.conf
[root@es-node1 ~]#sysctl -a |grep vm.max_map_count
vm.max_map_count =65530
[root@es-node1 ~]#sysctl -p
vm.max_map_count =262144
[root@es-node1 ~]#sysctl -a |grep vm.max_map_count
vm.max_map_count =262144
#默认最大打开的文件描述符符合要求,可不做修改
[root@es-node1 ~]#sysctl -a |grep fs.file-max
fs.file-max =9223372036854775807
Ubuntu 基于包安装后会自动修改文件
[root@es-node1 ~]#cat /usr/lib/sysctl.d/elasticsearch.conf
vm.max_map_count=262144
修改资源限制配置
[root@es-node1 ~]#vim /etc/security/limits.conf
* soft core unlimited
* hard core unlimited
* soft nproc 1000000
* hard nproc 1000000
* soft nofile 1000000
* hard nofile 1000000
* soft memlock 32000
* hard memlock 32000
* soft msgqueue 8192000
* hard msgqueue 8192000
安装Java环境(可选)
Elasticsearch 是基于java的应用,所以依赖JDK环境
注意: 安装7.X以后版本官方建议要安装集成JDK的包,所以无需再专门安装 JDK
关于JDK环境说明
1.x 2.x 5.x 6.x都没有集成JDK的安装包,也就是需要自己安装java环境
7.x的安装包分为带JDK和不带JDK两种包,带JDK的包在安装时不需要再安装java,如果不带JDK的包仍然需要自己去安装java
如果安装no-jdk的包,才需要安装java环境
官网JAVA版支持说明
https://www.elastic.co/cn/support/matrix#matrix_jvm
因为 Elasticsearch 服务运行需要 Java环境,如果要安装没有JDK的包,需要提前安装JAVA环境,可以使用以下方式安装
方式一:直接使用yum/apt安装openjdk
[root@es-node1 ~]#apt update;apt -y install openjdk-17-jdk
方式二:本地安装在oracle官网下载rpm安装包:
[root@es-node1 ~]# yum -y install jdk-8u92-linux-x64.rpm
方式三:安装二进制包并自定义环境变量
下载地址:http://www.oracle.com/technetwork/java/javase/downloads/jdk8-downloads-2133151.html
[root@es-node1 ~]# tar xvf jdk-8u121-linux-x64.tar.gz -C /usr/local/
[root@es-node1 ~]# ln -sv /usr/local/jdk1.8.0_121 /usr/local/jdk
[root@es-node1 ~]# ln -sv /usr/local/jdk/bin/java /usr/bin/
[root@es-node1 ~]# vim /etc/profile
exportHISTTIMEFORMAT="%F %T `whoami` "
exportJAVA_HOME=/usr/local/jdk
export
CLASSPATH=.:$JAVA_HOME/jre/lib/rt.jar:$JAVA_HOME/lib/dt.jar:$JAVA_HOME/lib/tools.jar
exportPATH=$PATH:$JAVA_HOME/bin
[root@es-node1 ~]# source /etc/profile
[root@es-node1 ~]# java -version
java version "1.8.0_121"#确认可以出现当前的java版本号
Java(TM) SE Runtime Environment (build 1.8.0_121-b13)
Java HotSpot(TM) 64-Bit Server VM (build 25.121-b13, mixed mode)
Elasticsearch 安装
有两种包: 包含jdk和no-jdk的包
注意: 官方提示no-jdk的包将被淘汰,建议使用包含JDK的包
下载地址:
#包含JDK的版本下载
https://www.elastic.co/downloads/elasticsearch
https://mirrors.tuna.tsinghua.edu.cn/elasticstack/
#不包含JDK的版本下载
https://www.elastic.co/cn/downloads/elasticsearch-no-jdk
包安装
下载链接
https://www.elastic.co/cn/downloads/elasticsearch
https://mirrors.tuna.tsinghua.edu.cn/elasticstack/
[root@ubuntu2204 ~]#dpkg -i elasticsearch-8.6.1-amd64.deb
#内置JAVA
[root@ubuntu2204 ~]#/usr/share/elasticsearch/jdk/bin/java -version
openjdk version "19.0.1"2022-10-18
OpenJDK Runtime Environment (build 19.0.1+10-21)
OpenJDK 64-Bit Server VM (build 19.0.1+10-21, mixed mode, sharing)
[root@ubuntu2204 ~]#systemctl enable --now elasticsearch.service
#默认8.X开启xpack安全
[root@ubuntu2204 ~]#curl http://127.0.0.1:9200/
curl: (52) Empty reply from server
[root@ubuntu2204 ~]#vim /etc/elasticsearch/elasticsearch.yml
xpack.security.enabled: false
[root@ubuntu2204 ~]#systemctl restart elasticsearch.service
[root@ubuntu2204 ~]#curl http://127.0.0.1:9200/
{
"name" : "node-1",
"cluster_name" : "elasticsearch",
"cluster_uuid" : "fz_huZn7SAW51VlvmdlX-A",
"version" : {
"number" : "8.6.1",
"build_flavor" : "default",
"build_type" : "deb",
"build_hash" : "180c9830da956993e59e2cd70eb32b5e383ea42c",
"build_date" : "2023-01-24T21:35:11.506992272Z",
"build_snapshot" : false,
"lucene_version" : "9.4.2",
"minimum_wire_compatibility_version" : "7.17.0",
"minimum_index_compatibility_version" : "7.0.0"
},
"tagline" : "You Know, for Search"
}
包安装,默认配置文件
[root@ubuntu2204 ~]#grep -Ev '#|^$' /etc/elasticsearch/elasticsearch.yml
path.data: /var/lib/elasticsearch
path.logs: /var/log/elasticsearch
xpack.security.enabled: true
xpack.security.enrollment.enabled: true
xpack.security.http.ssl:
enabled: true
keystore.path: certs/http.p12
xpack.security.transport.ssl:
enabled: true
verification_mode: certificate
keystore.path: certs/transport.p12
truststore.path: certs/transport.p12
cluster.initial_master_nodes: ["ubuntu2204.hailin.org"]
http.host: 0.0.0.0
包安装,默认service文件配置
[root@ubuntu2204 ~]#cat /lib/systemd/system/elasticsearch.service
[Unit]
Description=Elasticsearch
Documentation=https://www.elastic.co
Wants=network-online.target
After=network-online.target
[Service]
Type=notify
# the elasticsearch process currently sends the notifications back to systemd
# and for some reason exec does not work (even though it is a child). We should change
# this notify access back to main (the default), see https://github.com/elastic/elasticsearch/issues/86475
NotifyAccess=all
RuntimeDirectory=elasticsearch
PrivateTmp=true
Environment=ES_HOME=/usr/share/elasticsearch
Environment=ES_PATH_CONF=/etc/elasticsearch
Environment=PID_DIR=/var/run/elasticsearch
Environment=ES_SD_NOTIFY=true
EnvironmentFile=-/etc/default/elasticsearch
WorkingDirectory=/usr/share/elasticsearch
User=elasticsearch
Group=elasticsearch
ExecStart=/usr/share/elasticsearch/bin/systemd-entrypoint -p${PID_DIR}/elasticsearch.pid --quiet
# StandardOutput is configured to redirect to journalctl since
# some error messages may be logged in standard output before
# elasticsearch logging system is initialized. Elasticsearch
# stores its logs in /var/log/elasticsearch and does not use
# journalctl by default. If you also want to enable journalctl
# logging, you can simply remove the "quiet" option from ExecStart.
StandardOutput=journal
StandardError=inherit
# Specifies the maximum file descriptor number that can be opened by this process
LimitNOFILE=65535
# Specifies the maximum number of processes
LimitNPROC=4096
# Specifies the maximum size of virtual memory
LimitAS=infinity
# Specifies the maximum file size
LimitFSIZE=infinity
# Disable timeout logic and wait until process is stopped
TimeoutStopSec=0
# SIGTERM signal is used to stop the Java process
KillSignal=SIGTERM
# Send the signal only to the JVM rather than its control group
KillMode=process
# Java process is never killed
SendSIGKILL=no
# When a JVM receives a SIGTERM signal it exits with code 143
SuccessExitStatus=143
# Allow a slow startup before the systemd notifier module kicks in to extend the timeout
TimeoutStartSec=75
[Install]
WantedBy=multi-user.target
# Built for packages-8.6.1 (packages)
二进制安装
官方文档
https://www.elastic.co/guide/en/elasticsearch/reference/master/targz.html
下载二进制文件
https://www.elastic.co/cn/downloads/elasticsearch
基于二进制包含JDK文件安装
[root@es-node1 ~]#ls
elasticsearch-8.6.1-linux-x86_64.tar.gz
[root@es-node1 ~]#tar xvf elasticsearch-8.6.1-linux-x86_64.tar.gz -C /usr/local/src/
[root@es-node1 ~]#ln -s /usr/local/src/elasticsearch-8.6.1/ /usr/local/elasticsearch
[root@es-node1 ~]#ls /usr/local/elasticsearch
bin jdk LICENSE.txt modules plugins
config lib logs NOTICE.txt README.asciidoc
编辑服务配置文件
[root@es-node1 ~]#vim /usr/local/elasticsearch/config/elasticsearch.yml
[root@es-node1 ~]#grep -Ev '#|^$' /usr/local/elasticsearch/config/elasticsearch.yml
cluster.name: es-cluster
node.name: es-node1 #在其它节点改为唯一的标识,如es-node2,es-node3
path.data: /data/es-data
path.logs: /data/es-logs
network.host: 10.0.0.206
http.port: 9200
discovery.seed_hosts: ["10.0.0.206", "10.0.0.207", "10.0.0.208"]
cluster.initial_master_nodes: ["10.0.0.206", "10.0.0.207", "10.0.0.208"] #只用于初始集群启动,集群启动后该配置失效,用于初始启动有资格参与master选举
gateway.recover_after_nodes: 2
#复制配置文件到其它节点
[root@es-node1 ~]#scp /usr/local/elasticsearch/config/elasticsearch.yml 10.0.0.207:/usr/local/elasticsearch/config/
[root@es-node1 ~]#scp /usr/local/elasticsearch/config/elasticsearch.yml 10.0.0.208:/usr/local/elasticsearch/config/
#修改其余两个节点配置
[root@es-node2 ~]#vim /usr/local/elasticsearch/config/elasticsearch.yml
[root@es-node2 ~]#grep -Ev '#|^$' /usr/local/elasticsearch/config/elasticsearch.yml
cluster.name: es-cluster
node.name: es-node2 #只修改此行
path.data: /data/es-data
path.logs: /data/es-logs
network.host: 0.0.0.0
http.port: 9200
discovery.seed_hosts: ["10.0.0.206", "10.0.0.207", "10.0.0.208"]
cluster.initial_master_nodes: ["10.0.0.206", "10.0.0.207", "10.0.0.208"]
gateway.recover_after_nodes: 2#集群无法启动时,可以注释该项
[root@es-node3 ~]#vim /usr/local/elasticsearch/config/elasticsearch.yml
[root@es-node3 ~]#grep -Ev '#|^$' /usr/local/elasticsearch/config/elasticsearch.yml
cluster.name: es-cluster
node.name: es-node3 #只修改此行
path.data: /data/es-data
path.logs: /data/es-logs
network.host: 10.0.0.206
http.port: 9200
discovery.seed_hosts: ["10.0.0.206", "10.0.0.207", "10.0.0.208"]
cluster.initial_master_nodes: ["10.0.0.206", "10.0.0.207", "10.0.0.208"]
gateway.recover_after_nodes: 2
修改 ELK 内存配置
修改ELK内存配置,推荐使用宿主机物理内存的一半,最大不超过30G
官方文档:
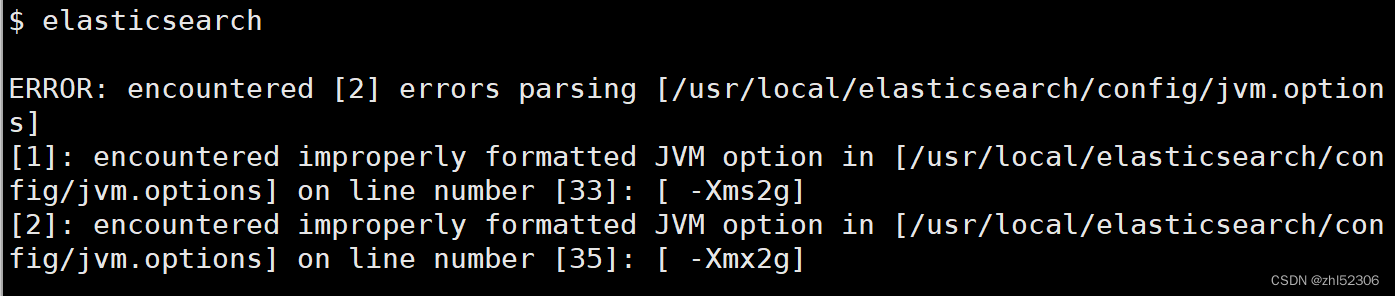
[root@es-node1 ~]#vim /usr/local/elasticsearch/config/jvm.options
-Xms2g#需注意格式,需置顶,前面不能有空格,否则启动服务会提示格式不正确
-Xmx2g
创建用户
从ES7.X以后版不允许以root启动服务,需要委创建专用的用户在所有节点上创建用户
[root@es-node1 ~]#useradd -r elasticsearch
[root@es-node1 ~]#id elasticsearch
用户id=999(elasticsearch) 组id=999(elasticsearch) 组=999(elasticsearch)
目录权限更改
在所有节点上创建数据和日志目录并修改目录权限为elasticsearch
#可以不用创建下面目录es-data和es-logs,系统可以自动创建,但data目录需创建
[root@es-node1 ~]#mkdir /data
[root@es-node1 ~]#ll /data -d
drwxr-xr-x 2 root root 4096 2月 1619:32 /data/
#必须分配权限,否则服务无法启动
[root@es-node1 ~]#chown -R elasticsearch.elasticsearch /data/
[root@es-node1 ~]#ll /data -d
drwxr-xr-x 2 elasticsearch elasticsearch 4096 2月 1619:32 /data/
#修改elasticsearch安装目录权限
[root@es-node1 ~]#ll /usr/local/elasticsearch/
总用量 2232
drwxr-xr-x 9 root root 4096 1月 2505:47 ./
drwxr-xr-x 3 root root 4096 2月 1617:56 ../
drwxr-xr-x 2 root root 4096 1月 2505:47 bin/
drwxr-xr-x 3 root root 4096 2月 1619:29 config/
drwxr-xr-x 8 root root 4096 1月 2505:47 jdk/
drwxr-xr-x 5 root root 4096 1月 2505:47 lib/
-rw-r--r-- 1 root root 3860 1月 2505:34 LICENSE.txt
drwxr-xr-x 2 root root 4096 1月 2505:43 logs/
drwxr-xr-x 69 root root 4096 1月 2505:47 modules/
-rw-r--r-- 1 root root 2235851 1月 2505:43 NOTICE.txt
drwxr-xr-x 2 root root 4096 1月 2505:43 plugins/
-rw-r--r-- 1 root root 8106 1月 2505:34 README.asciidoc
[root@es-node1 ~]#chown -R elasticsearch.elasticsearch /usr/local/elasticsearch/
[root@es-node1 ~]#ll /usr/local/elasticsearch/
总用量 2232
drwxr-xr-x 9 elasticsearch elasticsearch 4096 1月 2505:47 ./
drwxr-xr-x 3 root root 4096 2月 1617:56 ../
drwxr-xr-x 2 elasticsearch elasticsearch 4096 1月 2505:47 bin/
drwxr-xr-x 3 elasticsearch elasticsearch 4096 2月 1619:29 config/
drwxr-xr-x 8 elasticsearch elasticsearch 4096 1月 2505:47 jdk/
drwxr-xr-x 5 elasticsearch elasticsearch 4096 1月 2505:47 lib/
-rw-r--r-- 1 elasticsearch elasticsearch 3860 1月 2505:34 LICENSE.txt
drwxr-xr-x 2 elasticsearch elasticsearch 4096 1月 2505:43 logs/
drwxr-xr-x 69 elasticsearch elasticsearch 4096 1月 2505:47 modules/
-rw-r--r-- 1 elasticsearch elasticsearch 2235851 1月 2505:43 NOTICE.txt
drwxr-xr-x 2 elasticsearch elasticsearch 4096 1月 2505:43 plugins/
-rw-r--r-- 1 elasticsearch elasticsearch 8106 1月 2505:34 README.asciidoc
启动 Elasticsearch服务
在所有节点上配置并启动
[root@es-node1 ~]#echo 'PATH=/usr/local/elasticsearch/bin:$PATH' >/etc/profile.d/elasticsearch.sh
[root@es-node1 ~]#. /etc/profile.d/elasticsearch.sh
#不能以root用户运行,切换用户
[root@es-node1 ~]#su - elasticsearch
su: 警告:无法更改到 /home/elasticsearch 目录: 没有那个文件或目录
$ elasticsearch
[2023-02-16T21:37:59,131][INFO ][o.e.n.Node ] [es-node1] version[8.6.1], pid[3754], build[tar/180c9830da956993e59e2cd70eb32b5e383ea42c/2023-01-24T21:35:11.506992272Z], OS[Linux/5.15.0-58-generic/amd64], JVM[Oracle Corporation/OpenJDK 64-Bit Server VM/19.0.1/19.0.1+10-21]
[2023-02-16T21:37:59,137][INFO ][o.e.n.Node ] [es-node1] JVM home [/usr/local/src/elasticsearch-8.6.1/jdk], using bundled JDK [true]
....................
以service服务方式启动
#创建service文件
[root@es-node1 ~]#cat /lib/systemd/system/elasticsearch.service
[Unit]
Description=Elasticsearch
Documentation=http://www.elastic.co
Wants=network-online.target
After=network-online.target
[Service]
RuntimeDirectory=elasticsearch
PrivateTmp=true
Environment=PID_DIR=/var/run/elasticsearch
WorkingDirectory=/usr/local/elasticsearch
User=elasticsearch
Group=elasticsearch
ExecStart=/usr/local/elasticsearch/bin/elasticsearch -p${PID_DIR}/elasticsearch.pid --quiet
# StandardOutput is configured to redirect to journalctl since
# some error messages may be logged in standard output before
# elasticsearch logging system is initialized. Elasticsearch
# stores its logs in /var/log/elasticsearch and does not use
# journalctl by default. If you also want to enable journalctl
# logging, you can simply remove the "quiet" option from ExecStart.
# Specifies the maximum file descriptor number that can be opened by this process
LimitNOFILE=65535
# Specifies the maximum number of processes
LimitNPROC=4096
# Specifies the maximum size of virtual memory
LimitAS=infinity
# Specifies the maximum file size
LimitFSIZE=infinity
# Disable timeout logic and wait until process is stopped
TimeoutStopSec=0
# SIGTERM signal is used to stop the Java process
KillSignal=SIGTERM
# Send the signal only to the JVM rather than its control group
KillMode=process
# Java process is never killed
SendSIGKILL=no
# When a JVM receives a SIGTERM signal it exits with code 143
SuccessExitStatus=143
[Install]
WantedBy=multi-user.target
[root@es-node1 ~]#systemctl daemon-reload
[root@es-node1 ~]#systemctl enable --now elasticsearch.service
验证端口监听成功
[root@es-node1 ~]#ss -tlnp | grep java
LISTEN 0 4096 *:9200 *:* users:(("java",pid=3573,fd=416))
LISTEN 0 4096 *:9300 *:* users:(("java",pid=3573,fd=414))
访问 Elasticsearch 服务端口
在所有节点上验证访问9200/tcp端口
#需关闭xpack安全选项,否则无法直接访问9200端口
[root@es-node1 ~]#curl http://10.0.0.208:9200
{"error":{"root_cause":[{"type":"security_exception","reason":"missing authentication credentials for REST request [/]","header":{"WWW-Authenticate":["ApiKey","Basic realm=\"security\" charset=\"UTF-8\""]}}],"type":"security_exception","reason":"missing authentication credentials for REST request [/]","header":{"WWW-Authenticate":["ApiKey","Basic realm=\"security\" charset=\"UTF-8\""]}},"status":401}
#关闭xpack安全选项
[root@es-node3 ~]#vim /usr/local/elasticsearch/config/elasticsearch.yml
xpack.security.enabled: false
[root@es-node3 ~]#systemctl restart elasticsearch.service
#验证9200端口
[root@es-node1 ~]#curl http://10.0.0.206:9200
{
"name" : "es-node1",
"cluster_name" : "es-cluster",
"cluster_uuid" : "_na_",
"version" : {
"number" : "8.6.1",
"build_flavor" : "default",
"build_type" : "tar",
"build_hash" : "180c9830da956993e59e2cd70eb32b5e383ea42c",
"build_date" : "2023-01-24T21:35:11.506992272Z",
"build_snapshot" : false,
"lucene_version" : "9.4.2",
"minimum_wire_compatibility_version" : "7.17.0",
"minimum_index_compatibility_version" : "7.0.0"
},
"tagline" : "You Know, for Search"
}
[root@es-node1 ~]#curl http://10.0.0.207:9200
{
"name" : "es-node2",
"cluster_name" : "es-cluster",
"cluster_uuid" : "_na_",
"version" : {
"number" : "8.6.1",
"build_flavor" : "default",
"build_type" : "tar",
"build_hash" : "180c9830da956993e59e2cd70eb32b5e383ea42c",
"build_date" : "2023-01-24T21:35:11.506992272Z",
"build_snapshot" : false,
"lucene_version" : "9.4.2",
"minimum_wire_compatibility_version" : "7.17.0",
"minimum_index_compatibility_version" : "7.0.0"
},
"tagline" : "You Know, for Search"
}


 430
430

 被折叠的 条评论
为什么被折叠?
被折叠的 条评论
为什么被折叠?
 到【灌水乐园】发言


