


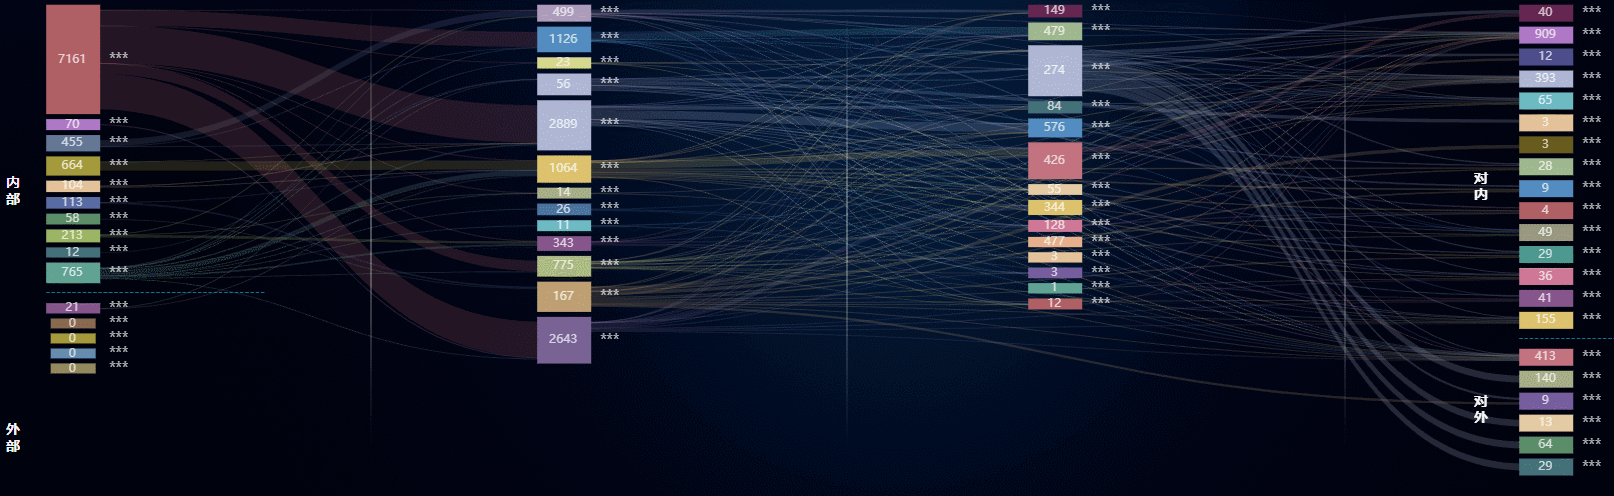
点击高亮整条链路
思路: 从后台返回整条链路的数据, 并分别设置高亮与不高亮的节点和连线的样式
代码:
props: {
  emphasisInfo: {
    type: Object,
    default: () => ({}),
  },
},

watch: {
  nodes: {
    deep: true,
    handler() {
      this.$nextTick(() => {
        this.init()
      })
    },
  },
}
  emphasisInfo: {
    deep: true,
    handler(val) {
  	  this.setEmphasis()
    },
  },
},

setEmphasis() {
  const { name } = this.emphasisInfo.eventData

  // 若与上一次点击的不是同一个节点, 或者点击前并非处于高亮状态
  if (this.emphaticName !== name) {
    this.isEmphatic = false
    this.emphaticName = name
  }

  // 若已处于高亮状态, 则恢复所有数据
  if (this.isEmphatic) {
    this.option.series = {
      ...this.option.series,
      data: this.nodes,
      links: this.links,
    }
    this.isEmphatic = false
    this.emphaticName = ''
    return
  }

  this.updateData()

  this.isEmphatic = true
},

updateData() {
  const nodeInfo = this.emphasisInfo.nodeInfo
  const emphaticNodeIds = nodeInfo.nodes.map((el) => el.nodeId)
  let nodes = _.cloneDeep(this.nodes)

  nodes = nodes.map((el) => {
    const empNodeStyle = {
      itemStyle: {
        color:
          el.valueFlag == 0
            ? this.getColorOpacity(el.color, '0.3')
            : el.color,
        borderColor:
          el.valueFlag == 0
            ? this.getColorOpacity(el.color, '0.3')
            : el.color,
      },
      label: {
        show: el.valueFlag !== 0,
      },
    }
    const notEmpNodeStyle = {
      itemStyle: {
        color: this.getColorOpacity(el.color, '0.3'),
        borderColor: this.getColorOpacity(el.color, '0.3'),
        borderWidth: el.valueFlag == 0 ? 10 : 0,
      },
      label: {
        show: false,
      },
    }

    return emphaticNodeIds.includes(el.nodeId)
      ? _.merge(el, empNodeStyle)
      : _.merge(el, notEmpNodeStyle)
  })

  const emphaticLinkIds = nodeInfo.links.map((el) => el.linkId)
  let links = _.cloneDeep(this.links)

  links = links.map((el) => {
    const notEmpLinkStyle = {
      lineStyle: {
        color: el.labelValue == 0 ? 'transparent' : '#999',
        opacity: 0.1,
      },
    }
    const emphaticLinkStyle = {
      lineStyle: {
        color: el.labelValue == 0 ? 'transparent' : 'source',
        opacity: 0.8,
      },
    }

    return emphaticLinkIds.includes(el.linkId)
      ? _.merge(el, emphaticLinkStyle)
      : _.merge(el, notEmpLinkStyle)
  })

  this.option.series = {
    ...this.option.series,
    data: nodes,
    links: links,
  }
},

getColorOpacity(color, opacity) {
  return color.replace(/(?<=,)[^,\)]*(?=\))/, opacity)
},
悬停高亮
series: {
	emphasis: {
	  focus: 'adjacency', // 实现鼠标悬停高亮显示整条链路
	  // disabled: true,
	},
}
点击节点后在节点下方显示搜索控件
思路: 通过节点点击事件回调方法里传入的事件参数获取节点位置信息, 来定位控件显示的位置
// 控件容器, 根据计算属性 changePos 来确定位置
<div :style="changePos">
...
</div>

computed: {
  changePos() {
    return {
      position: 'absolute',
      top: this.selectDialog.y + 'px',
      left: this.selectDialog.x + 'px',
      color: '#fff',
      zIndex: '11',
    }
  },
},

// 节点点击回调方法
handleNodeClick(){
 // 显示表搜索组件
 if (this.showNodeSelect) {
   // 获取位置信息, 注意点击标题时, 通过 e.event.topTarget.parent.__hostTarget.shape 取得位置
   const positionInfo =
     e.event.target.shape || e.event.topTarget.parent.__hostTarget.shape
   this.setDialongXY(positionInfo)
 }
}

setDialongXY(position) {
  this.selectDialog.x = position?.x + 44
  this.selectDialog.y = position?.y + posit
}
根据传入数据的顺序渲染
series: {
  type: 'sankey',
  layoutIterations: 0, // 为 0 时节点按照数据的顺序排列
}
将节点放置于指定列 (归类)
思路: echarts桑基图会根据连线关系, 将节点摆放至相应的列, 也就是说, 后一列的节点, 至少要有一根与前一列节点的连线存在. 但在实际的数据中, 我们想放置到某一列的节点并没有与前一列有连线关系, 此时可以创造一根 value 为 0 的连线, 并利用连线样式 lineStyle: el.dataNum == 0 ? { color: 'transparent' } : {}, , 将该连线隐藏起来, 以此来实现将节点放置在指定列的功能.
固定节点高度
思路: 统一设置相同的节点数值 value, 并在 tooltip 里显示真实的节点数值.
节点的高度是由其数值决定的, 而节点的数值是由所有连线数据汇总累加, 因此返回的数据中, 需要有一个字段
linkCount表示有多少根线连接到该节点,value的值就等于固定数值/linkCount
代码:
  const links = linksList?.map((el) => ({
    source: el.startNodeId,
    target: el.endNodeId,
    sourceName: el.startNodeAlias,
    targetName: el.endNodeAlias,
    // 这里设置了一个固定的值为 500
    value:
      el.endNodeCount == 0
        ? 500
        : 500 / el.endNodeCount,
    labelValue: el.dataNum,
    linkCount: el.linkCount,
    linkId: el.id,
    lineStyle: el.dataNum == 0 ? { color: 'transparent' } : {},
  }))
设置节点的最小高度 (当数据为0时仍有高度)
series: {
    itemStyle: {
      borderWidth: 10, // 用边框宽度来保证在数据为0时仍有最小高度
    },
}
在节点之间添加分割线
利用富文本格式, 在 label.formatter 中加入
 label: {
   formatter: (params) => {
     const { nodeName, leftSplitLine, rightSplitLine } = params.data

     if (leftSplitLine || rightSplitLine) {
       return [
         '{line|------------------------------------------}',
         leftSplitLine
           ? `{leftText|${nodeName}}`
           : `{rightText|${nodeName}}`,
       ].join('\n')
     }

     return nodeName
   },
   rich: {
     leftText: {
       fontSize: '14px',
       padding: [0, 0, 18, 0],
       lineHeight: 24, //调整分割线和文字之间的间距
     },
     rightText: {
       fontSize: '14px',
       padding: [0, 0, 15, 0],
     },
     line: {
       color: '#17a9c5',
       fontWeight: 'bold',
       padding: [8, 0, 0, -60],
     },
   },
 },
桑基图配置代码
<template>
  <div class="sankey-chart">
    <v-chart
      ref="chart"
      :autoresize="true"
      :option="option"
      :update-options="{ notMerge: true }"
    >
    </v-chart>
    <!-- <div v-else class="no-data" /> -->
  </div>
</template>

<script>
import { data, links, tooltipContent } from './sankeyData'
export default {
  name: 'sankey-chart',
  props: {
    data: {
      type: Object,
      default: () => ({}),
    },
  },
  computed: {
    isNoData() {
      return _.isEmpty(this.data.seriesData)
    },
  },
  data() {
    return {
      option: {},
    }
  },
  watch: {
    data: {
      deep: true,
      handler() {
        this.$nextTick(() => {
          this.init()
        })
      },
    },
  },
  mounted() {
    this.init()
  },
  methods: {
    init() {
      // if (_.isEmpty(this.data)) return
      this.initOption()
    },
    initOption() {
      this.option = {
        series: {
          type: 'sankey',
          draggable: false,
          emphasis: {
            focus: 'adjacency', // 实现鼠标悬停高亮显示整条链路
          },
          data,
          links,
        },
        tooltip: {
          trigger: 'item',
          triggerOn: 'mousemove',
          borderRadius: 4,
          padding: 6,
          borderWidth: 0,
          backgroundColor: '#000c2890',
          textStyle: {
            color: '#fff',
          },
          formatter: (params) => {
            if (params.dataType == 'edge') return
            console.log(params)
            const name = params.data.name
            const contentArr = tooltipContent[name]
            if (!contentArr) return
            let content = ''
            for (let item of contentArr) {
              content += `<div class="tooltip-item">
                    <div class="tooltip-item-label">${item[0]}:</div>
                    <div class="tooltip-item-value">${item[1]}</div>
                  </div>`
            }
            return `<div>${content}</div>`
          },
        },
      }
    },
  },
}
</script>

<style lang="less">
.sankey-chart {
  // canvas {
  //   cursor: default;
  // }
}

.tooltip-item {
  display: flex;
  &-label {
    width: 110px;
    text-align: right;
    margin-right: 5px;
  }
}
</style>
sankeyData.js (桑基图数据结构 )
const nodes = [
  { name: '协同XXX' },
  { name: 'XXX资源中心' },
  { name: '综合系统XX' },
  { name: '数字XXXX' },
  .....
]

const links = [
  { source: 'XXX系统', target: '人力资源', value: 35 },
  { source: 'XXX系统', target: '分析指标', value: 7 },
  { source: 'XXX系统', target: '市场营销', value: 39 },
  { source: 'XXX系统', target: '调度运行', value: 19 },
  { source: 'XXXX资源中心', target: '调度运行', value: 25 },
  { source: 'XXX资源中心', target: 'XXXX生产', value: 56 },
  { source: 'XXX系统', target: '综合管理', value: 5 },
  { source: '数字XXXX', target: '基建管理', value: 19 },
  { source: '数字XXXX', target: '调度运行', value: 15 },
 ....
}

export { nodes, links}


 3664
3664

 被折叠的 条评论
为什么被折叠?
被折叠的 条评论
为什么被折叠?
 到【灌水乐园】发言


