


1. 了解项目
中州养老为JAVA项目,旨为养老院量身定制开发专业的养老管理软件产品;其中包含入住管理、服务管理与财务管理等方面。
中州养老分为前端与后端,采用前后端分离形式
该项目主要以部署上线为主
2. 技术架构
- 前端主要使用的Vue3
- 后端主要使用的是若依框架作为基础架构,如:spring boot
- 数据库采用Mysql与redis
- 使用nginx作为反向代理服务器
本项目基于Linux CentOS Stream9部署上线
3.各节点部署需求
| 服务器 | 数据库 | redis | DNS | tomcat | JDK | nginx | NTP |
| node1 | √ | √ | 与node3同步 | ||||
| node2 | √ | √ | 与node3同步 | ||||
| node3 | √ | √ | √ |
4.各节点参数说明及初始化
4-1 IP需求
node1 ip:192.168.89.101
node2 ip:192.168.89.102
node3 ip:192.186.89.103
4-2 修改各节点主机名
#node1节点
vim /etc/hostname
#修改为:
node1

#node2节点
node2

#node3节点
node3
4-3 更改hosts
#更改hosts使其ping它们的主机名即可通信
vim /etc/hosts
#三个节点都添加以下语句
192.168.89.101 node1 node1-zz-cn
192.168.89.102 node2 node2-zz-cn
192.168.89.103 node3 node3-zz-cn
4-4 设置三台主机免密远程登陆
本步骤使用shell脚本配置
在node1中配置前先下载expect依赖包
dnf -y install expect
#!/bin/bash

if [ ! -f ~/.ssh/id_rsa ];then
    ssh-keygen -t rsa -b 2048 -N "" -f ~/.ssh/id_rsa
fi

for i in 192.168.89.102 192.168.89.103
do
    /usr/bin/expect <<EOF
    spawn ssh-copy-id -o StrictHostKeyChecking=no root@$i

expect {

    "yes/no" {
        send "yes\r";
        exp_continue
}
    "password: " {
        send "密码\r"
}

}
expect eof
EOF
done
4-5 关闭SE防火墙
#分别编辑/etc/sysconfig/selinux与/etc/selinux/config

#将SELINUX状态修改为
SELINUX=disabled
5.部署Mysql数据库【node1】
MySQL是一种关系型数据库管理系统,关系数据库将数据保存在不同的表中,而不是将所有数据放在一个大仓库内,这样就增加了速度并提高了灵活性。
此文章用到的数据库:https://pan.quark.cn/s/df9597998f0f

5-1 安装mysql
dnf -y install https://dev.mysql.com/get/mysql80-community-release-el9-1.noarch.rpm5-2 查看是否安装成功
dnf repolist enabled | grep mysql

#命令说明
#dnf repolist enabled:列出已启用的包
#grep mysql:查找已启用包里的mysql
5-3 安装Mysql
dnf install -y mysql-community-server --nogpgcheck

#命令说明
#--nogpgcheck:代表信任该链接
5-4 启动Mysql服务
systemctl start mysqld
systemctl enable mysqld
systemctl status mysqld

#命令说明
#systemctl start enable status:代表对服务开启、开机自启动、查看状态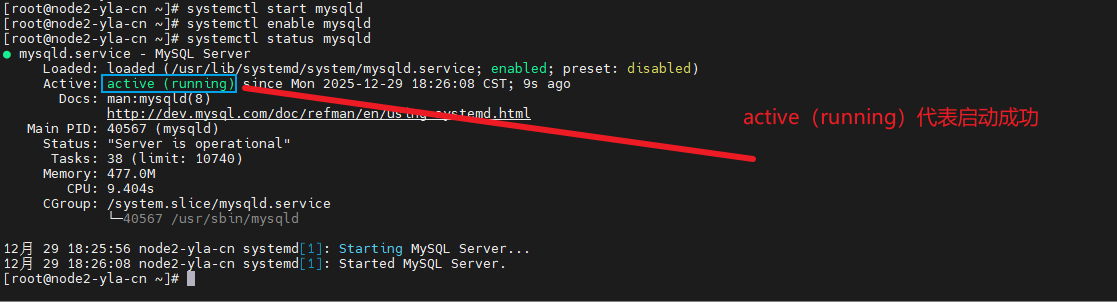
5-5 获取Mysql的临时密码
MySQL的临时密码存储在/var/log/mysqld.log的文件处
grep password /var/log/mysqld.log

#grep password:查找对应文件中包含password文字的区域
5-6 登录到MySQL重新设置密码
mysql_secure_installationSecuring the MySQL server deployment.
#需要输入的内容:输入刚才获取到的临时密码
Enter password for user root:
The existing password for the user account root has expired. Please set a new password.
#需要输入的内容:输入新密码,统一为 Aa123456.
New password:
Re-enter new password:
The 'validate_password' component is installed on the server.
The subsequent steps will run with the existing configuration
of the component.
Using existing password for root.
Estimated strength of the password: 100
#需要输入的内容:是否更改root用户的密码
Change the password for root ? ((Press y|Y for Yes, any other key for No) : y
#需要输入的内容:若y则输入要更改的密码
New password:
Re-enter new password:
Estimated strength of the password: 100
#需要输入的内容:是否确认修改
Do you wish to continue with the password provided?(Press y|Y for Yes, any other key for No) : y
By default, a MySQL installation has an anonymous user,
allowing anyone to log into MySQL without having to have
a user account created for them. This is intended only for
testing, and to make the installation go a bit smoother.
You should remove them before moving into a production
environment.
#需要输入的内容:是否移除匿名用户,这里可以移除
Remove anonymous users? (Press y|Y for Yes, any other key for No) : y
Success.
Normally, root should only be allowed to connect from
'localhost'. This ensures that someone cannot guess at
the root password from the network.
#需要输入的内容:是否禁止远程使用root登录,这里选n
Disallow root login remotely? (Press y|Y for Yes, any other key for No) : n
... skipping.
By default, MySQL comes with a database named 'test' that
anyone can access. This is also intended only for testing,
and should be removed before moving into a production
environment.
#需要输入的内容:是否删除test库,这里没有输入y删除
Remove test database and access to it? (Press y|Y for Yes, any other key for No) : y
- Dropping test database...
Success.
- Removing privileges on test database...
Success.
Reloading the privilege tables will ensure that all changes
made so far will take effect immediately.
#需要输入的内容:是否现在加载,y确认加载
Reload privilege tables now? (Press y|Y for Yes, any other key for No) : y
Success.
All done!
5-7 测试登录并设置密码
mysql -uroot -p[密码]

#密码为刚才设置的Aa123456.
#也可以省略密码按回车后再输入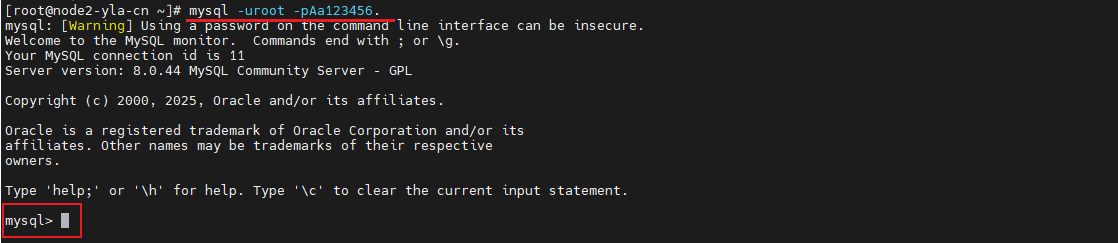
#配置远程连接访问的root用户密码

CREATE USER 'root'@'%' IDENTIFIED BY 'Aa123456.';
GRANT ALL PRIVILEGES ON *.* TO 'root'@'%' WITH GRANT OPTION;
FLUSH PRIVILEGES;
5-8 将数据库导入到账号中
#1.先将ry-zzyl_20240913.sql上传到指定的目录
#2.使用cd命令移动到上传的目录中,执行以下命令,将数据库导入到root账号中
#假设上传到/root/目录中
cd /root/
mysql -uroot < ry-zzyl_20240913.sql -pAa123456.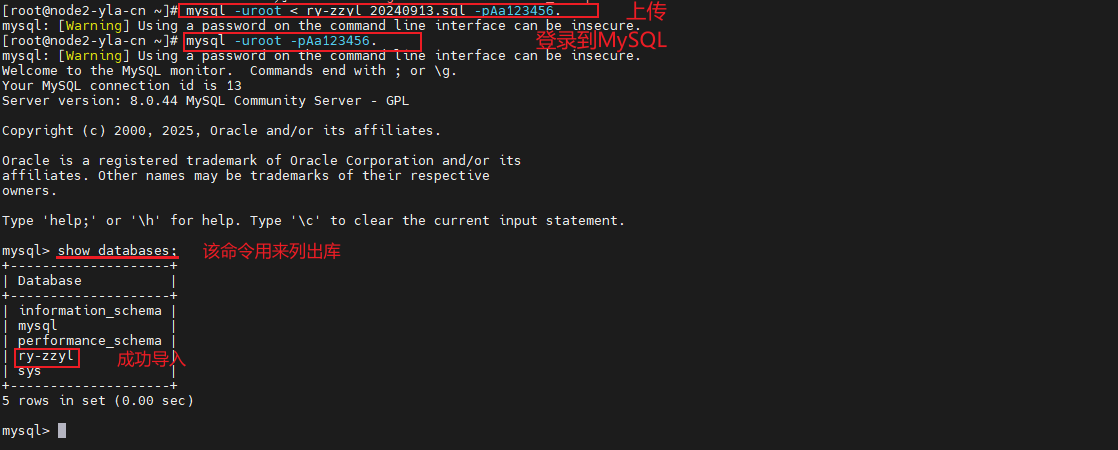
5-9 开启防火墙放行安全策略
#服务模式
firewall-cmd --add-service=mysql --permanent
或

#端口模式
firewall-cmd --add-port=3306/tcp --permanent

#使防火墙立即生效
firewall-cmd --reload

#命令说明
#firewall-cmd --add-service=[放心的服务]
#firewall-cmd --add-port=[放行的端口]/tcp|udp
#--permanent:策略永久生效
6.部署Redis服务【node1】
Redis(Remote Dictionary Server) 是一个开源的、基于内存的键值数据存储系统。它不仅支持简单的键值对,还提供列表、集合、哈希、有序集合等高级数据结构,并可通过持久化机制保证数据安全。因其极高的性能和丰富的功能,Redis已成为现代应用中实现缓存、消息队列、会话存储和实时分析的首选解决方案之一。

6-1 安装redis
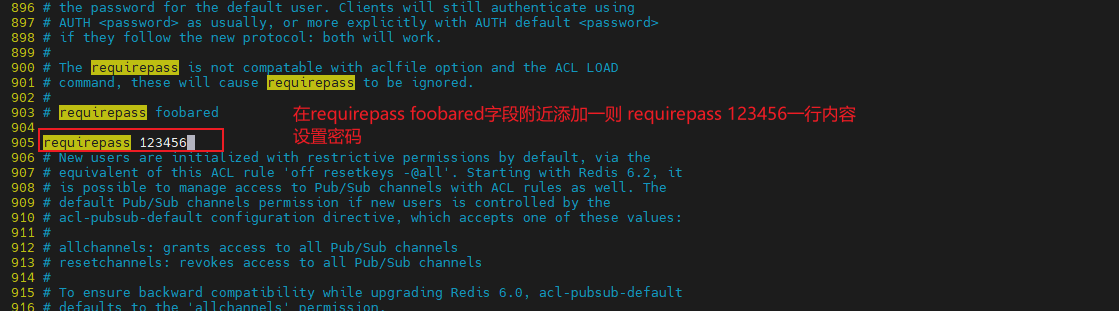
dnf -y install redis6-2 编辑redis配置文件
vim /etc/redis/redis.conf

将bind 127.0.0.0 -::1暂时改为0.0.0.0 -::1
添加requirepass 123456用以设置密码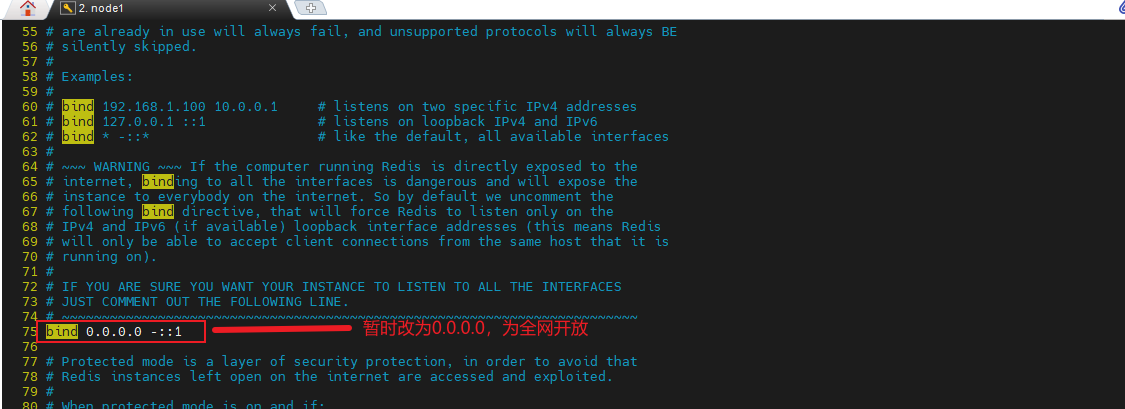
6-3 启动redis服务
systemctl start redis
systemctl enable redis
systemctl status redis

#用以开启、开机自启动、查看状态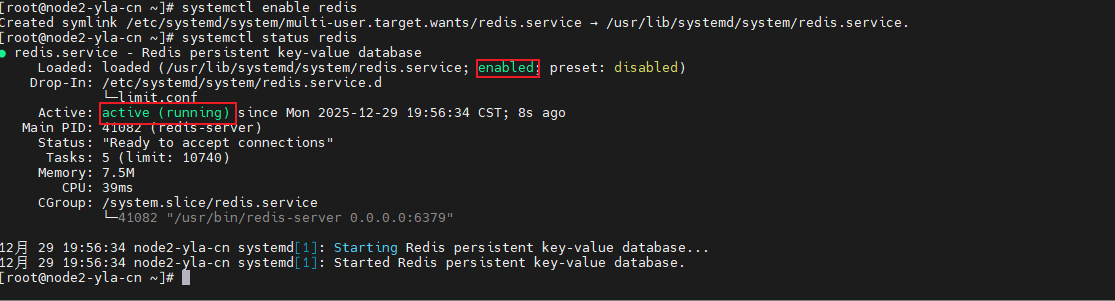
6-4 测试redis结果
- 先redis-cli -a 123456
- 进入后输入 keys * 可以查看所有键,此处为空代表无数据库

6-5 开启防火墙放行安全策略
firewall-cmd --add-service=redis --permanent
或
firewall-cmd --add-port=5379/tcp --permanent
firewall-cmd --reload
7.总结
node1 作为集成的数据服务节点,承载了现代应用数据架构的两个核心层:
-
MySQL(持久化存储层):作为 “唯一数据源”,负责数据的持久化、结构化存储和事务性保证,确保数据的完整性与安全性。
-
Redis(高性能缓存与实时数据层):作为 “数据加速器” 和 “实时状态中心”,通过内存存储提供微秒级读写,极大减轻后端压力,并处理MySQL不擅长的实时、高频场景。
至此,node1的主要配置皆以部署完毕,node1在其中主要担任数据库服务器及redis服务器,用以存储数据,后续有能力可以再对其进行优化。
持续更新。。。
部分内容来源自网络


 345
345

 被折叠的 条评论
为什么被折叠?
被折叠的 条评论
为什么被折叠?
 到【灌水乐园】发言


