


 此代码示例演示如何使用VTK库从体积数据集中读取FullHead.mhd文件,通过FlyingEdges3D或MarchingCubes算法提取皮肤的等值面,并进行渲染展示。程序定义了皮肤和背景的颜色,并提供了数据的轮廓以供上下文参考。
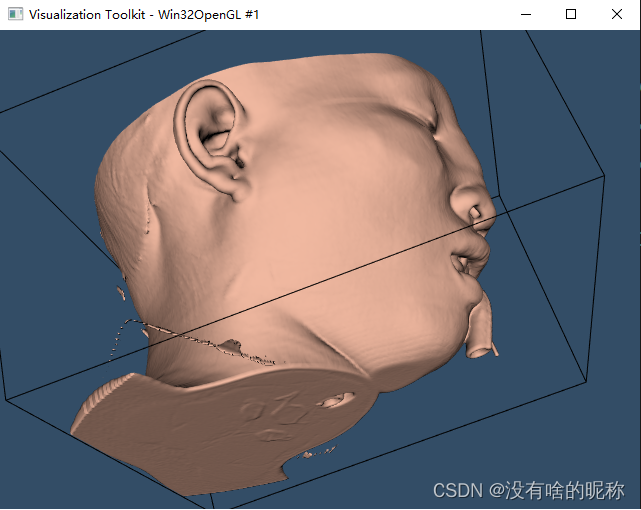
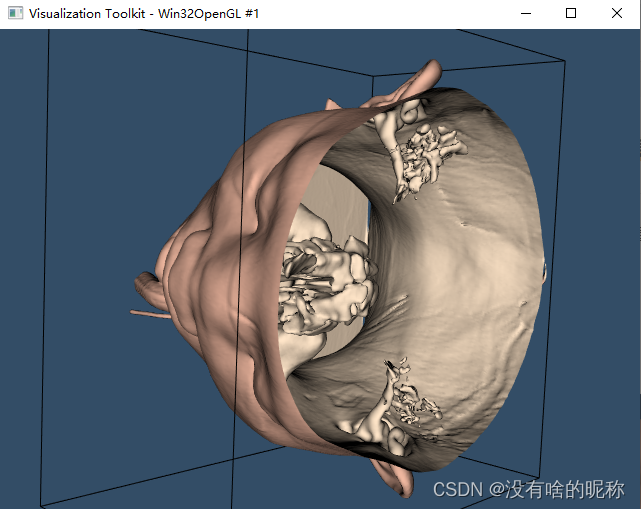
本示例读取一个体积数据集,提取一个表示皮肤的等值面并显示它。 在医学上用处很大。
用的是 FullHead.mhd文件。
先是效果图。
#include <vtkActor.h>
#include <vtkCamera.h>
#include <vtkMetaImageReader.h>
#include <vtkNamedColors.h>
#include <vtkNew.h>
#include <vtkOutlineFilter.h>
#include <vtkPolyDataMapper.h>
#include <vtkProperty.h>
#include <vtkRenderWindow.h>
#include <vtkRenderWindowInteractor.h>
#include <vtkRenderer.h>
#include <vtkVersion.h>

//   VTK >= 8.2才能用vtkFlyingEdges3D
#if VTK_MAJOR_VERSION >= 9 || (VTK_MAJOR_VERSION >= 8 && VTK_MINOR_VERSION >= 2)
#define USE_FLYING_EDGES
#else
#undef USE_FLYING_EDGES
#endif

#ifdef USE_FLYING_EDGES
#include <vtkFlyingEdges3D.h>
#else
#include <vtkMarchingCubes.h>
#endif

#include <array>
#include <vtkAutoInit.h>
VTK_MODULE_INIT(vtkRenderingOpenGL2);
VTK_MODULE_INIT(vtkInteractionStyle);
VTK_MODULE_INIT(vtkRenderingContextOpenGL2);

int main(int argc, char* argv[])
{
  if (argc < 2)
  {
    cout << "Usage: " << argv[0] << " file.mhd e.g. FullHead.mhd" << endl;
    return EXIT_FAILURE;
  }

  vtkNew<vtkNamedColors> colors;

  std::array<unsigned char, 4> skinColor{{240, 184, 160, 255}};   //皮肤外部颜色
  colors->SetColor("SkinColor", skinColor.data());
  std::array<unsigned char, 4> backColor{{255, 229, 200, 255}};   //相当于皮肤内部颜色
  colors->SetColor("BackfaceColor", backColor.data());
  std::array<unsigned char, 4> bkg{{51, 77, 102, 255}};   //背景色
  colors->SetColor("BkgColor", bkg.data());

  // 创建渲染器、渲染窗口和交互器。
  // 渲染器绘制到渲染窗口中,交互器启用基于鼠标和键盘与渲染窗口中的数据交互。
  //
  vtkNew<vtkRenderer> aRenderer;
  vtkNew<vtkRenderWindow> renWin;
  renWin->AddRenderer(aRenderer);

  vtkNew<vtkRenderWindowInteractor> iren;
  iren->SetRenderWindow(renWin);

  vtkNew<vtkMetaImageReader> reader;
  reader->SetFileName(argv[1]);


#ifdef USE_FLYING_EDGES
  vtkNew<vtkFlyingEdges3D> skinExtractor;
#else
  vtkNew<vtkMarchingCubes> skinExtractor;
#endif
  skinExtractor->SetInputConnection(reader->GetOutputPort());
  skinExtractor->SetValue(0, 500);   //  已知500的等值表面或轮廓值对应于患者的皮肤。

  vtkNew<vtkPolyDataMapper> skinMapper;
  skinMapper->SetInputConnection(skinExtractor->GetOutputPort());
  skinMapper->ScalarVisibilityOff();

  vtkNew<vtkActor> skin;
  skin->SetMapper(skinMapper);
  skin->GetProperty()->SetDiffuseColor(colors->GetColor3d("SkinColor").GetData());

  vtkNew<vtkProperty> backProp;
  backProp->SetDiffuseColor(colors->GetColor3d("BackfaceColor").GetData());
  skin->SetBackfaceProperty(backProp);

  //轮廓图提供了数据的上下文。
  vtkNew<vtkOutlineFilter> outlineData;
  outlineData->SetInputConnection(reader->GetOutputPort());

  vtkNew<vtkPolyDataMapper> mapOutline;
  mapOutline->SetInputConnection(outlineData->GetOutputPort());

  vtkNew<vtkActor> outline;
  outline->SetMapper(mapOutline);
  outline->GetProperty()->SetColor(colors->GetColor3d("Black").GetData());


  //创建数据的初始视图很方便。FocalPoint和Position形成矢量方向。稍后(ResetCamera()方法),该矢量用于定位相机,以沿该方向查看数据。
  vtkNew<vtkCamera> aCamera;
  aCamera->SetViewUp(0, 0, -1);
  aCamera->SetPosition(0, -1, 0);
  aCamera->SetFocalPoint(0, 0, 0);
  aCamera->ComputeViewPlaneNormal();
  aCamera->Azimuth(30.0);
  aCamera->Elevation(30.0);

  //将Actors添加到渲染器中。创建初始摄影机视图。Dolly()方法将相机移向FocalPoint,从而放大图像。
  aRenderer->AddActor(outline);
  aRenderer->AddActor(skin);
  aRenderer->SetActiveCamera(aCamera);
  aRenderer->ResetCamera();
  aCamera->Dolly(1.5);


  // 为渲染器设置背景色,并设置渲染窗口的大小(以像素表示)。
  aRenderer->SetBackground(colors->GetColor3d("BkgColor").GetData());
  renWin->SetSize(640, 480);
  renWin->SetWindowName("MedicalDemo1");


  aRenderer->ResetCameraClippingRange();


  renWin->Render();
  iren->Initialize();
  iren->Start();

  return EXIT_SUCCESS;
}


 1450
1450


 被折叠的 条评论
为什么被折叠?
被折叠的 条评论
为什么被折叠?
 到【灌水乐园】发言


