


Spring Boot 设计理念
应用开箱即用,只要通过 “just run”(可能是 java -jar 或 tomcat 或 maven插件run 或 shell脚本),就可以启动项目。二者,Spring Boot 只要很少的Spring配置文件(例如那些xml,property)。
因为“习惯优先于配置”的原则,使得Spring Boot在快速开发应用和微服务架构实践中得到广泛应用。
创建项目
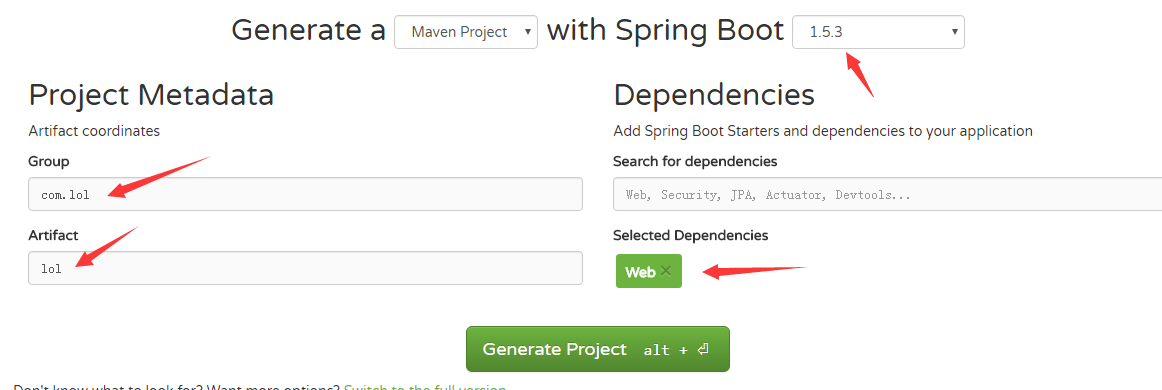
- 从官网上:https://start.spring.io/ 创建项目
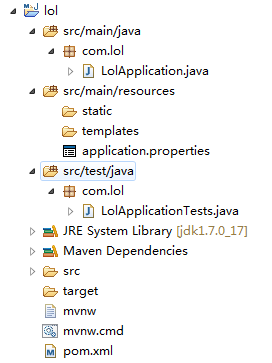
- 项目结构是这样的:
pom.xml 配置
<?xml version="1.0" encoding="UTF-8"?>
<project xmlns="http://maven.apache.org/POM/4.0.0" xmlns:xsi="http://www.w3.org/2001/XMLSchema-instance"
    xsi:schemaLocation="http://maven.apache.org/POM/4.0.0 http://maven.apache.org/xsd/maven-4.0.0.xsd">
    <modelVersion>4.0.0</modelVersion>

    <groupId>com.lol</groupId>
    <artifactId>lol</artifactId>
    <version>0.0.1-SNAPSHOT</version>
    <packaging>jar</packaging>

    <name>lol</name>
    <description>Demo project for Spring Boot</description>

    <parent>
        <groupId>org.springframework.boot</groupId>
        <artifactId>spring-boot-starter-parent</artifactId>
        <version>1.5.3.RELEASE</version>
        <relativePath/> <!-- lookup parent from repository -->
    </parent>

    <properties>
        <project.build.sourceEncoding>UTF-8</project.build.sourceEncoding>
        <project.reporting.outputEncoding>UTF-8</project.reporting.outputEncoding>
        <java.version>1.8</java.version>
    </properties>

    <dependencies>
        <dependency>
            <groupId>org.springframework.boot</groupId>
            <artifactId>spring-boot-starter-web</artifactId>
        </dependency>

        <dependency>
            <groupId>org.springframework.boot</groupId>
            <artifactId>spring-boot-starter-test</artifactId>
            <scope>test</scope>
        </dependency>
    </dependencies>

    <build>
        <plugins>
            <plugin>
                <groupId>org.springframework.boot</groupId>
                <artifactId>spring-boot-maven-plugin</artifactId>
            </plugin>
        </plugins>
    </build>

</project>
只要加入一个 Spring Boot 启动父依赖即可。
controller 层代码
HelloWorldController.java 代码如下:
/**
 * 描述:Spring Boot  HelloWorld  案例
 * 2017年4月25日 下午7:48:24
 */
@RestController
public class HelloWorldController {

    @RequestMapping("/hello")
    public String sayHello() {
        return "Hello,World!";
    }
}
@RestController 注解
官方文档:
@RestController is a stereotype annotation that combines @ResponseBody and @Controller.意思是:
@RestController注解相当于@ResponseBody + @Controller合在一起的作用。
如果只是使用@RestController注解Controller,则Controller中的方法无法返回jsp页面,配置的视图解析器InternalResourceViewResolver不起作用,返回的内容就是Return 里的内容。
例如:本来应该到success.jsp页面的,则其显示success.如果需要返回到指定页面,则需要用 @Controller配合视图解析器InternalResourceViewResolver才行。
- 如果需要返回JSON,XML或自定义mediaType内容到页面,则需要在对应的方法上加上@ResponseBody注解。
@RequestMapping 注解是一个用来处理请求地址映射的注解,可用于类或方法上。用于类上,表示类中的所有响应请求的方法都是以该地址作为父路径。
启动类
@SpringBootApplication
public class LolApplication {
    public static void main(String[] args) {
        SpringApplication.run(LolApplication.class, args);
    }
}
@SpringBootApplication:Spring Boot 应用的标识
LolApplication,一个main函数作为主入口。SpringApplication引导应用,并将LolApplication本身作为参数传递给run方法。具体run方法会启动嵌入式的Tomcat并初始化Spring环境及其各Spring组件。
运行
Run As —> Java Application 运行项目可以看到控制台输出
2017-04-26 11:08:13.003  INFO 31220 --- [           main] s.b.c.e.t.TomcatEmbeddedServletContainer : Tomcat started on port(s): 8080 (http)
2017-04-26 11:08:13.007  INFO 31220 --- [           main] com.lol.LolApplication                   : Started LolApplication in 1.881 seconds (JVM running for 2.061)
然后访问 http://localhost:8080/hello ,即可在页面中看到Spring Boot对你 say hello:
Hello,World!


 801
801

 被折叠的 条评论
为什么被折叠?
被折叠的 条评论
为什么被折叠?
 到【灌水乐园】发言


