


在Android开发中,Service主要用于在后台完成用户的操作,例如播放音乐,文件下载,消息推送等功能。
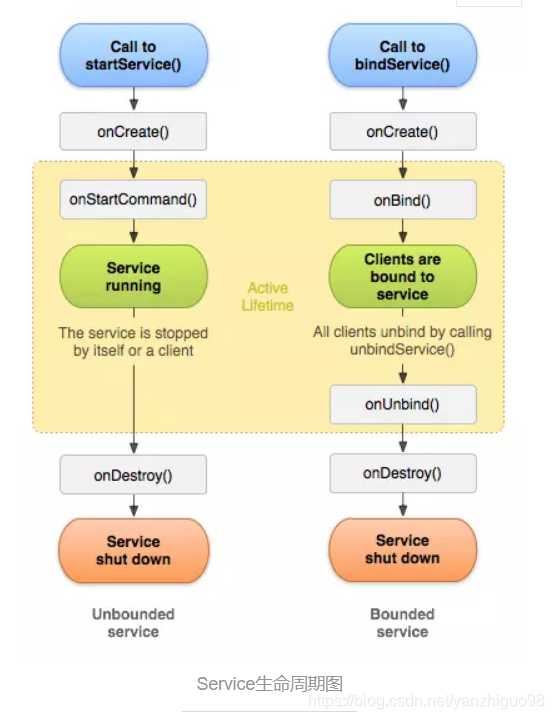
Service按照启动分类分为Satrted Service和Binded Service两种,除了两种的启动方式不一样,还有他们的生命周期也略有不同,具体的生命周期如下图所示:
下面一个具体的例子实现Service的用法:
需求:
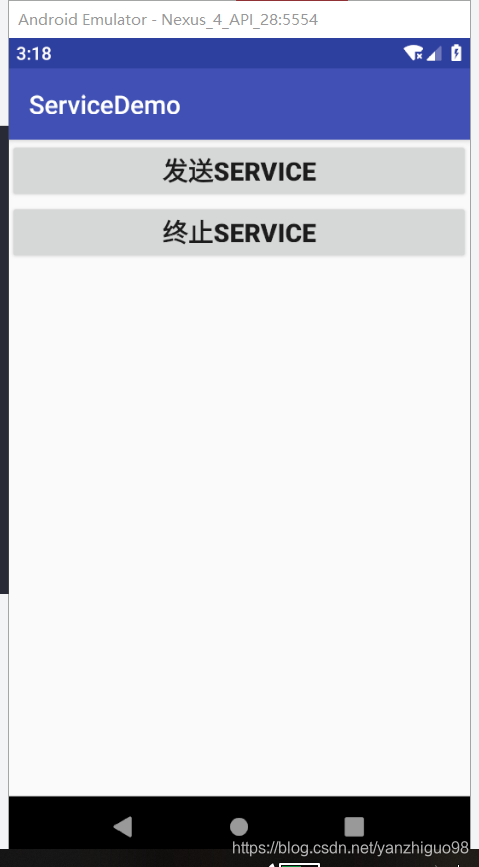
界面中有两个按钮,第一个按钮实现音乐的播放,第二个按钮实现音乐的停止。
主界面的代码:
<?xml version="1.0" encoding="utf-8"?>
<android.support.v7.widget.LinearLayoutCompat xmlns:android="http://schemas.android.com/apk/res/android"
    xmlns:app="http://schemas.android.com/apk/res-auto"
    xmlns:tools="http://schemas.android.com/tools"
    android:layout_width="match_parent"
    android:layout_height="match_parent"
    android:orientation="vertical"
    tools:context="com.example.yzg.servicedemo.MainActivity">

    <Button
        android:id="@+id/sendservice1"
        android:layout_width="match_parent"
        android:layout_height="wrap_content"
        android:text="发送Service"

        android:textSize="20sp"
        android:textStyle="bold"
        />

    <Button
        android:id="@+id/stopservice1"
        android:layout_width="match_parent"
        android:layout_height="wrap_content"
        android:text="终止Service"
        android:textSize="20sp"
        android:textStyle="bold"
        />
</android.support.v7.widget.LinearLayoutCompat>
MainActivity.java的代码:
package com.example.yzg.servicedemo;

import android.content.Intent;
import android.support.v7.app.AppCompatActivity;
import android.os.Bundle;
import android.view.View;
import android.widget.Button;

public class MainActivity extends AppCompatActivity {


    Button button1;
    Button button2;

    @Override
    protected void onCreate(Bundle savedInstanceState) {
        super.onCreate(savedInstanceState);
        setContentView(R.layout.activity_main);
        button1  =findViewById(R.id.sendservice1);
        button2  =findViewById(R.id.stopservice1);

        //发送Service时的逻辑代码
        button1.setOnClickListener(new View.OnClickListener() {
            @Override
            public void onClick(View v) {
                Intent intent = new Intent(MainActivity.this, MyService1.class);
                startService(intent);
            }
        });


        //终止Service时的逻辑代码
        button2.setOnClickListener(new View.OnClickListener() {
            @Override
            public void onClick(View v) {
                Intent intent = new Intent(MainActivity.this, MyService1.class);
                stopService(intent);
            }
        });

    }
}
MyService,java的代码:
package com.example.yzg.servicedemo;

import android.app.Service;
import android.content.Intent;
import android.media.MediaPlayer;
import android.os.IBinder;
import android.util.Log;

public class MyService1 extends Service {

    static boolean isPlay;
    MediaPlayer mediaPlayer;

    public MyService1() {
    }


    //绑定Service时执行的方法
    @Override
    public IBinder onBind(Intent intent) {
        // TODO: Return the communication channel to the service.
        throw new UnsupportedOperationException("Not yet implemented");
    }


//创建Service时执行的方法
    @Override
    public void onCreate() {
        Log.d("测试", "onCreate: 开始准备音乐素材啦!!!");
        mediaPlayer  = MediaPlayer.create(this,R.raw.music);
        mediaPlayer.setLooping(true);
    }


    //执行Service时 执行的方法
    @Override
    public int onStartCommand(Intent intent, int flags, int startId) {

        Log.d("测试", "onStartCommand: 开始播放音乐啦!!!");
        //如果没有播放音乐  就开始播放音乐
        if (mediaPlayer.isPlaying() == false){
            mediaPlayer.start();
            isPlay = mediaPlayer.isPlaying();
        }
        return super.onStartCommand(intent, flags, startId);
    }


///销魂Service时执行的方法
    @Override
    public void onDestroy() {


        Log.d("测试", "onDestroy: 关闭音乐啦!!!");
        //停止播放音乐  释放资源
        mediaPlayer.stop();
        isPlay = mediaPlayer.isPlaying();
        mediaPlayer.release();
    }
}
最后别忘记注册组件的代码!
具体的效果图:
在上面的案例中,除了Service的基本用法要记得,还有音乐的播放的流程:
首先创建
mediaPlayer = MediaPlayer.create(this,R.raw.music);然后判断mediaPlayer是否在播放的状态,如果不在播放的状态就执行播放的操作,否则就什么都不执行
最后在关闭的时候要停止播放音乐并且释放所有的资源
这篇博客就是说了一下Service的基本用法,有兴趣的可以一起交流啊!!!


 2万+
2万+

 被折叠的 条评论
为什么被折叠?
被折叠的 条评论
为什么被折叠?
 到【灌水乐园】发言


