


 本文深入讲解Spring Security框架的使用,包括简单安全认证的实现、原理,以及如何自定义用户服务信息,限制请求路径访问权限,使用Spring表达式配置权限访问,和强制使用HTTPS等高级功能。
目录
2.使用WebSecurityConfigurerAdapter自定义
在Web应用中,对于客户端的请求需要考虑安全性问题,例如,对于一些重要的操作,有些请求需要用户验明身份以后才可以进行。这样做的意义在于保护自己的网站安全,避免一些恶意攻击导致数据和服务的不安全。
为了提供安全的机制,Spring提供了其安全框架Spring Security,它是一个能够为基于Spring生态圈,提供安全访问控制解决方案的框架。它提供了一组可以在Spring应用上下文中配置的机制,充分利用了Spring的强大特性,为应用程序提供声明式的安全访问控制功能,减少了为企业系统安全控制编写大量重复代码的工作。
1.简单安全认证
在Web工程中,一般使用Servlet过滤器(Filter)对请求进行拦截,然后在Filter中通过自己的验证逻辑来决定是否放行请求。同样地,Spring Security也是基于这个原理,在进入到DispatcherServlet前就可以对Spring MVC的请求进行拦截,然后通过一定的验证,从而决定是否放行请求访问系统。
在SpringBoot中,我们只需要引入security的starter,它便会自动启动Spring Security。
     <dependency>
         <groupId>org.springframework.boot</groupId>
         <artifactId>spring-boot-starter-security</artifactId>
     </dependency>
1.1 简单实现
引入Spring Security的starter之后,我们直接启动SpringBoot,会在控制台打印出随机生成的密码:
2020-02-04 16:39:49.157  INFO 10504 --- [           main] .s.s.UserDetailsServiceAutoConfiguration :

Using generated security password: e8a6814a-8bb1-497e-a0e3-4aefc757aeb6
这里需要注意的是,密码是随机生成的,也就是说每次启动密码都会不一样。我们访问一下我们的Web,会出现如下登录页面:
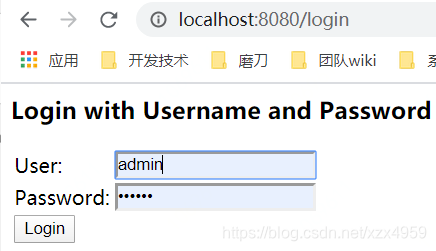
我们输入用户名“user”,输入随机生成的密码“e8a6814a-8bb1-497e-a0e3-4aefc757aeb6”,然后点击登录,就可以征程跳转到我们的请求路径上。当然我们也可以自定义我们的用户名和密码,这样就不需要每次启动的时候都随机生成一个密码。我们在application.properties中加入如下代码:
#自定义用户名和密码
spring.security.user.name=myuser
spring.security.user.password=123456
这样我们就定义了使用用户名“myuser”和密码“123456”来登录我们的系统了。除了这两个配置外,Spring Boot还支持多个Spring Security的配置选项。在实际的工作中,大部分选项无需进行配置,只需要配置少量的内容即可。
1.2 实现原理
为了后续学习,我们稍微讨论一下Spring Security的原理。一旦启用了Spring Security,IOC容器就会创建一个类型为FilterChainProxy,名称为springSecurityFilterChain的Spring Bean。FilterChainProxy实现了Filter接口,因此它是一个特殊的拦截器。在Spring Security操作的过程中它会提供Servlet过滤器DelegatingFilterProxy,这个过滤器会通过Spring Web IOC容器去获取Spring Security所自动创建的FilterChainProxy对象,这个对象上存在一个拦截器列表,列表上存在用户验证的拦截器、跨站点请求伪造等拦截器,这样它就可以提供多种拦截功能。通过FilterChainProxy,我们还可以注册自定义的Filter来实现对应的拦截逻辑,以满足不同的需求。当然,Spring Security也实现了大部分常用安全功能,并提供了相应的机制来简化开发者的工作,所以大部分情况下并不需要自定义开发。
2.使用WebSecurityConfigurerAdapter自定义
前面讨论了FilterChainProxy对象,过滤器DelegatingFilterProxy的拦截逻辑就是根据它的逻辑来完成的。为了给FilterChainProxy对象加入自定义的初始化,Spring提供了专门的接口WebSecurityConfigurer,并且在这个接口的定义上提供了一个抽象类WebSecurityConfigurer Adapter。开发者通过继承它就能得到Spring Security默认的安全功能,也可以通过覆盖它提供的方法,来自定义自己的安全拦截方案。
下面我们研究一下WebSecurityConfigurerAdapter中默认存在的3个方法,它们是:
//用来配置用户信息服务,还可以给用户赋予角色
protected void configure(AuthenticationManagerBuilder auth);
//用来配置Filter链,默认是一个空实现
protected void configure(HttpSecurity http);
//用来配置拦截保护的请求,比如什么请求放行,什么请求需要验证
public void configure(WebSecurity web);
对于AuthenticationManagerBuilder 参数的方法,则是定义用户(user)、密码(password)和角色(Role);对于使用WebSecurity参数的方法,主要是配置Filter链的内容,可以配置Filter链忽略哪些内容,WebSecurityConfigurerAdapter提供的是空实现,没有任何的配置;对于HttpSecurity参数的方法,则是指定用户和角色与对应URL的访问权限,也就是开发者可以通过覆盖这个方法来指定用户或者角色的访问权限。在WebSecurityConfigurerAdapter提供的验证方式下满足通过用户验证或者HTTP基本验证的任何请求,Spring Security都会放行。
2.1 自定义用户服务信息
在WebSecurityConfigurerAdapter中的方法
protected void configure(AuthenticationManagerBuilder auth);是一个用于配置用户信息的方法,在Spring Security中默认是没有任何用户配置的。而在Spring Boot中,如果没有用户的配置,它将会自动生成一个名称为user,密码随机的用户。我们可以通过覆写该方法定义用户、密码和角色权限,实现方式主要包含使用内存签名服务、数据库签名服务和自定义签名服务。
2.1.1 使用内存签名服务
顾名思义就是将用户的信息存放在内存中,相对而言,它比较简单,适合于测试的快速环境搭建,实例代码如下:
package com.martin.config.security;

import org.springframework.security.config.annotation.authentication.builders.AuthenticationManagerBuilder;
import org.springframework.security.config.annotation.web.configuration.EnableWebSecurity;
import org.springframework.security.config.annotation.web.configuration.WebSecurityConfigurerAdapter;
import org.springframework.security.crypto.bcrypt.BCryptPasswordEncoder;
import org.springframework.security.crypto.password.PasswordEncoder;

/**
 * @author: martin
 * @date: 2020/2/4
 */
@EnableWebSecurity
public class MemoryConfig extends WebSecurityConfigurerAdapter {
    @Override
    protected void configure(AuthenticationManagerBuilder auth) throws Exception {
        //密码编码器
        PasswordEncoder passwordEncoder = new BCryptPasswordEncoder();
        //使用内存存储并设置密码编码器
        auth.inMemoryAuthentication().passwordEncoder(passwordEncoder)
                //注册用户admin,密码为admin,并赋予USER和ADMIN两种角色权限
                .withUser("admin").password(passwordEncoder.encode("admin")).roles("USER","ADMIN")
                .and().withUser("myuser").password(passwordEncoder.encode("123")).roles("USER");
    }
}
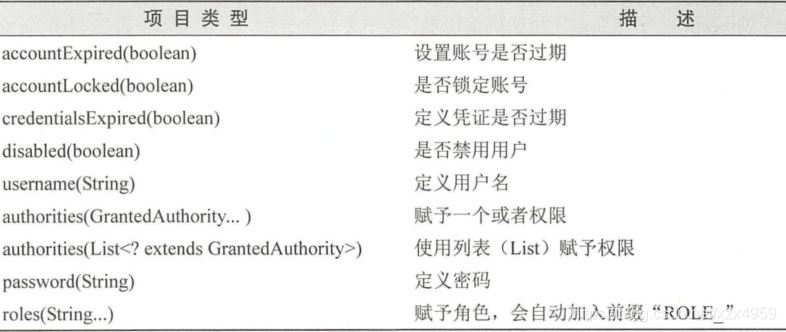
在Spring5的Security中要求使用密码编码器,否则会发生异常,所以代码中首先创建了一个BCryptPasswordEncoder实例,这个类实现了PasswordEncoder接口,它采用的是单向不可逆的密码加密方式。roles方法赋予角色类型,将来就可以通过这个角色名称赋予权限了,只是Spring Security会在注册的角色名称前面增加前缀“ROLE _”。除了代码中用到方法,UserDetailsBuilder类中还包括其他方法:
2.1.2 使用数据库定义用户认证服务
在大部分的情况下,用户的信息会存放在数据库中,为此Spring Security提供了对数据库的查询方法来满足开发者的需要。首先我们创建相关表:角色表(t_role)、用户表(t_user)、用户角色表(t_user_role),这里需要注意的是pwd存放的加密后的密文。
CREATE TABLE `t_role` (
  `id` int(11) NOT NULL AUTO_INCREMENT,
  `role_name` varchar(60) NOT NULL,
  `note` varchar(256) DEFAULT NULL,
  PRIMARY KEY (`id`)
) ENGINE=InnoDB DEFAULT CHARSET=utf8;

CREATE TABLE `t_user` (
  `id` int(11) NOT NULL AUTO_INCREMENT,
  `user_name` varchar(60) NOT NULL,
  `pwd` varchar(100) NOT NULL,
  `available` tinyint(1) NOT NULL DEFAULT '1',
  `note` varchar(256) DEFAULT NULL,
  PRIMARY KEY (`id`),
  UNIQUE KEY `uni_idx` (`user_name`) USING BTREE
) ENGINE=InnoDB DEFAULT CHARSET=utf8;


CREATE TABLE `t_user_role` (
  `id` int(12) NOT NULL AUTO_INCREMENT,
  `role_id` int(12) NOT NULL,
  `user_id` int(12) NOT NULL,
  PRIMARY KEY (`id`),
  UNIQUE KEY `uni_role_user` (`role_id`,`user_id`) USING BTREE
) ENGINE=InnoDB DEFAULT CHARSET=utf8;
使用数据验证的实例代码如下:
package com.martin.config.security;

import org.springframework.beans.factory.annotation.Autowired;
import org.springframework.security.config.annotation.authentication.builders.AuthenticationManagerBuilder;
import org.springframework.security.config.annotation.web.configuration.EnableWebSecurity;
import org.springframework.security.config.annotation.web.configuration.WebSecurityConfigurerAdapter;
import org.springframework.security.crypto.bcrypt.BCryptPasswordEncoder;
import org.springframework.security.crypto.password.PasswordEncoder;

import javax.sql.DataSource;

/**
 * @author: martin
 * @date: 2020/2/4
 */
@EnableWebSecurity
public class DatabaseConfig extends WebSecurityConfigurerAdapter {
    @Autowired
    private DataSource dataSource;
    //使用用户名称查询密码
    private static final String PWD_QUERY = "select user_name,pwd,available from t_user where user_name=?";
    //使用用户名称查询角色信息
    private static final String ROLE_QUERY = "select u.user_name,r.role_name from t_user u,t_user_role ur,t_role r " +
            "where u.id = ur.user_id and r.id = ur.role_id and u.user_name = ?";

    @Override
    protected void configure(AuthenticationManagerBuilder auth) throws Exception {
        //密码编码器
        PasswordEncoder passwordEncoder = new BCryptPasswordEncoder();
        auth.jdbcAuthentication().passwordEncoder(passwordEncoder)
                //查询用户,自动判断密码是否一致,并赋予角色权限
                .dataSource(dataSource).usersByUsernameQuery(PWD_QUERY).authoritiesByUsernameQuery(ROLE_QUERY);
    }
}
代码中首先使用@Autowired注入了数据源,这样就能够使用SQL。其次定义了两条SQL,其中PWD_QUERY所定义的是根据用户名查询用户信息,ROLE_QUERY是使用角色名去查询角色信息,这样就能够赋予角色。这里需要注意的是,PWD_QUERY定义的SQL返回了3个列,分别是用户名、密码和布尔值。这样就可以对用户名和密码进行验证了,其中布尔值是判断用户是否有效,这里使用的是available列,它存储的数据被约束为1和0,如果为1则用户是有效的,否则就是无效用户。
这里需要注意的是,虽然通过BCrypt加密的密文很难破解,但是仍旧不可避免的用户使用类似“123”、“abcd”这样的简单密码,如果被人截取了这些简单的密码进行匹配,那么一些用户的密码就可能被别人破解。为了克服这个问题,在实际的应用中通过自己的秘钥对密码进行加密处理,而秘钥存在企业服务器上,这样即使密文被人截取,别人也无法得到秘钥破解密文,这样就大大提高了网站的安全性。我们先在application.properties中加入一个秘钥配置属性:
system.user.password.secret=uvwxyz对实现代码进行改造如下:
package com.martin.config.security;

import org.springframework.beans.factory.annotation.Autowired;
import org.springframework.beans.factory.annotation.Value;
import org.springframework.security.config.annotation.authentication.builders.AuthenticationManagerBuilder;
import org.springframework.security.config.annotation.web.configuration.EnableWebSecurity;
import org.springframework.security.config.annotation.web.configuration.WebSecurityConfigurerAdapter;
import org.springframework.security.crypto.password.PasswordEncoder;
import org.springframework.security.crypto.password.Pbkdf2PasswordEncoder;

import javax.sql.DataSource;

/**
 * @author: martin
 * @date: 2020/2/4
 */
@EnableWebSecurity
public class DatabaseConfig extends WebSecurityConfigurerAdapter {
    @Value("${system.user.password.secret}")
    private String secret;
    @Autowired
    private DataSource dataSource;
    //使用用户名称查询密码
    private static final String PWD_QUERY = "select user_name,pwd,available from t_user where user_name=?";
    //使用用户名称查询角色信息
    private static final String ROLE_QUERY = "select u.user_name,r.role_name from t_user u,t_user_role ur,t_role r " +
            "where u.id = ur.user_id and r.id = ur.role_id and u.user_name = ?";

    @Override
    protected void configure(AuthenticationManagerBuilder auth) throws Exception {
        //密码编码器
        PasswordEncoder passwordEncoder = new Pbkdf2PasswordEncoder(secret);
        auth.jdbcAuthentication().passwordEncoder(passwordEncoder)
                //查询用户,自动判断密码是否一致,并赋予角色权限
                .dataSource(dataSource).usersByUsernameQuery(PWD_QUERY).authoritiesByUsernameQuery(ROLE_QUERY);
    }
}
在这段代码中,使用了Pbkdf2PasswordEncoder创建了密码编码器。除此之外,Spring Security还存在BCryptPasswordEncoder和DelegatingPasswordEncoder等密码编码器,甚至可以实现PasswordEncoder接口,定义自己的编码器。
2.1.3 使用自定义用户认证服务
在如今,有些企业的用户量很大,使用数据库进行验证有时候甚至会造成网站的缓慢,所以有些企业会考虑使用NoSQL存储用户数据,如Redis,这样就能大大地加速用户的验证速度。由于需求的多样化,有时候我们也需要对用户进行自定义验证。
假设系统已经存在了UserRoleService的接口,通过它可以操作Redis和数据库,下面就基于这个基础进行开发。
实现UserDetailsService接口定义用户服务类:
package com.martin.config.security.service.impl;

import com.martin.config.security.pojo.Role;
import com.martin.config.security.pojo.UserInfo;
import com.martin.config.security.service.UserRoleService;
import org.springframework.beans.factory.annotation.Autowired;
import org.springframework.security.core.GrantedAuthority;
import org.springframework.security.core.authority.SimpleGrantedAuthority;
import org.springframework.security.core.userdetails.User;
import org.springframework.security.core.userdetails.UserDetails;
import org.springframework.security.core.userdetails.UserDetailsService;
import org.springframework.security.core.userdetails.UsernameNotFoundException;
import org.springframework.transaction.annotation.Transactional;

import java.util.ArrayList;
import java.util.List;

/**
 * @author: martin
 * @date: 2020/2/5
 */
@Service
public class UserDetailServiceImpl implements UserDetailsService {
    @Autowired
    private UserRoleService userRoleService;

    @Override
    @Transactional
    public UserDetails loadUserByUsername(String userName) throws UsernameNotFoundException {
        UserInfo userInfo = userRoleService.getUserByName(userName);
        List<Role> roleList = userRoleService.findRolesByUserName(userName);

        return change2UserDetails(userInfo, roleList);
    }

    private UserDetails change2UserDetails(UserInfo userInfo, List<Role> roleList) {
        List<GrantedAuthority> authorities = new ArrayList<>();
        for (Role role : roleList) {
            GrantedAuthority authority = new SimpleGrantedAuthority(role.getRoleName());
            authorities.add(authority);
        }

        return new User(userInfo.getUserName(), userInfo.getPwd(), authorities);
    }
}
然后我们实现自定义的认证服务类:
package com.martin.config.security;

import org.springframework.beans.factory.annotation.Value;
import org.springframework.security.config.annotation.authentication.builders.AuthenticationManagerBuilder;
import org.springframework.security.config.annotation.web.configuration.EnableWebSecurity;
import org.springframework.security.config.annotation.web.configuration.WebSecurityConfigurerAdapter;
import org.springframework.security.core.userdetails.UserDetailsService;
import org.springframework.security.crypto.password.PasswordEncoder;
import org.springframework.security.crypto.password.Pbkdf2PasswordEncoder;

import javax.annotation.Resource;

/**
 * @author: martin
 * @date: 2020/2/4
 */
@EnableWebSecurity
public class UserDefineConfig extends WebSecurityConfigurerAdapter {
    @Value("${system.user.password.secret}")
    private String secret;
    @Resource(name = "userDetailServiceImpl")
    private UserDetailsService userDetailsService;

    @Override
    protected void configure(AuthenticationManagerBuilder auth) throws Exception {
        //密码编码器
        PasswordEncoder passwordEncoder = new Pbkdf2PasswordEncoder(secret);
        auth.userDetailsService(userDetailsService).passwordEncoder(passwordEncoder);
    }
}
2.2 限制请求
前面我们只是验证了用户,并且给予用户赋予了不同的角色。如果要实现对于不同的角色赋予不同的访问权限,我们可以通过覆写WebSecurityConfigurerAdapter的configure(HttpSecurity http)方法来实现。首先我们看一下该方法的默认实现:
 protected void configure(HttpSecurity http) throws Exception {
        this.logger.debug("Using default configure(HttpSecurity). If subclassed this will potentially override subclass configure(HttpSecurity).");
        ((HttpSecurity)((HttpSecurity)((AuthorizedUrl)http.authorizeRequests().anyRequest()).authenticated().and()).formLogin().and()).httpBasic();
    }
authorizeRequests方法限定只对登录成功的用户请求,anyRequest表示任何的请求,authenticated表示对所有登录成功的用户允许方法,and是连接词,formLogin代表使用Security默认的登录界面,httpBasic表示启用HTTP基础认证。
从源码中我们可以看出,只需要通过用户认证就可以访问所有的请求地址,但这往往不是我们真实的需要。现实中,我们需要根据不同的角色来赋予不同的访问权限。
2.2.1 配置请求路径访问权限
对于Spring Security,它允许使用Ant风格或者正则表达式的路径限定安全请求,例如下面使用Ant风格的实例代码:
    @Override
    protected void configure(HttpSecurity http) throws Exception {
        http.authorizeRequests().antMatchers("/user/welcome","/user/details").hasAnyRole("USER","ADMIN")
                .antMatchers("/admin/**").hasAuthority("ROLE_ADMIN")
                .anyRequest().permitAll()
                .and().anonymous()
                .and().formLogin()
                .and().httpBasic();
    }
这里authorizeRequests方法表示设置哪些需要签名的请求,并且可以将不同的请求权限赋予不同的角色。antMatchers配置的是请求的路径,这里使用的是Ant风格的配置,指明了请求的路径。hasAnyRole方法,指定了角色“ROLE_USER”,"ROLE_ADMIN"才可以访问。对于“/admin/**”则是统配指定,只有分配了“ROLE_ADMIN”的角色可以访问。注意hasAnyRole方法会默认加入前缀“ROLE”,而hasAuthority方法不会默认加入前缀“ROLE_”,它们都表示对应的请求路径只有用户分配了对应的角色才能访问。最后,anyRequests方法代表任意的没有限定的请求,permitAll方法则表示没有配置过权限限定的路径全部允许访问。
and方法表示连接词,重新加入新的权限规则,这里配置了anonymous方法,说明允许匿名访问没有配置过的请求。
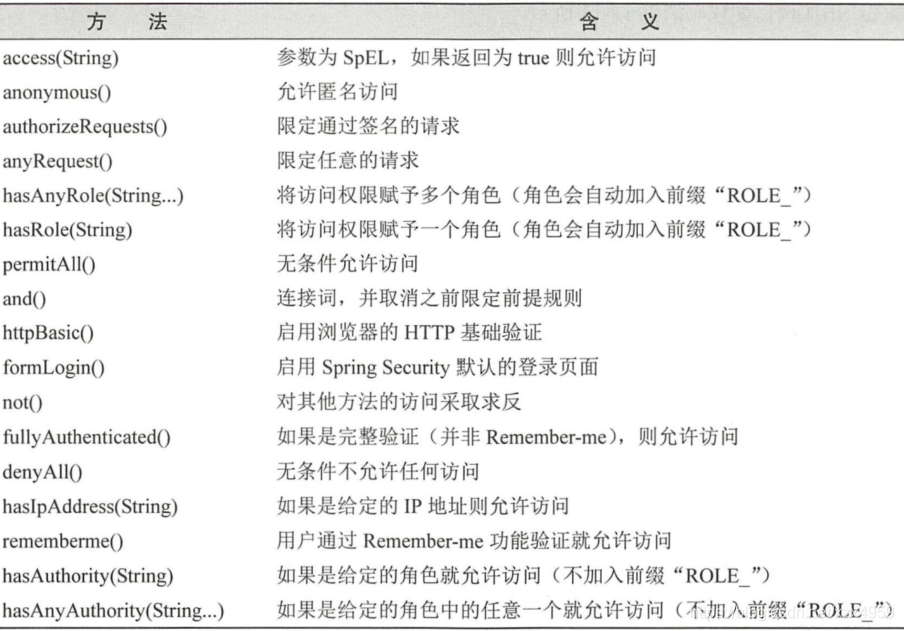
formLogin方法代表启用默认的登录页面,httpBasic方法表示启用HTTP的Basic认证请求输入用户名和密码。除此之外,还包括如下的权限方法:
这里需要注意的是,所有的权限配置会采用配置优先的原则,因为有时候权限会产生冲突。例如上面代码中,允许匿名访问,但没有给出地址,而前面又加入了登录验证访问其他路径的限制,所以基于配置优先的原则,Security还是会采用登录验证访问其他路径的限制。
此外,我们也可以使用正则表达式规则来配置:
        http.authorizeRequests().regexMatchers("/user/welcome","/user/details").hasAnyRole("USER","ADMIN")
                .regexMatchers("/admin/.*").hasAuthority("ROLE_ADMIN")
                .and().formLogin()
                .and().httpBasic();
2.2.2 使用Spring表达式配置权限访问
有时候需要更加强大的验证功能,而上述功能只能使用方法进行配置,为了更加灵活,我们还可以使用EL表达式进行配置。这就需要使用access方法,它的参数就是一个EL表达式,如果这个表达式返回true,就允许访问,否则不允许方法。实现代码如下:
http.authorizeRequests()
//使用Spring表达式限定只有角色ROLE_USER或者ROLE_ADMIN
.antMatchers("/user/welcome","/user/details").access("hasAnyRole('USER') or hasAnyRole('ADMIN')")
//设置访问权限给ADMIN,要求是完整登录(非记住我登录)
.antMatchers("/admin/welcome1").access("hasAuthority('ROLE_ADMIN') && isFullyAuthenticated()")
//设置访问权限给ADMIN,允许不完整登录
.antMatchers("/admin/welcome2").access("hasAuthority('ROLE_ADMIN')")
.anyRequest().permitAll()
//启用记住我的功能
.and().rememberMe()
.and().formLogin()
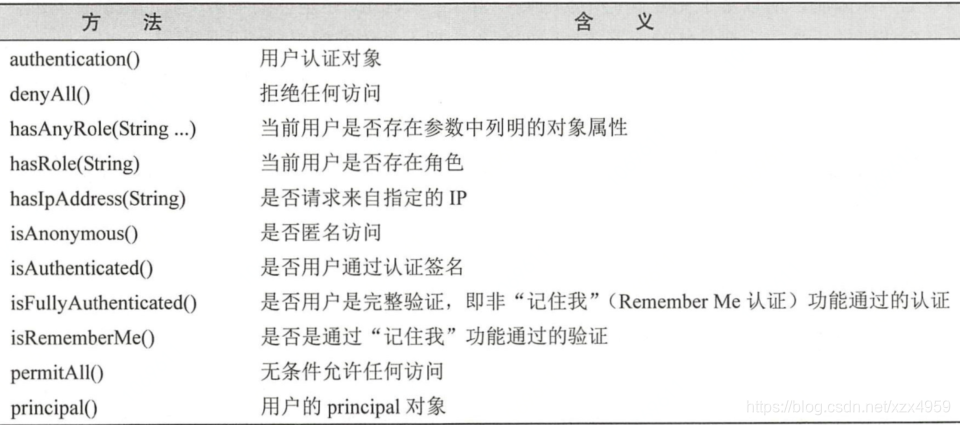
.and().httpBasic();除了代码中的这些表达式方法以外,Security还提供了其他的方法:
2.2.3 强制使用HTTPS
在一些实际的工作环境中,如银行、金融公司等,对于银行账号、密码、身份信息等往往都是极为敏感的,对于这些信息往往需要更为谨慎地进行保护。通过HTTPS协议采用证书进行加密,就可以保护那些敏感的信息。Spring Security强制使用HTTPS请求的实例代码如下:
        //使用安全通道,限定为https请求
        http.requiresChannel().regexMatchers("/admin/.*").requiresSecure()
                //不使用HTTPS请求
                .and().requiresChannel().regexMatchers("/user/welcome", "/user/details").requiresInsecure()
                //限定允许的访问角色
                .and().authorizeRequests().regexMatchers("/admin/.*").hasAnyRole("ADMIN")
                .and().formLogin()
                .and().httpBasic();
requiresChannel()方法说明使用通道,然后通过正则限定请求,最后使用requiresSecure表示使用HTTPS请求。对于requiresInsecure则是取消安全请求的机制,这样就可以使用普通的HTTP请求。


 4050
4050

 被折叠的 条评论
为什么被折叠?
被折叠的 条评论
为什么被折叠?
 到【灌水乐园】发言


