


目录
本章中,我们将学习Netty传输相关的通用的API,并通过和JDK的对比来证明它的简单易用。
1.案例研究
我们将从一个应用程序开始我们对传输的学习,这个应用程序只简单地接受连接,向客户端写“Hi!”,然后关闭连接。
1.1 使用Java的OIO和NIO实现
使用Java的OIO(阻塞)实现代码:
package com.martin.learn.netty.chapter4;

import java.io.IOException;
import java.io.OutputStream;
import java.net.ServerSocket;
import java.net.Socket;
import java.nio.charset.Charset;

/**
 * @author: martin
 * @date: 2019/10/22 20:43
 * @description:
 */
public class JavaOioServer {
    public void serve(int port) throws IOException {
        ServerSocket serverSocket = new ServerSocket(port);
        while (true) {
            Socket clientSocket = serverSocket.accept();
            System.out.println("接收连接来自:" + clientSocket);
            new Thread(() -> {
                try {
                    OutputStream outputStream = clientSocket.getOutputStream();
                    outputStream.write("Hi!\r\n".getBytes(Charset.forName("UTF-8")));
                    outputStream.flush();
                    clientSocket.close();
                } catch (Exception e) {
                    e.printStackTrace();
                } finally {
                    try {
                        clientSocket.close();
                    } catch (IOException e) {
                        e.printStackTrace();
                    }
                }
            }).start();
        }
    }
}
上面这段代码完全可以处理中等数量的并发客户端,但是如果我们要支持成千上万的并发连接,就需要改为异步网络编程。但是Java中的OIO和NIO的API是完全不同的,以至于我们不得不重写应用程序。代码实现如下:
package com.martin.learn.netty.chapter4;

import java.io.IOException;
import java.net.InetSocketAddress;
import java.net.ServerSocket;
import java.nio.ByteBuffer;
import java.nio.channels.SelectionKey;
import java.nio.channels.Selector;
import java.nio.channels.ServerSocketChannel;
import java.nio.channels.SocketChannel;
import java.util.Iterator;
import java.util.Set;

/**
 * @author: martin
 * @date: 2019/10/22 20:57
 * @description:
 */
public class JavaNioServer {
    public void serve(int port) throws IOException {
        ServerSocketChannel serverSocketChannel = ServerSocketChannel.open();
        serverSocketChannel.configureBlocking(false);

        ServerSocket serverSocket = serverSocketChannel.socket();
        InetSocketAddress socketAddress = new InetSocketAddress(port);
        //将服务器绑定到选定的端口
        serverSocket.bind(socketAddress);
        //打开Selector来处理Channel
        Selector selector = Selector.open();
        //将ServerSocket注册到Selector以接受连接
        serverSocketChannel.register(selector, SelectionKey.OP_ACCEPT);

        final ByteBuffer msg = ByteBuffer.wrap("Hi\r\n".getBytes());
        while (true) {
            //等待需要处理的新事件,阻塞将一直持续到下一个传入事件
            selector.select();
            //获取所有接收事件的SelectionKey实例
            Set<SelectionKey> readyKeys = selector.selectedKeys();
            Iterator<SelectionKey> iterator = readyKeys.iterator();
            while (iterator.hasNext()) {
                SelectionKey selectionKey = iterator.next();
                iterator.remove();
                try {
                    //检查事件是否是一个新的已经就绪可以被接受的连接
                    if (selectionKey.isAcceptable()) {
                        ServerSocketChannel server = (ServerSocketChannel) selectionKey.channel();
                        SocketChannel client = server.accept();
                        client.configureBlocking(false);
                        //接受客户端,并将它注册到选择器
                        client.register(selector, SelectionKey.OP_WRITE | SelectionKey.OP_READ, msg.duplicate());

                        System.out.println("Accepted connection from" + client);
                    }
                    //检查套接字是否已经准备好写数据
                    if (selectionKey.isWritable()) {
                        SocketChannel client = (SocketChannel) selectionKey.channel();
                        ByteBuffer buffer = (ByteBuffer) selectionKey.attachment();
                        while (buffer.hasRemaining()) {
                            //将数据写到已连接的客户端
                            if (client.write(buffer) == 0) {
                                break;
                            }
                        }

                        client.close();
                    }
                }catch (Exception e){
                    selectionKey.cancel();
                    selectionKey.channel().close();
                }
            }
        }
    }
}
如同你所看到的,虽然这段代码所做的事情与之前的同步方式完全相同,但是代码却截然不同。如果为了用于非阻塞IO而重新实现这个简单的应用程序,都需要一次完全重写的话,这对我们的程序升级迁移会造成巨大的困难。
1.2 Netty使用OIO和NIO
我们先编写Netty的阻塞版本:
package com.martin.learn.netty.chapter4;

import io.netty.bootstrap.ServerBootstrap;
import io.netty.buffer.ByteBuf;
import io.netty.buffer.Unpooled;
import io.netty.channel.ChannelFuture;
import io.netty.channel.ChannelFutureListener;
import io.netty.channel.ChannelHandlerContext;
import io.netty.channel.ChannelInboundHandlerAdapter;
import io.netty.channel.ChannelInitializer;
import io.netty.channel.EventLoopGroup;
import io.netty.channel.oio.OioEventLoopGroup;
import io.netty.channel.socket.SocketChannel;
import io.netty.channel.socket.oio.OioServerSocketChannel;

import java.net.InetSocketAddress;
import java.nio.charset.Charset;

/**
 * @author: martin
 * @date: 2019/10/23 10:20
 * @description:
 */
public class NettyOioServer {
    public void server(int port) throws Exception {
        final ByteBuf buf = Unpooled.unreleasableBuffer(Unpooled.copiedBuffer("Hi!\r\n", Charset.forName("UTF-8")));
        EventLoopGroup group = new OioEventLoopGroup();
        try {
            //创建ServerBootstrap
            ServerBootstrap bootstrap = new ServerBootstrap();
            bootstrap.group(group)
                    //使用OIOEventLoopGroup以允许阻塞模式
                    .channel(OioServerSocketChannel.class)
                    .localAddress(new InetSocketAddress(port))
                    //指定ChannelInitializer,对于每个已接受的连接都调用它
                    .childHandler(new ChannelInitializer<SocketChannel>() {
                        @Override
                        protected void initChannel(SocketChannel ch) throws Exception {
                            //添加一个ChannelInboundHandlerAdapter以拦截和处理事件
                            ch.pipeline().addLast(new ChannelInboundHandlerAdapter() {
                                //将消息写到客户端,并添加ChannelFutureListener以便消息一被写完就关闭连接
                                @Override
                                public void channelActive(ChannelHandlerContext ctx) throws Exception {
                                    ctx.writeAndFlush(buf.duplicate()).addListener(ChannelFutureListener.CLOSE);
                                }
                            });
                        }
                    });
            ChannelFuture future = bootstrap.bind().sync();
            //绑定服务器以接受连接
            future.channel().closeFuture().sync();
        } finally {
            group.shutdownGracefully().sync();
        }
    }
}
接着我们使用Netty的非阻塞版本:
package com.martin.learn.netty.chapter4;

import io.netty.bootstrap.ServerBootstrap;
import io.netty.buffer.ByteBuf;
import io.netty.buffer.Unpooled;
import io.netty.channel.ChannelFuture;
import io.netty.channel.ChannelFutureListener;
import io.netty.channel.ChannelHandlerContext;
import io.netty.channel.ChannelInboundHandlerAdapter;
import io.netty.channel.ChannelInitializer;
import io.netty.channel.EventLoopGroup;
import io.netty.channel.nio.NioEventLoopGroup;
import io.netty.channel.socket.SocketChannel;
import io.netty.channel.socket.nio.NioServerSocketChannel;

import java.net.InetSocketAddress;
import java.nio.charset.Charset;

/**
 * @author: martin
 * @date: 2019/10/23 10:20
 * @description:
 */
public class NettyNioServer {
    public void server(int port) throws Exception {
        final ByteBuf buf = Unpooled.unreleasableBuffer(Unpooled.copiedBuffer("Hi!\r\n", Charset.forName("UTF-8")));
        EventLoopGroup group = new NioEventLoopGroup();
        try {
            //创建ServerBootstrap
            ServerBootstrap bootstrap = new ServerBootstrap();
            bootstrap.group(group)
                    //非阻塞模式
                    .channel(NioServerSocketChannel.class)
                    .localAddress(new InetSocketAddress(port))
                    //指定ChannelInitializer,对于每个已接受的连接都调用它
                    .childHandler(new ChannelInitializer<SocketChannel>() {
                        @Override
                        protected void initChannel(SocketChannel ch) throws Exception {
                            //添加一个ChannelInboundHandlerAdapter以拦截和处理事件
                            ch.pipeline().addLast(new ChannelInboundHandlerAdapter() {
                                //将消息写到客户端,并添加ChannelFutureListener以便消息一被写完就关闭连接
                                @Override
                                public void channelActive(ChannelHandlerContext ctx) throws Exception {
                                    ctx.writeAndFlush(buf.duplicate()).addListener(ChannelFutureListener.CLOSE);
                                }
                            });
                        }
                    });
            ChannelFuture future = bootstrap.bind().sync();
            //绑定服务器以接受连接
            future.channel().closeFuture().sync();
        } finally {
            group.shutdownGracefully().sync();
        }
    }
}
从上面的代码看出,我们仅仅是更换EventLoopGroup为NioEventLoopGroup,Channel更换为NioServerSocketChannel。因为Netty为每种传输的实现都暴露了相同的API,所以无论使用哪一种传输的实现,代码仍然几乎不受影响。
2.传输API
Netty传输API的核心是interface Channel,它被用于所有的IO操作。Channel类的层次结构如图所示:

如图所示,每个Channel都将会被分配一个ChannelPipeline和ChannelConfig。ChannelConfig包含了该Channel的所有配置设置,并且支持热更新。由于Channel是独一无二的,因此为了保证顺序将Channel声明为Comparable的一个子接口。ChannelPipeline持有全部的ChannelHandler实例,这些ChannelHandler实现了处理状态变化以及数据的逻辑。
ChannelHandler的典型用途包括:
- 将数据从一种格式转换为另外一种格式
- 提供异常通知
- 提供Channel变为活动的或者非活动的通知
- 提供当Channel注册到EventLoop或者从EventLoop注销时的通知
- 提供有关用户自定义事件的通知
我们还可以根据需要添加或者移除ChannelHandler实例来修改ChannelPipeline,通过利用Netty的这项能力可以构建出高度灵活的应用程序。
除了访问所分配的ChannelPipeline和ChannelConfig之外,也可以利用Channel的其他方法,其中主要方法如下表:

考虑一下写数据并将其冲刷到远程节点的任务,如下代码使用了Channel.writeAndFlush()来实现这一目的:
public void testWriteAndFlush() {
        Channel channel = new NioServerSocketChannel();
        ByteBuf buf = Unpooled.copiedBuffer("data", CharsetUtil.UTF_8);
        //写数据并冲刷它
        ChannelFuture channelFuture = channel.writeAndFlush(buf);
        //添加ChannelFutureListener以便在写操作完成后接受通知
        channelFuture.addListener(new ChannelFutureListener() {
            @Override
            public void operationComplete(ChannelFuture future) throws Exception {
                //写操作完成,并且没有错误发生
                if (future.isSuccess()) {
                    System.out.println("Write Success");
                } else {
                    //记录错误
                    System.err.println("Write error");
                    future.cause().printStackTrace();
                }
            }
        });
    }
Netty的Channel实现是线程安全的,因此可以存储一个到Channel引用,并且每当需要向远程节点写数据时,都可以使用它,即使当时许多线程都在使用它。如下代码展示了一个多线程写数据的简单例子。
 public void multiThread() {
        Channel channel = new NioServerSocketChannel();
        ByteBuf buf = Unpooled.copiedBuffer("data", CharsetUtil.UTF_8);
        Runnable writer = (() -> {
            channel.writeAndFlush(buf);
        });

        Executor executor = Executors.newCachedThreadPool();
        //多线程执行
        executor.execute(writer);
        executor.execute(writer);
        executor.execute(writer);
    }
3 内置的传输
Netty内置了一些开箱即用的传输,因为并不是所有的传输都支持每一种协议,所以必须选择一个和应用程序所使用的协议相容的传输。Netty提供的传输如下所示:
| 名称 | 描述 |
| NIO | 使用java.nio.channels包作为基础,基于选择器的方式 |
| Epoll | 由JNI驱动的epoll()和非阻塞IO。只有在Linux上支持,比NIO传输更快,而且是完全非阻塞的 |
| OIO | 使用java.net包作为基础,使用阻塞流,基本不再使用 |
| Local | 可以在JVM内部通过管道进行通信的本地传输 |
| Embedded | Embedded传输,允许使用ChannelHandler而又不需要一个真正的基于网络的传输。在测试ChannelHandler实现时,非常有用 |
3.1 NIO-非阻塞IO
NIO基于JDK中的选择器实现了IO操作的全异步,选择器背后的基本概念是充当一个注册表,当请求在Channel中的状态发生变更时会得到通知。可能的状态变化有:
- 新的Channel已被接受并且就绪
- Channel连接已经完成
- Channel有已经就绪的可供读取的数据
- Channel可用于写数据
选择器运行在一个检查状态变化并对其做出相应响应的线程上,在应用程序对状态的变化做出响应以后,选择器将会被重置,并将重复这个过程。下面的常量值代表了class java.nio.channels.SelectionKey定义的位模式。这些位模式可以组合在一起来定义请求通知的状态变化集:
- OP_ACCEPT:请求在接受新连接并创建Channel时获得通知
- OP_CONNECT:请求在建立一个连接时获得通知
- OP_READ:当数据已经就绪,可以从Channel中读取时获得通知
- OP_WRITE:当可以向Channel中写更多的数据时获得通知。这处理了套接字缓冲区被完全填满的情况,这种情况通常发生在数据的发送速度比远程节点可处理的速度更快的时候。
当然,我们在使用的时候无需关心底层的实现细节,Netty的API完全隐藏了这些NIO的内部实现细节。
零拷贝:
零拷贝是一种目前只有在使用NIO和Epoll传输时,才使用的特性。它使你可以快速高效地将数据从文件系统移动到网络接口,而不需要将其从内核空间复制到用户空间,在FTP或者HTTP这些的协议中可以显著的提高性能。但是并不是所有的操作系统都支持。当然,对于实现了数据加密或者压缩的文件系统是不可用的,只能传输文件的原始内容。
3.2 Epoll-用于Linux的本地非阻塞传输
Netty的NIO传输基于Java提供的异步/非阻塞网络编程的通用抽象。这虽然保证了Netty的跨平台性,但是如果我们的网络服务是运行在Linux上的,更优的选择是使用Epoll。你会发现在高负载下它的性能要优于JDK的NIO实现。
Epoll是Linux提供的一个高度可扩展的IO事件通知特性,这个API相比旧的select和poll系统调用拥有更加优异的性能,同时也是Linux上非阻塞网络编程的事实标准。
Netty中使用Epoll是非常简单直接的,只需要将NIOEventLoopGroup替换为EpollEventLoopGroup,并且将NioServerSocketChannel替换为EpollServerSocketChannel即可。
3.3 用于JVM内部通信的Local传输
Netty提供了一个Local传输,用于在同一个JVM中运行的客户端和服务器程序之间的异步通信。这种传输方式并不会接受真正的网络流量,所以它并不能够和其他传输实现相互操作。
3.4 Embedded传输
Embedded传输时一种额外的传输方式,使得你可以将一组ChannelHandler作为帮助器类嵌入到其他的ChannelHandler内部。这种方式,你将可以扩展一个ChannelHandler的功能,而又不需要修改其内部代码。
4.小结
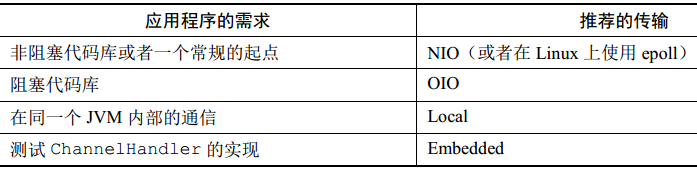
我们现在已经详细了解了所有的传输,那么让我们总结一下各种传输方式的使用场景:


 790
790

 被折叠的 条评论
为什么被折叠?
被折叠的 条评论
为什么被折叠?
 到【灌水乐园】发言


