


 该程序展示了如何使用Proteus进行C51单片机的仿真,实现24小时制数码管显示时钟。通过T1定时器中断每50ms更新时间,并利用按键控制时、分、秒的增减。代码中包含了数码管显示、定时器配置、中断处理以及按键消抖等关键功能。
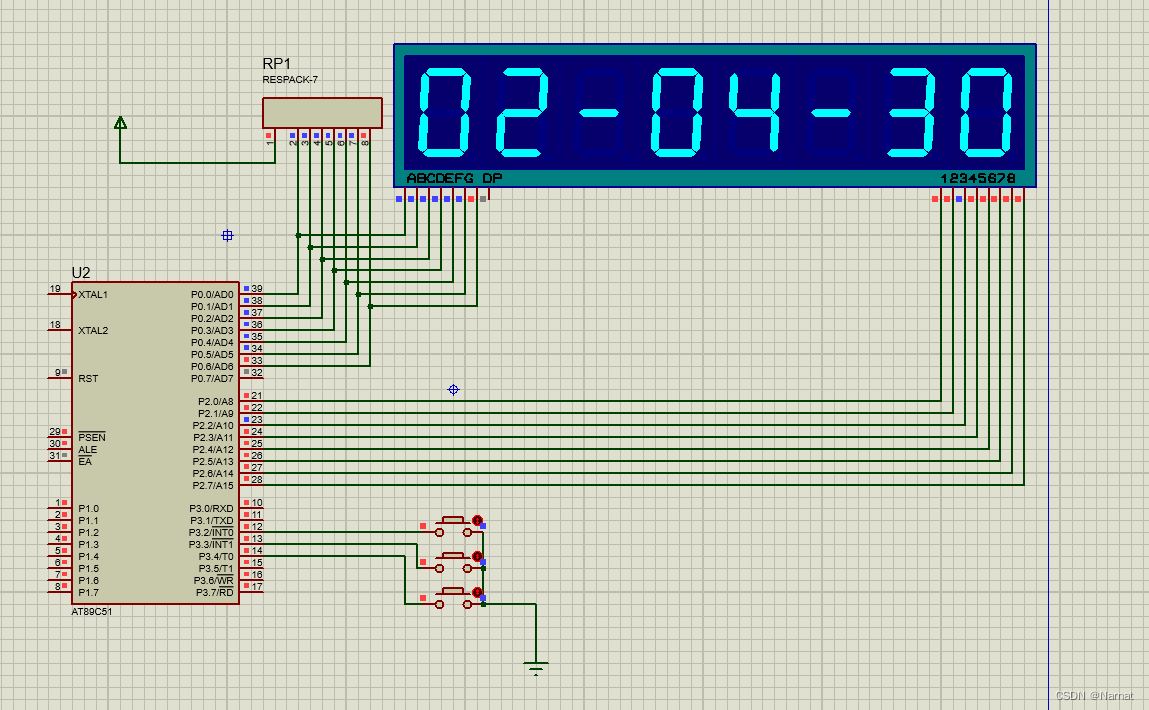
Proteus 实现:
1. 主要器件:
C51单片机、8位LED数码管(共阴极)…
2. 仿真图如下:
3. 主要特点
1. 24进制显示
2. 最下方三个按钮分别控制时、分、秒
proteus 实现代码:
#include <reg51.h>
#include <intrins.h>
void Delayms(unsigned int xms){
  unsigned char i,j;
  while(xms--){
    i=2;
    j=239;
  do{
    while(--j);
 }
  while(--i);
 }
}

char led_mod[] = {0x3f, 0x06, 0x5b, 0x4f, 0x66, 0x6d, 0x7d, 0x07, 0x7f, 0x6f};

unsigned char net = 0;//按键
unsigned char count = 0;
unsigned char time[] = {23, 58, 50};//默认数值
unsigned char timp = 0xc0;

sbit tt = P3^2;
sbit mm = P3^3;
sbit ss = P3^4;

void disp(){//数码管显示
 P2 = 0x7f;
    P0 = led_mod[time[2] % 10];
    Delayms(3);

    P2 = _cror_(P2, 1);
    P0 = led_mod[time[2] / 10];
    Delayms(3);

    P2 = P2 = _cror_(P2, 1);
    P0 = timp;
    Delayms(3);

    P2 = _cror_(P2, 1);
    P0 = led_mod[time[1] % 10];
    Delayms(3);

    P2 = _cror_(P2, 1);
    P0 = led_mod[time[1] / 10];
    Delayms(3);

    P2 = P2 = _cror_(P2, 1);
    P0 = timp;
    Delayms(3);

    P2 = _cror_(P2, 1);
    P0 = led_mod[time[0] % 10];
    Delayms(3);

    P2 = _cror_(P2, 1);
    P0 = led_mod[time[0] / 10];
    Delayms(3);
}

timer1() interrupt 3{//中断方式1
 TH1 = 0x3C;
 TL1 = 0xB0;
 count = count + 1;
 if(count == 20){
  count = 0;
        time[2] = time[2] + 1;
  if(time[2] >= 60){
   time[2] = 0;
   time[1] = time[1] + 1;
   if(time[1] >= 60){
    time[1] = 0;
    time[0] = time[0] + 1;
    if(time[0] >= 24){
     time[0] = 0;
    }
   }
  }
 }
}

void key(){//按键
   net = net + 1;
   if(net == 6){
  net = 0;
     if(tt == 0){
      time[0] = time[0] + 1;
      if(time[0] >= 24){
       time[0] = 0;
   }
  Delayms(10);
  }

  if(mm == 0){
  time[1] = time[1] + 1;
  if(time[1] >= 60){
     time[1] = 0;
  }
   Delayms(10);
  }

  if(ss == 0){
  time[2] = 0;
  Delayms(10);
  }

  tt = 1;
  mm = 1;
  ss = 1;
   }
}

int main(){//主函数
    TMOD = 0x10;
 TH1 = 0x3C;
 TL1 = 0xB0;
 EA = 1;
 ET1 = 1;
 TR1 = 1;
 while(1){
  disp();//显示
  if(tt == 0 || mm == 0 || ss == 0){
    Delayms(10);
    key();
     }
 }
}
上述代码包含的主要内容:
1. T1定时方式1,用到T1中断函数
2. 每50ms溢出一次,一共20次为 1s 记一次数
3. 按键知识,消抖动...
4. 移位知识,_crol_() 左移,_cror_() 右移
上述知识点都是课本知识,理解之后,看懂上述代码完全没有问题。
实验板 实现代码:
#include <reg51.h>
#include <intrins.h>
void Delayms(unsigned int xms){
  unsigned char i,j;
  while(xms--){
    i=2;
    j=239;
  do{
    while(--j);
 }
  while(--i);
 }
}

char led_mod[] = {0x3f, 0x06, 0x5b, 0x4f, 0x66, 0x6d, 0x7d, 0x07, 0x7f, 0x6f};

unsigned char net = 0;//按键
unsigned char count = 0;
unsigned char time[] = {23, 58, 50};//默认数值
unsigned char timp = 0xc0;

sbit tt = P2^2;
sbit mm = P2^3;
sbit ss = P2^4;

void disp(){//数码管显示
	tt = 0;
	mm = 0;
	ss = 0;
    P0 = led_mod[time[2] % 10];
    Delayms(3);

    tt = 1;
	mm = 0;
	ss = 0;
    P0 = led_mod[time[2] / 10];
    Delayms(3);

    tt = 0;
	mm = 1;
	ss = 0;
    P0 = timp;
    Delayms(3);

    tt = 1;
	mm = 1;
	ss = 0;
    P0 = led_mod[time[1] % 10];
    Delayms(3);

    tt = 0;
	mm = 0;
	ss = 1;
    P0 = led_mod[time[1] / 10];
    Delayms(3);

    tt = 1;
	mm = 0;
	ss = 1;
    P0 = timp;
    Delayms(3);


    tt = 0;
	mm = 1;
	ss = 1;
    P0 = led_mod[time[0] % 10];
    Delayms(3);


    tt = 1;
	mm = 1;
	ss = 1;
    P0 = led_mod[time[0] / 10];
    Delayms(3);
}

timer1() interrupt 3{//中断方式1
	TH1 = 0x3C;
	TL1 = 0xB0;
	count = count + 1;
	if(count == 20){
		count = 0;
        time[2] = time[2] + 1;
		if(time[2] >= 60){
			time[2] = 0;
			time[1] = time[1] + 1;
			if(time[1] >= 60){
				time[1] = 0;
				time[0] = time[0] + 1;
				if(time[0] >= 24){
					time[0] = 0;
				}
			}
		}
	}
}


int main(){//主函数
    TMOD = 0x10;
	TH1 = 0x3C;
	TL1 = 0xB0;
	EA = 1;
	ET1 = 1;
	TR1 = 1;
	while(1){
		disp();//显示
	}
}
为了切合实验板,对仿真代码做了一些调整。因为嫌麻烦,所以删去了按键功能,本代码在实验板上只能显示时间,不能利用按键改时间。初始值为23:58:50


 3万+
3万+

 被折叠的 条评论
为什么被折叠?
被折叠的 条评论
为什么被折叠?
 到【灌水乐园】发言


