


 本文详细介绍了如何将个人库上传到CocoaPods。首先在桌面上通过pod创建工程,然后在GitHub创建相应项目并推送本地代码。接着编辑.podspec文件并设置描述,验证其合法性。再通过trunk注册CocoaPods账号,检查仓库Owner,并解决可能出现的问题。最后,设置tag,提交pod到specs仓库并验证。
自己的库上传到pod详细步骤
1:利用pod在桌面创建一个工程
cd 到桌面然后 执行如下命令行:
命令行:pod lib create XFPodTest
What is your class prefix? (工程前缀,这个可以根据自己需求随意写)
此时会在桌面出现通过pod 创建的工程
2:在GitHub中创建一个XFPodTest的项目
具体步骤如下图所示:

3:把本地创建的XFPodTest通过git上传到GitHub仓库
1  git init
2  git commit -m "first commit"
3  git remote add origin https://github.com/xufengbj/XFPodTest.git
4  git push -u origin master
4:编辑.podspec文件
#
# Be sure to run `pod lib lint XFPodTest.podspec' to ensure this is a
# valid spec before submitting.
#
# Any lines starting with a # are optional, but their use is encouraged
# To learn more about a Podspec see https://guides.cocoapods.org/syntax/podspec.html
#

Pod::Spec.new do |s|
  s.name             = 'XFPodTest'
  s.version          = '0.1.0'
  s.summary          = 'A short description of XFPodTest.'

# This description is used to generate tags and improve search results.
#   * Think: What does it do? Why did you write it? What is the focus?
#   * Try to keep it short, snappy and to the point.
#   * Write the description between the DESC delimiters below.
#   * Finally, don't worry about the indent, CocoaPods strips it!

  s.description      = <<-DESC
TODO: Add long description of the pod here.
                       DESC

  s.homepage         = 'https://github.com/xufengbj/XFPodTest'
  # s.screenshots     = 'www.example.com/screenshots_1', 'www.example.com/screenshots_2'
  s.license          = { :type => 'MIT', :file => 'LICENSE' }
  s.author           = { 'xufengbj' => 'xufeng@zhuomogroup.com' }
  s.source           = { :git => 'https://github.com/xufengbj/XFPodTest.git', :tag => s.version.to_s }
  # s.social_media_url = 'https://twitter.com/<TWITTER_USERNAME>'

  s.ios.deployment_target = '8.0'

  s.source_files = 'XFPodTest/Classes/**/*'

  # s.resource_bundles = {
  #   'XFPodTest' => ['XFPodTest/Assets/*.png']
  # }

  # s.public_header_files = 'Pod/Classes/**/*.h'
  # s.frameworks = 'UIKit', 'MapKit'
  # s.dependency 'AFNetworking', '~> 2.3'
end- s.summary = ‘A short description of XFPodTest.’ 这里最好写上描述不要用默认描述否则后面的验证会有提示错误
5:验证.podspec文件是否合法
pod lib lint XFPodTest.podspec6:提交自己的pod
- 设置tag
git tag 0.1.0
git push origin 0.1.0- 验证.podspec文件是否合法
pod lib lint XFPodTest.podspec- 提交pod到specs仓库
pod trunk push XFPodTest.podspec
出现    Updating spec repo `master`
--------------------------------------------------------------------------------
    ��  Congrats
    ��  Tell your friends!

    --------------------------------------------------------------------------------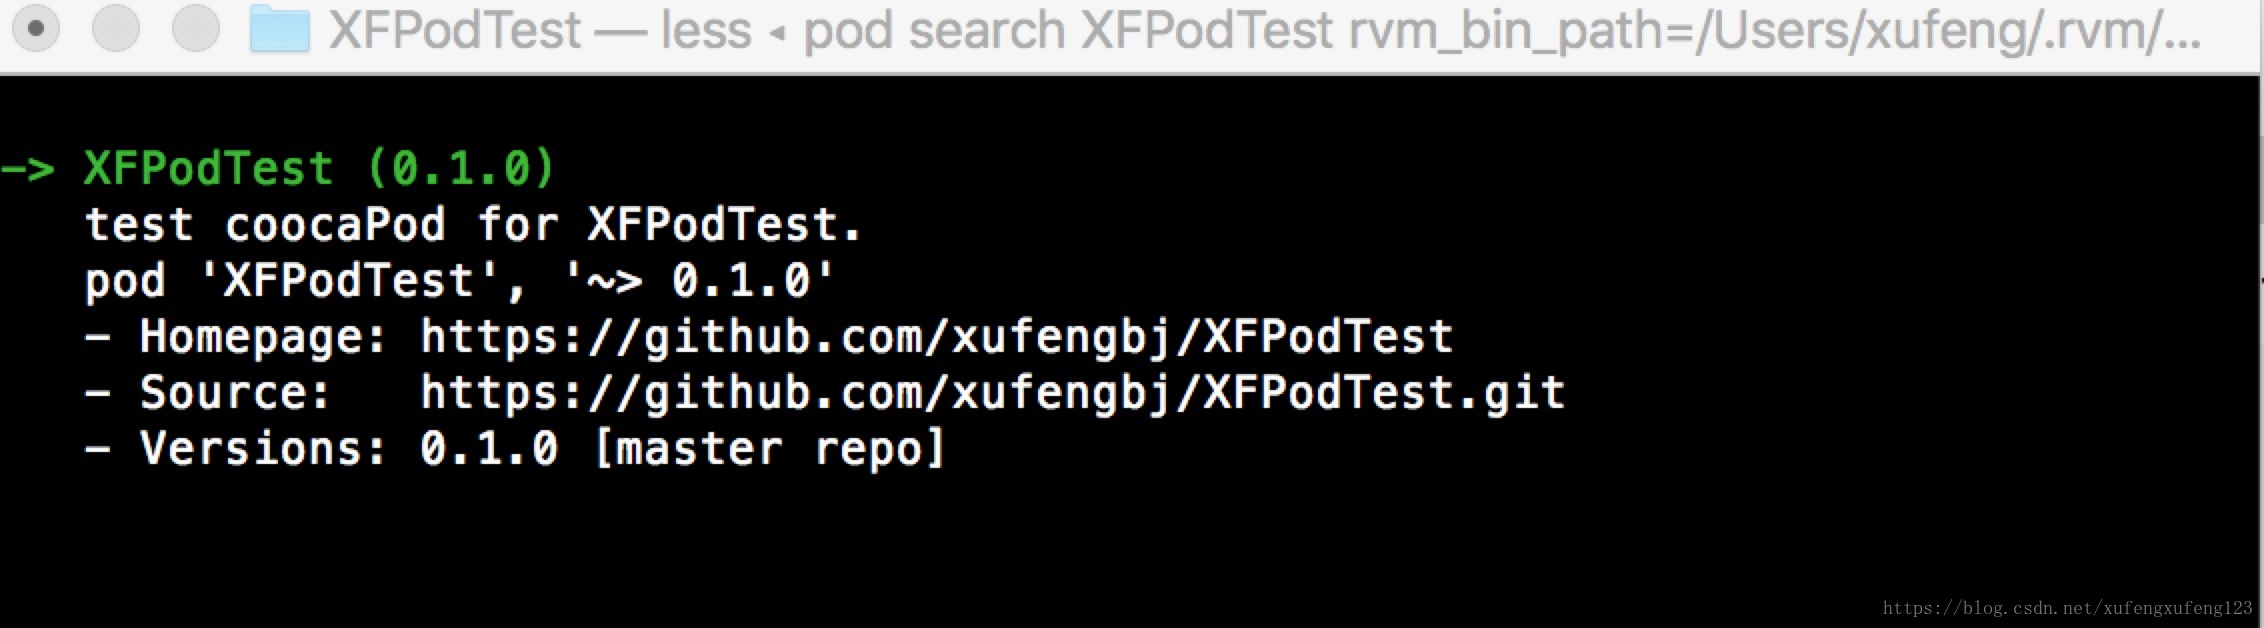
即表示提交成功- 验证是否提交成功
pod search XFPodTest
一:pod上传自己的库是通过trunk进行上传的再上传之前需要注册一个CocoaPod账号,通过总得注册的方式如下:
pod trunk register 邮箱地址 '用户名' --verbose按Enter键之后会发一个确认邮件到你的邮箱上,注意查收邮件并进行验证确认。
注册成功之后 然后再终端输入
pod trunk me
可以看到注册的信息

二:查看仓库Owner
看看现在仓库的Owner属于xufengbj账户(这个XFPodTest是唯一的根据自己的库然后查找相应的仓库Owner)
XFPodTest
    - Versions:
      - 0.1.0 (2018-09-07 09:22:48 UTC)
    - Owners:
- xufengbj <xufeng@zhuomogroup.com>- 添加一个账户
trunk add-owner XFPodTest 1192936115@qq.com- 删除一个账户
trunk remove-owner XFPodTest 1192936115@qq.com三:自己的库上传到pod详细步骤中可能会出现问题一下是一些命令用于查找原因供解决。
- git查找自己的用户名和邮箱
git config user.name
git config user.email- git修改自己的用户名和邮箱
git config --global user.name 'xxx'
git config --global user.email 'xxx'
以上一 二 三 是可能再上传过程中会遇到的一些问题 可以根据相应提示错误进行查询找到问题然后修改。
邮箱:1192936115@qq.com
以上是我邮箱有问题可以发我邮箱或者叫我QQ进行沟通交流。


 1万+
1万+

 被折叠的 条评论
为什么被折叠?
被折叠的 条评论
为什么被折叠?
 到【灌水乐园】发言


