


布局优化
1.布局优化简介
- 避免ui布局优化可以先从合理使用背景色开始,比如:如果子view和父布局公用一个背景色就没有必要了。
- 减少不必要的嵌套,一般建议不超过5层
- 合理使用各种布局,尽量使用LinearLayout和FrameLayout,因为RelativeLayout在进行message时会执行两次,而LinearLayout只有设置weight的情况下执行两次(LinearLayout会避开设置过weight属性的view做第一次measure,完了再对设置过weight属性的view做第二次measure),还有如果你是ListView或者GridView,不建议使用LinearLayout,因为使用 LinearLayout 容易产生多层嵌套的布局结构,这在性能上是不好的,一个RelativeLayout可以代替多个LinearLayout这也就是我们上面说的减少嵌套。具体视情况而定。
- 合理使用include、merge和ViewStub,使用include和merge增加复用,减少层级;ViewStub按需加载。
- 推荐使用google已经出来的新的布局ConstraintLayout,这个有机会说。
2.使用include 和merge标签减少复用布局而产生的布局嵌套,使用ViewStub懒加载减少渲染元素
布局复用的步骤大致为:
1.创建一个正常的可用布局layout文件A_layout.xml
2.在需要添加复用布局(A_layout.xml)的当前布局内B_layout.xml,使用include标签
3.将A_layout.xml的布局文件中的Root View 替换成merge标签,从而减少布局嵌套
- 第一步:创建一个正常可用的布局layout文件,命名为A_layout.xml
<LinearLayout xmlns:android="http://schemas.android.com/apk/res/android"
    android:layout_width="match_parent"
    android:layout_height="match_parent"
    android:orientation="vetical" >

    <TextView
        android:layout_width="wrap_content"
        android:layout_height="wrap_content"
        android:text="张三" />

    <TextView
        android:layout_width="wrap_content"
        android:layout_height="wrap_content"
        android:text="李四" />

    <TextView
        android:layout_width="wrap_content"
        android:layout_height="wrap_content"
        android:text="王五" />

</LinearLayout>
- 第二步:使用include标签把复用布局添加到实际需要的布局中(B_layout.xml)去
<LinearLayout xmlns:android="http://schemas.android.com/apk/res/android"
    android:layout_width="match_parent"
    android:layout_height="match_parent"
    android:orientation="horizontal">

    <include layout="@layout/A_layout"/>
    <TextView
        android:layout_width="wrap_content"
        android:layout_height="wrap_content"
        android:text="@string/hello_world" />

</LinearLayout>
- 第三步:把第一步中的布局文件中的LinearLayout替换成merge标签(当熟悉之后,可以直接创建一个merge标签的布局文件,第三步可以省略)
<merge xmlns:android="http://schemas.android.com/apk/res/android">

    <TextView
        android:layout_width="wrap_content"
        android:layout_height="wrap_content"
        android:text="张三" />

    <TextView
        android:layout_width="wrap_content"
        android:layout_height="wrap_content"
        android:text="李四" />

    <TextView
        android:layout_width="wrap_content"
        android:layout_height="wrap_content"
        android:text="王五" />

</merge>
系统在加载这个布局的时候,会自动忽略merge标签,从而将上述的三个TextView直接加入到第二步中的include标签的位置,而并没有增加布局层级
2.ViewStub标签的使用姿势
- 步骤一:定义需要懒加载的布局 test.xml
<?xml version="1.0" encoding="utf-8"?>
<LinearLayout xmlns:android="http://schemas.android.com/apk/res/android"
android:layout_width="match_parent"
android:layout_height="match_parent"
android:orientation="vertical">

    <TextView
        android:id="@+id/text_view"
        android:layout_width="match_parent"
        android:layout_height="100dp"
        android:background="#36e7ea"
        android:gravity="center"
        android:textSize="18sp" />

</LinearLayout>
- 步骤二:使用ViewStub引入要懒加载的布局
<?xml version="1.0" encoding="utf-8"?>
<LinearLayout xmlns:android="http://schemas.android.com/apk/res/android"
android:layout_width="match_parent"
android:layout_height="match_parent"
android:orientation="vertical">

    <Button            //点击按钮时才加载下面的ViewStub布局
        android:id="@+id/button"
        android:layout_width="match_parent"
        android:layout_height="wrap_content"
        android:text="加载ViewStub" />

    <ViewStub  //这个布局现在还不会被添加到布局树中
        android:id="@+id/view_stub"
        android:layout_width="match_parent"
        android:layout_height="wrap_content"
        android:layout="@layout/test" />  //这里指定要加载的布局名字

</LinearLayout>
- 步骤三:使用代码按需加载上面的ViewStub布局
这里是点击按钮的时候添加:
Button button = (Button) findViewById(R.id.button);
    button.setOnClickListener(new View.OnClickListener() {
        @Override
        public void onClick(View v) {
            View view = ((ViewStub)findViewById(R.id.view_stub)).inflate();  //加载出来用view接收
            TextView tv = (TextView) view.findViewById(R.id.text_view); //然后可以用view访问它的子控件
            tv.setText("ViewStub的使用");
    }
});
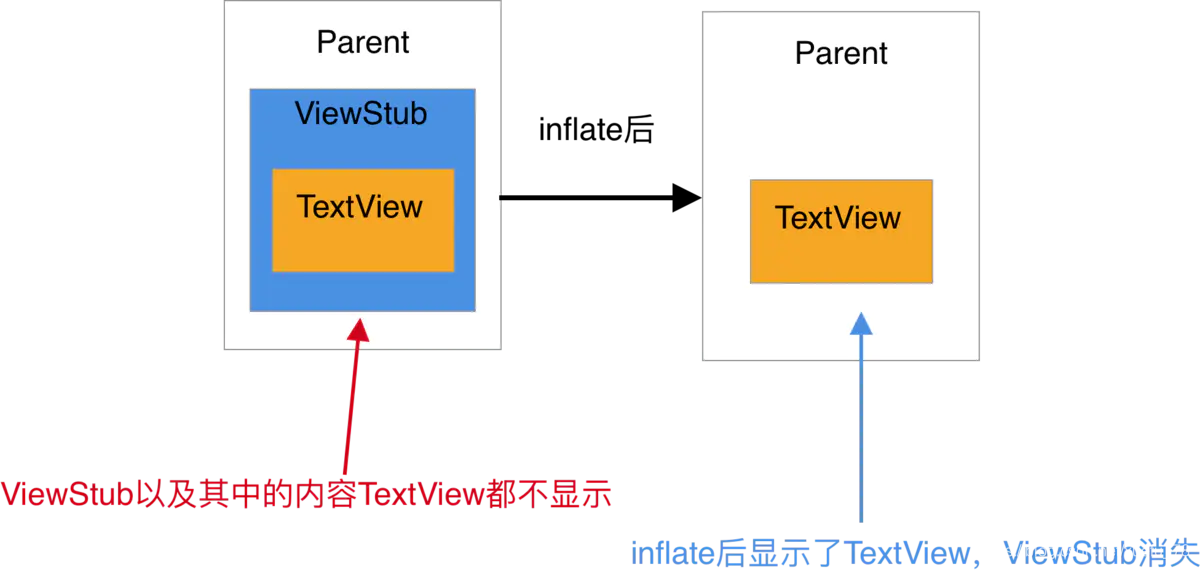
- ViewStub使用注意点
ViewStub对象只可以Inflate一次,之后ViewStub对象会被置为空。
所以,inflate一个ViewStub对象之后,就不能再inflate它了,否则会报错:ViewStub must have a non-null ViewGroup viewParent。。
ViewStub不支持merge标签,意味着你不能引入包含merge标签的布局到ViewStub中。
否则会报错:android.view.InflateException: Binary XML file line #1: can be used only with a valid ViewGroup root and attachToRoot=true
总结如下
-
1.将可重复使用的布局通过include标签与merge标签搭配进行使用
-
2.尽量少添加不必要的背景,减少过度绘制
-
3.布局能扁平化的扁平化,尽量不要增加布局层级
-
4.适当的时侯某些控件使用懒加载ViewStub,但需要牢记它的坑
-
5.使用Hierarchy View 工具或者Lint工具来进行app的检测


 2750
2750

 被折叠的 条评论
为什么被折叠?
被折叠的 条评论
为什么被折叠?
 到【灌水乐园】发言


