


ComponentsIndex
这里说明一点,Spring源码中在6.1版本将CandidateComponentsIndex类标记为了Deprecated,因此在之后可能会废弃这种用法

ComPonentIndexs翻译过来就是“组件索引”。在Spring中,如果想精确的控制Spring来扫描并生成那些类,可以在META-INF/spring.components文件中配置那些类是要交给Spring来管理的,其文件内格式是
com.ww.User=org.springframework.stereotype.Component
com.ww.Order=org.springframework.stereotype.Component
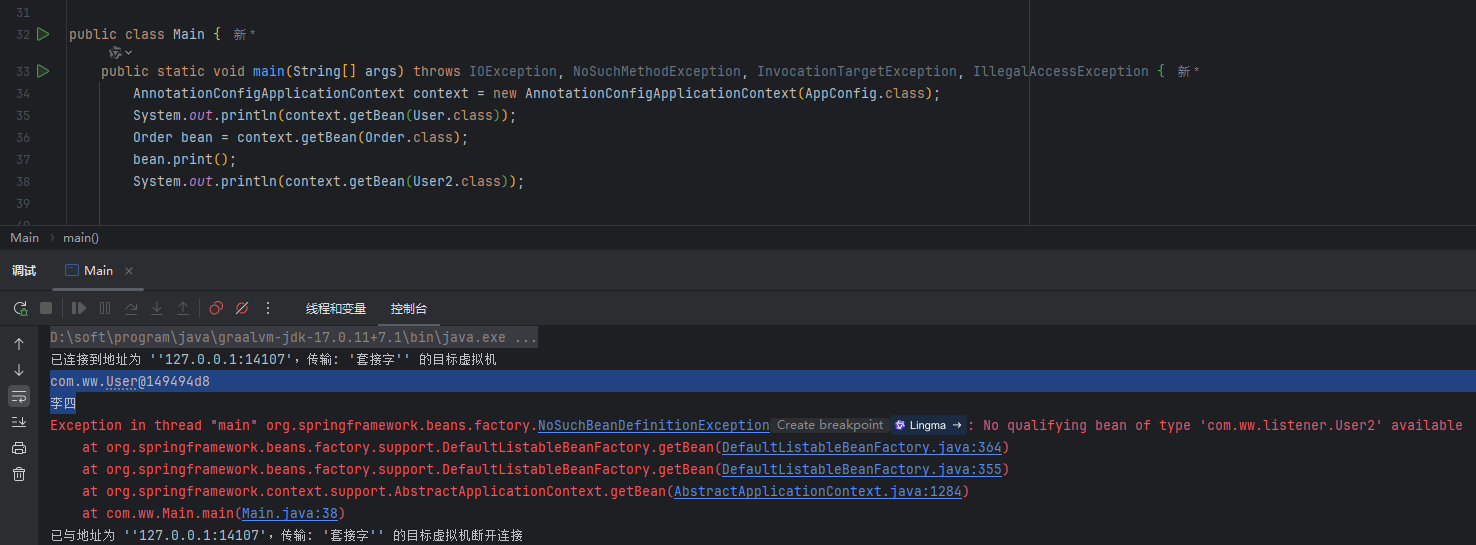
这样,在Spring执行扫描BeanDefinition时,就会只扫描文件中的类,而不会扫描配置类上配置的包路径。具体的使用效果如下,其中Order、User、User2都是添加了@Component注解的类
public static void main(String[] args){
    AnnotationConfigApplicationContext context = new AnnotationConfigApplicationContext(AppConfig.class);
    System.out.println(context.getBean(User.class));
    Order bean = context.getBean(Order.class);
    bean.print();
    System.out.println(context.getBean(User2.class));
}
初始化
还记的ComponentScanAnnotationParser#parse(AnnotationAttributes componentScan, String declaringClass)方法中新建的那个扫描器ClassPathBeanDefinitionScanner吗,在它的构造方法中会调用setResourceLoader(resourceLoader);方法来设置资源加载器。在这个方法中的最后一步就是设置comPonentIndexs
@Override
public void setResourceLoader(@Nullable ResourceLoader resourceLoader) {
    this.resourcePatternResolver = ResourcePatternUtils.getResourcePatternResolver(resourceLoader);
    this.metadataReaderFactory = new CachingMetadataReaderFactory(resourceLoader);
    // 在这里添加componentsIndex
    this.componentsIndex = CandidateComponentsIndexLoader.loadIndex(this.resourcePatternResolver.getClassLoader());
}
ClassPathScanningCandidateComponentProvider#findCandidateComponents(String basePackage)
在上一篇《2、BeanDefinition扫描源码》ClassPathBeanDefinitionScanner#doScan()方法中,会调用findCandidateComponents(String basePackage)方法。在这里会检查是否有componentsIndex,如果有,而且includeFilters中存在有@Index注解或被该注解修饰的注解,那么就会走扫描你配置的类这段逻辑,而不走配置类上配置的basePackages
public Set<BeanDefinition> findCandidateComponents(String basePackage) {
    // 这里是如果存在META-INF/spring.components文件时,会只扫描配置的类
    if (this.componentsIndex != null && indexSupportsIncludeFilters()) {
        // 根据索引生成候选的beanDefinition
        return addCandidateComponentsFromIndex(this.componentsIndex, basePackage);
    }
    else {
        // 普通的扫描走这里
        return scanCandidateComponents(basePackage);
    }
}
在这里有两个判断,一个是存在META-INF/spring.components文件,另一个是索引支持的includeFilters
private boolean indexSupportsIncludeFilters() {
    // 循环判断includeFilter,确定此实例是否可以使用组件索引。
    for (TypeFilter includeFilter : this.includeFilters) {
        // 这里要判断每一个过滤器,只要有返回false的,就返回false
        if (!indexSupportsIncludeFilter(includeFilter)) {
            return false;
        }
    }
    return true;
}
private boolean indexSupportsIncludeFilter(TypeFilter filter) {
    if (filter instanceof AnnotationTypeFilter annotationTypeFilter) {
        /**
         * 判断filter是不是注解方式,@Component在includeFilters中就是AnnotationTypeFilter,详见
         * {@link this#registerDefaultFilters()}
         * 如果是,则获取出来
         */
        Class<? extends Annotation> annotationType = annotationTypeFilter.getAnnotationType();
        // 检查配置的注解是否存在Indexed注解或者以jakarta.或javax.开头的注解
        // @Component上存在@Indexed注解,因此这里返回true
        return (AnnotationUtils.isAnnotationDeclaredLocally(Indexed.class, annotationType) ||
                annotationType.getName().startsWith("jakarta.") ||
                annotationType.getName().startsWith("javax."));
    }
    if (filter instanceof AssignableTypeFilter assignableTypeFilter) {
        Class<?> target = assignableTypeFilter.getTargetType();
        return AnnotationUtils.isAnnotationDeclaredLocally(Indexed.class, target);
    }
    return false;
}
addCandidateComponentsFromIndex()
这里看返回候选BeanDefinition集合的方法,这里主要做几件事
- 获取includeFilters中匹配的过滤器的名字
- 从索引文件中获取对应名字的类的全名,也就是根据META-INF/spring.components文件中等号右边获取左面边的数据。这一步在获取过程中还会比对传入的basePackages,如果不匹配,是不会获取出来的
- 获取到的类的全名集合,循环处理,通过MetadataReaderFactory获取对应的MetadataReader
- 后续处理和扫描包生成BeanDefinition的一致。
/**
 * 从索引文件中添加候选BeanDefinition
 * @param index
 * @param basePackage
 * @return
 */
private Set<BeanDefinition> addCandidateComponentsFromIndex(CandidateComponentsIndex index, String basePackage) {
    Set<BeanDefinition> candidates = new LinkedHashSet<>();
    try {
        Set<String> types = new HashSet<>();
        // 循环获取includeFilter,这里用Component注解理解
        for (TypeFilter filter : this.includeFilters) {
            // 这里获取到filter中的名字
            String stereotype = extractStereotype(filter);
            if (stereotype == null) {
                throw new IllegalArgumentException("Failed to extract stereotype from " + filter);
            }
            // 这里index.getCandidateTypes方法会获取索引中的类类型
            // 这里需要注意,配置类上的basePackage需要和索引中的包路径一致,否则这里会返回空集合
            types.addAll(index.getCandidateTypes(basePackage, stereotype));
        }
        boolean traceEnabled = logger.isTraceEnabled();
        boolean debugEnabled = logger.isDebugEnabled();
        for (String type : types) {
            // 这里从集合中获取到类的全名,并用MetadataReaderFactory获取类的元数据
            MetadataReader metadataReader = getMetadataReaderFactory().getMetadataReader(type);
            // 与扫描包时一样
            // 判断是否存在需要排除的注解,如果是,则不进入if
            // 判断是否能匹配includeFilter,当没有匹配到时,也不会进if
            // 因此这里可以确定,在META-INF/spring.components文件中配置的类上需要添加includeFilters中的注解,一般是@Component
            if (isCandidateComponent(metadataReader)) {
                //生成BeanDefinition
                ScannedGenericBeanDefinition sbd = new ScannedGenericBeanDefinition(metadataReader);
                sbd.setSource(metadataReader.getResource());
                if (isCandidateComponent(sbd)) {
                    // 判断是否有资格存入BeanDefinition的集合中,能作为BeanDefinition的条件
                    // 1、是一个独立的类,不是内部类
                    // 2、不是接口也不是抽象类 || 是抽象类,但存在@Loop修饰的方法
                    if (debugEnabled) {
                        logger.debug("Using candidate component class from index: " + type);
                    }
                    candidates.add(sbd);
                }
                else {
                    if (debugEnabled) {
                        logger.debug("Ignored because not a concrete top-level class: " + type);
                    }
                }
            }
            else {
                if (traceEnabled) {
                    logger.trace("Ignored because matching an exclude filter: " + type);
                }
            }
        }
    }
    catch (IOException ex) {
        throw new BeanDefinitionStoreException("I/O failure during classpath scanning", ex);
    }
    return candidates;
}
在这段源码中,获取types集合时,会将获取到的与传入的basePackage匹配
public Set<String> getCandidateTypes(String basePackage, String stereotype) {
    // 这里index其实就是个map,key为META-INF/spring.components文件中等号右边配置的信息
    // value为等号左边的类信息
    List<Entry> candidates = this.index.get(stereotype);
    if (candidates != null) {
        return candidates.parallelStream()
                // 下面这步会match传入的basePackage,只有匹配的会被选出来
                .filter(t -> t.match(basePackage))
                .map(t -> t.type)
                .collect(Collectors.toSet());
    }
    return Collections.emptySet();
}
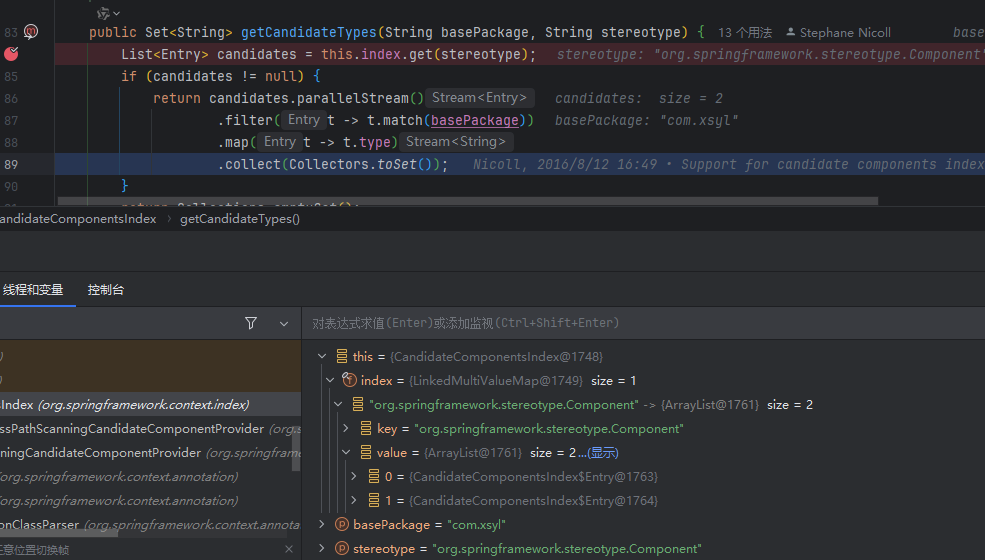

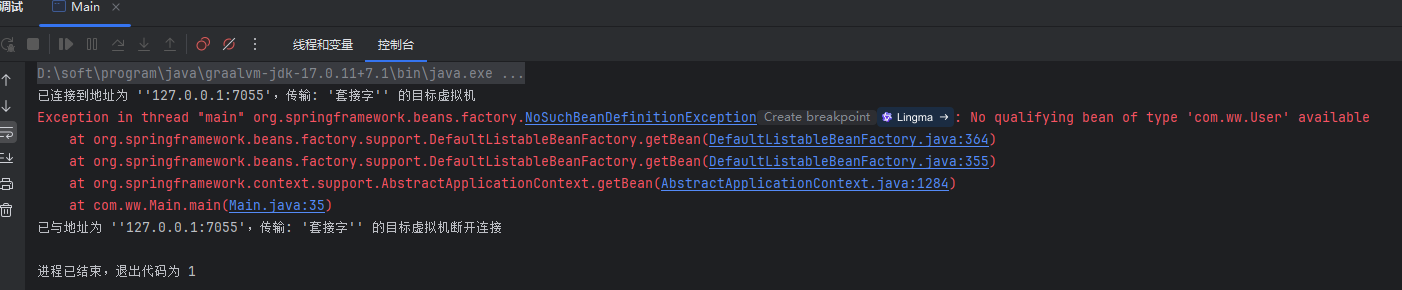
这里可以看到,我传入的basePackage和spring.components中配置的类的包名不一致,返回的就是false,这些类都不会在次生成BeanDefinition,因没有配置其他的basePackage,因此最终从Spring获取类的时候报错了
ScopedProxyMode
先来看一个例子,
1、首先User的Scope是多例模式
2、在Order中通过依赖注入User,在Order中使用User时需要User的多例,也就是每次使用不同的User
在这个例子中,Order依赖注入过一次User后,User属性会固定住。因此上面的场景就不适用
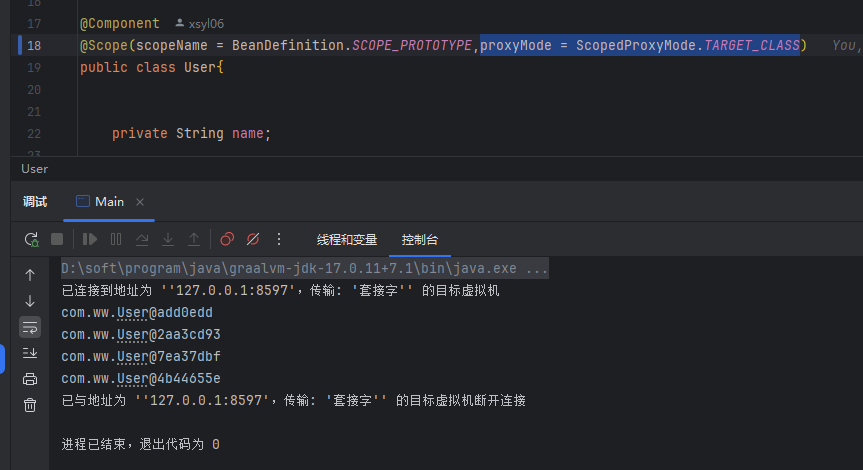
@Component
@Scope(scopeName = BeanDefinition.SCOPE_PROTOTYPE)
public class User{
	private String name;

	public String getName() {
		return name;
	}

	public void setName(String name) {
		this.name = name;
	}

	public void print(){
		System.out.println(this);
	}

}
@Component
public class Order implements PriorityOrdered {

	@Autowired
	private User user;

	public User getUser() {
		return user;
	}

	public void setUser(User user) {
		this.user = user;
	}

	@Override
	public int getOrder() {
		return 10;
	}
}
public static void main(String[] args) throws IOException, NoSuchMethodException, InvocationTargetException, IllegalAccessException {
    AnnotationConfigApplicationContext context = new AnnotationConfigApplicationContext(AppConfig.class);
    System.out.println(context.getBean(User.class));
    Order bean = context.getBean(Order.class);
    System.out.println(bean.getUser());
    System.out.println(bean.getUser());
    System.out.println(bean.getUser());
}
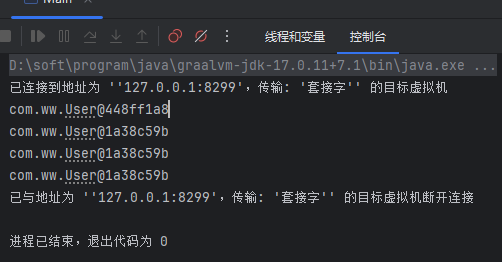
这里就需要用到Scope注解中的proxyMode = ScopedProxyMode.TARGET_CLASS属性了,可以看下效果
AnnotationConfigUtils#applyScopedProxyMode()
在上一篇介绍BeanDefinition扫描源码的时候,在获得了BeanDefinition候选集合后,会循环处理这些候选BeanDefinition,在处理中会使用AnnotationConfigUtils.applyScopedProxyMode(scopeMetadata, definitionHolder, this.registry)会判断当前的beanDefinition和它对应类上的scope注解,如果ScopedProxyMode是NO或者DEFAULT都会直接返回definitionHolder,否则会返回代理类的BeanDefinitionHolder
static BeanDefinitionHolder applyScopedProxyMode(
        ScopeMetadata metadata, BeanDefinitionHolder definition, BeanDefinitionRegistry registry) {

    ScopedProxyMode scopedProxyMode = metadata.getScopedProxyMode();
    // 判断模式是否是No,另外DEFAULT默认是NO
    if (scopedProxyMode.equals(ScopedProxyMode.NO)) {
        return definition;
    }
    boolean proxyTargetClass = scopedProxyMode.equals(ScopedProxyMode.TARGET_CLASS);
    // 这里会创建代理类的beanDefinitionHolder
    return ScopedProxyCreator.createScopedProxy(definition, registry, proxyTargetClass);
}
ScopedProxyUtils#createScopedProxy()
在这个方法中,会新建一个RootBeanDefinition来代替原有的,其新建的BeanDefinition传入的要生成的Bean类型是ScopedProxyFactoryBean。这里的主要步骤包括
- 获取到原始的beanName和beanDefinition
- 新生成一个targetName,用于代理执行时,获取真正的目标类的bean和beanDefinition
- 生成新的RootBeanDefinition,目标类是ScopedProxyFactoryBean
- 拷贝原有的BeanDefinition属性到新的RootBeanDefinition
- 将新生成的targetName和原始的beanDefinition注册到beanFactory中,这点在真正使用的时候会用到。
- 使用原始的beanName、新的RootBeanDefinition生成新得到BeanDefinitionHolder并返回
public static BeanDefinitionHolder createScopedProxy(BeanDefinitionHolder definition,
        BeanDefinitionRegistry registry, boolean proxyTargetClass) {
    // 获取原始的bean名字
    String originalBeanName = definition.getBeanName();
    // 获取原始的目标beanDefinition
    BeanDefinition targetDefinition = definition.getBeanDefinition();
    // 获取target目标名字,这里主要用于在代理类中进行生成bean的时候用于获取真正的BeanDefinition
    String targetBeanName = getTargetBeanName(originalBeanName);

    // Create a scoped proxy definition for the original bean name,
    // "hiding" the target bean in an internal target definition.
    // 重新定义一个RootBeanDefinition,其原始的beanDefinition就是targetDefinition,他所表示的类是ScopedProxyFactoryBean
    // 也就是说,当Spring生成对象并需要注入其他单例对象中时,生成的其实是ScopedProxyFactoryBean中返回的bean,这个bean是单例的
    RootBeanDefinition proxyDefinition = new RootBeanDefinition(ScopedProxyFactoryBean.class);
    //设置一些属性
    proxyDefinition.setDecoratedDefinition(new BeanDefinitionHolder(targetDefinition, targetBeanName));
    proxyDefinition.setOriginatingBeanDefinition(targetDefinition);
    proxyDefinition.setSource(definition.getSource());
    proxyDefinition.setRole(targetDefinition.getRole());

    proxyDefinition.getPropertyValues().add("targetBeanName", targetBeanName);
    if (proxyTargetClass) {
        targetDefinition.setAttribute(AutoProxyUtils.PRESERVE_TARGET_CLASS_ATTRIBUTE, Boolean.TRUE);
        // ScopedProxyFactoryBean's "proxyTargetClass" default is TRUE, so we don't need to set it explicitly here.
    }
    else {
        proxyDefinition.getPropertyValues().add("proxyTargetClass", Boolean.FALSE);
    }

    // Copy autowire settings from original bean definition.
    // 这里将原有的autowire settings复制到新的BeanDefinition中
    proxyDefinition.setAutowireCandidate(targetDefinition.isAutowireCandidate());
    proxyDefinition.setPrimary(targetDefinition.isPrimary());
    if (targetDefinition instanceof AbstractBeanDefinition abd) {
        proxyDefinition.copyQualifiersFrom(abd);
    }

    // The target bean should be ignored in favor of the scoped proxy.
    targetDefinition.setAutowireCandidate(false);
    targetDefinition.setPrimary(false);

    // Register the target bean as separate bean in the factory.
    //这里将原有的beanDefinition注册到BeanDefinitionRegistry中,其beanName是scopedTarget.+原始的beanName
    registry.registerBeanDefinition(targetBeanName, targetDefinition);

    // Return the scoped proxy definition as primary bean definition
    // (potentially an inner bean).
    // 返回一个新的BeanDefinitionHolder,注意这里传入的beanName是原始的beanName,aliases也是原始的aliases
    return new BeanDefinitionHolder(proxyDefinition, originalBeanName, definition.getAliases());
}
ScopedProxyFactoryBean
这个类同时实现了FactoryBean BeanFactoryAware AopInfrastructureBean,因此在根据BeanDefinition对象创建Bean对象时,会先执行BeanFactoryAware的setBeanFactory()方法, 在这个方法中会通过ProxyFactory生成proxy代理对象。在真正生成Bean对象时,因为是FacotryBean,因此会调用getObject()来获取对象作为Bean,将刚刚生成proxy代理对象返回出去作为Bean。而代理对象执行时,执行的的是AOP逻辑,最重要的就是ProxyFactory生成代理对象时设置的targetSource。
/**
 * Set the name of the bean that is to be scoped.
 */
public void setTargetBeanName(String targetBeanName) {
    this.targetBeanName = targetBeanName;
    this.scopedTargetSource.setTargetBeanName(targetBeanName);
}

@Override
public void setBeanFactory(BeanFactory beanFactory) {
    // beanFactoryAware回调时调用这个方法
    if (!(beanFactory instanceof ConfigurableBeanFactory cbf)) {
        throw new IllegalStateException("Not running in a ConfigurableBeanFactory: " + beanFactory);
    }
    // 将beanFactory设置到targetSource中,用于在获取真正bean时使用
    this.scopedTargetSource.setBeanFactory(beanFactory);

    // 创建ProxyFactory
    ProxyFactory pf = new ProxyFactory();
    pf.copyFrom(this);
    // 设置目标代理类,这里重要的方法就是getTarget()
    pf.setTargetSource(this.scopedTargetSource);

    Assert.notNull(this.targetBeanName, "Property 'targetBeanName' is required");
    Class<?> beanType = beanFactory.getType(this.targetBeanName);
    if (beanType == null) {
        throw new IllegalStateException("Cannot create scoped proxy for bean '" + this.targetBeanName +
                "': Target type could not be determined at the time of proxy creation.");
    }
    if (!isProxyTargetClass() || beanType.isInterface() || Modifier.isPrivate(beanType.getModifiers())) {
        pf.setInterfaces(ClassUtils.getAllInterfacesForClass(beanType, cbf.getBeanClassLoader()));
    }

    // Add an introduction that implements only the methods on ScopedObject.
    ScopedObject scopedObject = new DefaultScopedObject(cbf, this.scopedTargetSource.getTargetBeanName());
    pf.addAdvice(new DelegatingIntroductionInterceptor(scopedObject));

    // Add the AopInfrastructureBean marker to indicate that the scoped proxy
    // itself is not subject to auto-proxying! Only its target bean is.
    pf.addInterface(AopInfrastructureBean.class);
    // 生成代理类
    this.proxy = pf.getProxy(cbf.getBeanClassLoader());
}
上面的源码中this.scopedTargetSource的类型就是

SimpleBeanTargetSource
这个类继承了AbstractBeanFactoryBasedTargetSource,在AbstractBeanFactoryBasedTargetSource中,保存着beanFactory和targetBeanName,因此在AOP的代理类,执行到getTarget()时,会获取真正需要的类的targetName,然后通过BeanFactory#getBean(beanName)方法,获取到真正的bean对象。
public class SimpleBeanTargetSource extends AbstractBeanFactoryBasedTargetSource {

	@Override
	public Object getTarget() throws Exception {
		// 注意这里的getTargetBeanName()会获取到targetName(scopedTarget.+ beanName)
		/**
		 * @see org.springframework.aop.scope.ScopedProxyUtils#getTargetBeanName(String)
		 */
        // 在获取到tageetName后,通过beanFactory来获取bean,这是就是bean根据BeanDefinition生成的逻辑
		return getBeanFactory().getBean(getTargetBeanName());
	}

}
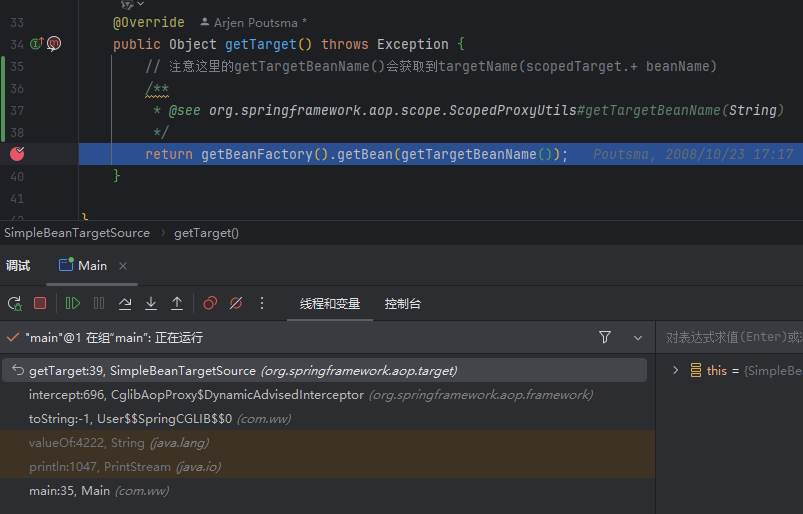
通过调用链可以看到通过User的toString方法最终调用到Spring的Cglib代理中的getTarget()方法。


 被折叠的 条评论
为什么被折叠?
被折叠的 条评论
为什么被折叠?
 到【灌水乐园】发言


