


1.概要
需求:QTableWidget设置为整行选择模式,但是其中有一列有一个多选按钮,这个按钮不需要整行选择,只针对这个控件本身
2.内容
在 Qt 的 QTableWidget 中,如果你想要设置整行选择模式,但同时希望某一列中的多选按钮(如 QCheckBox)不受整行选择的影响,你需要采取一些特殊的处理措施。因为 QTableWidget 的整行选择模式会默认影响表格中的所有单元格,包括那些包含独立控件(如 QCheckBox)的单元格。
以下是一个解决方案的示例:
- 设置整行选择模式:为
QTableWidget设置整行选择。 - 自定义单元格渲染器和编辑器:为包含多选按钮的列创建一个自定义的单元格渲染器和编辑器,这样你可以控制这些单元格的行为。
- 处理选择事件:在必要时,通过事件过滤器或自定义的信号槽来处理选择事件,以确保多选按钮的行为不受整行选择的影响。
下面是一个简化的示例代码,展示了如何实现这个需求:
#ifndef MYWIDGET_H
#define MYWIDGET_H
#include <QApplication>
#include <QTableWidget>
#include <QCheckBox>
#include <QVBoxLayout>
#include <QWidget>
#include <QStyledItemDelegate>

class CheckBoxDelegate : public QStyledItemDelegate {
     Q_OBJECT
public:
    CheckBoxDelegate(QObject *parent = nullptr) : QStyledItemDelegate(parent) {}

    // 创建编辑器控件
    QWidget *createEditor(QWidget *parent, const QStyleOptionViewItem &,
                          const QModelIndex &index) const override {
        QCheckBox *editor = new QCheckBox(parent);
        connect(editor, &QCheckBox::stateChanged, this, &CheckBoxDelegate::commitData);
        return editor;
    }

    // 设置编辑器数据
    void setEditorData(QWidget *editor, const QModelIndex &index) const override {
        QCheckBox *checkBox = static_cast<QCheckBox *>(editor);
        Qt::CheckState state = index.data(Qt::CheckStateRole).toBool() ? Qt::Checked : Qt::Unchecked;
        checkBox->setCheckState(state);
    }

    // 提交编辑器数据
    void commitData(int value) {
        //QCheckBox *checkBox = static_cast<QCheckBox *>(editor);
        //emit commitData(checkBox);
    }

    // 绘制单元格内容
    void paint(QPainter *painter, const QStyleOptionViewItem &option, const QModelIndex &index) const override {
        QCheckBox checkBox;
        Qt::CheckState state = index.data(Qt::CheckStateRole).toBool() ? Qt::Checked : Qt::Unchecked;
        checkBox.setCheckState(state);
        QStyleOptionButton buttonOption;
        buttonOption.rect = option.rect;
        buttonOption.state = QStyle::State_Enabled | (state == Qt::Checked ? QStyle::State_On : QStyle::State_Off);
        QApplication::style()->drawControl(QStyle::CE_CheckBox, &buttonOption, painter);
    }
};

class MyWidget : public QWidget {
    Q_OBJECT

public:
    MyWidget(QWidget *parent = nullptr) : QWidget(parent) {
        QVBoxLayout *layout = new QVBoxLayout(this);

        // 创建 QTableWidget
        tableWidget = new QTableWidget(5, 3, this);
        tableWidget->setSelectionBehavior(QAbstractItemView::SelectRows);
        tableWidget->setSelectionMode(QAbstractItemView::SingleSelection);

        // 设置自定义委托给特定列
        CheckBoxDelegate *delegate = new CheckBoxDelegate(this);
        tableWidget->setItemDelegateForColumn(2, delegate);

        // 添加一些数据
        for (int row = 0; row < tableWidget->rowCount(); ++row) {
            for (int column = 0; column < tableWidget->columnCount(); ++column) {
                if (column == 2) {
                    // 为多选按钮列设置初始状态
                    tableWidget->setItem(row, column, new QTableWidgetItem());
                    tableWidget->item(row, column)->setCheckState(Qt::Unchecked);
                } else {
                    tableWidget->setItem(row, column, new QTableWidgetItem(QString("Item %1-%2").arg(row).arg(column)));
                }
            }
        }

        layout->addWidget(tableWidget);
        setLayout(layout);
    }

private:
    QTableWidget *tableWidget;
};

#endif // MYWIDGET_H
#include "MyWidget.h"


int main(int argc, char *argv[]) {
    QApplication a(argc, argv);

    MyWidget w;
    w.show();

    return a.exec();
}
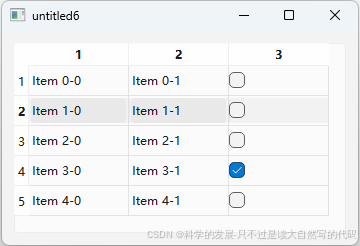
在这个示例中,我们创建了一个自定义的 CheckBoxDelegate,它负责绘制和管理表格中多选按钮列的行为。我们通过 setItemDelegateForColumn 方法将这个委托应用到特定的列上。这样,当整行被选择时,多选按钮列中的 QCheckBox 将不会受到整行选择的影响,并且它们的状态可以独立地改变和提交。
3.运行结果
4.关联知识
c++QTableWidget整行选择,且一次只能选择一行,并添加整行选择的函数链接
在 Qt 中使用 QTableWidget 来实现整行选择,并且确保一次只能选择一行,同时添加整行选择的信号槽连接,可以按照以下步骤进行:
- 设置表格整行选择模式:使用
setSelectionBehavior和setSelectionMode方法。 - 连接信号槽:连接表格的行选择信号到一个槽函数,以便在行被选择时执行特定操作。
下面是一个完整的示例:
#ifndef MYWIDGET_H
#define MYWIDGET_H
#include <QApplication>
#include <QTableWidget>
#include <QVBoxLayout>
#include <QWidget>
#include <QHeaderView>
#include <QDebug>

class MyWidget : public QWidget {
    Q_OBJECT

public:
    MyWidget(QWidget *parent = nullptr) : QWidget(parent) {
        QVBoxLayout *layout = new QVBoxLayout(this);

        // 创建 QTableWidget
        tableWidget = new QTableWidget(5, 3, this);  // 5 行 3 列
        tableWidget->horizontalHeader()->setStretchLastSection(true);

        // 设置整行选择模式
        tableWidget->setSelectionBehavior(QAbstractItemView::SelectRows);
        // 设置一次只能选择一行
        tableWidget->setSelectionMode(QAbstractItemView::SingleSelection);

        // 添加一些数据
        for (int row = 0; row < tableWidget->rowCount(); ++row) {
            for (int column = 0; column < tableWidget->columnCount(); ++column) {
                tableWidget->setItem(row, column, new QTableWidgetItem(QString("Item %1-%2").arg(row).arg(column)));
            }
        }

        // 连接信号槽
        connect(tableWidget->selectionModel(), &QItemSelectionModel::selectionChanged, this, &MyWidget::onRowSelected);

        layout->addWidget(tableWidget);
        setLayout(layout);
    }

private slots:
    void onRowSelected(const QItemSelection &selected, const QItemSelection &deselected) {
        Q_UNUSED(deselected);

        // 如果有选中的行
        if (!selected.empty()) {
            int row = selected.indexes().first().row();
            qDebug() << "Selected row:" << row;

            // 在这里添加你的处理函数,例如:
            handleRowSelected(row);
        }
    }

    void handleRowSelected(int row) {
        // 在这里处理行选择事件
        qDebug() << "Handling row selection for row:" << row;
    }

private:
    QTableWidget *tableWidget;
};

#endif // MYWIDGET_H
#include "MyWidget.h"

int main(int argc, char *argv[]) {
    QApplication a(argc, argv);

    MyWidget w;
    w.show();

    return a.exec();
}
说明:
- 创建
QTableWidget:- 创建一个 5 行 3 列的
QTableWidget。 - 使用
setSelectionBehavior(QAbstractItemView::SelectRows)设置整行选择。 - 使用
setSelectionMode(QAbstractItemView::SingleSelection)确保一次只能选择一行。
- 创建一个 5 行 3 列的
- 填充数据:
- 使用循环向表格中添加一些示例数据。
- 连接信号槽:
- 连接
selectionModel()的selectionChanged信号到自定义槽onRowSelected。
- 连接
- 处理行选择:
- 在
onRowSelected槽函数中,检查是否有选中的行,并获取选中的行号。 - 调用
handleRowSelected函数处理行选择事件,这里只是简单地输出行号,你可以根据需要进行其他处理。
- 在
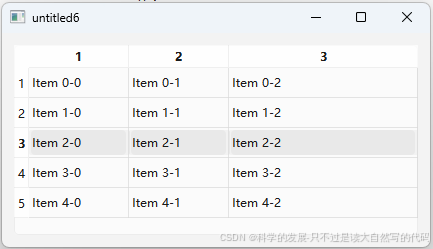
运行这个程序,你会看到一个包含 5 行 3 列的表格,当你点击某一行时,会在控制台输出所选行的行号。


 9738
9738

 被折叠的 条评论
为什么被折叠?
被折叠的 条评论
为什么被折叠?
 到【灌水乐园】发言


