


参考资料
《Spring IoC源码学习:ApplicationContext 刷新前的配置》
写在开头:本文为个人学习笔记,内容比较随意,夹杂个人理解,如有错误,欢迎指正。
目录
2、initWebApplicationContext源码初窥
四、configureAndRefreshWebApplicationContext
1.2、resolvePath、getEnvironment、createEnvironment
1.3、StandardServletEnvironment
1.4、resolveRequiredPlaceholders
3.1、determineContextInitializerClasses
一、前置步骤
1、读取web.xml基本配置
在tomcat启动时会读取web.xml中的配置,为每个 Web 应用(webapps 下的每个目录都是一个 Web 应用)创建一个唯一的 ServletContext 对象,该对象一般被称为“Servlet 上文”。
ServletContext 对象的生命周期从 Servlet 容器启动时开始,到容器关闭或应用被卸载时结束。Web 应用中的所有 Servlet 共享同一个 ServletContext 对象,不同 Servlet 之间可以通过 ServletContext 对象实现数据通讯。
web.xml中注册的ContextLoaderListener是ServletContextListener接口的实现类,负责监听ServletContext的创建和销毁。
  <context-param>
      <param-name>contextConfigLocation</param-name>
      <param-value>classpath:springContext.xml</param-value>
  </context-param>
  <listener>
      <listener-class>org.springframework.web.context.ContextLoaderListener</listener-class>
  </listener>
ContextLoaderListener是启动和销毁Spring的根WebApplicationContext的引导器,其中实现了ServletContextListener的contextInitialized容器初始化方法与contextDestoryed销毁方法,用于引导根web容器的创建和销毁。
tomcat创建ServletContext的时候会触发ContextLoaderListener.contextInitialized()初始化方法的执行,进而触发容器的初始化。
public class ContextLoaderListener extends ContextLoader implements ServletContextListener {
	public ContextLoaderListener() {
	}
	public ContextLoaderListener(WebApplicationContext context) {
		super(context);
	}
	@Override
	public void contextInitialized(ServletContextEvent event) {
        // 跳转至父类ContextLoader的initWebApplicationContext方法,开始创建容器
		initWebApplicationContext(event.getServletContext());
	}
	@Override
	public void contextDestroyed(ServletContextEvent event) {
		closeWebApplicationContext(event.getServletContext());
		ContextCleanupListener.cleanupAttributes(event.getServletContext());
	}
}
2、initWebApplicationContext源码初窥
initWebApplicationContext方法实现了容器的创建。
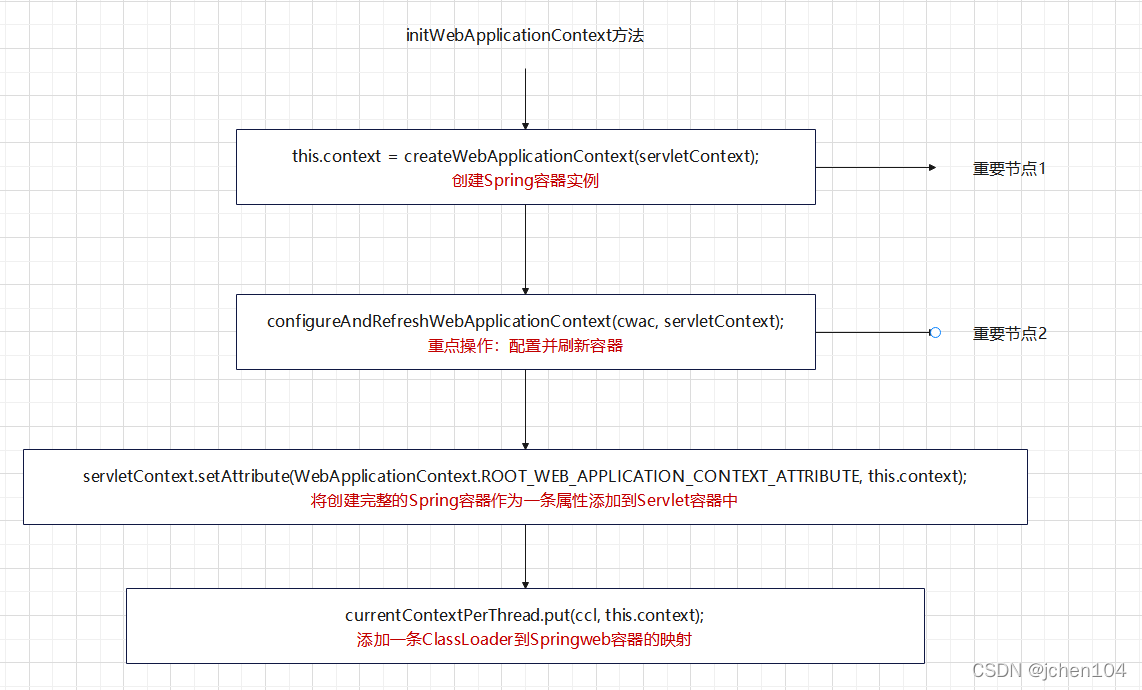
整改方法主要的过程就是创建一个WebApplicationContext,配置并刷新后将其与servletContext进行关联。
	public WebApplicationContext initWebApplicationContext(ServletContext servletContext) {
        // 校验容器是否重复创建
		if (servletContext.getAttribute(WebApplicationContext.ROOT_WEB_APPLICATION_CONTEXT_ATTRIBUTE) != null) {
			throw new IllegalStateException(
					"Cannot initialize context because there is already a root application context present - " +
					"check whether you have multiple ContextLoader* definitions in your web.xml!");
		}


			// 其余代码
			if (this.context == null) {
                // 创建容器实例,即WebApplicationContext
				this.context = createWebApplicationContext(servletContext);
			}
			if (this.context instanceof ConfigurableWebApplicationContext) {
				ConfigurableWebApplicationContext cwac = (ConfigurableWebApplicationContext) this.context;
				if (!cwac.isActive()) {
					if (cwac.getParent() == null) {
						// 设置父上下文
						ApplicationContext parent = loadParentContext(servletContext);
						cwac.setParent(parent);
					}
                    // 配置并刷新容器
					configureAndRefreshWebApplicationContext(cwac, servletContext);
				}
			}

            // 将创建完整的容器作为一条属性添加到servletContext中
            servletContext.setAttribute(WebApplicationContext.ROOT_WEB_APPLICATION_CONTEXT_ATTRIBUTE, this.context);

			// 其余代码

	}
注意WebApplicationContext与ServletContext关系如下:
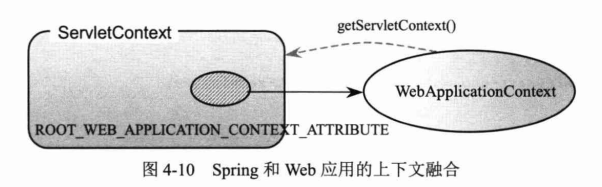
WebApplicationContext是专门为web应用准备的,他允许从相对于web根目录的路劲中装载配置文件完成初始化工作。
从WebApplicationContext中可以获得ServletContext的引用,整个Web应用上下文对象将作为属性放置在ServletContext中,以便web应用可以访问spring上下文,spring中提供WebApplicationContextUtils的getWebApplicationContext(ServletContext src)方法来获得WebApplicationContext对象。
同时WebApplicationContext作为一个属性存储在 ServletContext中。
二、createWebApplicationContext
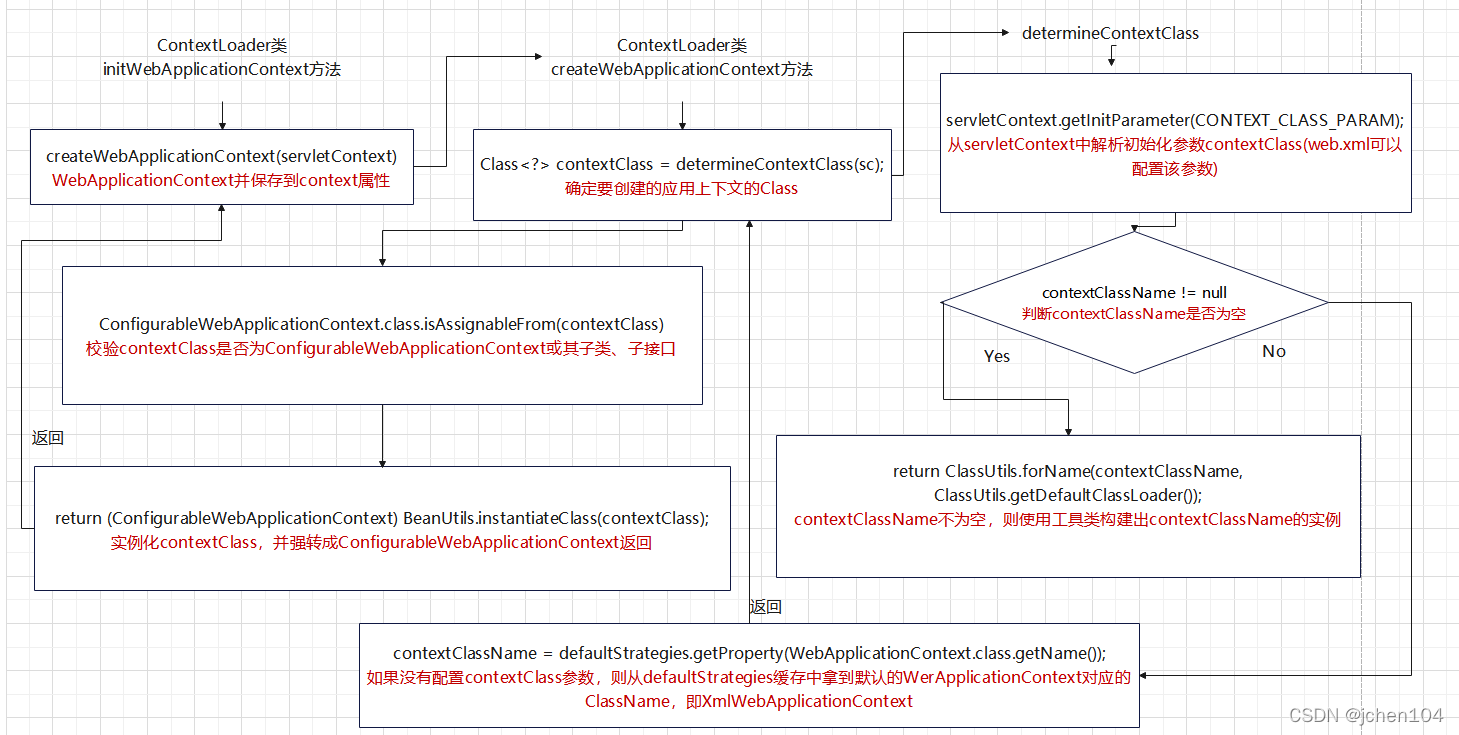
createWebApplicationContext的作用在于创建Spring容器实例。
整个createWebApplicationContext方法的调用链整理如下。
createWebApplicationContext源码如下。
	protected WebApplicationContext createWebApplicationContext(ServletContext sc) {
		// 决定使用哪个容器实现
        Class<?> contextClass = determineContextClass(sc);
		if (!ConfigurableWebApplicationContext.class.isAssignableFrom(contextClass)) {
			throw new ApplicationContextException("Custom context class [" + contextClass.getName() +
					"] is not of type [" + ConfigurableWebApplicationContext.class.getName() + "]");
		}
        // 反射方式创建容器实例
		return (ConfigurableWebApplicationContext) BeanUtils.instantiateClass(contextClass);
	}
1、defaultStrategies
这里插入进来讲一下defaultStrategies,便于理解下文中的容器实现类的获取。
	private static final String DEFAULT_STRATEGIES_PATH = "ContextLoader.properties";
	private static final Properties defaultStrategies;
	static {
		try {
            // 根据 DEFAULT_STRATEGIES_PATH(ContextLoader.properties) 和 ContextLoader.class 构建 ClassPathResource
            // path在这边为相对路径,全路径为:org.springframework.web.context.ContextLoader.properties
			ClassPathResource resource = new ClassPathResource(DEFAULT_STRATEGIES_PATH, ContextLoader.class);
            // 加载resource的属性,这里取的是默认的WebApplicationContext,即:XmlWebApplicationContext
			defaultStrategies = PropertiesLoaderUtils.loadProperties(resource);
		}
		catch (IOException ex) {
			throw new IllegalStateException("Could not load 'ContextLoader.properties': " + ex.getMessage());
		}
	}
在ContextLoader中静态初始化块内完成了defaultStrategies的赋值,默认取的是同路径下的ContextLoader.properties
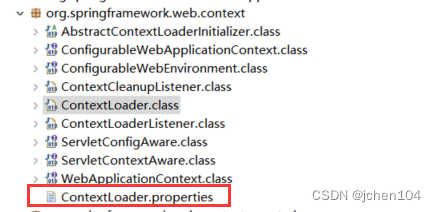
文件内设置了默认的WebApplicationContext,即:XmlWebApplicationContext
org.springframework.web.context.WebApplicationContext=org.springframework.web.context.support.XmlWebApplicationContext2、determineContextClass
然后使用determineContextClass方法确定使用哪个类来实现WebApplicationContext。
	protected Class<?> determineContextClass(ServletContext servletContext) {
        // 从servletContext中解析初始化参数contextClass(web.xml可以配置该参数)
		String contextClassName = servletContext.getInitParameter(CONTEXT_CLASS_PARAM);
        // contextClassName不为空,则使用工具类构建出contextClassName的实例
		if (contextClassName != null) {
			try {
				return ClassUtils.forName(contextClassName, ClassUtils.getDefaultClassLoader());
			}
			catch (ClassNotFoundException ex) {
				throw new ApplicationContextException(
						"Failed to load custom context class [" + contextClassName + "]", ex);
			}
		}
		else {
            // 如果没有配置contextClass参数,则从defaultStrategies缓存中拿到默认的
            // WerApplicationContext对应的ClassName,即:XmlWebApplicationContext
			contextClassName = defaultStrategies.getProperty(WebApplicationContext.class.getName());
			try {
				return ClassUtils.forName(contextClassName, ContextLoader.class.getClassLoader());
			}
			catch (ClassNotFoundException ex) {
				throw new ApplicationContextException(
						"Failed to load default context class [" + contextClassName + "]", ex);
			}
		}
	}
如果没有在web.xml中以<context-param> 的形式设置contextclass参数自定义应用使用哪种Spring容器,则从 defaultStrategies 缓存中拿到默认的 WerApplicationContext 对应的 ClassName,即XmlWebApplicationContext。
三、loadParentContext
WebApplicationContext创建完后,还会为判断是否需要设置父上下文信息,如果需要的话可以通过在web.xml中的参数配置locatorFactorySelector、parentContextKey进行设置。
	protected ApplicationContext loadParentContext(ServletContext servletContext) {
		ApplicationContext parentContext = null;
		// 获取web.xml中的参数,locatorFactorySelector与parentContextKey
		String locatorFactorySelector = servletContext.getInitParameter(LOCATOR_FACTORY_SELECTOR_PARAM);
		String parentContextKey = servletContext.getInitParameter(LOCATOR_FACTORY_KEY_PARAM);
		if (parentContextKey != null) {
			BeanFactoryLocator locator = ContextSingletonBeanFactoryLocator.getInstance(locatorFactorySelector);
			Log logger = LogFactory.getLog(ContextLoader.class);
			if (logger.isDebugEnabled()) {
				logger.debug("Getting parent context definition: using parent context key of '" +
						parentContextKey + "' with BeanFactoryLocator");
			}
			this.parentContextRef = locator.useBeanFactory(parentContextKey);
			parentContext = (ApplicationContext) this.parentContextRef.getFactory();
		}

		return parentContext;
	}
四、configureAndRefreshWebApplicationContext
这一步将会配置并刷新容器,因此极为重要
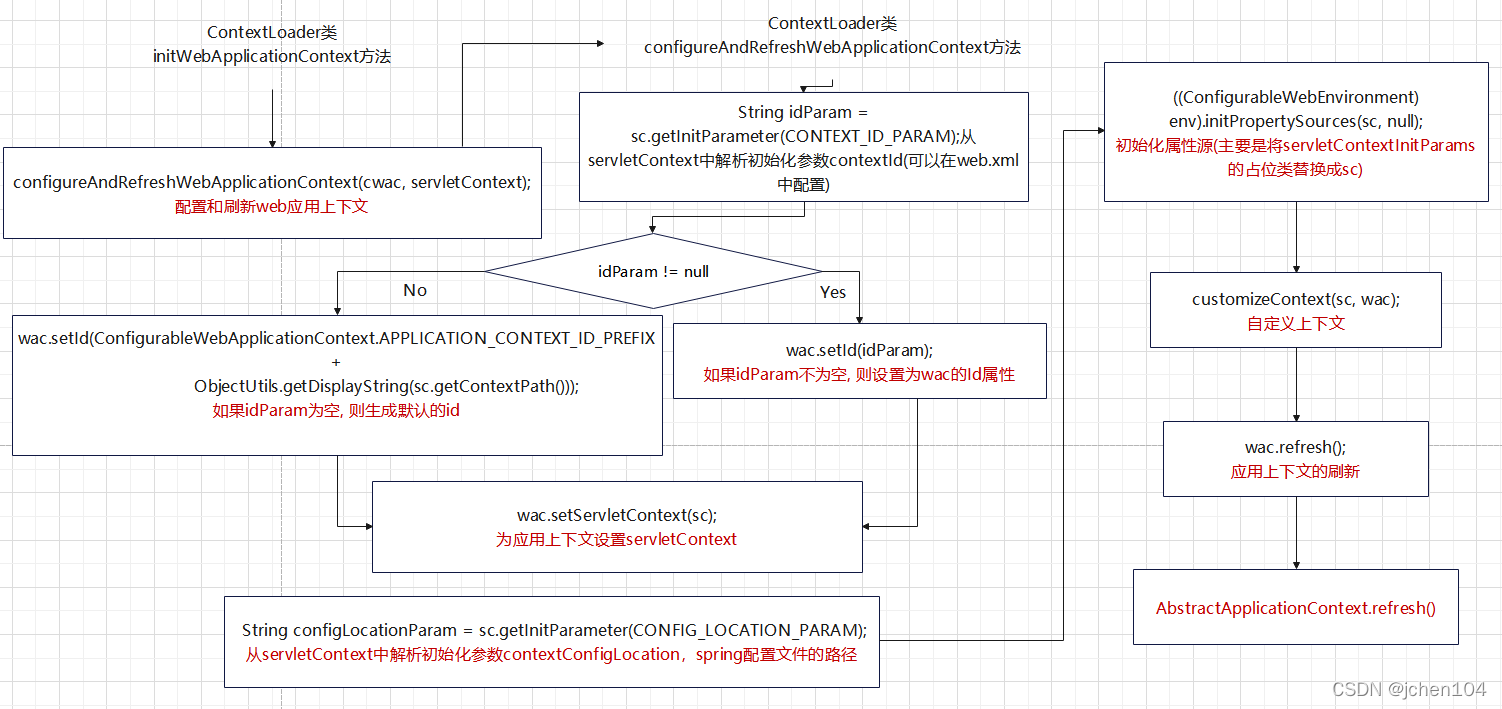
configureAndRefreshWebApplicationContext源码
   protected void configureAndRefreshWebApplicationContext(ConfigurableWebApplicationContext wac, ServletContext sc) {
        // 其余代码
        // 在当前Spring容器中保留对Servlet容器的引用
        wac.setServletContext(sc);
        // 将web.xml中配置的contextConfigLocation参数,即spring配置文件路径置到当前容器中
        String configLocationParam = sc.getInitParameter(CONFIG_LOCATION_PARAM);
        if (configLocationParam != null) {
            // 设置wac的configLocations属性值为configLocationParam
            wac.setConfigLocation(configLocationParam);
        }
        //在容器刷新之前,提前进行属性资源的初始化,以备使用,将ServletContext设置为servletContextInitParams
        ConfigurableEnvironment env = wac.getEnvironment();
        if (env instanceof ConfigurableWebEnvironment) {
            ((ConfigurableWebEnvironment) env).initPropertySources(sc, null);
        }
        //取得web.xml中配置的contextInitializerClasses和globalInitializerClasses对应的初始化器,执行初始化
        customizeContext(sc, wac);
        //刷新容器
        wac.refresh();
    }
1、setConfigLocation
这里首先从CONFIG_LOCATION_PARAM中获取spring配置文件的路径(即contextConfigLocation),取出后置入WebApplicationContext。
    String configLocationParam = sc.getInitParameter(CONFIG_LOCATION_PARAM);
    if (configLocationParam != null) {
        wac.setConfigLocation(configLocationParam);
    }
1.1、setConfigLocation
首先是读取contextConfigLocation的配置,因为兼容了可以配置多个地址,因此这里尝试对路劲进行分割。
然后逐个遍历这个路径,并处理其中的占位符,例如${path}。
    public void setConfigLocation(String location) {
        // tokenizeToStringArray: 将location通过分割符(,;\t\n)分割成String数组
        // setConfigLocations: 将分割后的路径赋值给configLocations
        setConfigLocations(StringUtils.tokenizeToStringArray(location, CONFIG_LOCATION_DELIMITERS));
    }

    public void setConfigLocations(String... locations) {
        if (locations != null) {
            Assert.noNullElements(locations, "Config locations must not be null");
            this.configLocations = new String[locations.length];
            // 遍历解析locations
            for (int i = 0; i < locations.length; i++) {
                // 解析给定路径,并将相应的环境属性值替换占位符
                this.configLocations[i] = resolvePath(locations[i]).trim();
            }
        }
        else {
            this.configLocations = null;
        }
    }
1.2、resolvePath、getEnvironment、createEnvironment
为了解析给定路径,这里会先创建一个环境对象StandardEnvironment。
protected String resolvePath(String path) {
    // getEnvironment:获取环境属性
    // resolveRequiredPlaceholders: 解析给定路径,必要时用相应的环境属性值替换占位符,例如${path}
    return getEnvironment().resolveRequiredPlaceholders(path);
}
@Override
public ConfigurableEnvironment getEnvironment() {
if (this.environment == null) {
// 1.创建Environment
this.environment = createEnvironment();
}
return this.environment;
}protected ConfigurableEnvironment createEnvironment() {
return new StandardEnvironment();
}1.3、StandardServletEnvironment
StandardServletEnvironment的初始化过程也是较为复杂的,这里给出UML图,有兴趣的可以自行了解,这里只针对几个重要过程解析下源码

初始化时,必须先初始化父类。因此,此时会先初始化 AbstractEnvironment,AbstractEnvironment 的构造函数如下。
public AbstractEnvironment() {
    // 1.自定义属性源
    customizePropertySources(this.propertySources);
    if (logger.isDebugEnabled()) {
        logger.debug("Initialized " + getClass().getSimpleName() + " with PropertySources " + this.propertySources);
    }
}

protected void customizePropertySources(MutablePropertySources propertySources) {
}
AbstractEnvironment 中的 customizePropertySources 方法为空方法,通过 protected 修饰,用于给子类进行重写。因此,此时我们会走到 StandardServletEnvironment 中的重写方法。
@Override
protected void customizePropertySources(MutablePropertySources propertySources) {
    // 1.添加servletConfigInitParams属性源(作为占位符, 之后会被替换)
    propertySources.addLast(new StubPropertySource(SERVLET_CONFIG_PROPERTY_SOURCE_NAME));
    // 2.添加servletContextInitParams属性源(作为占位符, 之后会被替换)
    propertySources.addLast(new StubPropertySource(SERVLET_CONTEXT_PROPERTY_SOURCE_NAME));
    if (JndiLocatorDelegate.isDefaultJndiEnvironmentAvailable()) {
        // 3.添加jndiProperties属性源
        propertySources.addLast(new JndiPropertySource(JNDI_PROPERTY_SOURCE_NAME));
    }
    // 4.调用父类中的customizePropertySources方法
    super.customizePropertySources(propertySources);
}
这里会添加servletConfigInitParams、servletContextInitParams这里两个属性源作为占位符,之后会被替换。
最后调用父类AbstractEnvironment中的customizePropertySources。
@Override
protected void customizePropertySources(MutablePropertySources propertySources) {
    // 添加systemProperties属性源
    propertySources.addLast(new MapPropertySource(SYSTEM_PROPERTIES_PROPERTY_SOURCE_NAME, getSystemProperties()));
    // 添加systemEnvironment属性源
    propertySources.addLast(new SystemEnvironmentPropertySource(SYSTEM_ENVIRONMENT_PROPERTY_SOURCE_NAME, getSystemEnvironment()));
}
以上的这些配置中:
- SERVLET_CONFIG_PROPERTY_SOURCE_NAME表示servlet的配置信息,也就是以前在web.xml中配置的 init-param
- SERVLET_CONTEXT_PROPERTY_SOURCE_NAME表示servlet初始化上下文,也就是以前我们在web.xml中配置的 context-param 。
- SYSTEM_ENVIRONMENT_PROPERTY_SOURCE_NAME表示系统环境变量,也就是我们配置JAVA_HOME的地方。
1.4、resolveRequiredPlaceholders
resolveRequiredPlaceholders会进行占位符的解析,这个过程不是我们的重点就不展开看了,有兴趣的朋友可以追踪到AbstractPropertyResolver类的resolveRequiredPlaceholders方法中去了解。
public String resolveRequiredPlaceholders(String text) throws IllegalArgumentException {
    if (this.strictHelper == null) {
        this.strictHelper = createPlaceholderHelper(false);
    }
    return doResolvePlaceholders(text, this.strictHelper);
}
2、initPropertySources
这里,我们将上文setConfigLocation方法中设置的占位符数据源,替换成真正的数据源
public static void initServletPropertySources(
        MutablePropertySources propertySources, ServletContext servletContext, ServletConfig servletConfig) {

    Assert.notNull(propertySources, "'propertySources' must not be null");
    if (servletContext != null && propertySources.contains(StandardServletEnvironment.SERVLET_CONTEXT_PROPERTY_SOURCE_NAME) &&
            propertySources.get(StandardServletEnvironment.SERVLET_CONTEXT_PROPERTY_SOURCE_NAME) instanceof StubPropertySource) {
        // 如果servletContext不为null && propertySources中包含servletContextInitParams数据源 && 该数据源的类型为StubPropertySource,
        // 则将servletContextInitParams的数据源替换成servletContext
        propertySources.replace(StandardServletEnvironment.SERVLET_CONTEXT_PROPERTY_SOURCE_NAME,
                new ServletContextPropertySource(StandardServletEnvironment.SERVLET_CONTEXT_PROPERTY_SOURCE_NAME, servletContext));
    }
    if (servletConfig != null && propertySources.contains(StandardServletEnvironment.SERVLET_CONFIG_PROPERTY_SOURCE_NAME) &&
            propertySources.get(StandardServletEnvironment.SERVLET_CONFIG_PROPERTY_SOURCE_NAME) instanceof StubPropertySource) {
        // 如果servletConfig不为null && propertySources中包含servletConfigInitParams数据源 && 该数据源的类型为StubPropertySource,
        // 则将servletConfigInitParams的数据源替换成servletConfig
        propertySources.replace(StandardServletEnvironment.SERVLET_CONFIG_PROPERTY_SOURCE_NAME,
                new ServletConfigPropertySource(StandardServletEnvironment.SERVLET_CONFIG_PROPERTY_SOURCE_NAME, servletConfig));
    }
}
至此,我们了解到Spring容器的environment表示的是容器运行的基础环境配置,其中保存的是Profile和Properties,其initPropertySources方法是在ConfigurableWebEnvironment接口中定义的,是专门用于web应用中来执行真实属性资源与占位符资源(StubPropertySource)的替换操作的。
StubPropertySource就是一个占位用的实例,在应用上下文创建时,当实际属性资源无法及时初始化时,临时使用这个实例进行占位,等到容器刷新的时候执行替换操作。
3、customizeContext
    protected void customizeContext(ServletContext sc, ConfigurableWebApplicationContext wac) {
        // 获取初始化器类集合
        List<Class<ApplicationContextInitializer<ConfigurableApplicationContext>>> initializerClasses =
                determineContextInitializerClasses(sc);
        // 如果initializerClasses不为空, 遍历处理initializerClasses
        for (Class<ApplicationContextInitializer<ConfigurableApplicationContext>> initializerClass : initializerClasses) {
            Class<?> initializerContextClass =
                    GenericTypeResolver.resolveTypeArgument(initializerClass, ApplicationContextInitializer.class);
            if (initializerContextClass != null && !initializerContextClass.isInstance(wac)) {
                throw new ApplicationContextException(String.format(
                        "Could not apply context initializer [%s] since its generic parameter [%s] " +
                        "is not assignable from the type of application context used by this " +
                        "context loader: [%s]", initializerClass.getName(), initializerContextClass.getName(),
                        wac.getClass().getName()));
            }
            // 实例化initializerClass, 并添加到contextInitializers中
            this.contextInitializers.add(BeanUtils.instantiateClass(initializerClass));
        }
        // 排序并执行,编号越小越早执行
        AnnotationAwareOrderComparator.sort(this.contextInitializers);
		// 遍历实例化后的contextInitializers
        for (ApplicationContextInitializer<ConfigurableApplicationContext> initializer : this.contextInitializers) {
			// 调用initializer的initialize方法,进行自定义初始化wac操作
            initializer.initialize(wac);
        }
    }
3.1、determineContextInitializerClasses
判断web.xml中是否配置了globalInitializerClasses、contextInitializerClasses等属性。
    protected List<Class<ApplicationContextInitializer<ConfigurableApplicationContext>>>
            determineContextInitializerClasses(ServletContext servletContext) {

        List<Class<ApplicationContextInitializer<ConfigurableApplicationContext>>> classes =
                new ArrayList<Class<ApplicationContextInitializer<ConfigurableApplicationContext>>>();
        //通过<context-param>属性配置globalInitializerClasses获取全局初始化类名
        String globalClassNames = servletContext.getInitParameter(GLOBAL_INITIALIZER_CLASSES_PARAM);
        if (globalClassNames != null) {
            for (String className : StringUtils.tokenizeToStringArray(globalClassNames, INIT_PARAM_DELIMITERS)) {
                classes.add(loadInitializerClass(className));
            }
        }
        //通过<context-param>属性配置contextInitializerClasses获取容器初始化类名
        String localClassNames = servletContext.getInitParameter(CONTEXT_INITIALIZER_CLASSES_PARAM);
        if (localClassNames != null) {
            for (String className : StringUtils.tokenizeToStringArray(localClassNames, INIT_PARAM_DELIMITERS)) {
                classes.add(loadInitializerClass(className));
            }
        }

        return classes;
    }
3.2、loadInitializerClass
loadInitializerClass方法用于使用反射创建所传参数className的实例。
@SuppressWarnings("unchecked")
private Class<ApplicationContextInitializer<ConfigurableApplicationContext>> loadInitializerClass(String className) {
    try {
        // 实例化className
        Class<?> clazz = ClassUtils.forName(className, ClassUtils.getDefaultClassLoader());
        if (!ApplicationContextInitializer.class.isAssignableFrom(clazz)) {
            // 校验clazz是否实现了ApplicationContextInitializer接口, 如果没有则抛异常
            throw new ApplicationContextException(
                    "Initializer class does not implement ApplicationContextInitializer interface: " + clazz);
        }
        // clazz强转成ApplicationContextInitializer, 并返回
        return (Class<ApplicationContextInitializer<ConfigurableApplicationContext>>) clazz;
    } catch (ClassNotFoundException ex) {
        throw new ApplicationContextException("Failed to load context initializer class [" + className + "]", ex);
    }
}
可以很明显的看出 customizeContext 方法是 Spring 提供给开发者的一个扩展点,我们可以通过此方法对 ConfigurableApplicationContext 进行一些自定义操作。
例如下面的 SpringApplicationContextInitializer,可以在 initialize 方法中进行自己的逻辑操作,例如:添加监听器、添加 BeanFactoryPostProcessor。
public class SpringApplicationContextInitializer implements ApplicationContextInitializer<ConfigurableApplicationContext> {
    @Override
    public void initialize(ConfigurableApplicationContext applicationContext) {
        // 自己的逻辑实现

        // 例子1:通过硬编码的方式添加监听器
        EarlyListener earlyListener = new EarlyListener();
        applicationContext.addApplicationListener(earlyListener);

        // 例子2:通过硬编码的方式添加BeanFactoryPostProcessor
        MyBeanFactoryPostProcessor myBeanFactoryPostProcessor = new MyBeanFactoryPostProcessor();
        applicationContext.addBeanFactoryPostProcessor(myBeanFactoryPostProcessor);
    }
}
然后在web.xml中,定义 contextInitializerClasses 或 globalInitializerClasses 参数,参数值为 SpringApplicationContextInitializer 的全路径
<context-param>
	<param-name>contextInitializerClasses</param-name>
	<param-value>com.test.SpringApplicationContextInitializer</param-value>
</context-param>
配置完后,当项目启动走到 customizeContext 方法时,会找到 SpringApplicationContextInitializer,初始化该类,最后调用该类的 initialize 方法。
WebApplicationContext初始化后进行refresh刷新,进入AbstractApplicationContext类的refresh方法中,下篇文章我们就进入refresh中的第一个重要步骤obtainFreshBeanFactory方法中去了解bean是如何解析的。


 726
726

 被折叠的 条评论
为什么被折叠?
被折叠的 条评论
为什么被折叠?
 到【灌水乐园】发言


