


Typer
Typer is a library for building CLI applications that users will love using and developers will love creating. Based on Python 3.6+ type hints.(跟fastapi的原理相同,都是python上用来构建api服务中cli的一个高性能框架)
Documentation: https://typer.tiangolo.com
Source Code: https://github.com/tiangolo/typer
代码示例
import typer
def main(name: str):
    typer.echo(f"Hello {name}")
if __name__ == "__main__":
    typer.run(main)
import typer
app = typer.Typer()

@app.command()
def hello(name: str):
    typer.echo(f"Hello {name}")

@app.command()
def goodbye(name: str, formal: bool = False):
    if formal:
        typer.echo(f"Goodbye Ms. {name}. Have a good day.")
    else:
        typer.echo(f"Bye {name}!")

if __name__ == "__main__":
    app()
使用演示
💬 Check the --help
python main.py --help

Usage: main.py [OPTIONS] COMMAND [ARGS]...

Options:
  --install-completion  Install completion for the current shell.
  --show-completion     Show completion for the current shell, to copy it or customize the installation.
  --help                Show this message and exit.

Commands:
  goodbye
  hello

💬 You have 2 subcommands (the 2 functions): goodbye and hello

💬 Now get the --help for hello

python main.py hello --help

Usage: main.py hello [OPTIONS] NAME

Arguments:
  NAME  [required]

Options:
  --help  Show this message and exit.

💬 And now get the --help for goodbye

python main.py goodbye --help

Usage: main.py goodbye [OPTIONS] NAME

Arguments:
  NAME  [required]

Options:
  --formal / --no-formal  [default: False]
  --help                  Show this message and exit.

💬 Automatic --formal and --no-formal for the bool option 🎉

💬 And if you use it with the hello command

python main.py hello Camila

Hello Camila

💬 And with the goodbye command

python main.py goodbye Camila

Bye Camila!

💬 And with --formal

python main.py goodbye --formal Camila

Goodbye Ms. Camila. Have a good day.
Rich
命令行花式输出
转:https://juejin.cn/post/6844904179333332999
from rich.console import Console
console = Console()

console.print([1, 2, 3])
console.print("[blue underline]Looks like a link")
#console.print(locals())
console.print("MEDUSA", style="white on blue")
console = Console(width=20)

style = "bold white on blue"
console.print("Medusa", style=style)
console.print("Medusa", style=style, justify="left")
console.print("Medusa", style=style, justify="center")
console.print("Medusa", style=style, justify="right")
DearPyGui
转:https://blog.youkuaiyun.com/hekaiyou/article/details/109386393
Dear PyGui 库用于开发跨平台的 GUI 应用程序,于2020年9月发布,通过对 Dear ImGui 的包装,使它与众不同(相比其他的 Python GUI 框架)。DearPyGui 在后台使用 C++ 的 Bloat-free 立即模式图形用户界面,能够实现灵活的动态界面。而且,DearPyGui 不使用系统平台的窗口控件,而是使用计算机的显卡来绘制窗口控件,因此能支持所有系统平台。
先确保你的 Python 版本在 3.7 以上,再通过 pip install dearpygui 命令下载 DearPyGui 库。
from dearpygui.core import *
from dearpygui.simple import *
def save_callback(sender, data):
print("保存点击")
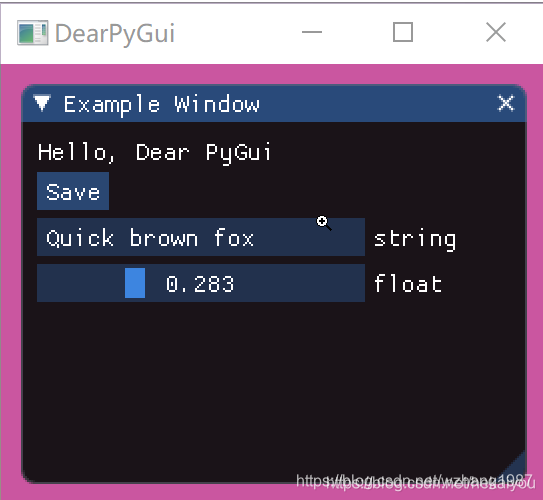
with window("Example Window"):
add_text("Hello, Dear PyGui")
add_button("Save", callback=save_callback)
add_input_text("string", default_value="Quick brown fox")
add_slider_float("float", default_value=0.283, max_value=1)
start_dearpygui()
PrettyErrors
美化和优化错误显示
安装:pip install pretty-errors
全局配置:python3 -m pretty_errors
import pretty_errors
print(1/0)
Diagrams
一个制作架构示意图的工具
转:https://www.cnblogs.com/baby123/archive/2004/01/13/14246824.html
官网 https://diagrams.mingrammer.com/
github地址 https://github.com/mingrammer/diagrams
特别注意要先装和配置Graphviz
转https://www.cnblogs.com/baby123/p/14246829.html
示例
from diagrams import Diagram
from diagrams.aws.compute import EC2
from diagrams.aws.database import RDS
from diagrams.aws.network import ELB
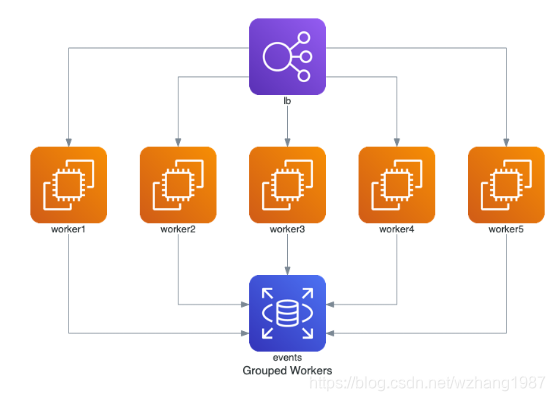
with Diagram("Grouped Workers", show=False, direction="TB"):
ELB("lb") >> [EC2("worker1"),
EC2("worker2"),
EC2("worker3"),
EC2("worker4"),
EC2("worker5")] >> RDS("events")
Hydra and OmegaConf
2个库,配置工具,配合使用可以进行分层批量配置。
Hydra :The Python Bloom Filter.(百度一搜都说是爆破神器)
omegaconf :是一个基于yaml的分层配置系统,支持合并来自多个源的配置(多个配置文件、cli参数) 提供一致的api,而不管配置是如何创建的。
pip install --upgrade hydra-core
pip install omegaconf
https://github.com/facebookresearch/hydra
转:https://zhuanlan.zhihu.com/p/86108053
转:https://blog.youkuaiyun.com/qq_34745899/article/details/79690528(可能没啥用)
关于yaml
转:https://segmentfault.com/a/1190000014620504
Pytorch(lighting)
PyTorch是一个基于Python的库,用来提供一个具有灵活性的深度学习开发平台。PyTorch的工作流程非常接近Python的科学计算库——numpy。
pytorch lighting是更简洁的版本。
官网:https://pytorch.org/get-started/locally/
安装方法有很多,可以用这个装:Anaconda(好处是可以把引用的一起装了,缺点是默认装成沙盒,我还不知道咋调整安装目录)
下载链接
https://mirrors.tuna.tsinghua.edu.cn/anaconda/archive/?C=M&O=D
上面的装好后:
如果有你就装CUDA:Install CUDA, if your machine has a CUDA-enabled GPU.
也可以用pip装,pip命令可以在官网通过选项确认下载。
参考:https://www.cnblogs.com/hanhao970620/p/13589074.html
学习这个要有一定的数学基础,起码要能认全大部分的专业术语。


 4810
4810

 被折叠的 条评论
为什么被折叠?
被折叠的 条评论
为什么被折叠?
 到【灌水乐园】发言


