In this tutorial we are going to see how to use Android AsyncTask. As we read from the Android Documentation :
- AsyncTask enables proper and easy use of the UI thread. This class allows to perform background operations and publish results on the UI thread without having to manipulate threads and/or handlers.
- AsyncTask is designed to be a helper class around
Thread and Handler and does not constitute a generic threading framework. AsyncTasks should ideally be used for short operations (a few seconds at the most.) If you need to keep threads running for long periods of time, it is highly recommended you use the various APIs provided by the java.util.concurrent pacakge such as Executor, ThreadPoolExecutor andFutureTask. - An asynchronous task is defined by a computation that runs on a background thread and whose result is published on the UI thread. An asynchronous task is defined by 3 generic types, called
Params, Progress andResult, and 4 steps, called onPreExecute, doInBackground, onProgressUpdate and onPostExecute.
在这个例子中我们将加载一个网页的背景和在WebView显示它。我们将注意到UI线程在其他UI活动仍然是快速响应。.
For this tutorial, we will use the following tools in a Windows 64-bit platform:
- JDK 1.7
- Eclipse 4.2 Juno
- Android SKD 4.2
1. Create a new Android Project
Open Eclipse IDE and go to File -> New -> Project -> Android -> Android Application Project. You have to specify the Application Name, the Project Name and the Package name in the appropriate text fields and then click Next.

In the next window make sure the “Create activity” option is selected in order to create a new activity for your project, and click Next. This is optional as you can create a new activity after creating the project, but you can do it all in one step.

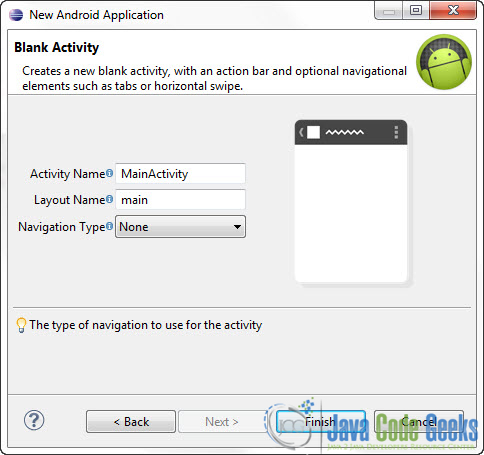
Select “BlankActivity” and click Next.

You will be asked to specify some information about the new activity. In the Layout Name text field you have to specify the name of the file that will contain the layout description of your app. In our case the file res/layout/main.xml will be created. Then, click Finish.
2. Create the main layout of the Application
Open res/layout/main.xml file :

And paste the following code :
01 | <?xml version="1.0" encoding="utf-8"?> |
03 | android:layout_width="match_parent" |
04 | android:layout_height="match_parent" |
05 | android:orientation="vertical" > |
09 | android:layout_width="match_parent" |
10 | android:layout_height="wrap_content" |
11 | android:onClick="readWebpage" |
12 | android:text="Load Webpage" > |
16 | android:id="@+id/button1" |
17 | android:layout_width="match_parent" |
18 | android:layout_height="wrap_content" |
19 | android:onClick="dummyFunc" |
20 | android:text="Dummy Button" /> |
23 | android:id="@+id/webView" |
24 | android:layout_width="fill_parent" |
25 | android:layout_height="fill_parent" /> |
Now you may open the Graphical layout editor to preview the User Interface you created:

3. Code
Now we have to write the code of the application. Use the Package Explorer to navigate to the Java file of the Activity you’ve created:

The code of this tutorial is pretty much self explanatory.
01 | package com.javacodegeeks.android.androidasynctasktutorial; |
03 | import android.app.Activity; |
04 | import android.content.Context; |
05 | import android.os.AsyncTask; |
06 | import android.os.Bundle; |
07 | import android.view.View; |
08 | import android.webkit.WebView; |
09 | import android.widget.Toast; |
11 | public class MainActivity extends Activity { |
12 | final Context context = this; |
14 | /** Called when the activity is first created. */ |
17 | public void onCreate(Bundle savedInstanceState) { |
19 | super.onCreate(savedInstanceState); |
20 | setContentView(R.layout.main); |
24 | private class LoadWebPageASYNC extends AsyncTask<String, Void, String> { |
27 | protected String doInBackground(String... urls) { |
29 | WebView webView = (WebView) findViewById(R.id.webView); |
30 | webView.getSettings().setJavaScriptEnabled(true); |
31 | webView.loadUrl(urls[0]); |
37 | protected void onPostExecute(String result) { |
42 | public void dummyFunc(View view){ |
43 | Toast.makeText(MainActivity.this, "Button Clicked", Toast.LENGTH_SHORT).show(); |
47 | public void readWebpage(View view) { |
48 | LoadWebPageASYNC task = new LoadWebPageASYNC(); |
4. Run the application
This is the main screen of our Application:

Now, when you press the “Load Webpage” button, the AsyncTask will start downloading and loading the Web Page. But, meanwhile if whe press the “Dummy Button”, you will see that the UI remains responsive. As you can see the web pages is loading and the UI is fast and responsive:

After a little while:

Download Eclipse Project
This was an Android Timer Example. Download the Eclipse Project of this tutorial: AndroidAsyncTaskTutorial.zip


 本文介绍如何使用AndroidAsyncTask在Android应用中加载网页,并确保UI线程保持快速响应,同时演示了创建新Android项目、布局设计、代码实现及运行应用的过程。


 1087
1087

 被折叠的 条评论
为什么被折叠?
被折叠的 条评论
为什么被折叠?
 到【灌水乐园】发言


