


基本概念:
服务网格(Service Mesh)是一个基础设施层,它为应用程序提供零信任安全、可观察性和高级流量管理等功能, 而无需更改代码。
Istio 是最受欢迎、最强大、最值得信赖的服务网格。 Istio 可确保云原生和分布式系统具有弹性,帮助现代企业在保持连接和保护的同时跨不同平台维护其工作负载。 它启用安全和治理控制,包括 mTLS 加密、策略管理和访问控制、 支持网络功能,例如金丝雀部署、A/B 测试、负载平衡、故障恢复, 并增加对整个资产流量的可观察性。
https://istio.io/latest/zh/about/service-mesh/
灰度发布(又名金丝雀发布)是指在黑与白之间,能够平滑过渡的一种发布方式。在其上可以进行A/B testing,即让一部分用户继续用产品特性A,一部分用户开始用产品特性B,如果用户对B没有什么反对意见,那么逐步扩大范围,把所有用户都迁移到B上面来。灰度发布可以保证整体系统的稳定,在初始灰度的时候就可以发现、调整问题,以保证其影响度。
百度百科
这里也解释一下我的 Spring Cloud 微服务,作为本次实战的演示项目包含 api-gateway、auth、account、notification 四个服务。其中api-gateway是服务网关,其他三个是应用服务有调用关系。应用服务都提供了 /ping 接口,会返回服务名和版本号以及调用的下游服务信息。

关注公众号“懂点代码的朋友”回复关键字:hello-istio 获取项目源代码
项目环境:
Kubernetes (v1.29.2)
Istio (1.22.1)
开始部署操作
创建一个新的namespace
kubectl create ns hello-istio
开启istio自动注入
kubectl label namespace hello-istio istio-injection=enabled
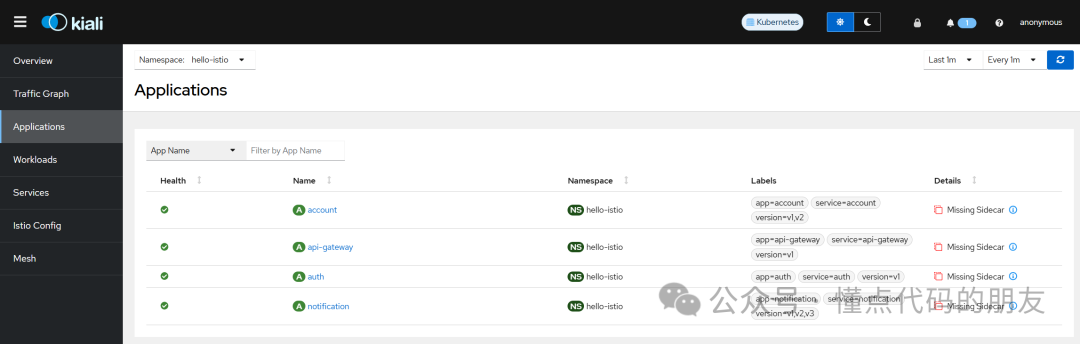
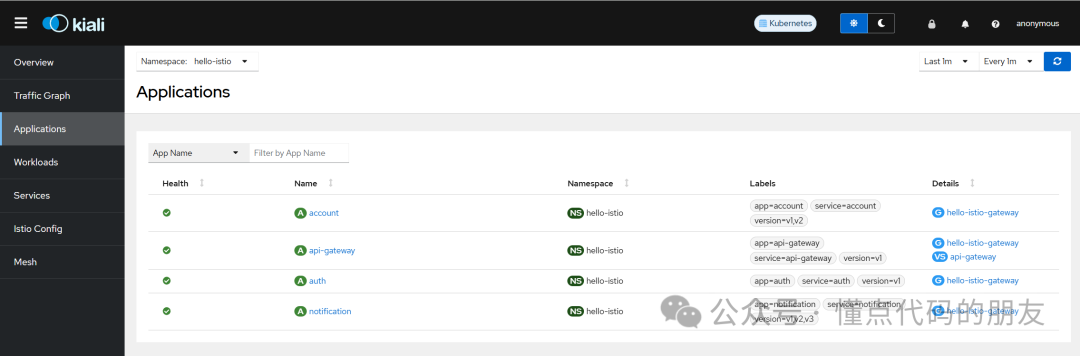
如果没开启自动注入最后在kiali将会看到下图中的“Missing Sidecar”提示,执行开启自动注入后重启所有 deployment 即可。
构建Docker 镜像
以 api-gateway 为例,进入项目目录执行
docker build -t api-gateway:0.0.1 .
部署到 Kubernetes
在项目根目录直接执行
kubectl -n hello-istio apply -f deployment.yaml
项目中 deployment.yaml 文件内容如下,会部署4个服务的 Service 以及4个服务的多个版本 Deployment。(正常在灰度之前只会有4个服务的一个版本,这里为了快速实战演示直接一次部署了多个版本)
# 给 notification、account、auth、api-gateway 配置 Service

apiVersion: v1
kind: Service
metadata:
  labels:
    app: notification
    service: notification
  name: notification
spec:
  ports:
    - name: http
      port: 80
      targetPort: 8080
  selector:
    app: notification
---
apiVersion: v1
kind: Service
metadata:
  labels:
    app: account
    service: account
  name: account
spec:
  ports:
    - name: http
      port: 80
      targetPort: 8080
  selector:
    app: account
---
apiVersion: v1
kind: Service
metadata:
  labels:
    app: auth
    service: auth
  name: auth
spec:
  ports:
    - name: http
      port: 80
      targetPort: 8080
  selector:
    app: auth
---
apiVersion: v1
kind: Service
metadata:
  labels:
    app: api-gateway
    service: api-gateway
  name: api-gateway
spec:
  ports:
    - name: http
      port: 80
      targetPort: 8080
  selector:
    app: api-gateway


# 部署 v1 版本的 notification、account、auth、api-gateway 服务

# v1 notification
apiVersion: apps/v1
kind: Deployment
metadata:
  name: notification
  labels:
    app: notification
    version: v1
spec:
  selector:
    matchLabels:
      app: notification
      version: v1
  replicas: 1
  template:
    metadata:
      labels:
        app: notification
        version: v1
    spec:
      containers:
        - name: notification
          image: notification:0.0.1
          imagePullPolicy: IfNotPresent
          ports:
            - containerPort: 8080
          env:
          - name: JAVA_OPTS
            value: "-Xmx256M -Xms256M -Dserver.port=8080 -Dinfo.app.version=v1.0"
          resources:
            requests:
              cpu: "100m"
              memory: "256Mi"
            limits:
              cpu: "200m"
              memory: "512Mi"
---
# v1 account
apiVersion: apps/v1
kind: Deployment
metadata:
  name: account
  labels:
    app: account
    version: v1
spec:
  selector:
    matchLabels:
      app: account
      version: v1
  replicas: 1
  template:
    metadata:
      labels:
        app: account
        version: v1
    spec:
      containers:
        - name: account
          image: account:0.0.1
          imagePullPolicy: IfNotPresent
          ports:
            - containerPort: 8080
          env:
          - name: JAVA_OPTS
            value: "-Xmx256M -Xms256M -Dserver.port=8080 -Dinfo.app.version=v1.0 -Dnotification.url=http://notification"
          resources:
            requests:
              cpu: "100m"
              memory: "256Mi"
            limits:
              cpu: "200m"
              memory: "512Mi"
---
# v1 auth
apiVersion: apps/v1
kind: Deployment
metadata:
  name: auth
  labels:
    app: auth
    version: v1
spec:
  selector:
    matchLabels:
      app: auth
      version: v1
  replicas: 1
  template:
    metadata:
      labels:
        app: auth
        version: v1
    spec:
      containers:
        - name: auth
          image: auth:0.0.1
          imagePullPolicy: IfNotPresent
          ports:
            - containerPort: 8080
          env:
          - name: JAVA_OPTS
            value: "-Xmx256M -Xms256M -Dserver.port=8080 -Dinfo.app.version=v1.0 -Dnotification.url=http://notification -Daccount.url=http://account"
          resources:
            requests:
              cpu: "100m"
              memory: "256Mi"
            limits:
              cpu: "200m"
              memory: "512Mi"
---
# v1 api-gateway
apiVersion: apps/v1
kind: Deployment
metadata:
  name: api-gateway
  labels:
    app: api-gateway
    version: v1
spec:
  selector:
    matchLabels:
      app: api-gateway
      version: v1
  replicas: 1
  template:
    metadata:
      labels:
        app: api-gateway
        version: v1
    spec:
      containers:
        - name: api-gateway
          image: api-gateway:0.0.1
          imagePullPolicy: IfNotPresent
          ports:
            - containerPort: 8080
          env:
          - name: JAVA_OPTS
            value: "-Xmx256M -Xms256M -Dserver.port=8080 -Dspring.profiles.active=k8s"
          resources:
            requests:
              cpu: "100m"
              memory: "256Mi"
            limits:
              cpu: "200m"
              memory: "512Mi"
---

# 部署 1 个 v2 版本的 account 服务
# v2 account
apiVersion: apps/v1
kind: Deployment
metadata:
  name: account-v2
  labels:
    app: account
    version: v2
spec:
  selector:
    matchLabels:
      app: account
      version: v2
  replicas: 1
  template:
    metadata:
      labels:
        app: account
        version: v2
    spec:
      containers:
        - name: account-v2
          image: account:0.0.1
          imagePullPolicy: IfNotPresent
          ports:
            - containerPort: 8080
          env:
          - name: JAVA_OPTS
            value: "-Xmx256M -Xms256M -Dserver.port=8080 -Dinfo.app.version=v2.0 -Dnotification.url=http://notification"
          resources:
            requests:
              cpu: "100m"
              memory: "256Mi"
            limits:
              cpu: "200m"
              memory: "512Mi"
---

# 部署 1 个 v2 和 1 个 v3 版本的 notification 服务
# v2 notification
apiVersion: apps/v1
kind: Deployment
metadata:
  name: notification-v2
  labels:
    app: notification
    version: v2
spec:
  selector:
    matchLabels:
      app: notification
      version: v2
  replicas: 1
  template:
    metadata:
      labels:
        app: notification
        version: v2
    spec:
      containers:
        - name: notification-v2
          image: notification:0.0.1
          imagePullPolicy: IfNotPresent
          ports:
            - containerPort: 8080
          env:
          - name: JAVA_OPTS
            value: "-Xmx256M -Xms256M -Dserver.port=8080 -Dinfo.app.version=v2.0"
          resources:
            requests:
              cpu: "100m"
              memory: "256Mi"
            limits:
              cpu: "200m"
              memory: "512Mi"
---
# v3 notification
apiVersion: apps/v1
kind: Deployment
metadata:
  name: notification-v3
  labels:
    app: notification
    version: v3
spec:
  selector:
    matchLabels:
      app: notification
      version: v3
  replicas: 1
  template:
    metadata:
      labels:
        app: notification
        version: v3
    spec:
      containers:
        - name: notification-v3
          image: notification:0.0.1
          imagePullPolicy: IfNotPresent
          ports:
            - containerPort: 8080
          env:
          - name: JAVA_OPTS
            value: "-Xmx256M -Xms256M -Dserver.port=8080 -Dinfo.app.version=v3.0"
          resources:
            requests:
              cpu: "100m"
              memory: "256Mi"
            limits:
              cpu: "200m"
              memory: "512Mi"
部署之后 Kubernetes Dashboard 可看到如下效果


测试服务访问
也可在 pod 中执行 curl 命令进行测试,下面是在打通网络的环境下直接用浏览器访问的效果。
curl http://api-gateway.hello-istio/auth/ping
接入 Istio 服务网格
服务部署完成后开始将整个微服务接入到 Istio 服务网格,在此之前服务使用的都是 Kubernetes 的服务发现,通过 Service进行的服务调用。
打开 Kiali 面板
为方便后续查看和操作先打开 kiali 面板
istioctl dashboard kiali
执行接入 Istio 服务网格
kubectl -n hello-istio apply -f hello-istio-gateway.yaml
hello-istio-gateway.yaml 文件内容如下(准备自己的域名和域名解析):
apiVersion: networking.istio.io/v1alpha3
kind: Gateway
metadata:
  name: hello-istio-gateway
spec:
  # The selector matches the ingress gateway pod labels.
  # If you installed Istio using Helm following the standard documentation, this would be "istio=ingress"
  selector:
    istio: ingressgateway # use istio default controller
  servers:
    - port:
        number: 80
        name: http
        protocol: HTTP
      hosts:
        - "istio.ready321.cn"
---

apiVersion: networking.istio.io/v1alpha3
kind: VirtualService
metadata:
  name: api-gateway
spec:
  hosts:
    - "istio.ready321.cn"
  gateways:
    - hello-istio-gateway
  http:
    - route:
        - destination:
            host: api-gateway
            port:
              number: 80
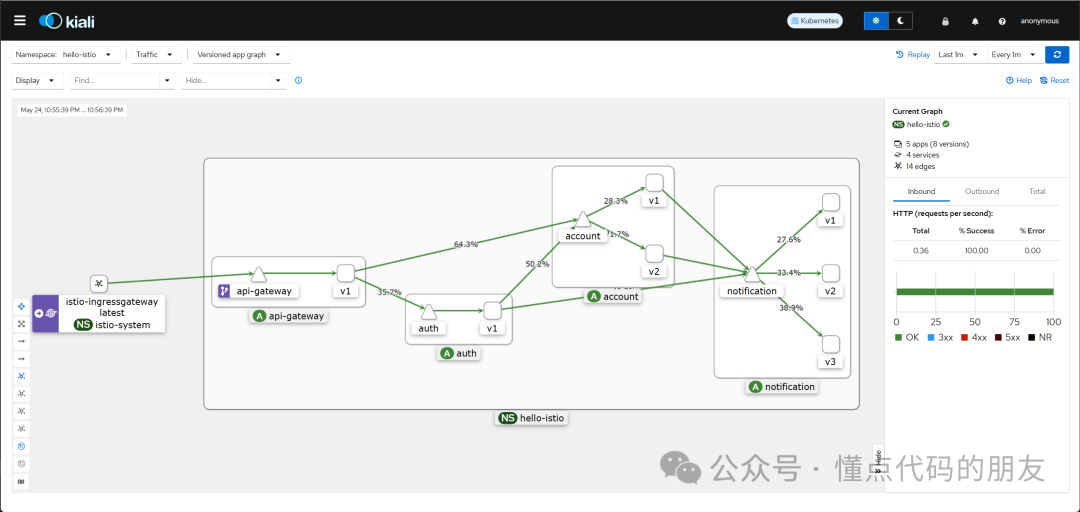
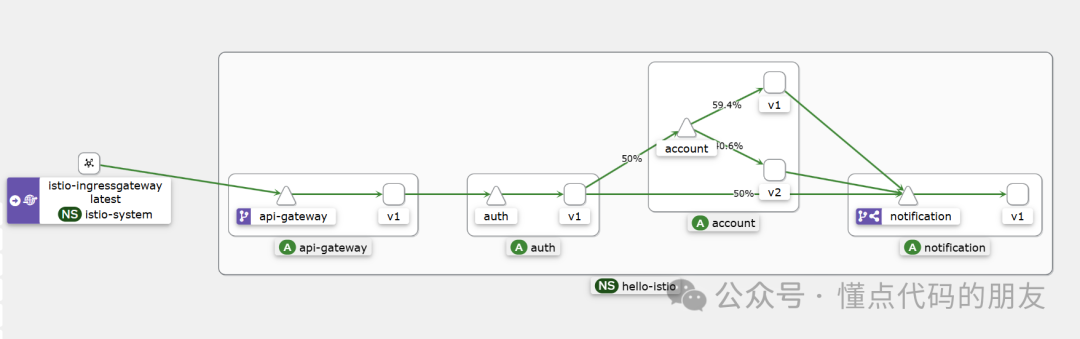
测试接入 Istio 之后的效果,此时可以通过刚才配置的域名进行访问,在 Kiali 的Traffic Graph 中可以看到相关的调用链路。


此时还没有进行流量的版本控制所以可以看到各个版本均有流量访问
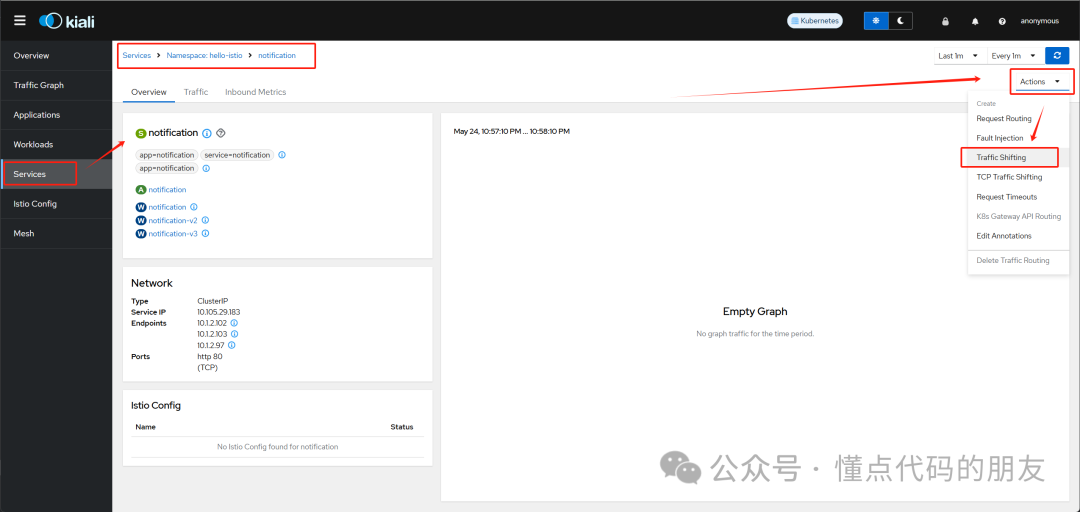
实施灰度发布
设置全部使用v1版本
这里为了简单直接在 kiali 中进行操作设置

测试效果,已均为v1版本。

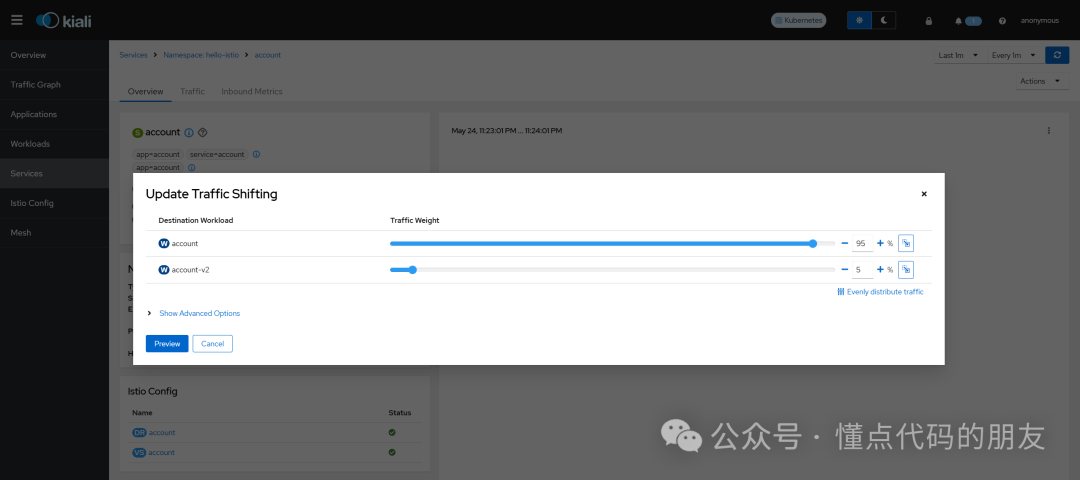
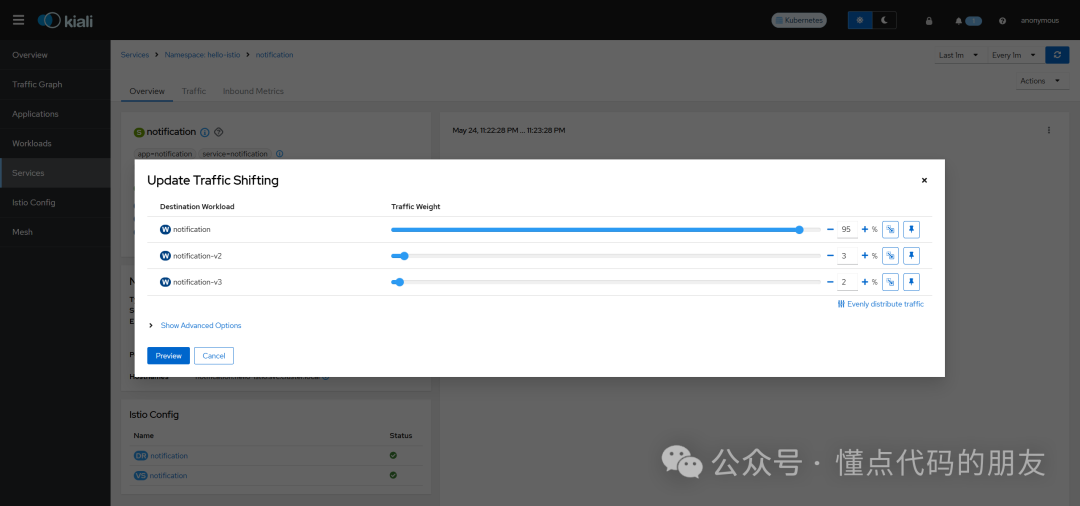
控制5%的流量走新版本
设置 account 服务 v1:95%,v2:5%
设置 notification 服务 v1:95% ,v2:3%,v3:2%
多次测试访问后可查看效果
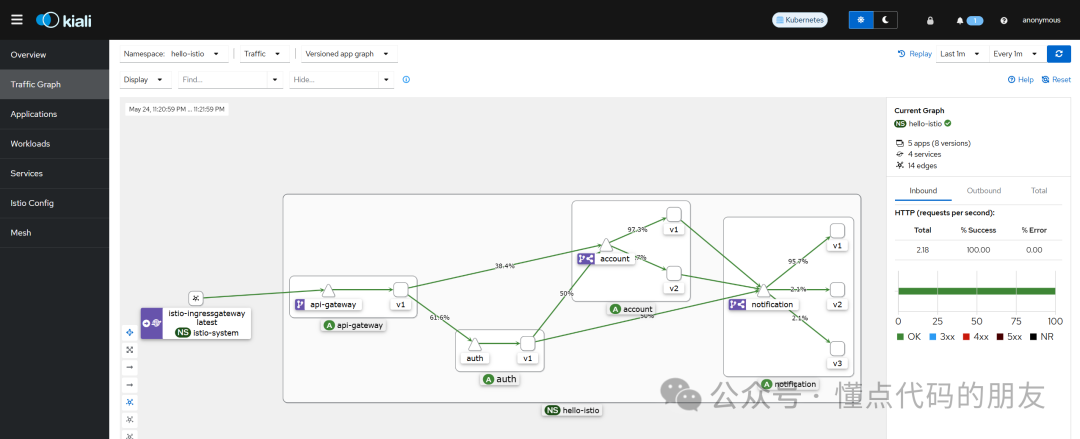
至此灰度的控制已经完成,后续根据情况调整版本的流量访问。在新版本确认无误后可以结束灰度期,全部使用新版本。


 268
268

 被折叠的 条评论
为什么被折叠?
被折叠的 条评论
为什么被折叠?
 到【灌水乐园】发言


