


Day02-1JS
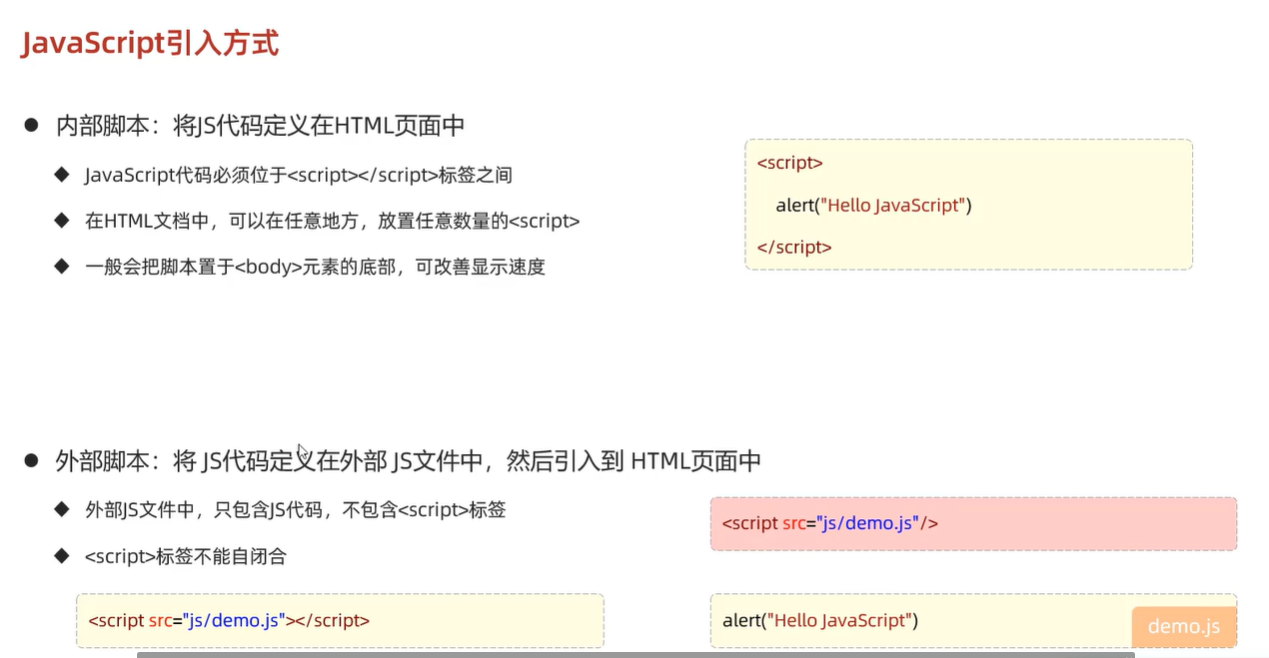
一、JS引入方式
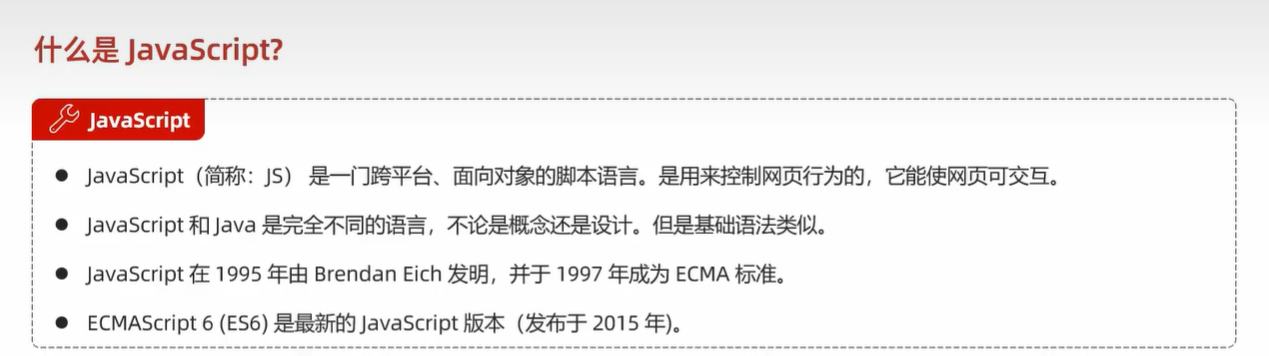
二、JS基础语法
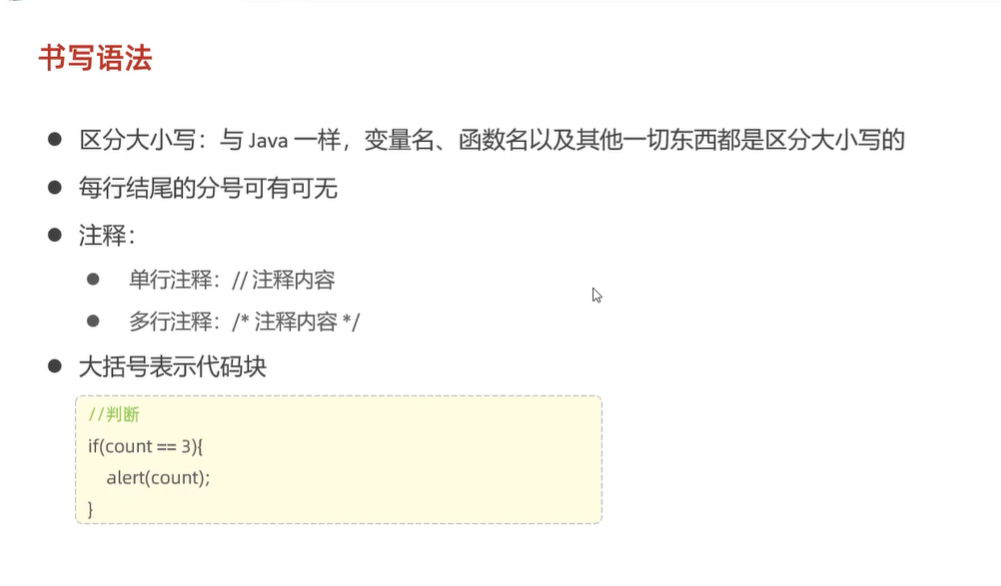
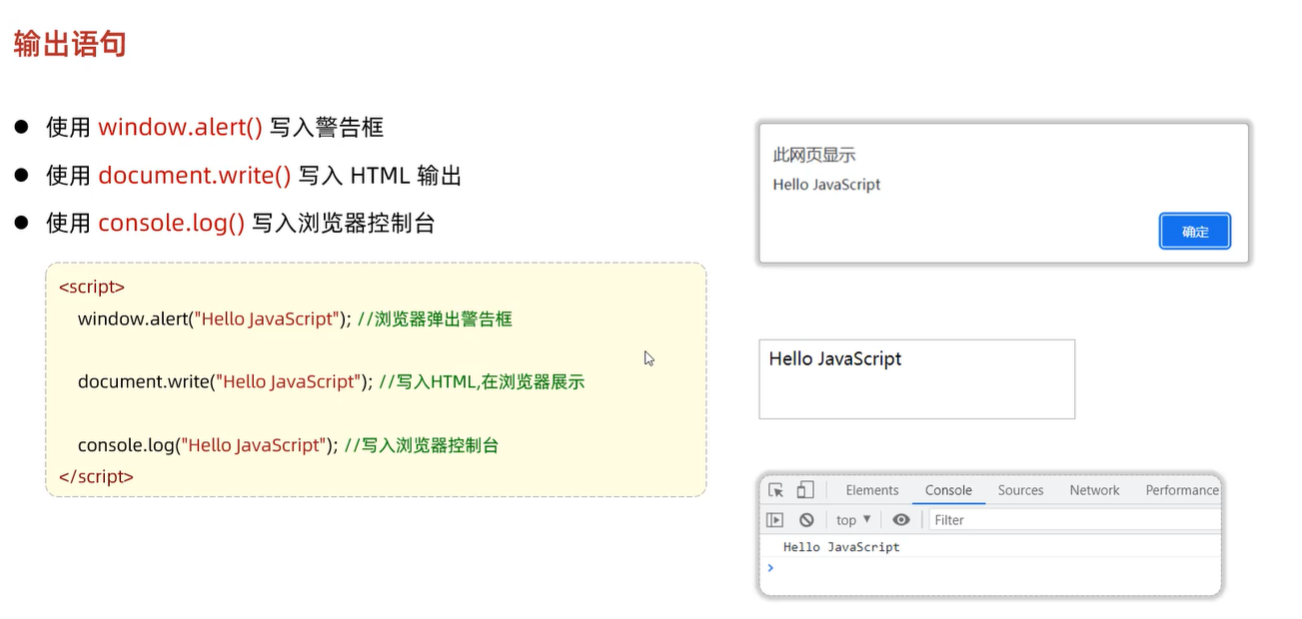
(一)书写语法
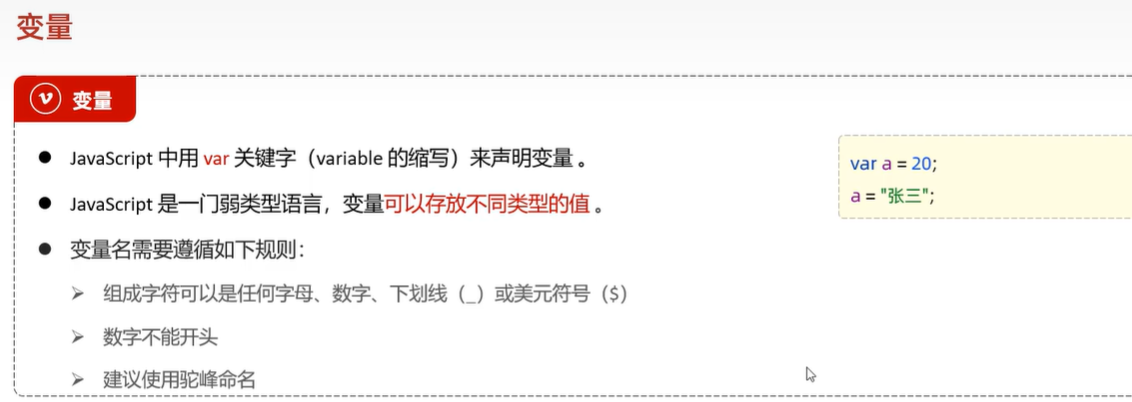
(二)变量

(三)数据类型、运算符、流程控制语句
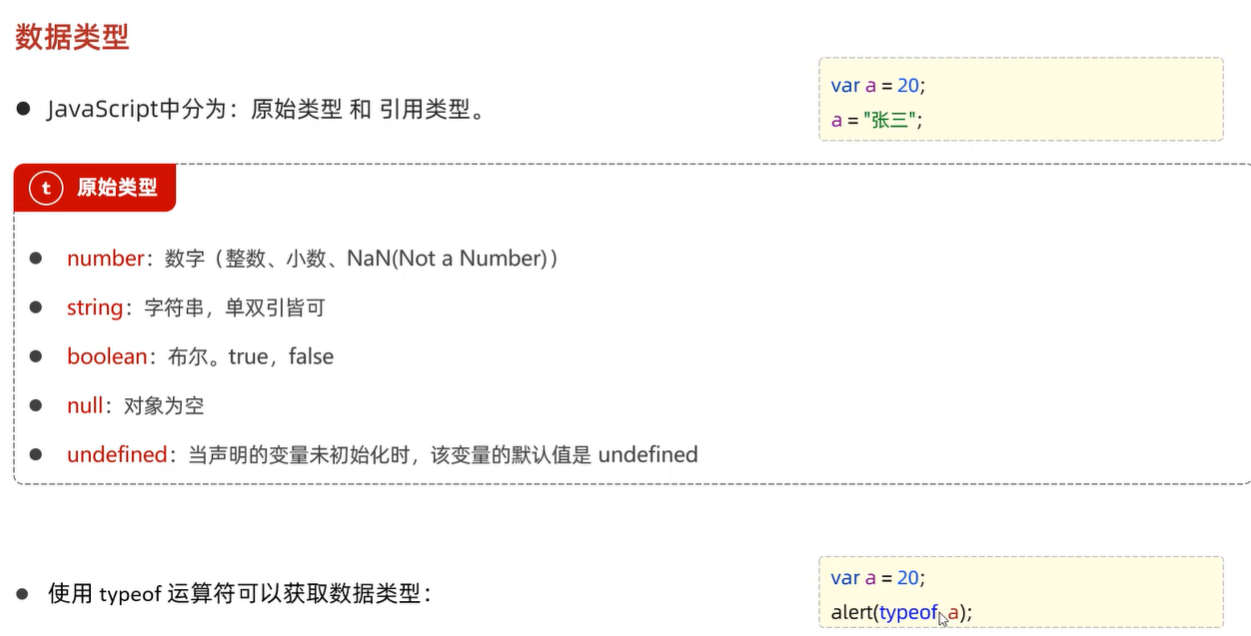
1.数据类型
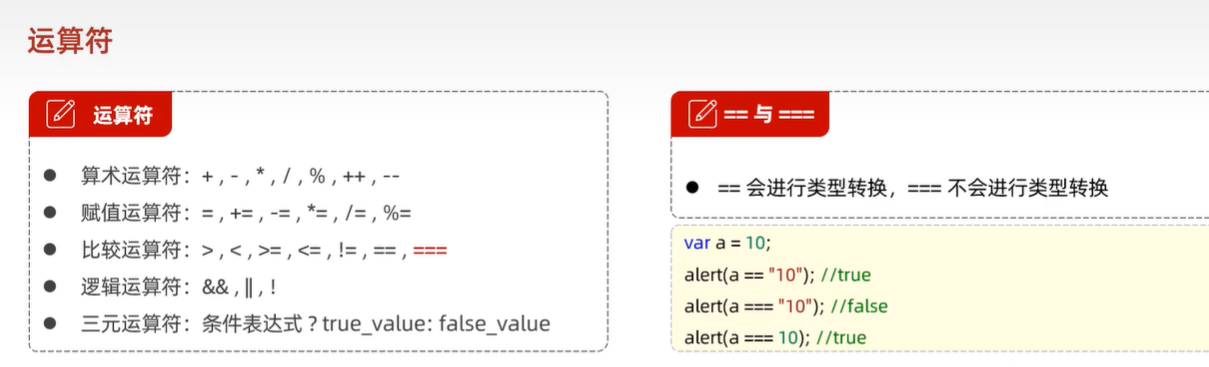
2.运算符
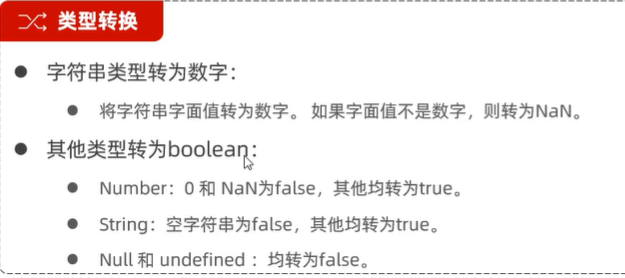
alert(parserInt("12"));//12
alert(parserInt("12A45"));//12
alert(parserInt("A45"));//NAN(not a number)
空格字符串也是true
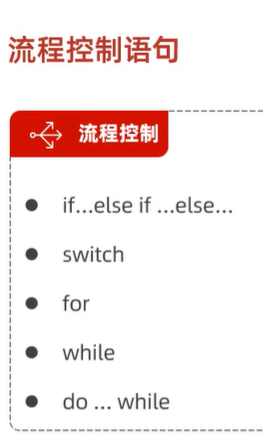
3.流程控制语句
官方网站:https://www.w3school.com.cn/js/index.asp
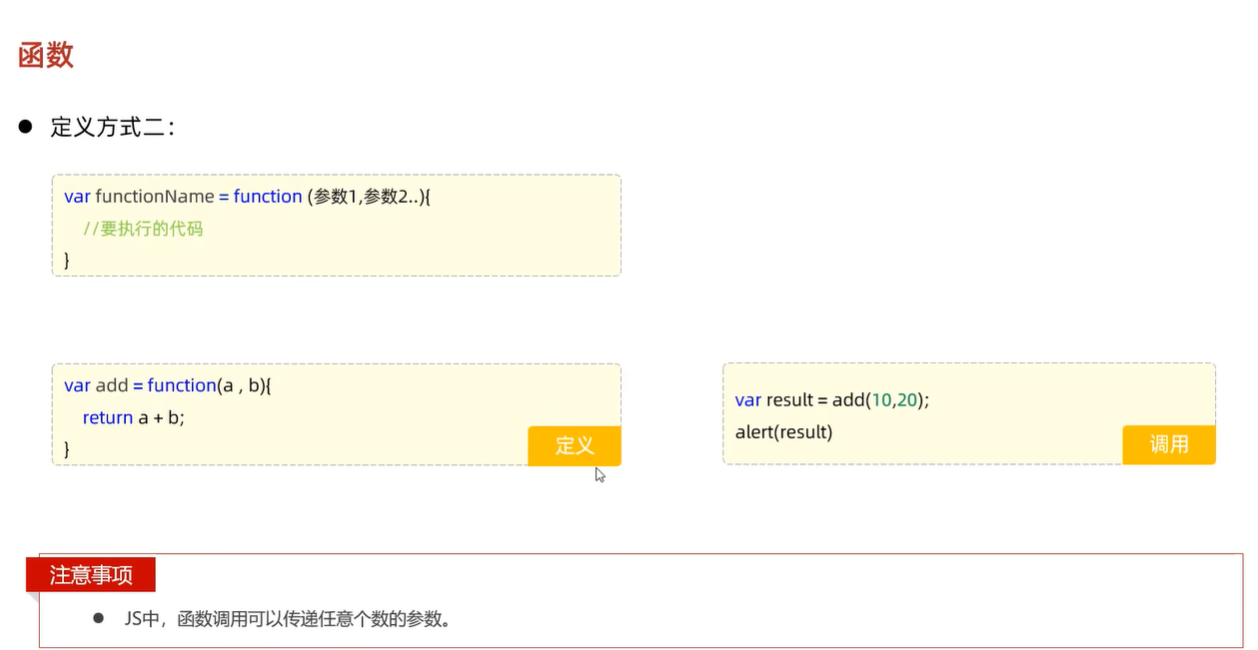
三、JS函数

<!DOCTYPE html>
<html lang="en">
<head>
    <meta charset="UTF-8">
    <meta name="viewport" content="width=device-width, initial-scale=1.0">
    <title>Document</title>
</head>
<body>

</body>
<script>

    //定义函数-1
    /* function add(a, b){
        return a + b;
    } */
    //定义函数-2
    var add = function(a, b){
        return a + b;
    }
    //调用函数
    var result = add(10, 20);
    alert(result);
</script>
</html>
四、JS对象
(一)JS基础对象
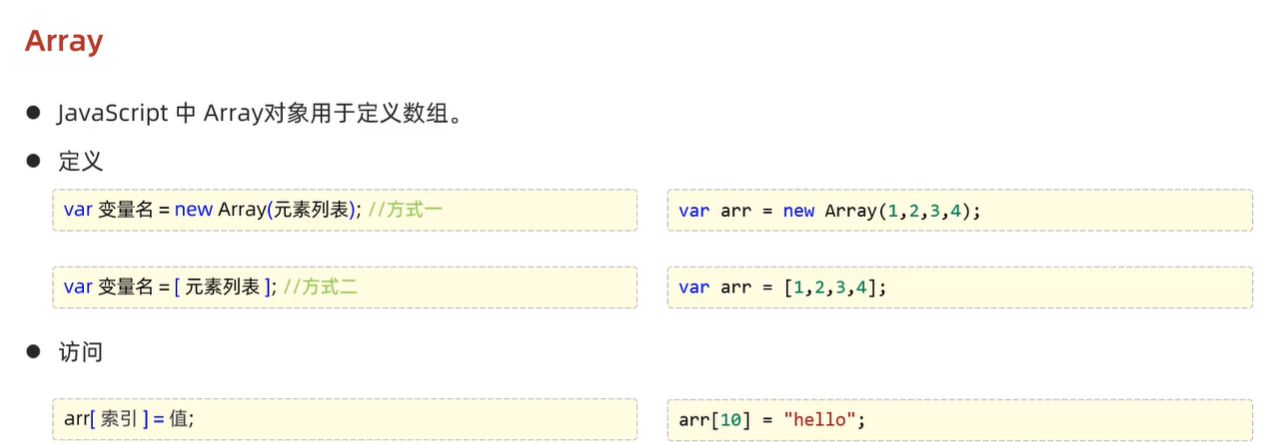
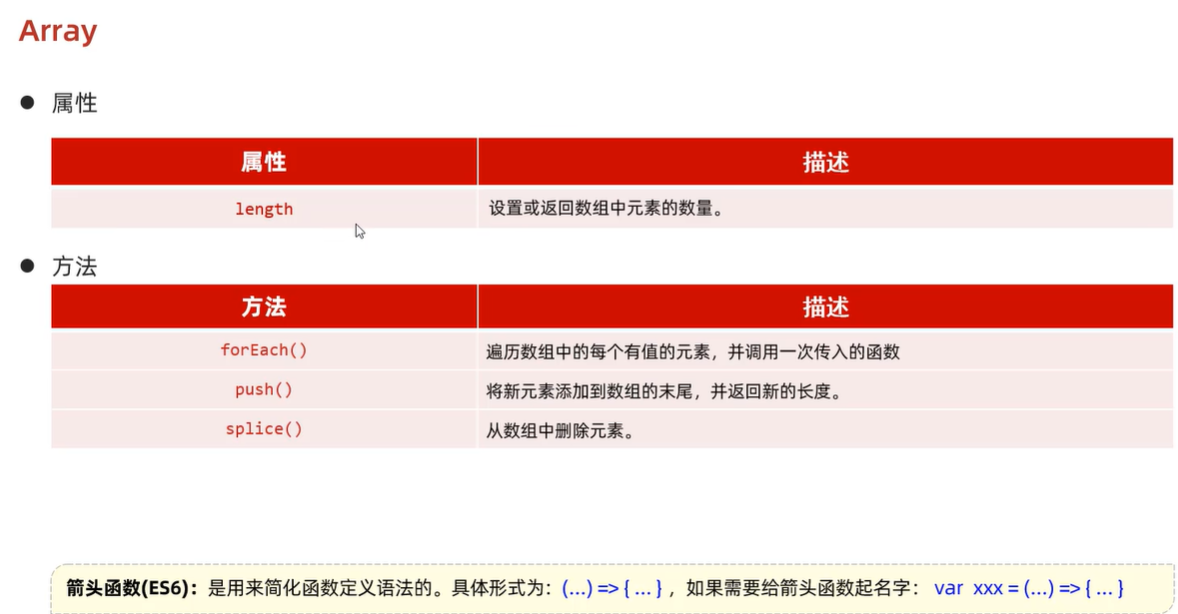
1.Array

<!DOCTYPE html>
<html lang="en">
<head>
    <meta charset="UTF-8">
    <meta name="viewport" content="width=device-width, initial-scale=1.0">
    <title>Document</title>
</head>
<body>

</body>
<script>
    //定义数组
    //var arr = new Array(1,2,3,4);
    // var arr = [1,2,3,4];

    // console.log(arr[0]);
    // console.log(arr[1]);

    //特点:长度可变、类型可变
    var arr = [1,2,3,4];
    arr[10] = 50;

    console.log(arr[10]);

    console.log(arr[10]);//50
    console.log(arr[9]);//undefined
    console.log(arr[8]);//undefined

    arr[9] = "A";
    arr[8] = true;
    console.log(arr);//Array(11) [ 1, 2, 3, 4, <4 empty slots>, true, "A", 50]
</script>
</html>
<!DOCTYPE html>
<html lang="en">
<head>
    <meta charset="UTF-8">
    <meta name="viewport" content="width=device-width, initial-scale=1.0">
    <title>Document</title>
</head>
<body>

</body>
<script>
    var arr = [1,2,3,4];
    arr[10] = 50;

    // for (let i = 0; i < arr.length; i++) {
    //    console.log(arr[i]);  //[1,2,3,4,6*undefined,50]共10个

    // }
    // //Foreach:遍历数组中有值的元素
    // arr.forEach(function(e){
    //     console.log(e);  //[1,2,3,4,50]共5个
    // })
    //ES6箭头函数:(……) => (……) 简化函数定义
    // arr.forEach((e)=>{
    //     console.log(e);  //[1,2,3,4,50]共5个
    // })

    //push:添加元素到数组末尾
    // arr.push(7,8,9);
    // console.log(arr);//Array(14) [ 1, 2, 3, 4, <6 empty slots>, 50, 7, 8, 9 ]

    //splice:删除元素
    // 1.测试,只删除2开始的2个数即3,4
    // arr.splice(2,2);//splic(start,deleteCount?)
    // console.log(arr);//Array(9) [ 1, 2, <6 empty slots>, 50 ]
    //2.测试,将后面的都删除了
    arr.splice(2);
    console.log(arr);//Array [ 1, 2 ]
</script>
</html>
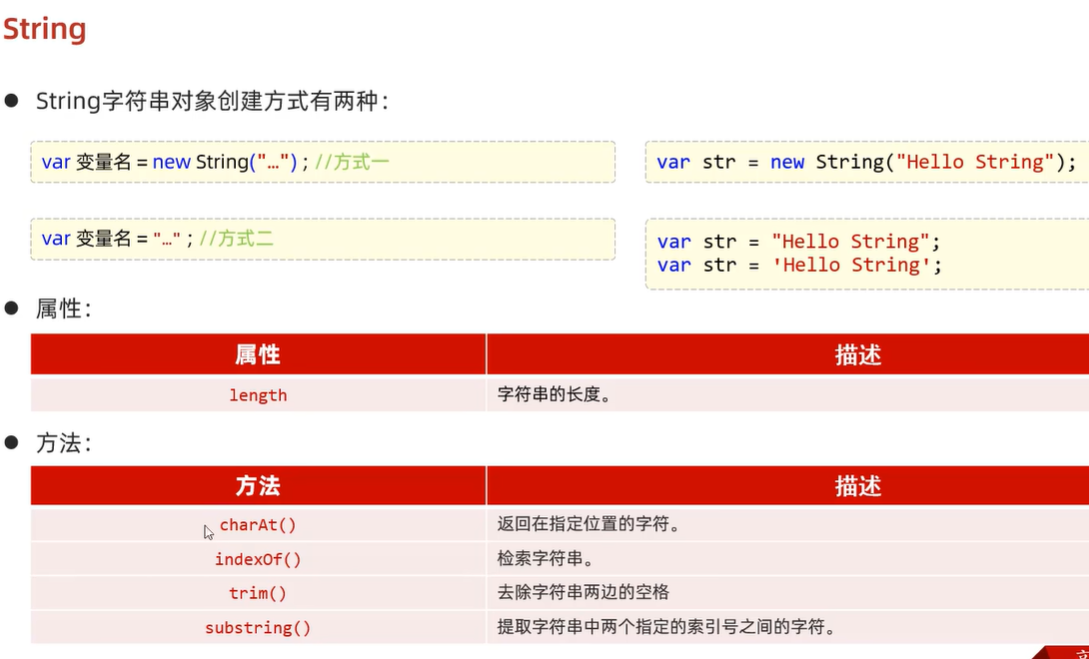
2.String
<!DOCTYPE html>
<html lang="en">
<head>
    <meta charset="UTF-8">
    <meta name="viewport" content="width=device-width, initial-scale=1.0">
    <title>Document</title>
</head>
<body>
    <script>
        //创建字符串对象
        //var str = new String("Hello String");
        var str = "Hello String";

        console.log(str);//Hello String

        //length
        console.log(str.length);//12

        //charAT
        console.log(str.charAt(4));//o

        //indexOf
        console.log(str.indexOf("lo"));//3

        //trim
        var s1 = "  Hello   ";
        console.log(s1);//"  Hello   "
        var s2 = s1.trim();
        console.log(s2);//"Hello"

        //substring(start,end)---开始索引,结束索引(含头不含尾)
        console.log(str.substring(0,4));//Hell
        console.log(str.substring(0,5));//Hello
    </script>
</body>
</html>
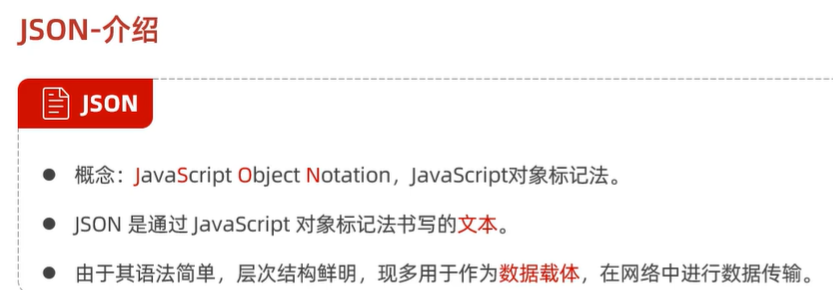
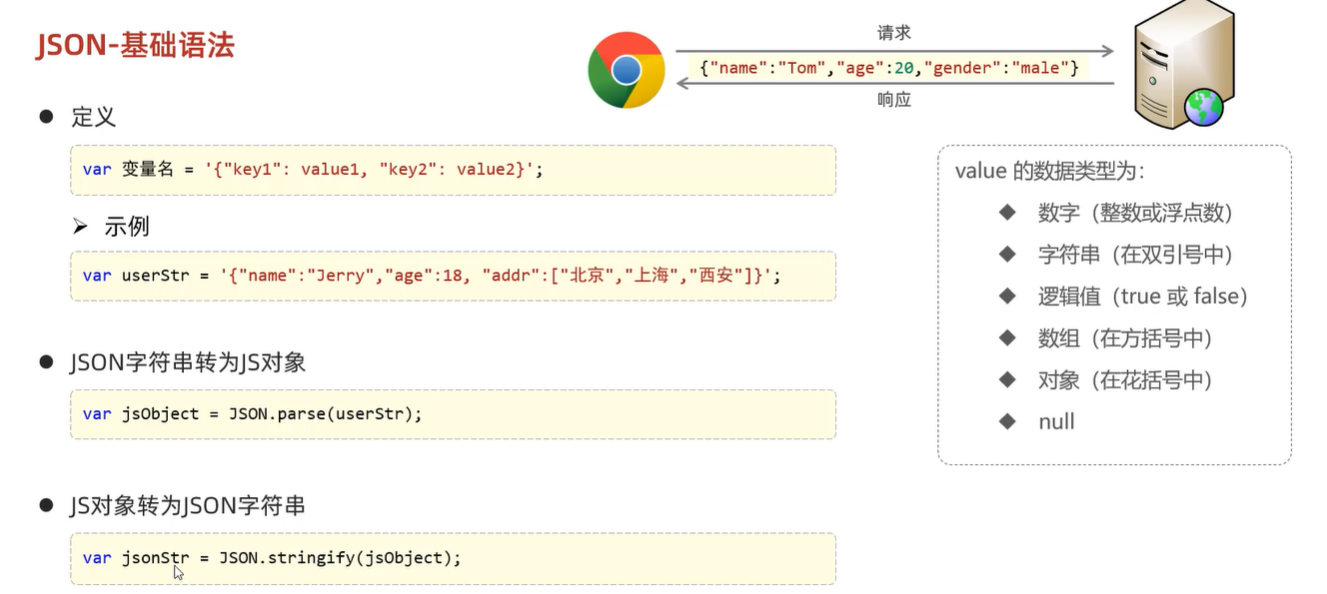
3.JOSN
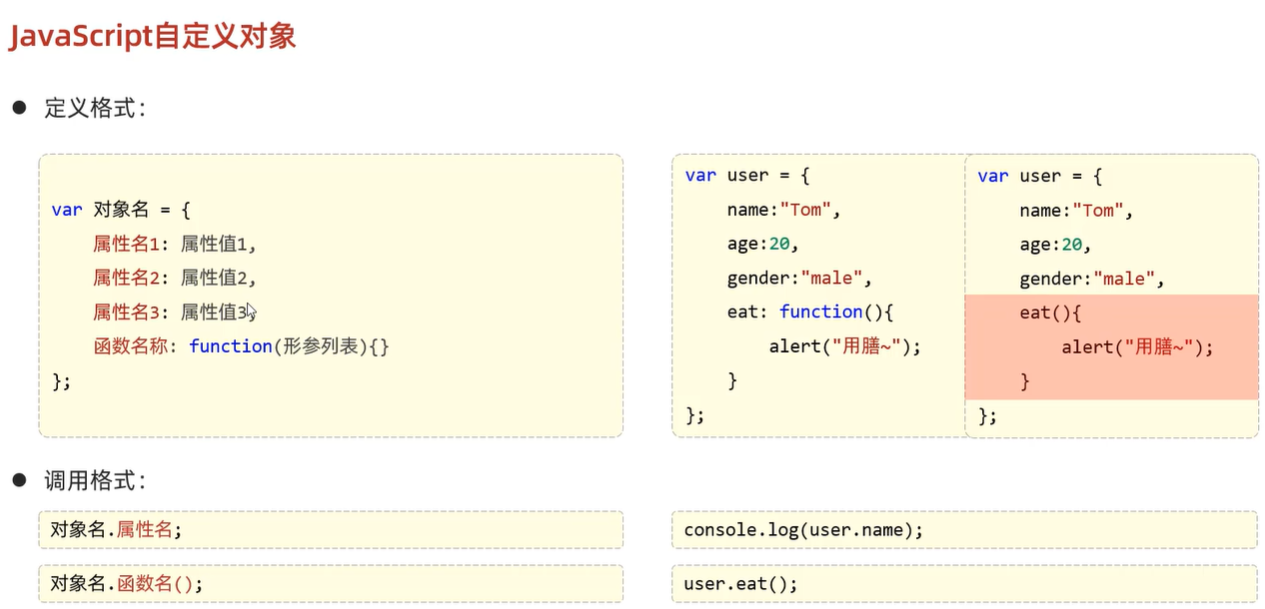
(1)自定义对象
<!DOCTYPE html>
<html lang="en">
<head>
    <meta charset="UTF-8">
    <meta name="viewport" content="width=device-width, initial-scale=1.0">
    <title>Document</title>
</head>
<body>
    <script>
        //自定义对象
        var user = {
            name: "Tom",
            age: 10,
            gender: "male",
            /* eat : function(){
                alert("用膳~");
            } */
           eat(){
            alert("用膳~");
           }
        }
        //调用
        alert(user.name);
        user.eat();
    </script>

</body>
</html>
(2)JOSN对象
(二)浏览器对象模型BOM
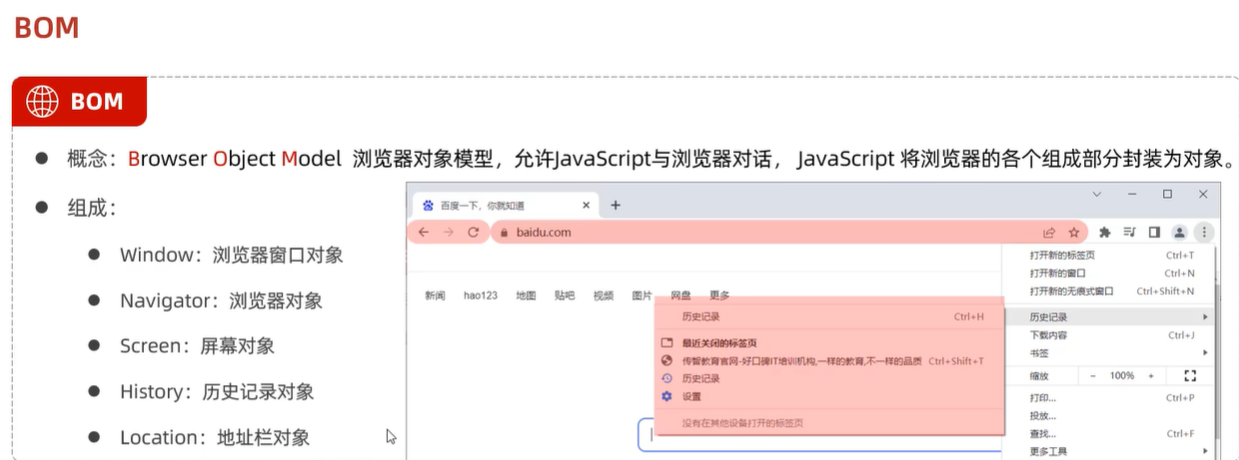
1.window对象

<!DOCTYPE html>
<html lang="en">
<head>
    <meta charset="UTF-8">
    <meta name="viewport" content="width=device-width, initial-scale=1.0">
    <title>Document</title>
</head>
<body>
    <script>
        //获取
        // window.alert("Hello BOM");
        // alert("Hello BOM Window");

        //方法
        //confirm -对话框 -- 确认:true,取消:false
        // var flag = confirm("您确认删除记录吗?");
        // alert(flag);

        //定时器 - setInterval --周期性地执行某一个函数
        // var i = 0;
        // setInterval(function(){
        //     i++;
        //     console.log("定时器执行了" + i + "次");
        // },2000);

        //定时器 - setTimeout  --延迟指定时间执行一次
        setTimeout(function(){
            alert("JS");
        },3000);
    </script>

</body>
</html>
2.location对象
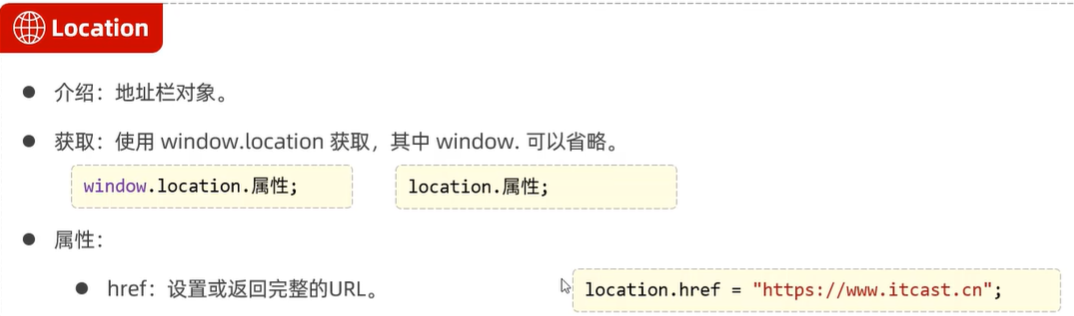
 //location
        alert(location.href);//弹出当前地址栏的url

        location.href = "https://itcast.cn";//跳转到对应的url
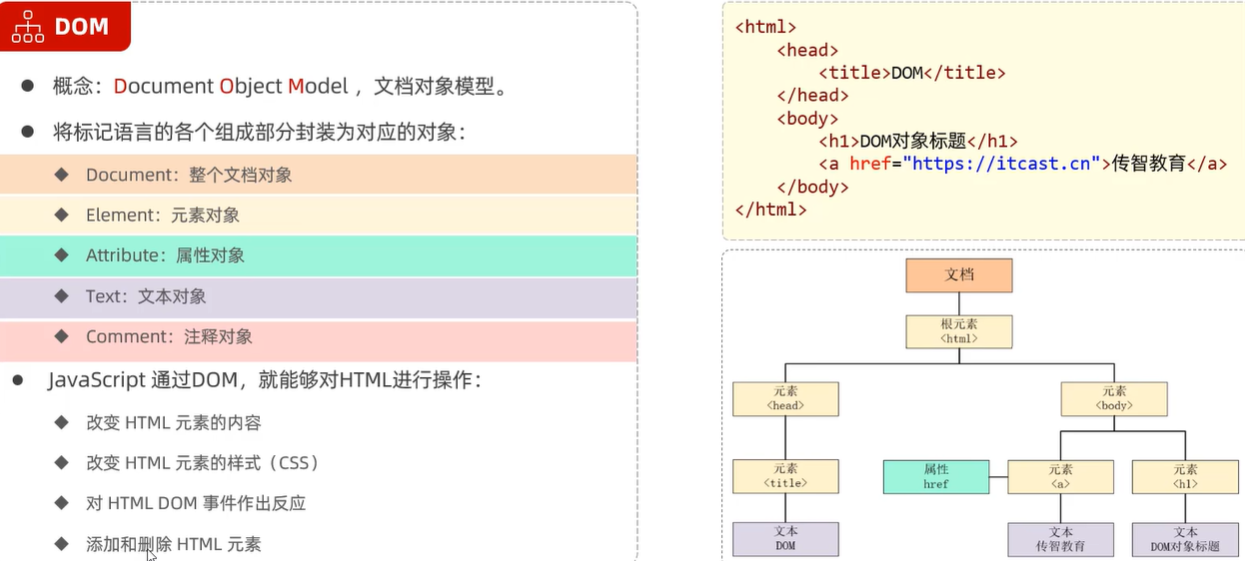
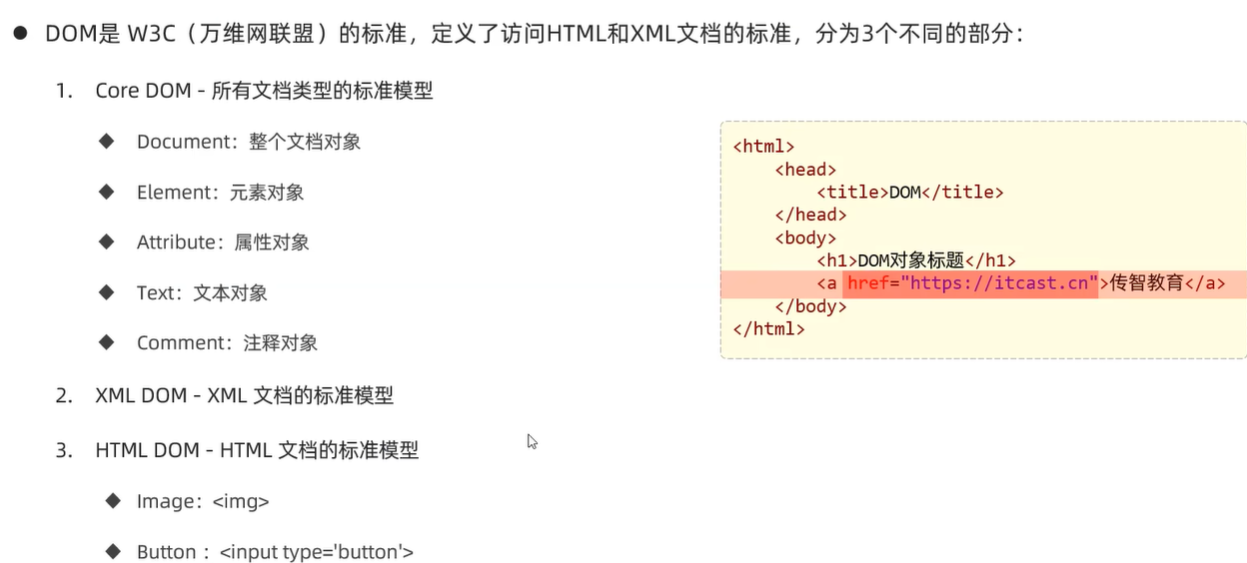
(三)文档对象模型DOM
*简单的获取元素和修改练习
<!DOCTYPE html>
<html lang="en">
<head>
<meta charset="UTF-8">
<meta name="viewport" content="width=device-width, initial-scale=1.0">
<title>Document</title>
</head>
<body>
<img id="h1" src="img/off.gif"> <br><br>
<div class="cls">传智教育</div> <br>
<div class="cls">黑马程序员</div> <br>
<input type="checkbox" name="hobby"> 电影
<input type="checkbox" name="hobby"> 旅游
<input type="checkbox" name="hobby"> 游戏
</body>
<script>
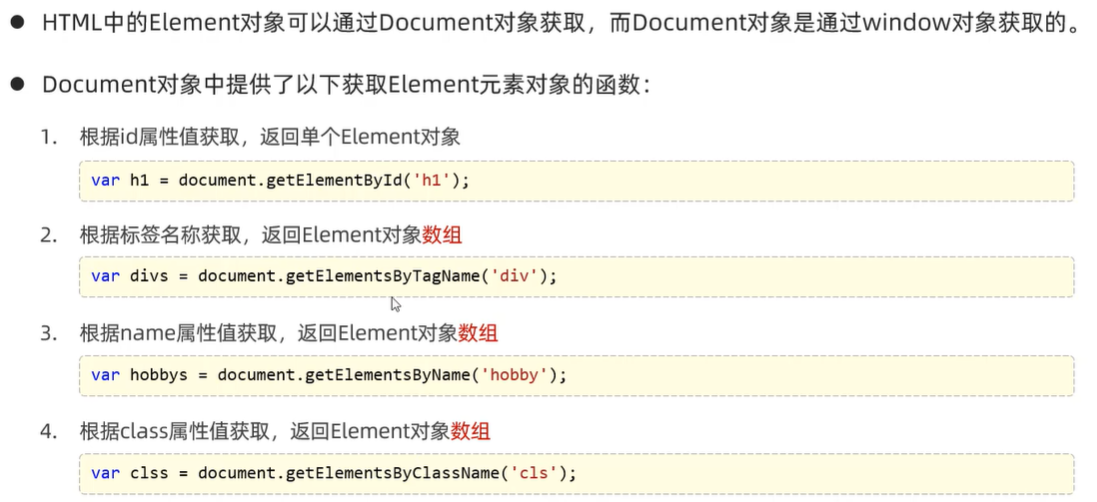
//1.获取Element元素
//1.1获取元素--根据id获取
// var img = document.getElementById('h1');
// alert(img);//[object HTMLImageElement]
//1.2获取元素--根据标签获取
// var divs = document.getElementsByTagName('div');
// for (let i = 0; i < divs.length; i++) {
// alert(divs[i]);
// }
//1.3获取元素--根据name属性获取
// var ins = document.getElementsByName('hobby');
// for (let i = 0; i < ins.length; i++) {
// alert(ins[i]);
// }
//1.4获取元素--根据clas属性获取
var divs = document.getElementsByClassName('cls');
for (let i = 0; i < divs.length; i++) {
alert(divs[i]);
}
//2.查询参考手册,查找属性和方法
//例如修改“传智教育”为“黑马教育111”
var divs = document.getElementsByClassName('cls');
var div1 = divs[0];
div1.innerHTML = "黑马教育111";
</script>
</html>
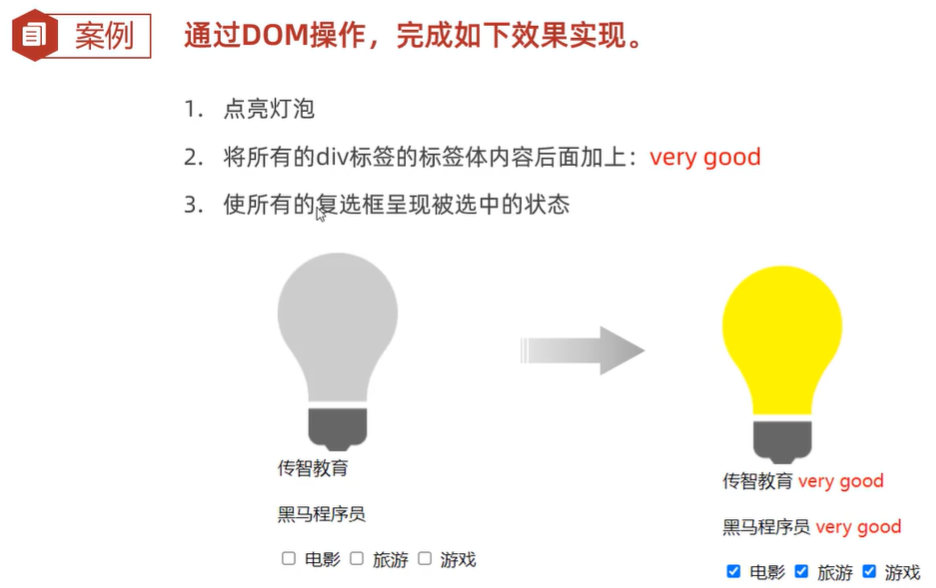
*案例
<!DOCTYPE html>
<html lang="en">
<head>
    <meta charset="UTF-8">
    <meta name="viewport" content="width=device-width, initial-scale=1.0">
    <title>Document</title>
</head>
<body>
    <img id="h1" src="img/off.gif">  <br><br>

    <div class="cls">传智教育</div>   <br>
    <div class="cls">黑马程序员</div>  <br>

    <input type="checkbox" name="hobby"> 电影
    <input type="checkbox" name="hobby"> 旅游
    <input type="checkbox" name="hobby"> 游戏
</body>
<script>
    //1.点亮灯泡:src属性
    var img = document.getElementById('h1');
    img.src = "img/on.gif";

    //2.将所有的div属性内容后加上very good(红色)--<font color = 'red'>very good</font>
    var divs = document.getElementsByTagName('div');
    for (let i = 0; i < divs.length; i++) {
        const div = divs[i];
        div.innerHTML += "<font color = 'red'>very good</font>";

    }

    //3.使所有的复选框呈现选中状态
    var ins = document.getElementsByName('hobby');
    for (let i = 0; i < ins.length; i++) {
        const check = ins[i];
        check.checked = true;//选中

    }

</script>
</html>
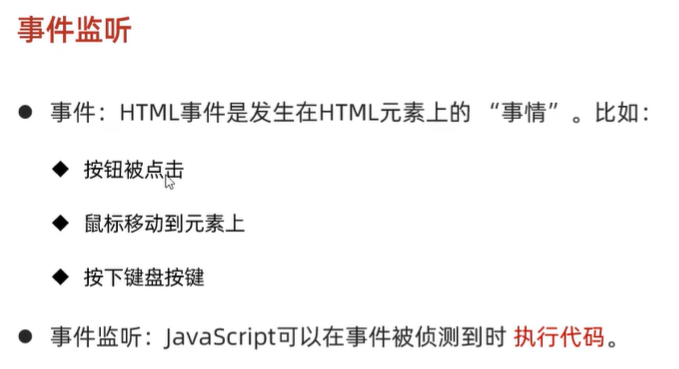
五、JS事件监听
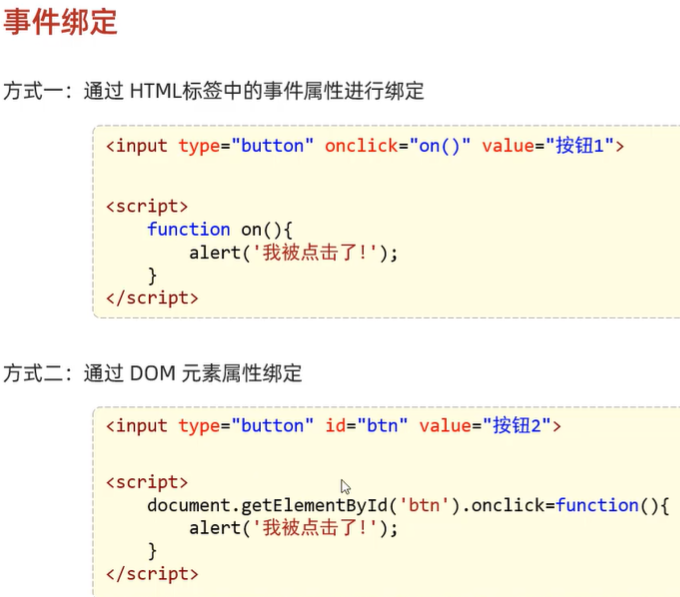
(一)事件绑定
<!DOCTYPE html>
<html lang="en">
<head>
    <meta charset="UTF-8">
    <meta name="viewport" content="width=device-width, initial-scale=1.0">
    <title>Document</title>
</head>
<body>
    <input type="button" id = "btn1" value = "事件绑定1" onclick = "on()">
    <input type="button" id = "btn2" value = "事件绑定2">
</body>
<script>
    //1.通过html中的事件属性进行绑定
    function on(){
        alert("按钮1被点击了。");
    }

    //2.通过DOM元素属性绑定
    document.getElementById('btn2').onclick = function(){
        alert("按钮2被点击了。");
    }


</script>
</html>
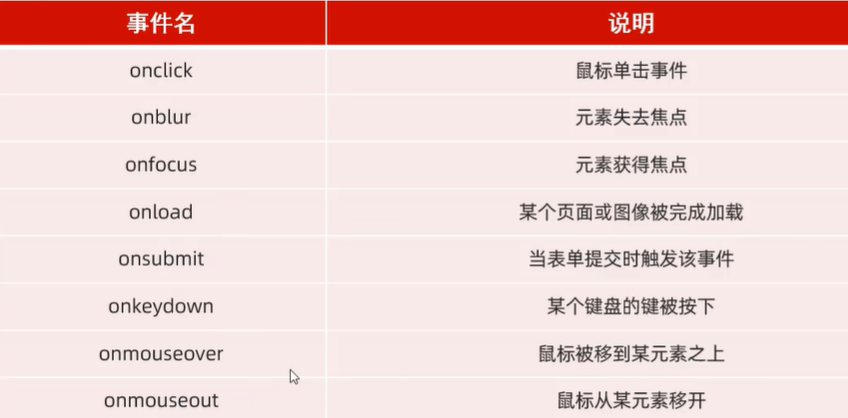
(二)常见事件
<!DOCTYPE html>
<html lang="en">
<head>
    <meta charset="UTF-8">
    <meta http-equiv="X-UA-Compatible" content="IE=edge">
    <meta name="viewport" content="width=device-width, initial-scale=1.0">
    <title>JS-事件-常见事件</title>
</head>

<body onload="load()">

    <form action="" style="text-align: center;" onsubmit="subfn()">
        <input type="text" name="username" onblur="bfn()" onfocus="ffn()" onkeydown="kfn()">

        <input id="b1" type="submit" value="提交">

        <input id="b1" type="button" value="单击事件" onclick="fn1()">
    </form>

    <br><br><br>

    <table width="800px" border="1" cellspacing="0" align="center" onmouseover="over()" onmouseout="out()">
        <tr>
            <th>学号</th>
            <th>姓名</th>
            <th>分数</th>
            <th>评语</th>
        </tr>
        <tr align="center">
            <td>001</td>
            <td>张三</td>
            <td>90</td>
            <td>很优秀</td>
        </tr>
        <tr align="center">
            <td>002</td>
            <td>李四</td>
            <td>92</td>
            <td>优秀</td>
        </tr>
    </table>

</body>

<script>
    //onload : 页面/元素加载完成后触发
    function load(){
        console.log("页面加载完成...")
    }

    //onclick: 鼠标点击事件
    function fn1(){
        console.log("我被点击了...");
    }

    //onblur: 失去焦点事件
    function bfn(){
        console.log("失去焦点...");
    }

    //onfocus: 元素获得焦点
    function ffn(){
        console.log("获得焦点...");
    }

    //onkeydown: 某个键盘的键被按下
    function kfn(){
        console.log("键盘被按下了...");
    }

    //onmouseover: 鼠标移动到元素之上
    function over(){
        console.log("鼠标移入了...")
    }

    //onmouseout: 鼠标移出某元素
    function out(){
        console.log("鼠标移出了...")
    }

    //onsubmit: 提交表单事件
    function subfn(){
        alert("表单被提交了...");
    }

</script>
</html>
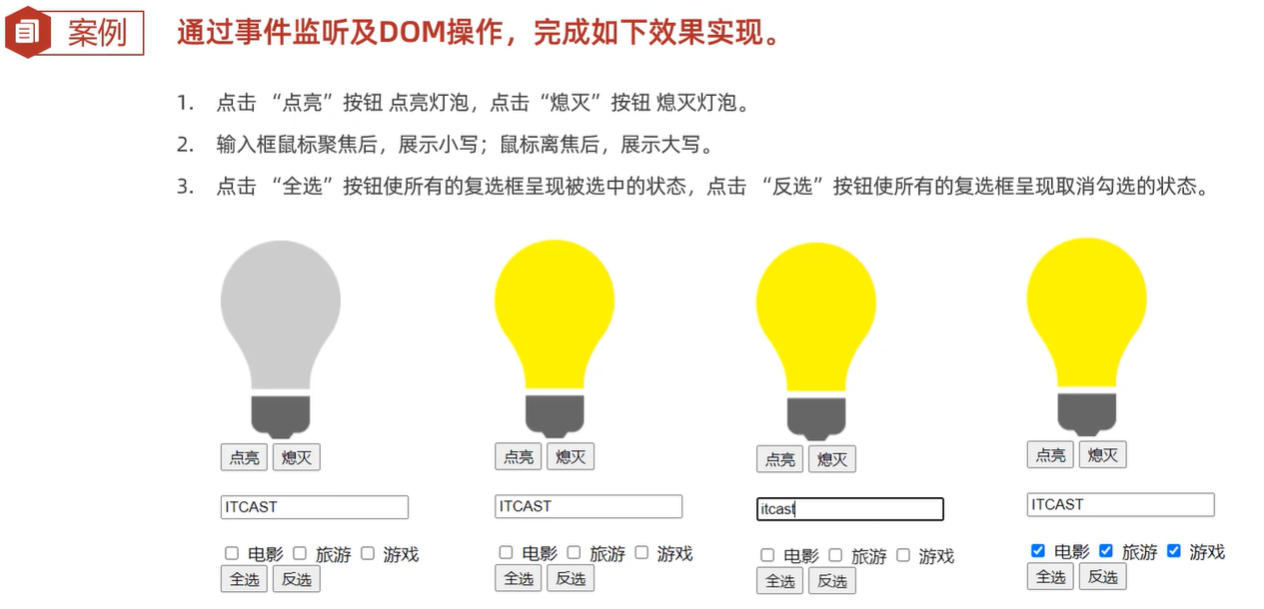
(三)案例
<!DOCTYPE html>
<html lang="en">
<head>
    <meta charset="UTF-8">
    <meta http-equiv="X-UA-Compatible" content="IE=edge">
    <meta name="viewport" content="width=device-width, initial-scale=1.0">
    <title>JS-事件-案例</title>
</head>
<body>

    <img id="light" src="img/off.gif"> <br>

    <input type="button" value="点亮" onclick = "on()">
    <input type="button"  value="熄灭" onclick = "off()">

    <br> <br>

    <input type="text" id="name" value="ITCAST" onfocus = "lower()" onblur=" upper()">
    <br> <br>

    <input type="checkbox" name="hobby"> 电影
    <input type="checkbox" name="hobby"> 旅游
    <input type="checkbox" name="hobby"> 游戏
    <br>

    <input type="button" value="全选" onclick="checkAll()">
    <input type="button" value="反选" onclick="reverse()">

</body>

<script>

    //1. 点击 "点亮" 按钮, 点亮灯泡; 点击 "熄灭" 按钮, 熄灭灯泡;
    function on(){
        //a.获取img元素对象
        var img = document.getElementById('light');
        //b.设置src属性
        img.src = "img/on.gif";
    }
    function off(){
        //a.获取img元素对象
        var img = document.getElementById('light');
        //b.设置src属性
        img.src = "img/off.gif";
    }


    //2. 输入框聚焦后, 展示小写; 输入框离焦后, 展示大写; -- onfocus,onblur
    function lower(){
        //获取元素内容
        var input = document.getElementById('name');
        //转为小写
        input.value = input.value.toLowerCase();
    }
    function upper(){
        //获取元素内容
        var input = document.getElementById('name');
        //转为大写
        input.value = input.value.toUpperCase();
    }


    //3. 点击 "全选" 按钮使所有的复选框呈现选中状态 ; 点击 "反选" 按钮使所有的复选框呈现取消勾选的状态 ; -- onclick
    function checkAll(){
        //获取元素对象
        var hobbies = document.getElementsByName('hobby');
        //设置为选中
        for (let i = 0; i < hobbies.length; i++) {
            const element = hobbies[i];
            element.checked = true;
        }

    }
    function reverse(){
        //获取元素对象
        var hobbies = document.getElementsByName('hobby');
        //设置为无
        for (let i = 0; i < hobbies.length; i++) {
            const element = hobbies[i];
            element.checked = false;
        }

    }


</script>
</html>


 505
505

 被折叠的 条评论
为什么被折叠?
被折叠的 条评论
为什么被折叠?
 到【灌水乐园】发言


