


 本文介绍了如何在RabbitMQ中实现消息持久化,包括队列和交换机的持久化配置,以避免消息丢失。通过消费者手动ACK机制确保消息处理的可靠性,并展示了在SpringBoot应用中整合RabbitMQ的测试案例,详细阐述了相关配置及AmqpTemplate的使用方法。
持久化
如何避免消息丢失?
1.消费者的手动ACK机制。可以防止业务处理失败。
2. 但是,如果在消费者消费之前,MQ就宕机了,消息就没了。
是可以将消息进行持久化呢?
要将消息持久化,前提是:队列、Exchange都持久化
交换机持久化

消息持久化

队列持久化

生产者
import com.bjpowernode.utils.ConnectionUtil;
import com.rabbitmq.client.Channel;
import com.rabbitmq.client.Connection;
import com.rabbitmq.client.MessageProperties;
import org.springframework.amqp.core.ExchangeTypes;

import java.io.IOException;
import java.util.concurrent.TimeoutException;

public class Sender {
    public static void main(String[] args) throws IOException, TimeoutException {
        Connection connection = ConnectionUtil.getConnection();
        Channel channel = connection.createChannel();

        String EXCHANGE_NAME = "durable_exchange";
        // 交换机持久化为 true
        channel.exchangeDeclare(EXCHANGE_NAME, ExchangeTypes.TOPIC, true);
        //发送50条消息
        for (int i = 0; i < 50; i++) {
            // 消息内容
            String msg = "HelloWorld!!!" + i;
            //MessageProperties.PERSISTENT_TEXT_PLAIN 消息持久化
            channel.basicPublish(EXCHANGE_NAME, "item.insert", MessageProperties.PERSISTENT_TEXT_PLAIN, msg.getBytes());
            System.out.println("sender:" + msg);
        }

        channel.close();
        connection.close();
    }
}
消费者
import com.bjpowernode.utils.ConnectionUtil;
import com.rabbitmq.client.*;

import java.io.IOException;
import java.util.concurrent.TimeoutException;

public class Recver {
    public static void main(String[] args) throws IOException, TimeoutException {
        Connection connection = ConnectionUtil.getConnection();
        Channel channel = connection.createChannel();

        String QUEUE_NAME = "durable_queue";
        // 声明队列  队列持久化为true
        channel.queueDeclare(QUEUE_NAME, true, false, false, null);
        String EXCHANGE_NAME = "durable_exchange";
        channel.queueBind(QUEUE_NAME, EXCHANGE_NAME, "item.*");
        channel.queueBind(QUEUE_NAME, EXCHANGE_NAME, "item.delete");

        DefaultConsumer consumer = new DefaultConsumer(channel) {
            @Override
            public void handleDelivery(String consumerTag, Envelope envelope,
                                       AMQP.BasicProperties properties, byte[] body) throws IOException {
                try {
                    // body 即消息体
                    String msg = new String(body);
                    System.out.println("Recver:" + msg);
                    channel.basicAck(envelope.getDeliveryTag(), false);
                    Thread.sleep(1000);
                } catch (Exception e) {
                    e.printStackTrace();
                }
            }
        };
        channel.basicConsume(QUEUE_NAME, false, consumer);
    }
测试
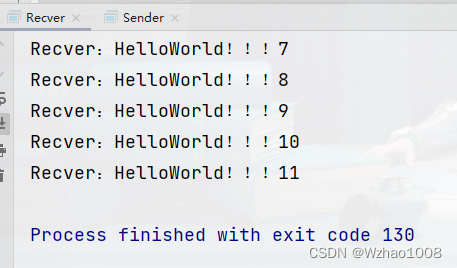
1、Send给Recv发送50条消息
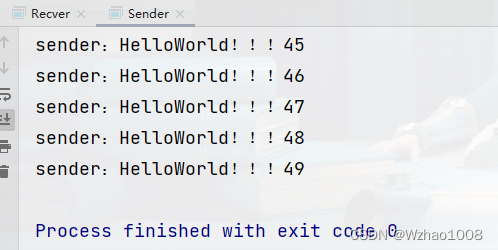
2、Recv收到一条消息sleep1秒钟,收到前几条消息后立即关闭
此时管理界面
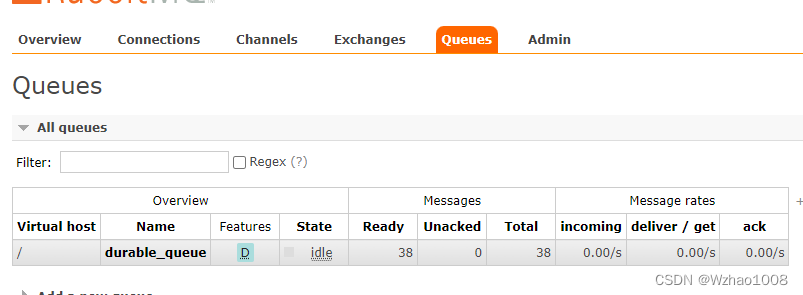
3、重启RabbitMQ观察消息是否丢失
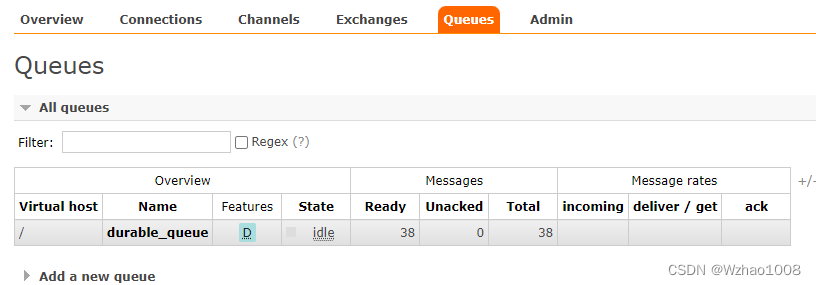
数据还在,继续运行程序接收

数据没有丢失,继续上次消息继续接收
springboot整合测试
pom
<?xml version="1.0" encoding="UTF-8"?>
<project xmlns="http://maven.apache.org/POM/4.0.0"
         xmlns:xsi="http://www.w3.org/2001/XMLSchema-instance"
         xsi:schemaLocation="http://maven.apache.org/POM/4.0.0 http://maven.apache.org/xsd/maven-4.0.0.xsd">
    <modelVersion>4.0.0</modelVersion>

    <parent>
        <groupId>org.springframework.boot</groupId>
        <artifactId>spring-boot-starter-parent</artifactId>
        <version>2.3.2.RELEASE</version>
    </parent>

    <groupId>com.bjpowernode</groupId>
    <artifactId>springboot_rabbitmq</artifactId>
    <version>1.0-SNAPSHOT</version>

    <properties>
        <maven.compiler.source>8</maven.compiler.source>
        <maven.compiler.target>8</maven.compiler.target>
    </properties>
    <dependencies>
        <dependency>
            <groupId>org.springframework.boot</groupId>
            <artifactId>spring-boot-starter-amqp</artifactId>
        </dependency>
        <dependency>
            <groupId>org.springframework.boot</groupId>
            <artifactId>spring-boot-starter-web</artifactId>
        </dependency>
        <dependency>
            <groupId>org.springframework.boot</groupId>
            <artifactId>spring-boot-starter-test</artifactId>
        </dependency>
    </dependencies>

</project>
application.yml
spring:
  rabbitmq:
    host: 192.168.226.208 #主机
    port: 5672 #端口
    username: admin #用户名
    password: 1111 #密码
    virtual-host: / #虚拟分组
    listener:
      direct:
        acknowledge-mode: manual #不自动ack
      simple:
        acknowledge-mode: manual #不自动ack
启动类
import org.springframework.boot.SpringApplication;
import org.springframework.boot.autoconfigure.SpringBootApplication;

@SpringBootApplication
public class RabbitMQApp {
    public static void main(String[] args) {
        SpringApplication.run(RabbitMQApp.class, args);
    }
}
监听者
在SpringAmqp中,对消息的消费者进行了封装和抽象,一个普通的JavaBean中的普通方法,只要通过简单的注解,就可以成为一个消费者。
import com.rabbitmq.client.Channel;
import org.springframework.amqp.core.ExchangeTypes;
import org.springframework.amqp.core.Message;
import org.springframework.amqp.rabbit.annotation.Exchange;
import org.springframework.amqp.rabbit.annotation.Queue;
import org.springframework.amqp.rabbit.annotation.QueueBinding;
import org.springframework.amqp.rabbit.annotation.RabbitListener;
import org.springframework.stereotype.Component;

@Component
public class Recver {
    /**
     * 监听者收消息三要素:
     * queue
     * exchange
     * routingkey
     */
    @RabbitListener(bindings = {@QueueBinding(
            value = @Queue(name = "springboot_queue", durable = "true"),
            exchange = @Exchange(name = "spring_exchange", type = ExchangeTypes.TOPIC),
            key = {"*.*"}
    )})
    public void listen(String msg, Message message, Channel channel) {
        try {
            System.out.println("Recver:" + msg);
            channel.basicAck(message.getMessageProperties().getDeliveryTag(), false);
        } catch (Exception e) {
            e.printStackTrace();
        }
    }
}
@Componet:类上的注解,注册到Spring容器@RabbitListener:方法上的注解,声明这个方法是一个消费者方法,需要指定下面的属性:bindings:指定绑定关系,可以有多个。值是@QueueBinding的数组。@QueueBinding包含下面属性:value:这个消费者关联的队列。值是@Queue,代表一个队列exchange:队列所绑定的交换机,值是@Exchange类型key:队列和交换机绑定的RoutingKey
类似listen这样的方法在一个类中可以写多个,就代表多个消费者。
AmqpTemplate
Spring最擅长的事情就是封装,把他人的框架进行封装和整合。
Spring为AMQP提供了统一的消息处理模板:AmqpTemplate,非常方便的发送消息,其发送方法:
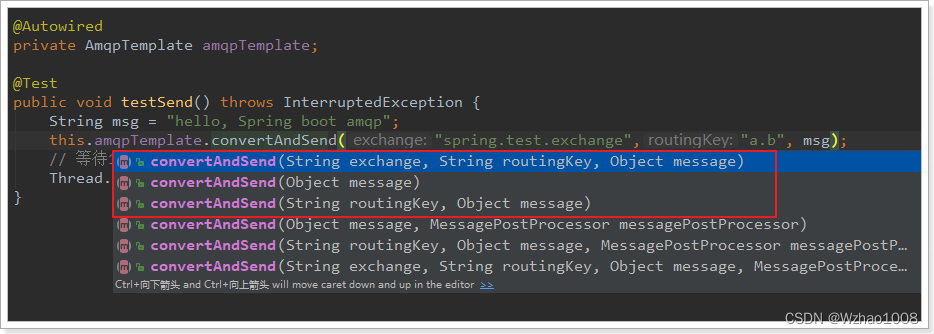
红框圈起来的是比较常用的3个方法,分别是:
- 指定交换机、RoutingKey和消息体
- 指定消息
- 指定RoutingKey和消息,会向默认的交换机发送消息
发送者
import com.bjpowernode.RabbitMQApp;
import org.junit.Test;
import org.junit.runner.RunWith;
import org.springframework.amqp.core.AmqpTemplate;
import org.springframework.beans.factory.annotation.Autowired;
import org.springframework.boot.test.context.SpringBootTest;
import org.springframework.test.context.junit4.SpringJUnit4ClassRunner;

@RunWith(SpringJUnit4ClassRunner.class)
@SpringBootTest(classes = RabbitMQApp.class)
public class Sender {

    @Autowired
    private AmqpTemplate amqpTemplate;

    @Test
    public void testSendMsg() throws InterruptedException {
        String EXCHANGE_NAME = "spring_exchange";
        String ROUTINGKEY = "item.add";
        String msg = "Hello SpringBoot!!!";
        amqpTemplate.convertAndSend(EXCHANGE_NAME,ROUTINGKEY,msg);

        Thread.sleep(10000);
    }
}
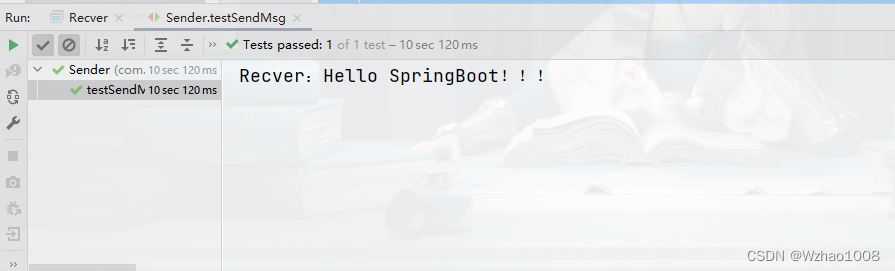
运行消费者


 1万+
1万+

 被折叠的 条评论
为什么被折叠?
被折叠的 条评论
为什么被折叠?
 到【灌水乐园】发言


