


实验一: 配置VRRP主备备份
1.实验目的
(1)熟悉VRRP主备备份的应用场景。
(2)掌握VRRP主备备份的配置方法。
2.实验拓扑
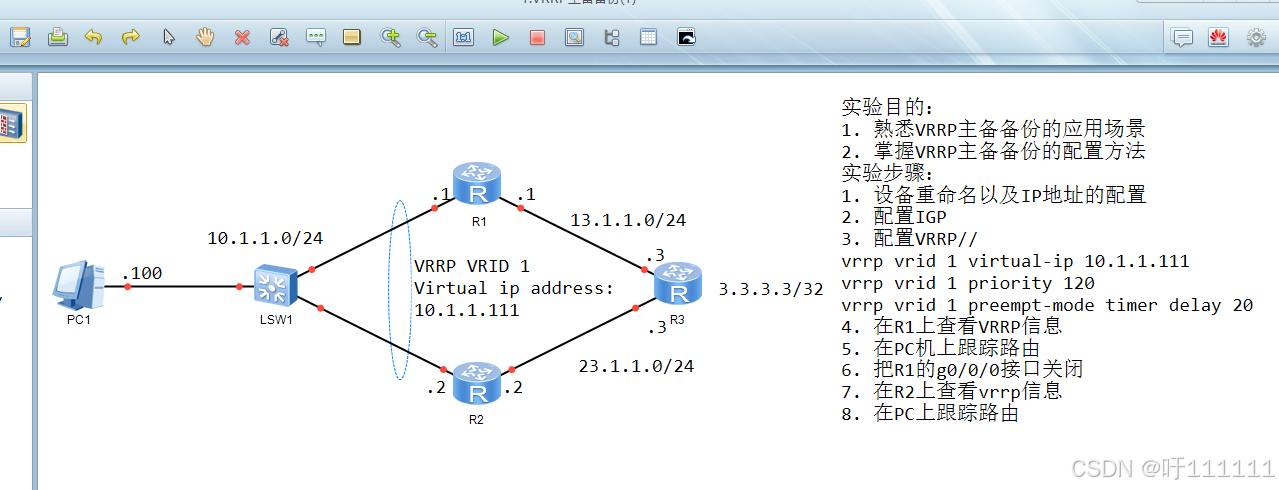
3.实验步骤
(1)配置IP地址。
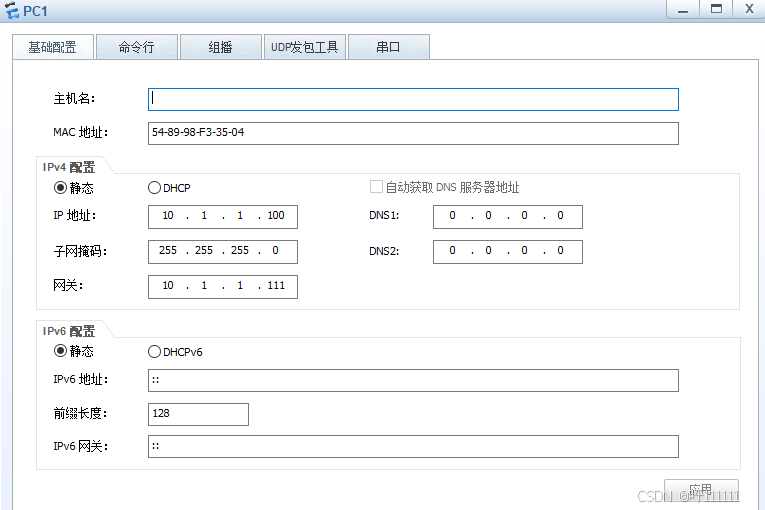
PC1的IP地址配置。
R1的配置:
[Huawei]sysname R1
[R1]in g0/0/0
[R1-GigabitEthernet0/0/0]ip address 10.1.1.1 24
[R1-GigabitEthernet0/0/0]q
[R1]in g0/0/1
[R1-GigabitEthernet0/0/1]ip address 13.1.1.1 24
[R1-GigabitEthernet0/0/1]q
R2的配置:
[Huawei]sysname R2
[R2]in g0/0/0
[R2-GigabitEthernet0/0/0]ip address 10.1.1.2 24
[R2-GigabitEthernet0/0/0]q
[R2]in g0/0/1
[R2-GigabitEthernet0/0/1]ip address 23.1.1.2 24
[R2-GigabitEthernet0/0/1]q
R3的配置:
[Huawei]sysname R3
[R3]in g0/0/0
[R3-GigabitEthernet0/0/0]ip address 23.1.1.3 24
[R3-GigabitEthernet0/0/0]quit
[R3]in g0/0/1
[R3-GigabitEthernet0/0/1]ip address 13.1.1.3 24
[R3-GigabitEthernet0/0/1]q
[R3]in LoopBack 0
[R3-LoopBack0]ip add
[R3-LoopBack0]ip address 3.3.3.3 32
[R3-LoopBack0]q
(2)配置IGP
R1的配置:
[R1]ospf router-id 1.1.1.1
[R1-ospf-1]area 0
[R1-ospf-1-area-0.0.0.0]network 10.1.1.0 0.0.0.255
[R1-ospf-1-area-0.0.0.0]network 13.1.1.0 0.0.0.255
[R1-ospf-1-area-0.0.0.0]q
R2的配置:
[R2]ospf router-id 2.2.2.2
[R2-ospf-1]area 0
[R2-ospf-1-area-0.0.0.0]network 10.1.1.0 0.0.0.255
[R2-ospf-1-area-0.0.0.0]network 23.1.1.0 0.0.0.255
[R2-ospf-1-area-0.0.0.0]quit
R3的配置:
[R3]ospf router-id 3.3.3.3
[R3-ospf-1]area 0
[R3-ospf-1-area-0.0.0.0]network 13.1.1.0 0.0.0.255
[R3-ospf-1-area-0.0.0.0]network 23.1.1.0 0.0.0.255
[R3-ospf-1-area-0.0.0.0]network 3.3.3.3 0.0.0.0
[R3-ospf-1-area-0.0.0.0]quit
(3)配置VRRP。
R1的配置:
[R1]in g0/0/0
//虚拟路由器的标识符为1,虚拟IP为10.1.1.111
[R1-GigabitEthernet0/0/0]vrrp vrid 1 virtual-ip 10.1.1.111
[R1-GigabitEthernet0/0/0]vrrp vrid 1 priority 120
//优先级设置为120,默认为1
[R1-GigabitEthernet0/0/0]vrrp vrid 1 preempt-mode timer delay 20
//抢占时间的延迟时间为20s,默认为0
[R1-GigabitEthernet0/0/0]q
R2的配置。
[R2]in g0/0/0
[R2-GigabitEthernet0/0/0]vrrp viid 1 virtual
[R2-GigabitEthernet0/0/0]vrrp vrid 1 virtual-ip 10.1.1.111
[R2-GigabitEthernet0/0/0]q
4.实验调试
(1)在R1上查看VRRP的信息。
[R1]display vrrp
GigabitEthernet0/0/0 | Virtual Router 1
State : Master
Virtual IP : 10.1.1.111
Master IP : 10.1.1.1
PriorityRun : 120
PriorityConfig : 120
MasterPriority : 120
Preempt : YES Delay Time : 20 s
TimerRun : 1 s
TimerConfig : 1 s
Auth type : NONE
Virtual MAC : 0000-5e00-0101
Check TTL : YES
Config type : normal-vrrp
Create time : 2024-12-02 11:50:25 UTC-08:00
Last change time : 2024-12-02 11:50:29 UTC-08:00
(2)在PC1上再次跟踪3.3.3.3。
PC>tracert 3.3.3.3
traceroute to 3.3.3.3, 8 hops max
(ICMP), press Ctrl+C to stop
1 10.1.1.2 125 ms 47 ms 63 ms
2 3.3.3.3 125 ms 93 ms 79 ms
通过以上输出可以看到,PC1经过10.1.1.1,跟踪3.3.3.3.
(3)关闭R1的接口。
[R3]in g0/0/0
[R3-GigabitEthernet0/0/0]shutdown
[R3-GigabitEthernet0/0/0]quit
(4)在R2上查看VRRP的信息。
[R2]display vrrp
GigabitEthernet0/0/0 | Virtual Router 1
State : Master
Virtual IP : 10.1.1.111
Master IP : 10.1.1.1
PriorityRun : 100
PriorityConfig : 100
MasterPriority : 120
Preempt : YES Delay Time : 0 s
TimerRun : 1 s
TimerConfig : 1 s
Auth type : NONE
Virtual MAC : 0000-5e00-0101
Check TTL : YES
Config type : normal-vrrp
Create time : 2024-12-09 10:22:03 UTC-08:00
Last change time : 2024-12-09 10:22:03 UTC-08:00
通过以上输出可以看到,R2成了Master。
(5)在PC1上再次跟踪3.3.3.3。
PC>tracert 3.3.3.3
traceroute to 3.3.3.3, 8 hops max
(ICMP), press Ctrl+C to stop
1 10.1.1.1 94 ms 16 ms 62 ms
2 3.3.3.3 94 ms 94 ms 109 ms


 504
504

 被折叠的 条评论
为什么被折叠?
被折叠的 条评论
为什么被折叠?
 到【灌水乐园】发言


