


概念解析
- LVS:Linux Virtual Server,Linux虚拟服务器
Linux虚拟服务器(LVS)是章文嵩在国防科技大学就读博士期间研发的由于性能过于强悍被Linux内核维护组织收录,从2.4版本内核开始嵌入
- 功能
实现高可用的、可伸缩的Web、Mail、Cache和Media等网络服务
- 目标
利用Linux操作系统和LVS集群软件实现一个高可用、高性能、低成本的服务器应用集群
- 组件
工作在内核空间的IPVS模块工作在用户空间的ipvsadm管理工具
- LVS的工作模式:
NAT:网络地址转换
DR:路由模式
UN:隧道模式
- 术语:
调度器:LVS服务器
真实服务器Real Server:提供服务的服务器
VIP:虚拟地址,提供给用户访问的地址
DIP:指定地址,LVS服务器上与真实服务器通信的地址
RIP:真实地址,真实服务器的地址
-
常见的调度算法,共10个,常用的有4个:
轮询rr:Real Server轮流提供服务
加权轮询wrr:根据服务器性能设置权重,权重大的得到的请求更多
最少连接lc:根据Real Server的连接数分配请求
加权最少连接wlc:类似于wrr,根据权重分配请求
LVS-NAT实验拓扑图
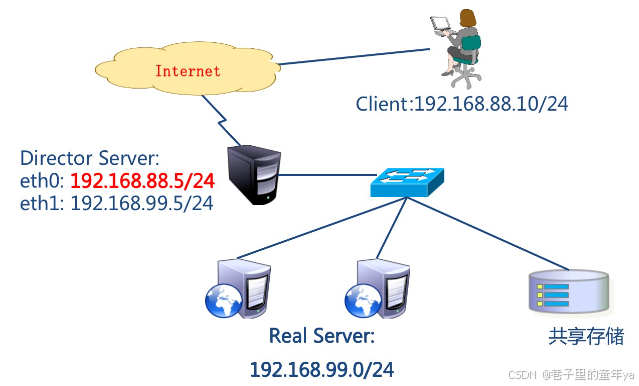
主机准备
| 主机名 | IP地址 | 角色 |
|---|---|---|
| pubserver | eth0:192.168.88.240 eth1->192.168.99.240 | ansible主机 |
| client | eth0->192.168.88.10 网关:192.168.88.5 | 客户端 |
| lvs1 | eth0 -> 192.168.88.5 eth1->192.168.99.5 | lvs服务器 |
| web1 | eth1->192.168.99.100 网关:192.168.99.5 | web服务器 |
| web2 | web2:eth1->192.168.99.200 网关:192.168.99.5 | web服务器 |
Ansible配置
用Ansible自动化配置LVS的NAT工作模式
## 配置Ansible

# 创建单独工作目录
[root@pubserver ~]# mkdir cluster
[root@pubserver ~]# cd cluster/

# 编写ansible配置文件和主机清单列表文件
[root@pubserver cluster]# vim ansible.cfg
[defaults]
inventory = inventory
host_key_checking = false
module_name = shell

[root@pubserver cluster]# vim inventory
[clients]
client ansible_ssh_host=192.168.88.10

[webservers]
web1 ansible_ssh_host=192.168.99.100
web2 ansible_ssh_host=192.168.99.200

[lbs]
lvs1 ansible_ssh_host=192.168.88.5

[all:vars]
ansible_ssh_user=root
ansible_ssh_pass=a

# 测试ansible配置
[root@pubserver cluster]# ansible all -m ping

# 准备repo文件
[root@pubserver cluster]# mkdir files
[root@pubserver cluster]# vim files/local88.repo
[BaseOS]
name=BaseOS
baseurl=ftp://192.168.88.240/dvd/BaseOS/
enabled=1
gpgcheck=0

[AppStream]
name=AppStream
baseurl=ftp://192.168.88.240/dvd/AppStream/
enabled=1
gpgcheck=0


[RPMS]
name=rpms
baseurl=ftp://192.168.88.240/rpms/
enabled=1
gpgcheck=0

[root@pubserver cluster]# cp files/local88.repo files/local99.repo
[root@pubserver cluster]# sed -i '/88/s/88/99/' files/local99.repo
[root@pubserver cluster]# cat files/local99.repo
[BaseOS]
name=BaseOS
baseurl=ftp://192.168.99.240/dvd/BaseOS/
enabled=1
gpgcheck=0

[AppStream]
name=AppStream
baseurl=ftp://192.168.99.240/dvd/AppStream/
enabled=1
gpgcheck=0


[RPMS]
name=rpms
baseurl=ftp://192.168.99.240/rpms/
enabled=1
gpgcheck=0
配置NAT模式
## 配置LVS-NAT模式

# 同步yum源文件
[root@pubserver cluster]# vim 01_config_yum.yml
---
- name: config yum
  hosts: all
  tasks:
    - name: rm dir      #删除/etc/yum.repos.d/目录
      file:
        path: /etc/yum.repos.d/
        state: absent
    - name: create dir  #创建/etc/yum.repos.d/目录
      file:
        path: /etc/yum.repos.d/
        mode: '0755'
        state: directory

- name: upload 88 yum
  hosts: clients,lbs
  tasks:
    - name: copy repo   #发送repo文件到目标主机
      copy:
        src: files/local88.repo
        dest: /etc/yum.repos.d/

- name: upload 99 yum
  hosts: webservers
  tasks:
    - name: copy repo   #发送repo文件到目标主机
      copy:
        src: files/local99.repo
        dest: /etc/yum.repos.d/
[root@pubserver cluster]# ansible-playbook 01_config_yum.yml

# 配置web服务器组
[root@pubserver cluster]# vim files/index.html.j2
Welcome to {{ ansible_hostname }}
[root@pubserver cluster]# vim 02_config_web.yml
---
- name: config web
  hosts: webservers
  tasks:
    - name: install nginx   #安装nginx
      yum:
        name: nginx
        state: present
    - name: copy index      #发送index.html.j2生成index.html文件
      template:
        src: files/index.html.j2
        dest: /usr/share/nginx/html/index.html
    - name: start nginx     #启动nginx服务
      service:
        name: nginx
        state: started
        enabled: true
[root@pubserver cluster]# ansible-playbook 02_config_web.yml

[root@pubserver cluster]# curl http://192.168.99.100/
Welcome to web1
[root@pubserver cluster]# curl http://192.168.99.200/
Welcome to web2

# 配置LVS服务器
[root@pubserver cluster]# sysctl -a
[root@pubserver cluster]# ansible lvs1 -a "sysctl -a | grep ip_forward"
[root@pubserver cluster]# vim 03_config_nat_sysctl.yml
---
- name: config sysctl
  hosts: lbs
  tasks:
    - name: modify kernel args          #持久开启Linux路由转发功能
      sysctl:
        name: net.ipv4.ip_forward
        value: '1'
        sysctl_set: true
        sysctl_file: /etc/sysctl.conf
      notify: flush args
  handlers:
    - name: flush args                  #刷新sysctl.conf文件
      shell: "sysctl -p"
[root@pubserver cluster]# ansible-playbook 03_config_nat_sysctl.yml
[root@pubserver cluster]# ansible lvs1 -a "cat /proc/sys/net/ipv4/ip_forward"
lvs1 | CHANGED | rc=0 >>
1
测试NAT工作模式
[root@pubserver cluster]# vim 04_install_lvs.yml
---
- name: install lvs
  hosts: lbs
  tasks:
    - name: install soft    #安装ipvsadm软件
      yum:
        name: ipvsadm
        state: present
[root@pubserver cluster]# ansible-playbook 04_install_lvs.yml

# ipvsadm命令常用选项
    -A: 添加虚拟服务器
    -E: 编辑虚拟服务器
    -D: 删除虚拟服务器
    -C: 删除所有虚拟服务器
    -t: 添加tcp服务器
    -u: 添加udp服务器
    -s: 指定调度算法。如轮询rr/加权轮询wrr/最少连接lc/加权最少连接wlc

    -a: 添加虚拟服务器后,向虚拟服务器中加入真实服务器
    -r: 指定真实服务器
    -w: 设置权重
    -m: 指定工作模式为NAT
    -g: 指定工作模式为DR

# 配置LVS-NAT模式规则
[root@lvs1 ~]# ipvsadm -Ln      #-n为显示具体IP地址
IP Virtual Server version 1.2.1 (size=4096)
Prot LocalAddress:Port Scheduler Flags
  -> RemoteAddress:Port           Forward Weight ActiveConn InActConn
[root@lvs1 ~]# ipvsadm -A -t 192.168.88.5:80 -s rr
[root@lvs1 ~]# ipvsadm -a -t 192.168.88.5:80 -r 192.168.99.100:80 -w 1 -m
[root@lvs1 ~]# ipvsadm -a -t 192.168.88.5:80 -r 192.168.99.200:80 -w 2 -m
[root@lvs1 ~]# ipvsadm -Ln
IP Virtual Server version 1.2.1 (size=4096)
Prot LocalAddress:Port Scheduler Flags
  -> RemoteAddress:Port           Forward Weight ActiveConn InActConn
TCP  192.168.88.5:80 rr
  -> 192.168.99.100:80            Masq    1      0          0
  -> 192.168.99.200:80            Masq    2      0          0

# 测试访问,必须使用LVS集群之外的主机作为客户端
[root@client ~]# for i in {1..6}
 do
 curl http://192.168.88.5
 done
Welcome to web2
Welcome to web1
Welcome to web2
Welcome to web1
Welcome to web2
Welcome to web1

# 调整LVS-NAT规则
[root@lvs1 ~]# ipvsadm -E -t 192.168.88.5:80 -s wrr
[root@lvs1 ~]# ipvsadm -Ln
IP Virtual Server version 1.2.1 (size=4096)
Prot LocalAddress:Port Scheduler Flags
  -> RemoteAddress:Port           Forward Weight ActiveConn InActConn
TCP  192.168.88.5:80 wrr    #算法为wrr后权重生效
  -> 192.168.99.100:80            Masq    1      0          3
  -> 192.168.99.200:80            Masq    2      0          3

# 访问测试,必须使用LVS集群之外的主机作为客户端
[root@client ~]# for i in {1..6}
 do
 curl http://192.168.88.5
 done
Welcome to web2
Welcome to web1
Welcome to web2
Welcome to web2
Welcome to web1
Welcome to web2


 被折叠的 条评论
为什么被折叠?
被折叠的 条评论
为什么被折叠?
 到【灌水乐园】发言


