


 本文介绍了KVM虚拟化的概念、优势,以及KVM在CentOS7上的部署步骤,包括检查CPU虚拟化功能、安装KVM、配置Libvirt和Webvirtmgr,最后展示了如何通过Web界面管理KVM虚拟机。
KVM虚拟化
虚拟化介绍
虚拟化:在一台计算机上虚拟出多个逻辑的计算机,而且每个逻辑计算机
它可以是不同操作系统
虚拟化技术:可以扩大硬件容量,单个cpu模拟出多个cpu并行,
允许一个平台上同时运行多个操作系统,应用程序都可以在相互独立
的空间内运行,而且互不影响。
为什么企业使用虚拟化技术
1、节约成本
2、提高效率,物理机我们一般称为宿主机(Host),宿主机上面的虚拟机称为客户机(Guest)
Hypervisor:一种运行在物理服务器硬件与操作系统之间的中间软件层
可允许多个操作系统和应用来共享硬件资源
根据 Hypervisor 的实现方式和所处的位置,虚拟化又分为两种:
完全虚拟化:直接在物理机上部署虚拟化,且不需要修改操作系统内核
半虚拟化:需要修改操作系统内核,使其支持虚拟化驱动来实现虚拟化技术
1、完全虚拟化
Hypervisor 直接安装在物理机上,多个虚拟机在 Hypervisor 上运行。Hypervisor 实现方式一般是一个特殊定制的 Linux 系统。Xen 和 VMWare 的 ESXi 都属于这个类型
2、半虚拟化
理论上讲:
完全虚拟化一般对硬件虚拟化功能进行了特别优化,性能上比半虚拟化要高;
半虚拟化因为基于普通的操作系统,会比较灵活,比如支持虚拟机嵌套。嵌套意味着可以在KVM虚拟机中再运行KVM。
kvm介绍
KVM 全称是 Kernel-Based Virtual Machine。也就是说 KVM 是基于 Linux 内核实现的。
KVM有一个内核模块叫 kvm.ko,只用于管理虚拟 CPU 和内存。
那 IO 的虚拟化,比如存储和网络设备则是由 Linux 内核与Qemu来实现。
Qemu 是纯软件实现的虚拟化模拟器,几乎可以模拟任何硬件设备,我们最熟悉的就是能够模拟一台能够独立运行操作系统的虚拟机,虚拟机认为自己和硬件打交道,但其实是和 Qemu 模拟出来的硬件打交道,Qemu 将这些指令转译给真正的硬件。
正因为 Qemu 是纯软件实现的,所有的指令都要经 Qemu 过一手,性能非常低,所以,在生产环境中,大多数的做法都是配合 KVM 来完成虚拟化工作,因为 KVM 是硬件辅助的虚拟化技术,主要负责 比较繁琐的 CPU 和内存虚拟化,而 Qemu 则负责 I/O 虚拟化,两者合作各自发挥自身的优势,相得益彰.
作为一个 Hypervisor,KVM 本身只关注虚拟机调度和内存管理这两个方面。IO 外设的任务交给 Linux 内核和 Qemu。
Libvirt 就是 KVM 的管理工具。管理虚拟机和虚拟化功能的软件
其实,Libvirt 除了能管理 KVM 这种 Hypervisor,还能管理 Xen,VirtualBox 等。
Libvirt 包含 3 个东西:后台 daemon 程序 libvirtd、API 库和命令行工具 virsh
1、libvirtd是服务程序,接收和处理 API 请求;
2、API 库使得其他人可以开发基于 Libvirt 的高级工具,比如 virt-manager,这是个图形化的 KVM 管理工具;
3、virsh 是我们经常要用的 KVM 命令行工具
KVM部署(基于CentOS7)
环境说明:
系统:CentOS7
ip :192.168.58.137
CPU虚拟化功能
部署前请确保你的CPU虚拟化功能已开启,分为两种情况:
(1)虚拟机要关机设置CPU虚拟化
(2)物理机要在BIOS里开启CPU虚拟化
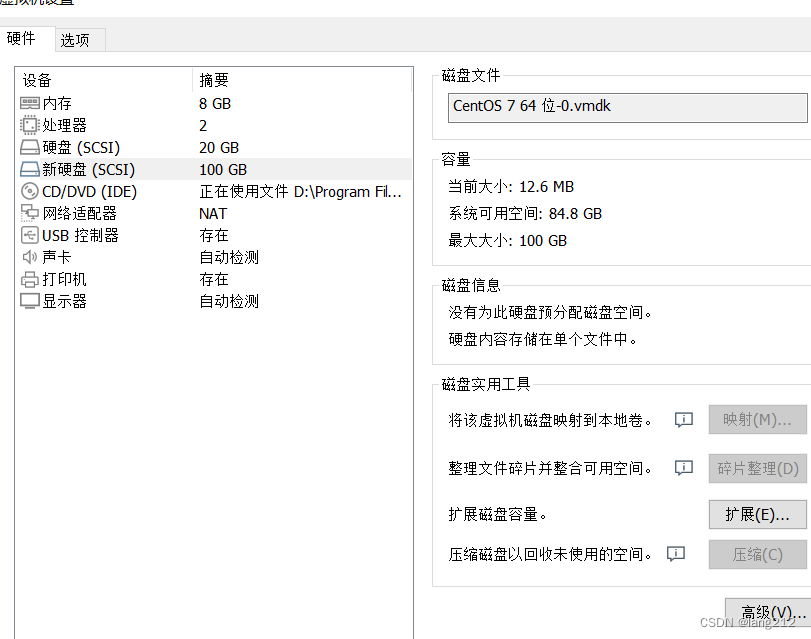
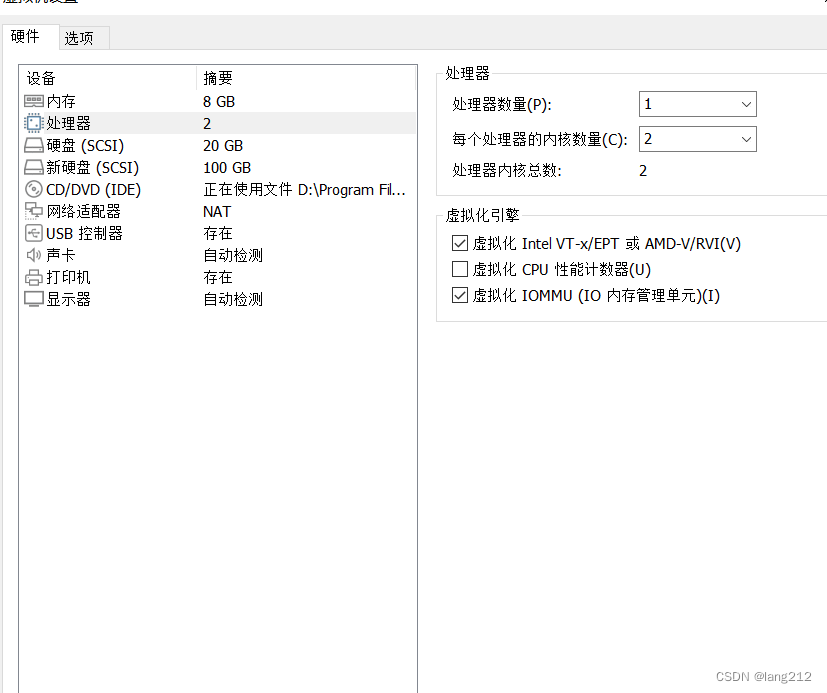
虚拟机设置(内存:8G 磁盘:80G(自定义可以大一点) 虚拟化功能:开启)
//设置虚拟机内存,添加一块100G的硬盘
虚拟化功能:开启
新建分区,将硬盘所有大小都给这个分区
[root@192 ~]# lsblk
NAME            MAJ:MIN RM  SIZE RO TYPE MOUNTPOINT
sda               8:0    0   20G  0 disk
├─sda1            8:1    0    1G  0 part /boot
└─sda2            8:2    0   19G  0 part
  ├─centos-root 253:0    0   17G  0 lvm  /
  └─centos-swap 253:1    0    2G  0 lvm  [SWAP]
sdb               8:16   0  100G  0 disk
sr0              11:0    1  4.4G  0 rom
[root@192 ~]# parted /dev/sdb
GNU Parted 3.1
Using /dev/sdb
Welcome to GNU Parted! Type 'help' to view a list of
commands.
(parted)     //Tab两下查看
align-check  mkpart       rescue       set
disk_set     mktable      resize       toggle
disk_toggle  name         resizepart   unit
help         print        rm           version
mklabel      quit         select
(parted) mktable
New disk label type?
aix    bsd    gpt    mac    pc98
amiga  dvh    loop   msdos  sun
New disk label type? msdos
(parted)
align-check  mkpart       rescue       set
disk_set     mktable      resize       toggle
disk_toggle  name         resizepart   unit
help         print        rm           version
mklabel      quit         select
(parted) unit
Unit?  [compact]?
%        compact  GiB      MB       TB
B        cyl      kB       MiB      TiB
chs      GB       kiB      s
Unit?  [compact]? MiB
(parted) p
Model: VMware, VMware Virtual S (scsi)
Disk /dev/sdb: 102400MiB
Sector size (logical/physical): 512B/512B
Partition Table: msdos
Disk Flags:

Number  Start  End  Size  Type  File system  Flags

(parted)
align-check  mkpart       rescue       set
disk_set     mktable      resize       toggle
disk_toggle  name         resizepart   unit
help         print        rm           version
mklabel      quit         select
(parted) mkpart
Partition type?  primary/extended? primary
File system type?  [ext2]?
affs0            amufs5           jfs
affs1            apfs1            linux-swap
affs2            apfs2            linux-swap(new)
affs3            asfs             linux-swap(old)
affs4            btrfs            linux-swap(v0)
affs5            ext2             linux-swap(v1)
affs6            ext3             nilfs2
affs7            ext4             ntfs
amufs            fat16            reiserfs
amufs0           fat32            sun-ufs
amufs1           hfs              swsusp
amufs2           hfs+             xfs
amufs3           hfsx
amufs4           hp-ufs
File system type?  [ext2]? xfs
Start? 10MiB
End? 102390MiB  //比刚刚创建的小10MiB
(parted) p
Model: VMware, VMware Virtual S (scsi)
Disk /dev/sdb: 102400MiB
Sector size (logical/physical): 512B/512B
Partition Table: msdos
Disk Flags:

Number  Start    End        Size       Type     File system  Flags
 1      10.0MiB  102390MiB  102380MiB  primary

(parted) q
Information: You may need to update /etc/fstab.
[root@192 ~]# udevadm settle
格式化并进行永久挂载
[root@192 ~]# lsblk
NAME            MAJ:MIN RM  SIZE RO TYPE MOUNTPOINT
sda               8:0    0   20G  0 disk
├─sda1            8:1    0    1G  0 part /boot
└─sda2            8:2    0   19G  0 part
  ├─centos-root 253:0    0   17G  0 lvm  /
  └─centos-swap 253:1    0    2G  0 lvm  [SWAP]
sdb               8:16   0  100G  0 disk
└─sdb1            8:17   0  100G  0 part
sr0              11:0    1  4.4G  0 rom
[root@192 ~]# mkfs.xfs /dev/sdb1
meta-data=/dev/sdb1              isize=512    agcount=4, agsize=6552320 blks
         =                       sectsz=512   attr=2, projid32bit=1
         =                       crc=1        finobt=0, sparse=0
data     =                       bsize=4096   blocks=26209280, imaxpct=25
         =                       sunit=0      swidth=0 blks
naming   =version 2              bsize=4096   ascii-ci=0 ftype=1
log      =internal log           bsize=4096   blocks=12797, version=2
         =                       sectsz=512   sunit=0 blks, lazy-count=1
realtime =none                   extsz=4096   blocks=0, rtextents=0
[root@192 ~]# blkid /dev/sdb1
/dev/sdb1: UUID="06aeeaf1-2d7a-48cf-8249-78cf0cb73538" TYPE="xfs"
[root@192 ~]# mkdir -p /kvm/data
[root@192 ~]# vim /etc/fstab
UUID="06aeeaf1-2d7a-48cf-8249-78cf0cb73538" /kvm/data xfs defaults 0 0
[root@192 ~]# mount -a
[root@192 ~]# df -h
Filesystem               Size  Used Avail Use% Mounted on
devtmpfs                 3.8G     0  3.8G   0% /dev
tmpfs                    3.9G     0  3.9G   0% /dev/shm
tmpfs                    3.9G   12M  3.8G   1% /run
tmpfs                    3.9G     0  3.9G   0% /sys/fs/cgroup
/dev/mapper/centos-root   17G  1.5G   16G   9% /
/dev/sda1               1014M  151M  864M  15% /boot
tmpfs                    781M     0  781M   0% /run/user/0
/dev/sdb1                100G   33M  100G   1% /kvm/data
KVM安装
//关闭防火墙和selinux
[root@192 ~]# systemctl stop firewalld
[root@192 ~]# vim /etc/selinux/config
SELINUX=disabled
[root@192 ~]# setenforce 0
//部署yum源
[root@192 ~]# cd /etc/yum.repos.d/
[root@192 yum.repos.d]# rm -rf *
[root@192 yum.repos.d]# curl -o /etc/yum.repos.d/CentOS-Base.repo https://mirrors.aliyun.com/repo/Centos-7.repo
  % Total    % Received % Xferd  Average Speed   Time    Time     Time  Current
                                 Dload  Upload   Total   Spent    Left  Speed
  0     0    0     0    0     0      0      0 --:--:-- --:--  0     0    0     0    0     0      0      0 --:--:-- --:--100  2523  100  2523    0     0   9788      0 --:--:-- --:--:-- --:--:--  9779
[root@192 yum.repos.d]# sed -i -e '/mirrors.cloud.aliyuncs.com/d' -e '/mirrors.aliyuncs.com/d' /etc/yum.repos.d/CentOS-Base.repo
[root@192 yum.repos.d]# ls
CentOS-Base.repo
//安装所需软件包
[root@192 ~]# yum -y install epel-release  wget net-tools unzip zip gcc gcc-c++
//验证cpu是否支持kvm,vmx是intel的 svm是AMD的
[root@192 ~]# egrep -o 'vmx|svm' /proc/cpuinfo
vmx
//安装kvm
[root@192 ~]# yum -y install qemu-kvm   qemu-img  virt-manager  libvirt  libvirt-python  libvirt-client  virt-install  virt-viewer  bridge-utils  libguestfs-tools
//配置网络,因为虚拟机中的网络,我们一般是都和公司服务器处在同一网段的,所以我们需要把kvm的网卡配置成桥接模式
[root@192 ~]#  cd /etc/sysconfig/network-scripts/
[root@192 network-scripts]# ls
ifcfg-ens33    ifdown-Team      ifup-post
ifcfg-lo       ifdown-TeamPort  ifup-ppp
ifdown         ifdown-tunnel    ifup-routes
ifdown-bnep    ifup             ifup-sit
ifdown-eth     ifup-aliases     ifup-Team
ifdown-ib      ifup-bnep        ifup-TeamPort
ifdown-ippp    ifup-eth         ifup-tunnel
ifdown-ipv6    ifup-ib          ifup-wireless
ifdown-isdn    ifup-ippp        init.ipv6-global
ifdown-post    ifup-ipv6        network-functions
ifdown-ppp     ifup-isdn        network-functions-ipv6
ifdown-routes  ifup-plip
ifdown-sit     ifup-plusb
[root@192 network-scripts]# cp ifcfg-ens33 ifcfg-br0
[root@192 network-scripts]# vim ifcfg-br0
[root@192 network-scripts]# cat ifcfg-br0
TYPE=bridge
BOOTPROTO=none
NAME=br0
DEVICE=br0
ONBOOT=yes
IPADDR=192.168.58.137
PREFIX=24
GATEWAY=192.168.58.254
DNS1=192.168.58.254
[root@192 network-scripts]# vim ifcfg-ens33
[root@192 network-scripts]# cat ifcfg-ens33
TYPE=Ethernet
BOOTPROTO=none
NAME=ens33
DEVICE=ens33
ONBOOT=yes
BRIDGE=br0
[root@192 network-scripts]# systemctl restart NetworkManager[root@192 network-scripts]# ifdown ens33;ifup ens33
Device 'ens33' successfully disconnected.
Connection successfully activated (D-Bus active path: /org/freedesktop/NetworkManager/ActiveConnection/3)
[root@192 ~]# ifconfig
br0: flags=4163<UP,BROADCAST,RUNNING,MULTICAST>  mtu 1500
        inet 192.168.58.137  netmask 255.255.255.0  broadcast 192.168.58.255
        inet6 fe80::20c:29ff:fe16:8487  prefixlen 64  scopeid 0x20<link>
        ether 00:0c:29:16:84:87  txqueuelen 1000  (Ethernet)
        RX packets 29  bytes 2147 (2.0 KiB)
        RX errors 0  dropped 0  overruns 0  frame 0
        TX packets 27  bytes 2374 (2.3 KiB)
        TX errors 0  dropped 0 overruns 0  carrier 0  collisions 0

ens33: flags=4163<UP,BROADCAST,RUNNING,MULTICAST>  mtu 1500
        ether 00:0c:29:16:84:87  txqueuelen 1000  (Ethernet)
        RX packets 165939  bytes 221152871 (210.9 MiB)
        RX errors 0  dropped 0  overruns 0  frame 0
        TX packets 26526  bytes 2180538 (2.0 MiB)
        TX errors 0  dropped 0 overruns 0  carrier 0  collisions 0

lo: flags=73<UP,LOOPBACK,RUNNING>  mtu 65536
        inet 127.0.0.1  netmask 255.0.0.0
        inet6 ::1  prefixlen 128  scopeid 0x10<host>
        loop  txqueuelen 1000  (Local Loopback)
        RX packets 0  bytes 0 (0.0 B)
        RX errors 0  dropped 0  overruns 0  frame 0
        TX packets 0  bytes 0 (0.0 B)
        TX errors 0  dropped 0 overruns 0  carrier 0  collisions 0
重启libvirtd服务,并设置开机自启
[root@192 ~]# systemctl enable --now libvirtd
[root@192 ~]# systemctl status libvirtd
● libvirtd.service - Virtualization daemon
   Loaded: loaded (/usr/lib/systemd/system/libvirtd.service; enabled; vendor preset: enabled)
   Active: active (running) since Fri 2022-10-07 09:56:36 EDT; 6s ago
     Docs: man:libvirtd(8)
           https://libvirt.org
 Main PID: 3053 (libvirtd)
    Tasks: 19 (limit: 32768)
   CGroup: /system.slice/libvirtd.service
           ├─3053 /usr/sbin/libvirtd
           ├─3163 /usr/sbin/dnsmasq --conf-file=/var/lib/...
           └─3164 /usr/sbin/dnsmasq --conf-file=/var/lib/...

Oct 07 09:56:36 192.168.58.137 systemd[1]: Started Virtua...
Oct 07 09:56:36 192.168.58.137 dnsmasq[3163]: started, ve...
Oct 07 09:56:36 192.168.58.137 dnsmasq[3163]: compile tim...
Oct 07 09:56:36 192.168.58.137 dnsmasq-dhcp[3163]: DHCP, ...
Oct 07 09:56:36 192.168.58.137 dnsmasq-dhcp[3163]: DHCP, ...
Oct 07 09:56:36 192.168.58.137 dnsmasq[3163]: reading /et...
Oct 07 09:56:36 192.168.58.137 dnsmasq[3163]: using names...
Oct 07 09:56:36 192.168.58.137 dnsmasq[3163]: read /etc/h...
Oct 07 09:56:36 192.168.58.137 dnsmasq[3163]: read /var/l...
Oct 07 09:56:36 192.168.58.137 dnsmasq-dhcp[3163]: read /...
Hint: Some lines were ellipsized, use -l to show in full.
查看kvm模块是否加载
[root@192 ~]# lsmod |grep kvm
kvm_intel             188740  0
kvm                   637289  1 kvm_intel
irqbypass              13503  1 kvm
安装结果
[root@192 ~]# virsh -c qemu:///system list
 Id    Name                           State
----------------------------------------------------

[root@192 ~]# virsh --version
4.5.0
[root@192 ~]# virt-install --version
1.5.0
//将qemu-kvm这个命令做一个软链接到/usr/bin/qemu-kvm
[root@192 ~]# ln -s /usr/libexec/qemu-kvm /usr/bin/qemu-kvm
[root@192 ~]# ll /usr/bin/qemu-kvm
lrwxrwxrwx. 1 root root 21 Oct  7 09:59 /usr/bin/qemu-kvm -> /usr/libexec/qemu-kvm
//查看网桥信息
[root@192 ~]# brctl show
bridge name	bridge id		STP enabled	interfaces
br0		8000.000c29168487	no		ens33
virbr0		8000.5254002b1c4c	yes		virbr0-nic
KVM管理界面安装
Kvm的web界面是由webvirtmgr程序提供的
//安装依赖包
[root@192 yum.repos.d]# yum -y install git python-pip libvirt-python libxml2-python python-websockify supervisor nginx python-devel
//可以提前做一个映射,防止访问不了github
[root@192 yum.repos.d]# vim /etc/hosts
[root@192 yum.repos.d]# cat /etc/hosts
127.0.0.1   localhost localhost.localdomain localhost4 localhost4.localdomain4
::1         localhost localhost.localdomain localhost6 localhost6.localdomain6
20.205.243.166 github.com
//从github上下载webvirtmgr代码
[root@192 src]# git clone http://github.com/retspen/webvirtmgr.git
Cloning into 'webvirtmgr'...
remote: Enumerating objects: 5614, done.
remote: Total 5614 (delta 0), reused 0 (delta 0), pack-reused 5614
Receiving objects: 100% (5614/5614), 2.01 MiB | 1.15 MiB/s  Receiving objects: 100% (5614/5614), 2.97 MiB | 1.15 MiB/s, done.
Resolving deltas: 100% (3606/3606), done.
安装webvirtmgr
[root@192 src]# cd webvirtmgr/
[root@192 webvirtmgr]# pip install -r requirements.txt
Installing collected packages: django, gunicorn, lockfile
Successfully installed django-1.5.5 gunicorn-19.5.0 lockfile-0.12.2
//检查sqlite3是否安装
[root@192 ~]# python
Python 2.7.5 (default, Jun 28 2022, 15:30:04)
[GCC 4.8.5 20150623 (Red Hat 4.8.5-44)] on linux2
Type "help", "copyright", "credits" or "license" for more information.
>>> import sqlite3
>>> exit()
初始化账号信息
[root@192 ~]# cd /usr/local/src/webvirtmgr/
[root@192 webvirtmgr]# python manage.py syncdb
WARNING:root:No local_settings file found.
Creating tables ...
Creating table auth_permission
Creating table auth_group_permissions
Creating table auth_group
Creating table auth_user_groups
Creating table auth_user_user_permissions
Creating table auth_user
Creating table django_content_type
Creating table django_session
Creating table django_site
Creating table servers_compute
Creating table instance_instance
Creating table create_flavor

You just installed Django's auth system, which means you don't have any superusers defined.
Would you like to create one now? (yes/no): yes
Username (leave blank to use 'root'):
Email address: 3042277527@qq.com
Password:
Password (again):
Superuser created successfully.
Installing custom SQL ...
Installing indexes ...
Installed 6 object(s) from 1 fixture(s)
//拷贝web网页到指定目录
[root@192 ~]# mkdir /var/www
[root@192 ~]# cp -r /usr/local/src/webvirtmgr/ /var/www/
[root@192 ~]# chown -R nginx.nginx /var/www/webvirtmgr/
//生成一对公钥与私钥,由于这里webvirtmgr和kvm服务部署在同一台主机中,所以这里本地信任。如果kvm部署在其他机器上的时候,那么就需要把公钥发送到kvm主机中
[root@192 webvirtmgr]# ssh-keygen
Generating public/private rsa key pair.
Enter file in which to save the key (/root/.ssh/id_rsa):
Created directory '/root/.ssh'.
Enter passphrase (empty for no passphrase):
Enter same passphrase again:
Your identification has been saved in /root/.ssh/id_rsa.
Your public key has been saved in /root/.ssh/id_rsa.pub.
The key fingerprint is:
SHA256:B/5qFn2QQVzB0rJDv4b4c8PBsFSzeZj8CQ0oWjkFQ1k root@192.168.58.137
The key's randomart image is:
+---[RSA 2048]----+
|       .+OE=o.   |
|        *.B *    |
|       o.+ X O   |
|      .. .B O o  |
|        S+.B = . |
|        oo+ * o  |
|         o.+ .   |
|        o.o +    |
|       o.  o .   |
+----[SHA256]-----+
[root@192 webvirtmgr]# ssh-copy-id -i ~/.ssh/id_rsa.pub root@192.168.58.137
/usr/bin/ssh-copy-id: INFO: Source of key(s) to be installed: "/root/.ssh/id_rsa.pub"
The authenticity of host '192.168.58.137 (192.168.58.137)' can't be established.
ECDSA key fingerprint is SHA256:wWGbSFy8ksElR5SkCTTw5RJT9/gU5ibvH6eMWeeR5FA.
ECDSA key fingerprint is MD5:f3:4c:97:5c:43:e3:44:96:cb:da:07:fd:31:70:11:c0.
Are you sure you want to continue connecting (yes/no)? yes
/usr/bin/ssh-copy-id: INFO: attempting to log in with the new key(s), to filter out any that are already installed
/usr/bin/ssh-copy-id: INFO: 1 key(s) remain to be installed -- if you are prompted now it is to install the new keys
root@192.168.58.137's password:

Number of key(s) added: 1

Now try logging into the machine, with:   "ssh 'root@192.168.58.137'"
and check to make sure that only the key(s) you wanted were added.
配置端口转发
[root@192 ~]# ssh 192.168.58.137 -L localhost:8000:localhost:8000 -L localhost:6080:localhost:60
Last login: Fri Oct  7 09:19:13 2022 from 192.168.58.1
[root@192 ~]# ss -antl
State      Recv-Q Send-Q Local Address:Port               Peer Address:Port
LISTEN     0      5      192.168.122.1:53                  *:*
LISTEN     0      128     *:22                  *:*
LISTEN     0      128    127.0.0.1:6080                *:*
LISTEN     0      128    127.0.0.1:8000                *:*
LISTEN     0      128      [::]:22                   [::]:*
LISTEN     0      128     [::1]:6080                 [::]:*
LISTEN     0      128     [::1]:8000                 [::]:*
配置nginx
[root@192 ~]# cp /etc/nginx/nginx.conf /etc/nginx/nginx.conf.bak
[root@192 ~]# vim /etc/nginx/nginx.conf
配置nginx虚拟主机
[root@192 ~]# vim /etc/nginx/conf.d/webvirtmgr.conf
[root@192 ~]# cat /etc/nginx/conf.d/webvirtmgr.conf
erver {
    listen 80 default_server;

    server_name $hostname;
    #access_log /var/log/nginx/webvirtmgr_access_log;

    location /static/ {
        root /var/www/webvirtmgr/webvirtmgr;
        expires max;
    }

    location / {
        proxy_pass http://127.0.0.1:8000;
        proxy_set_header X-Real-IP $remote_addr;
        proxy_set_header X-Forwarded-for $proxy_add_x_forwarded_for;
        proxy_set_header Host $host:$server_port;
        proxy_set_header X-Forwarded-Proto $remote_addr;
        proxy_connect_timeout 600;
        proxy_read_timeout 600;
        proxy_send_timeout 600;
        client_max_body_size 1024M;
    }
}
//确保bind绑定本机的8000端口
[root@192 ~]# vim /var/www/webvirtmgr/conf/gunicorn.conf.py
bind = '127.0.0.1:8000'
backlog = 2048
[root@192 ~]# grep bind /var/www/webvirtmgr/conf/gunicorn.conf.py
# bind - The socket to bind.
bind = '127.0.0.1:8000'
重启nginx服务设置开机自启,查看端口是否开启
[root@192 ~]# systemctl enable --now nginx
[root@192 ~]# ss -antl
State      Recv-Q Send-Q Local Address:Port               Peer Address:Port
LISTEN     0      128        *:80                     *:*
LISTEN     0      5      192.168.122.1:53                     *:*
LISTEN     0      128        *:22                     *:*
LISTEN     0      128    127.0.0.1:6080                   *:*
LISTEN     0      128    127.0.0.1:8000                   *:*
LISTEN     0      128     [::]:22                  [::]:*
LISTEN     0      128    [::1]:6080                [::]:*
LISTEN     0      128    [::1]:8000                [::]:*
设置supervisor
[root@192 ~]# vim /etc/supervisord.conf
//在文件最后添加
[program:webvirtmgr]
command=/usr/bin/python2 /var/www/webvirtmgr/manage.py run_gunicorn -c /var/www/webvirtmgr/conf/gunicorn.conf.py
directory=/var/www/webvirtmgr
autostart=true
autorestart=true
logfile=/var/log/supervisor/webvirtmgr.log
log_stderr=true
user=nginx

[program:webvirtmgr-console]
command=/usr/bin/python2 /var/www/webvirtmgr/console/webvirtmgr-console
directory=/var/www/webvirtmgr
autostart=true
autorestart=true
stdout_logfile=/var/log/supervisor/webvirtmgr-console.log
redirect_stderr=true
user=nginx
//启动supervisor并设置开机自启
[root@192 ~]# systemctl enable --now supervisord.service
Created symlink from /etc/systemd/system/multi-user.target.wants/supervisord.service to /usr/lib/systemd/system/supervisord.service.
配置nginx用户
[root@192 ~]# su - nginx -s /bin/bash
-bash-4.2$ ssh-keygen
Generating public/private rsa key pair.
Enter file in which to save the key (/var/lib/nginx/.ssh/id_rsa):
Created directory '/var/lib/nginx/.ssh'.
Enter passphrase (empty for no passphrase):
Enter same passphrase again:
Your identification has been saved in /var/lib/nginx/.ssh/id_rsa.
Your public key has been saved in /var/lib/nginx/.ssh/id_rsa.pub.
The key fingerprint is:
SHA256:ml0r3QnIuLGGGxBowNVckJKniOpM6flOZlr3jmey5Uc nginx@192.168.58.137
The key's randomart image is:
+---[RSA 2048]----+
|o ..+.+.         |
|.o o =           |
|o.o +            |
|o. o   o .       |
|. o   o S o      |
|.o . . B E + .   |
|= .=o.*.+ o o    |
| =* .==o o       |
| .oo.o*+.        |
+----[SHA256]-----+
-bash-4.2$ touch ~/.ssh/config
-bash-4.2$ echo -e "StrictHostKeyChecking=no\nUserKnownHostsFile=/dev/null" >> ~/.ssh/config
-bash-4.2$ chmod 0600 ~/.ssh/config
-bash-4.2$ ssh-copy-id -i ~/.ssh/id_rsa.pub root@192.168.58.137
/bin/ssh-copy-id: INFO: Source of key(s) to be installed: "/var/lib/nginx/.ssh/id_rsa.pub"
/bin/ssh-copy-id: INFO: attempting to log in with the new key(s), to filter out any that are already installed
/bin/ssh-copy-id: INFO: 1 key(s) remain to be installed -- if you are prompted now it is to install the new keys
Warning: Permanently added '192.168.58.137' (ECDSA) to the list of known hosts.
root@192.168.58.137's password:

Number of key(s) added: 1

Now try logging into the machine, with:   "ssh 'root@192.168.58.137'"
and check to make sure that only the key(s) you wanted were added.

-bash-4.2$ ssh root@192.168.58.137
Warning: Permanently added '192.168.58.137' (ECDSA) to the list of known hosts.
Last login: Fri Oct  7 11:12:18 2022 from 192.168.58.137
[root@192 ~]# exit
logout
Connection to 192.168.58.137 closed.
-bash-4.2$ exit
logout
[root@192 ~]# vim /etc/polkit-1/localauthority/50-local.d/50-libvirt-remote-access.pkla
[root@192 ~]# cat /etc/polkit-1/localauthority/50-local.d/50-libvirt-remote-access.pkla
bvirt SSH access]
Identity=unix-user:root
Action=org.libvirt.unix.manage
ResultAny=yes
ResultInactive=yes
ResultActive=yes
[root@192 ~]# chown -R root.root /etc/polkit-1/localauthority/50-local.d/50-libvirt-remote-access.pkla
[root@192 ~]# systemctl enable --now nginx
[root@192 ~]# systemctl enable --now libvirtd
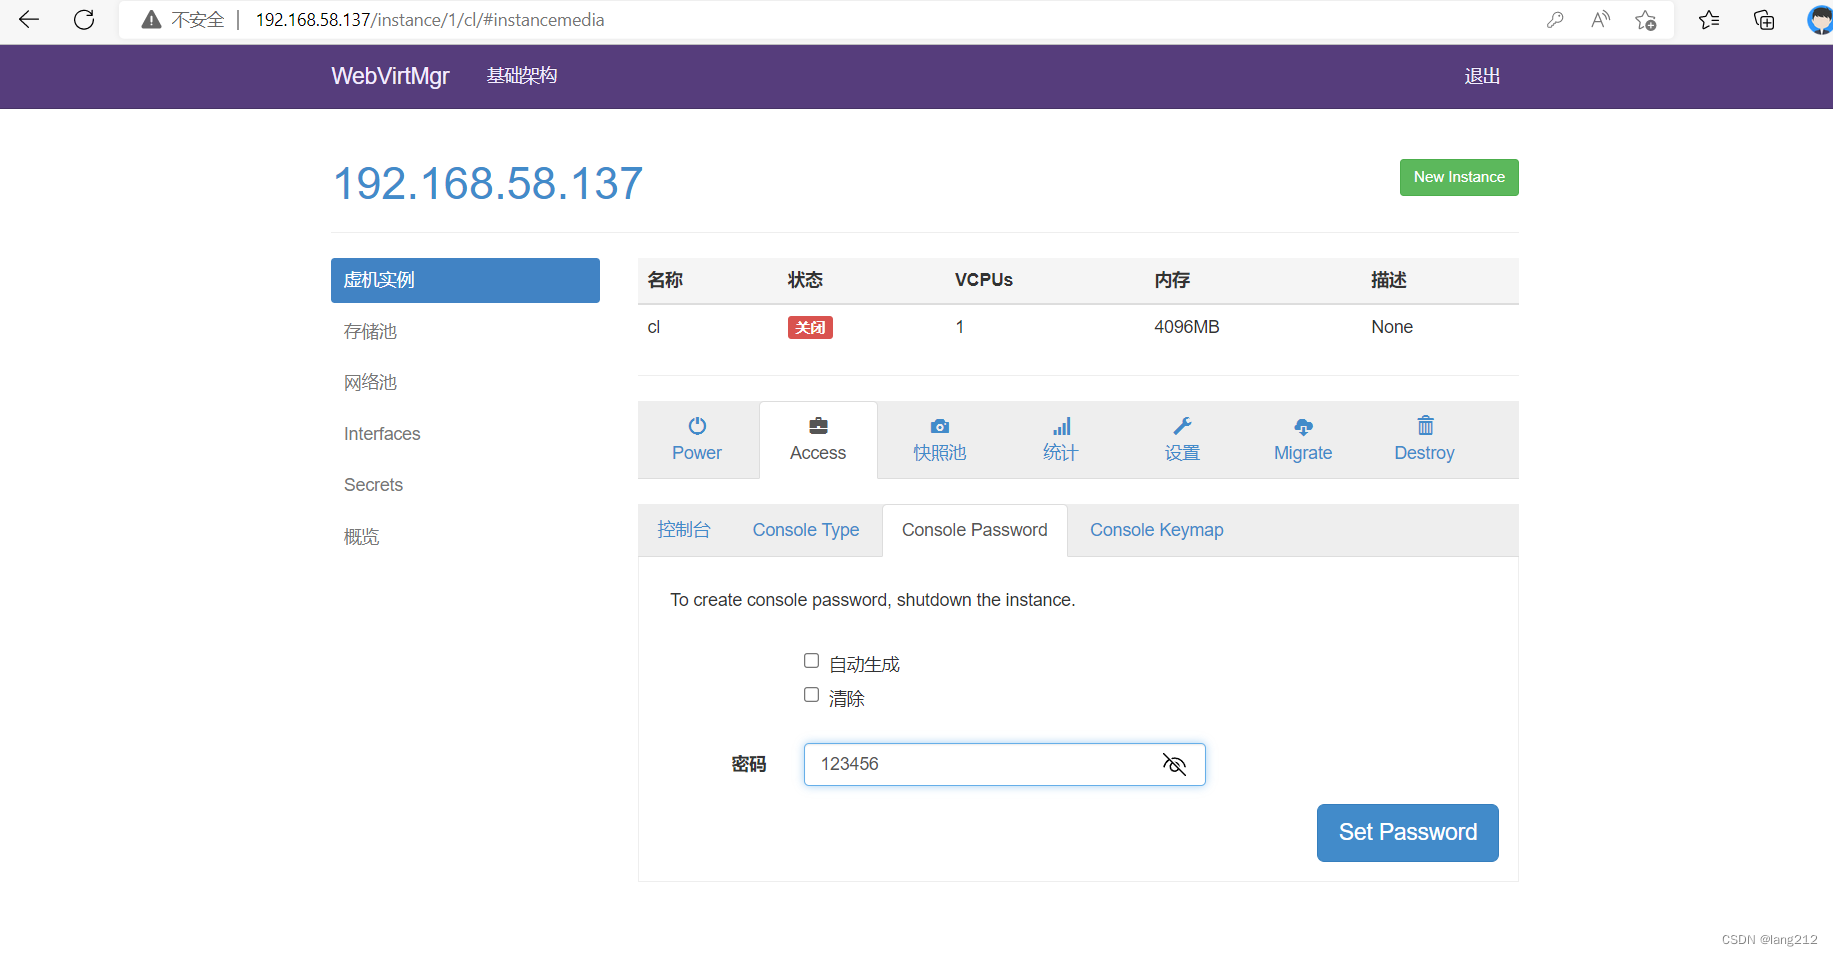
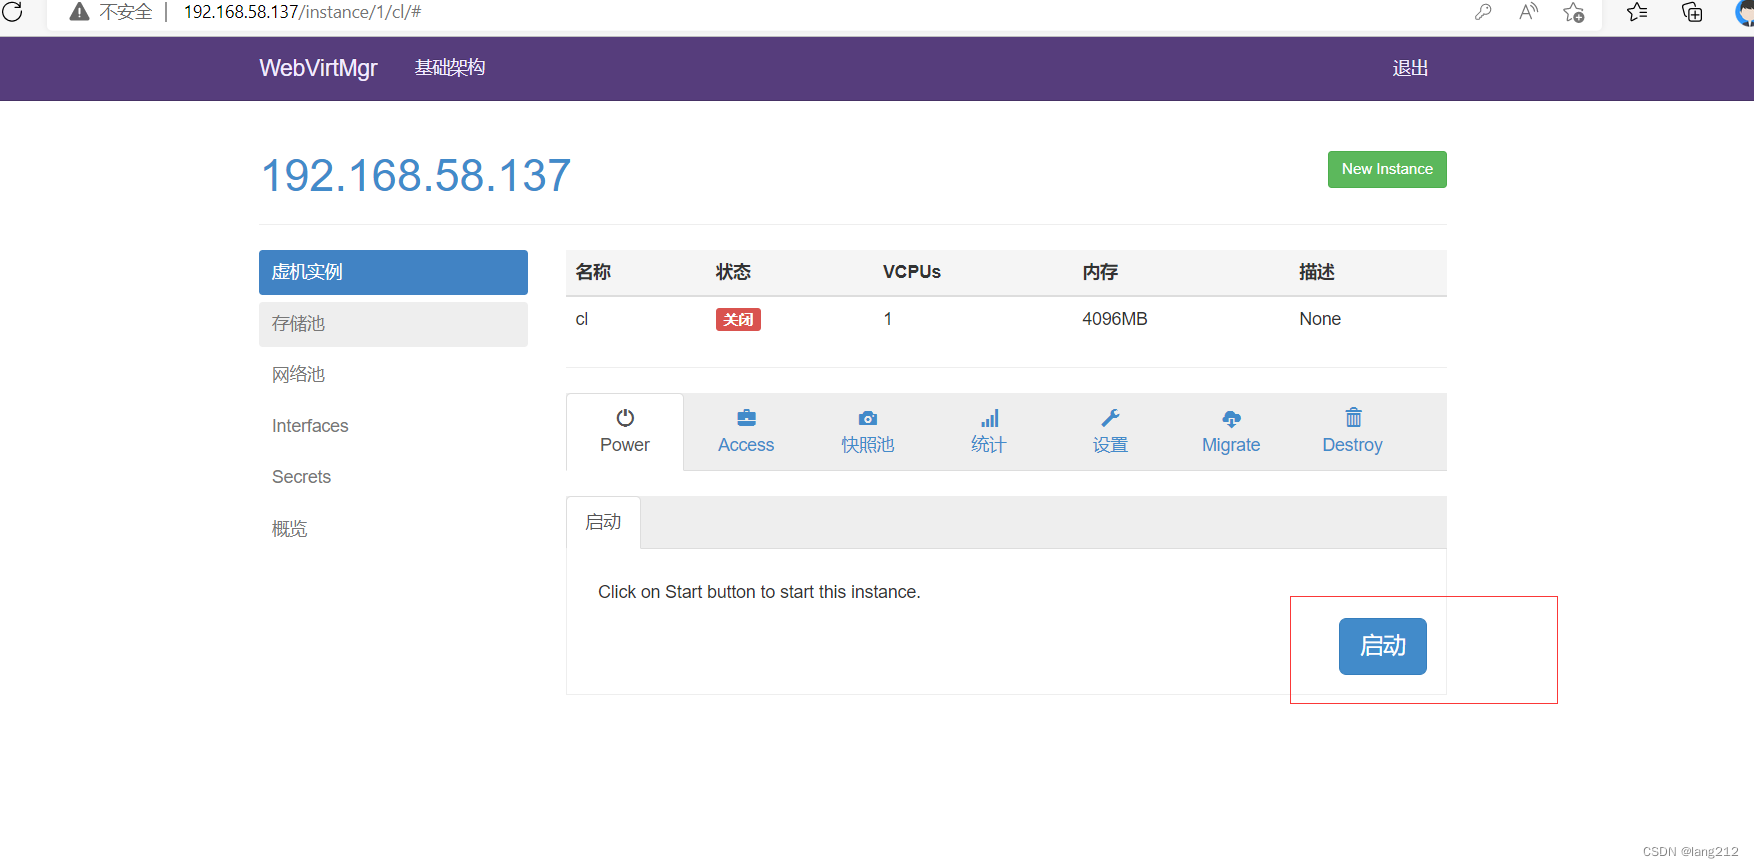
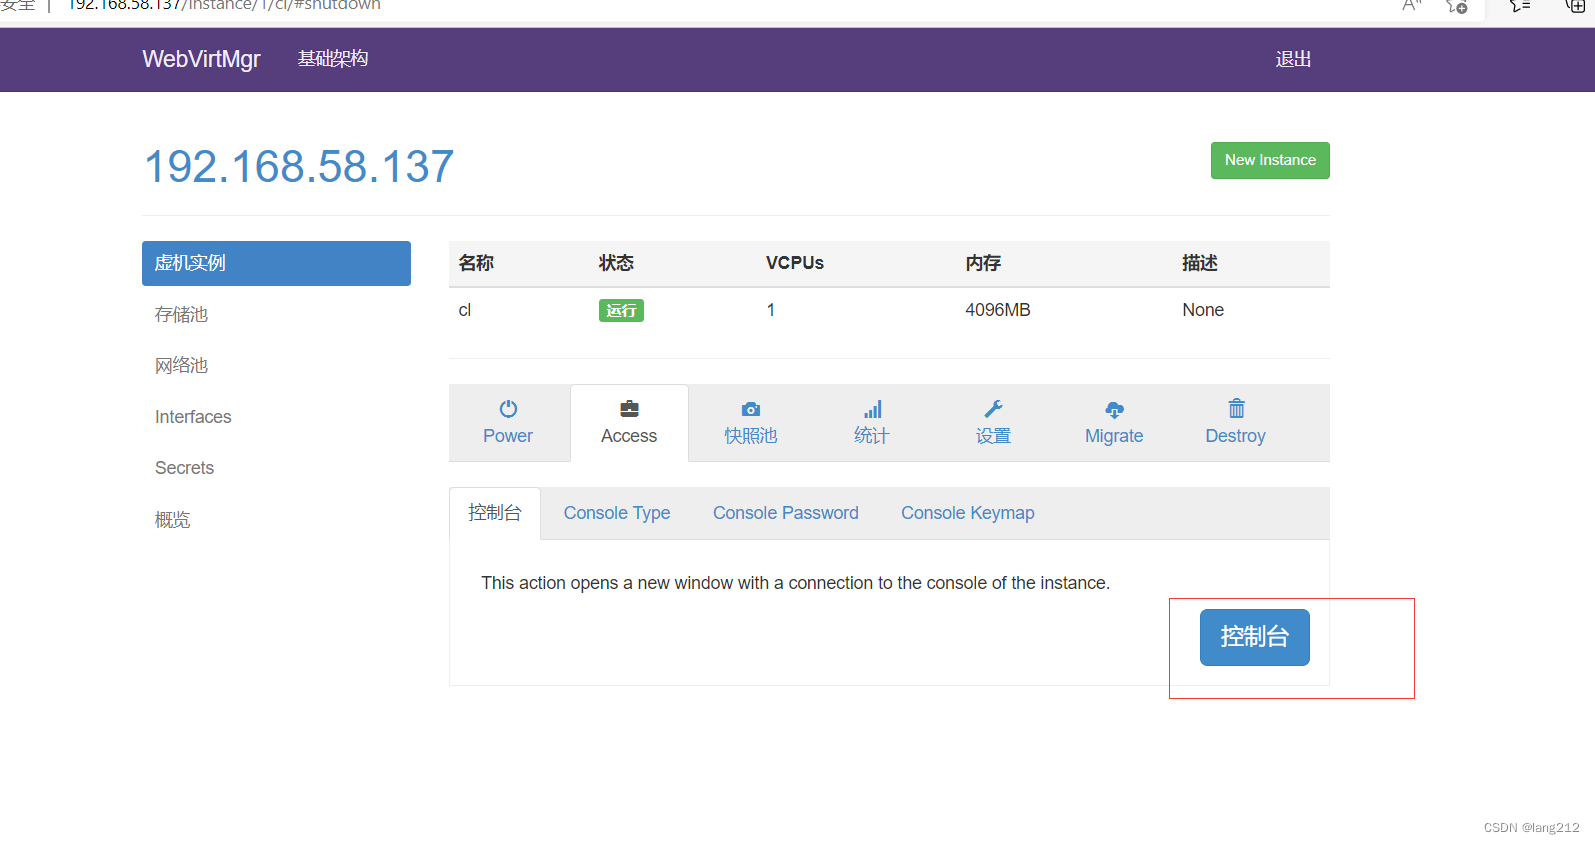
KVM web界面管理
//修改nginx配置文件
[root@192 ~]# vim /etc/nginx/nginx.conf
user nginx;
worker_processes auto;
error_log /var/log/nginx/error.log;
pid /run/nginx.pid;
worker_rlimit_nofile 655350;  //添加此行
//对系统参数进行设置
[root@192 ~]# vim /etc/security/limits.conf
//在文件最末尾写入
* soft nofile 655350
* hard nofile 655350
//重启服务,重读文件
[root@192 ~]# sysctl -p
[root@192 ~]# systemctl enable --now nginx
安装novnc,并通过novnc_server启动一个vnc
[root@192 ~]# yum -y install novnc
[root@192 ~]# chmod +x /etc/rc.d/rc.local
[root@192 ~]# vim /etc/rc.d/rc.local
nohup novnc_server 192.168.58.137:5920 &
[root@192 ~]# . /etc/rc.d/rc.local
[root@192 ~]# nohup: ignoring input and appending output to ‘nohup.out’
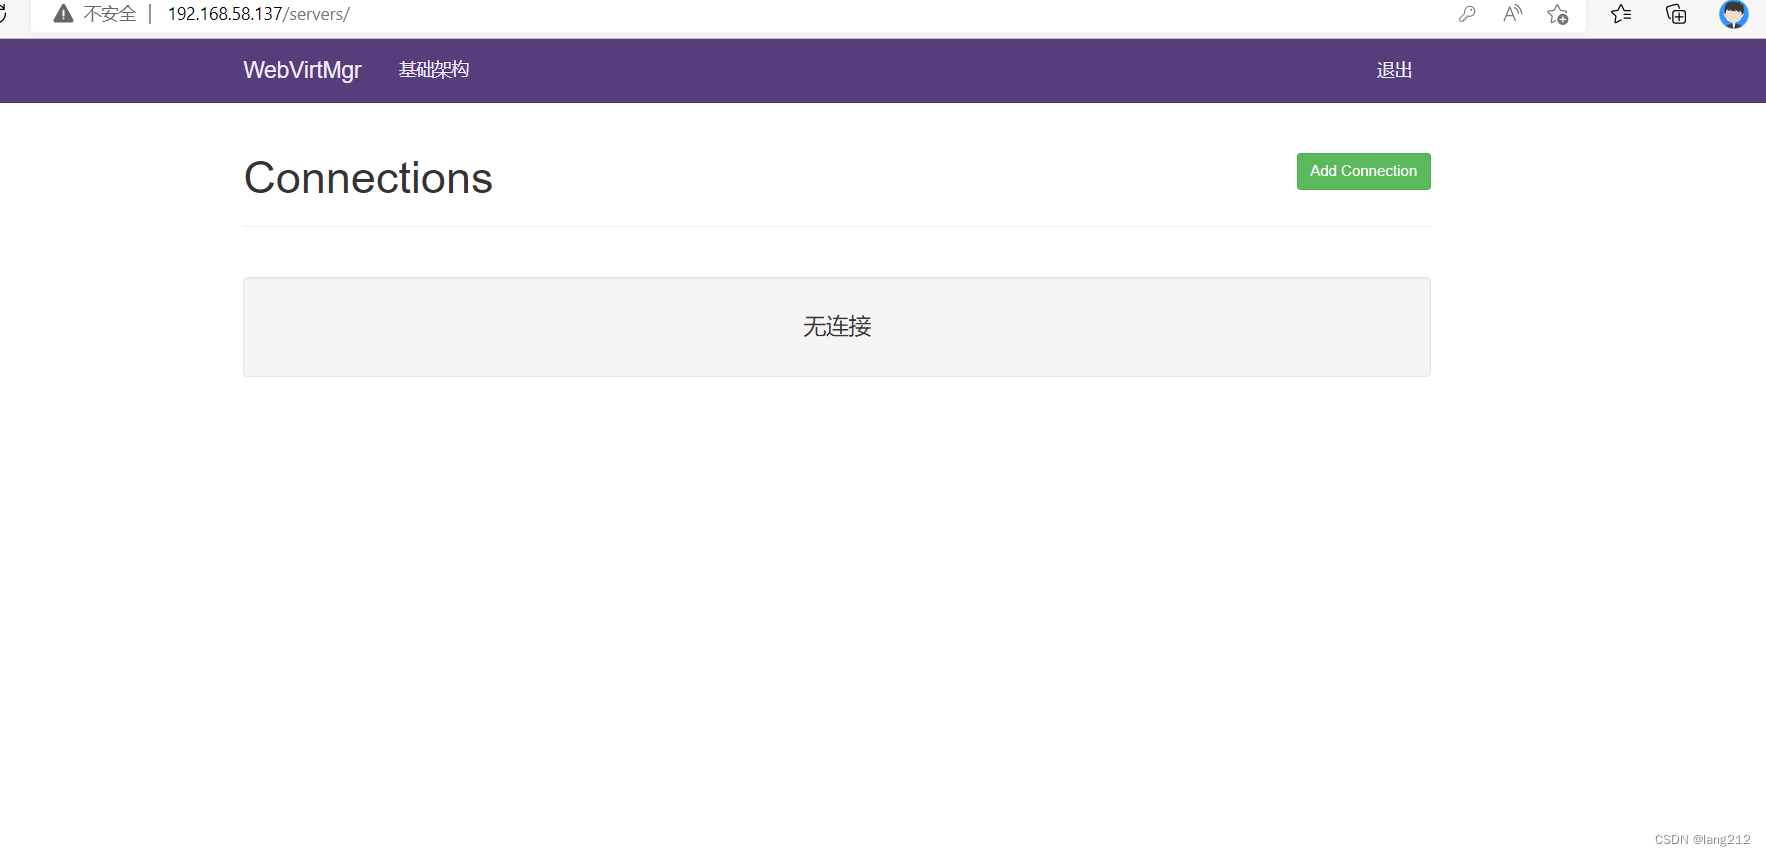
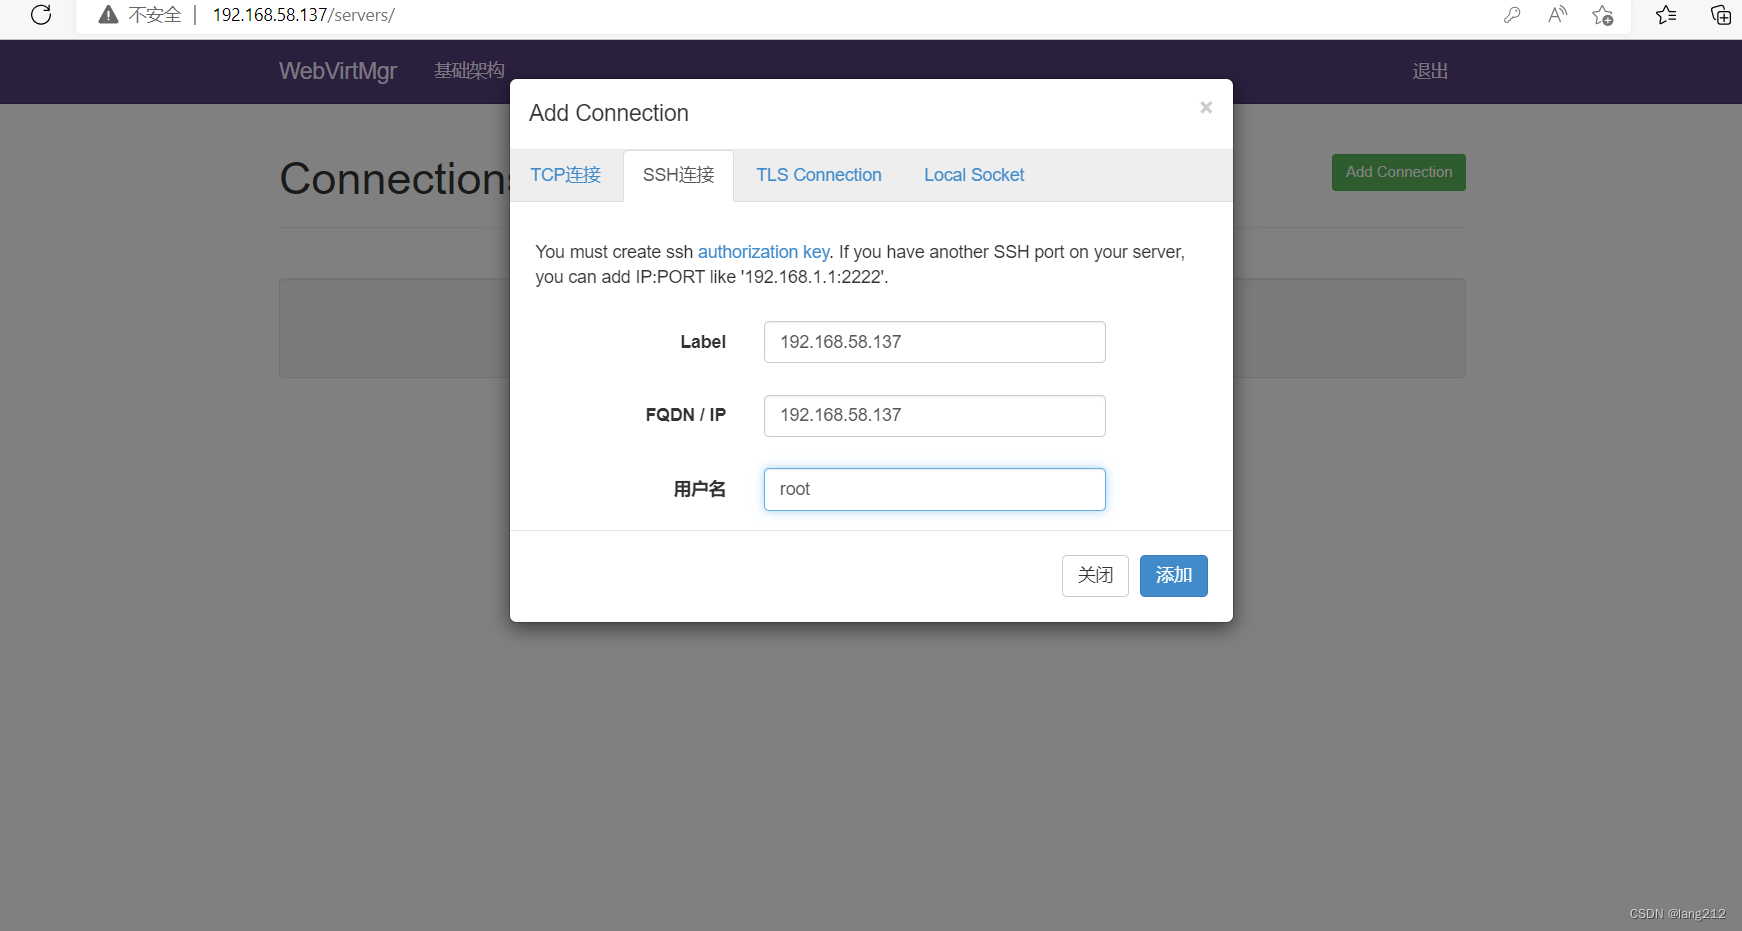
使用浏览器访问
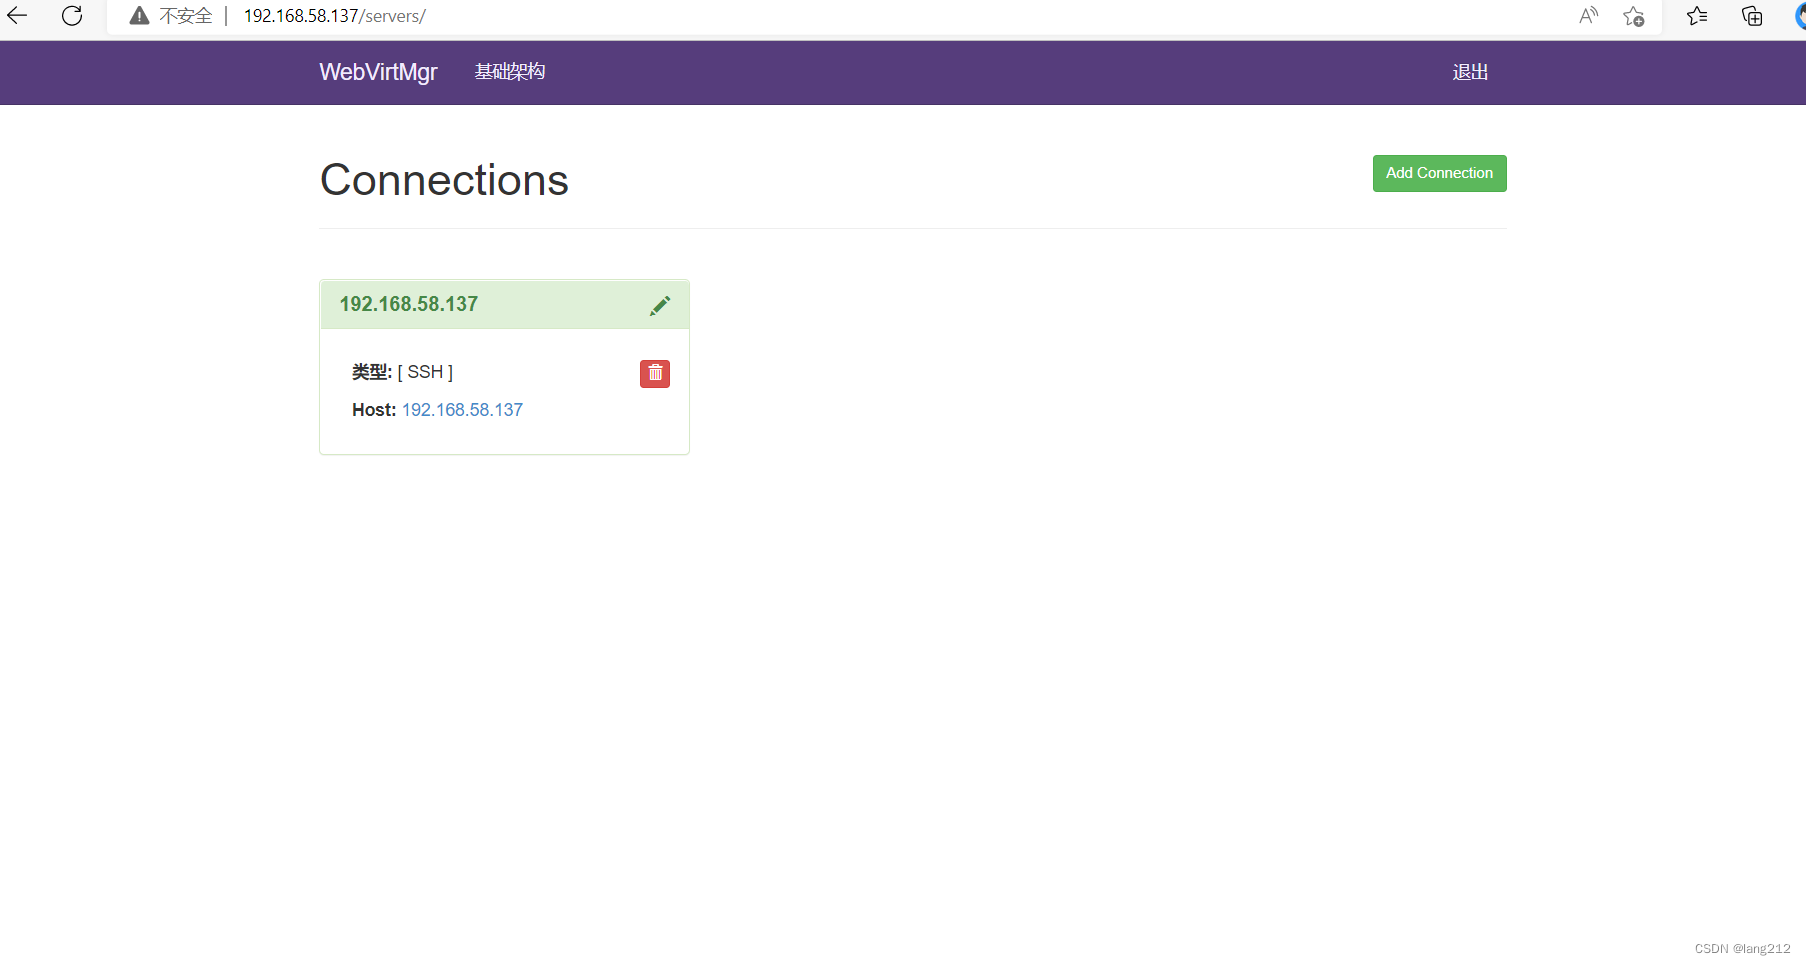
新建连接
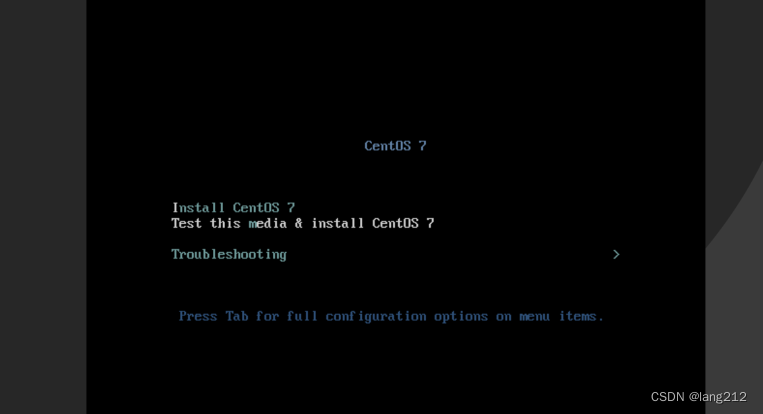
创建虚拟机
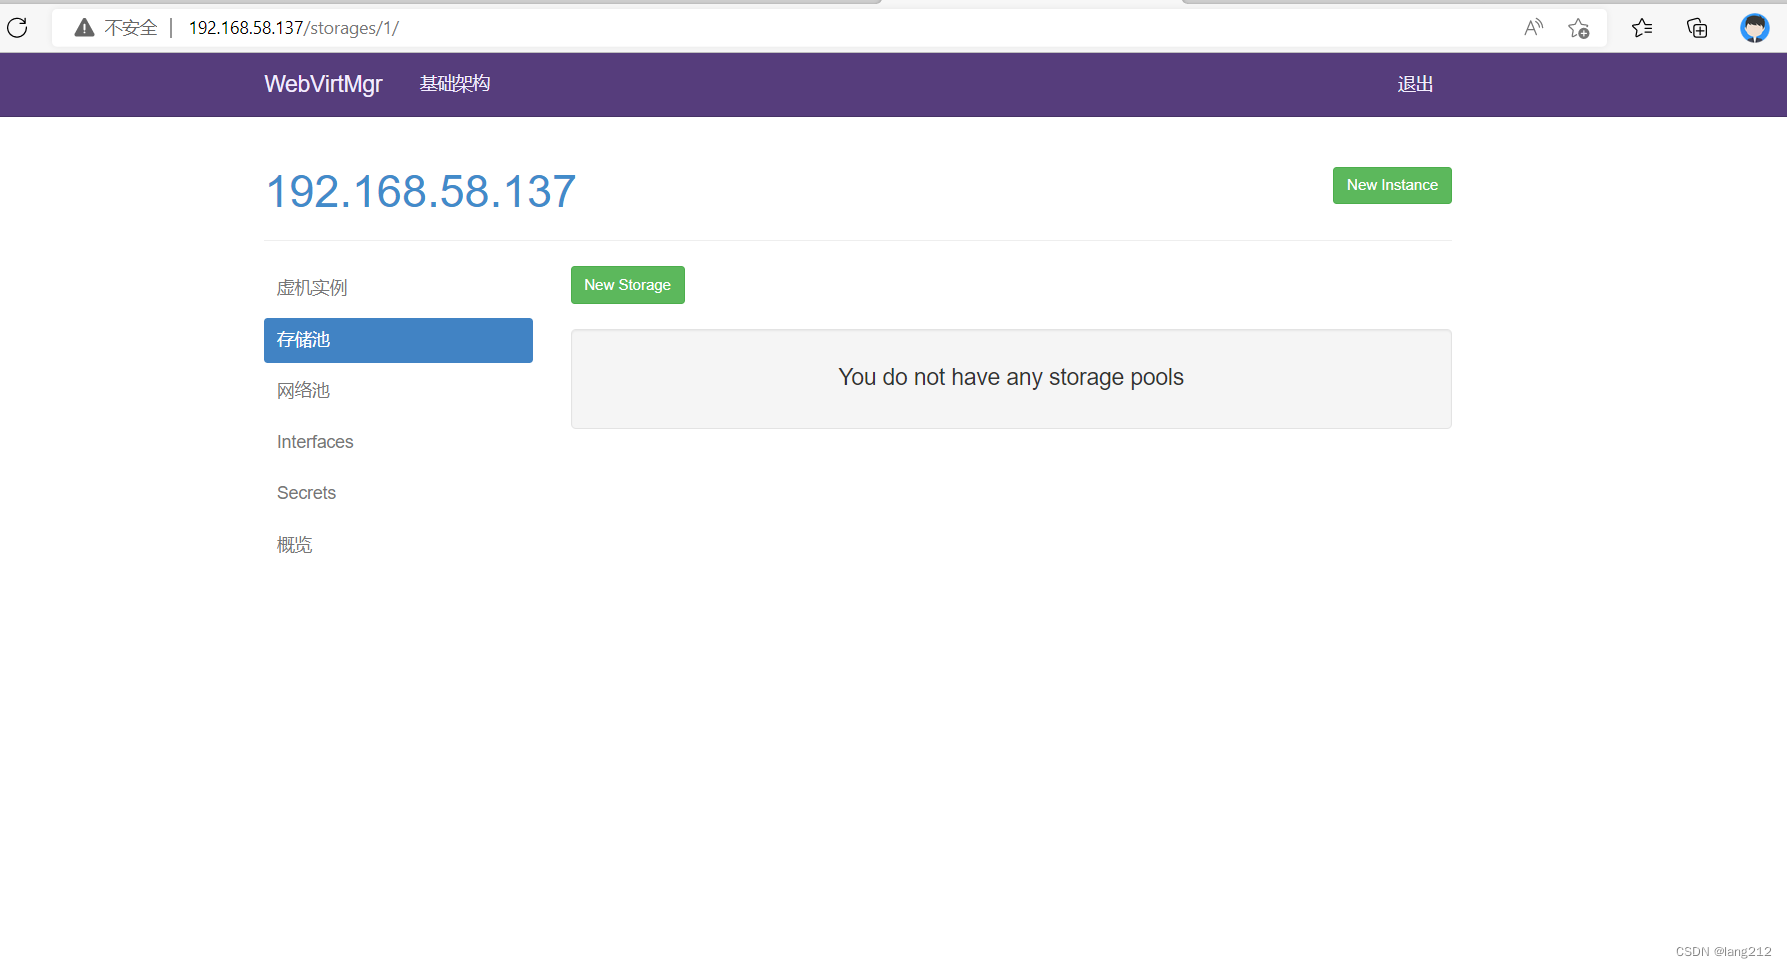
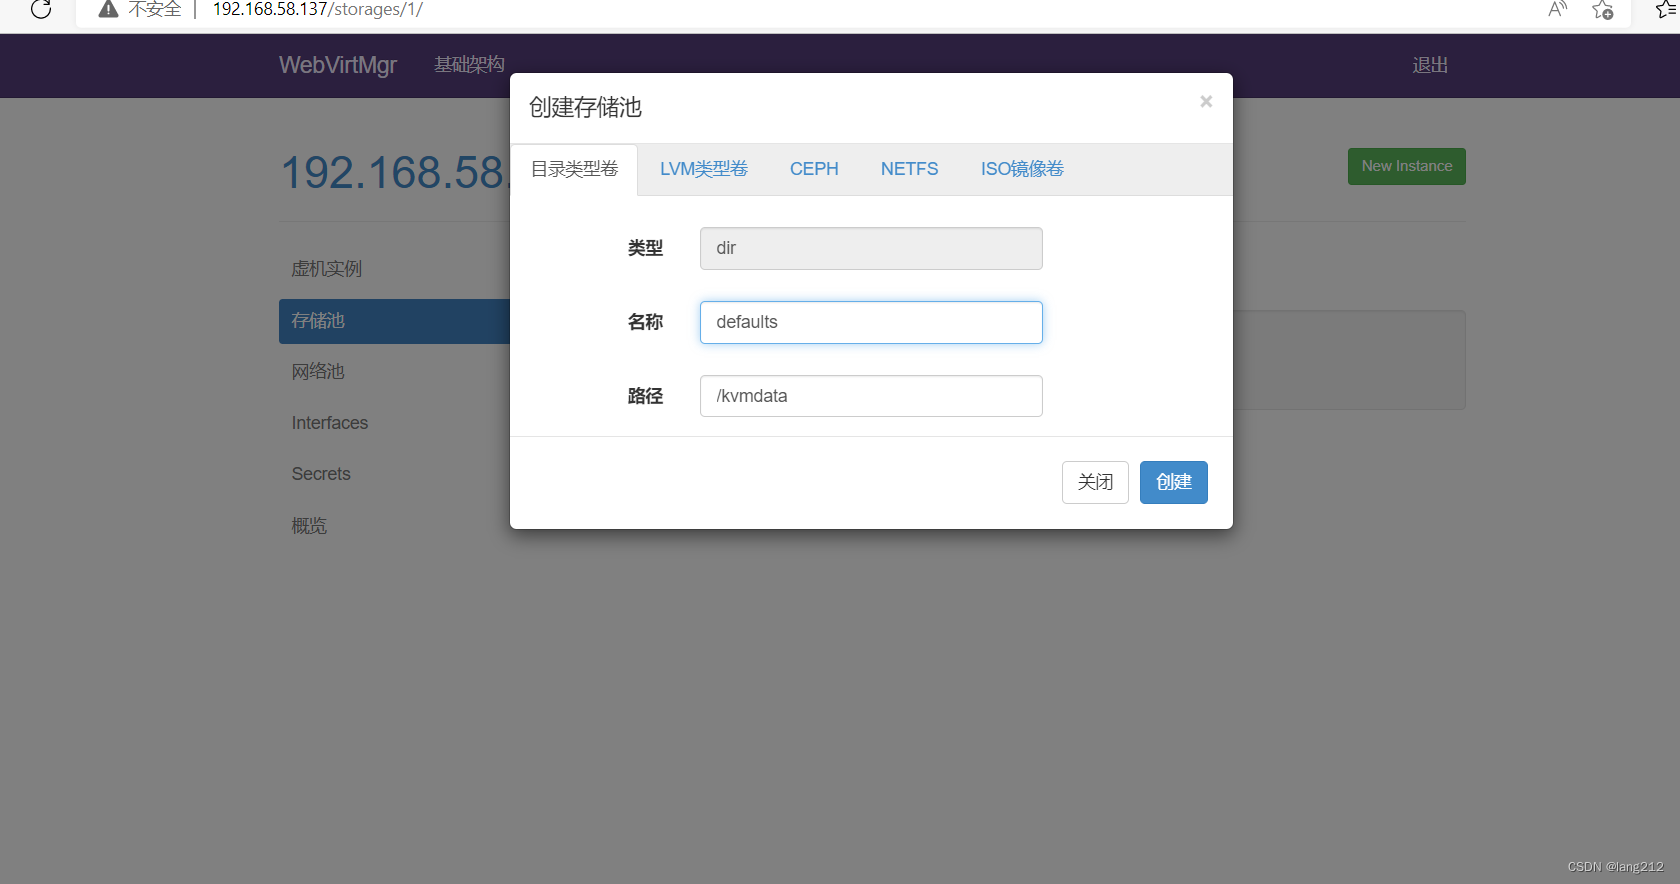
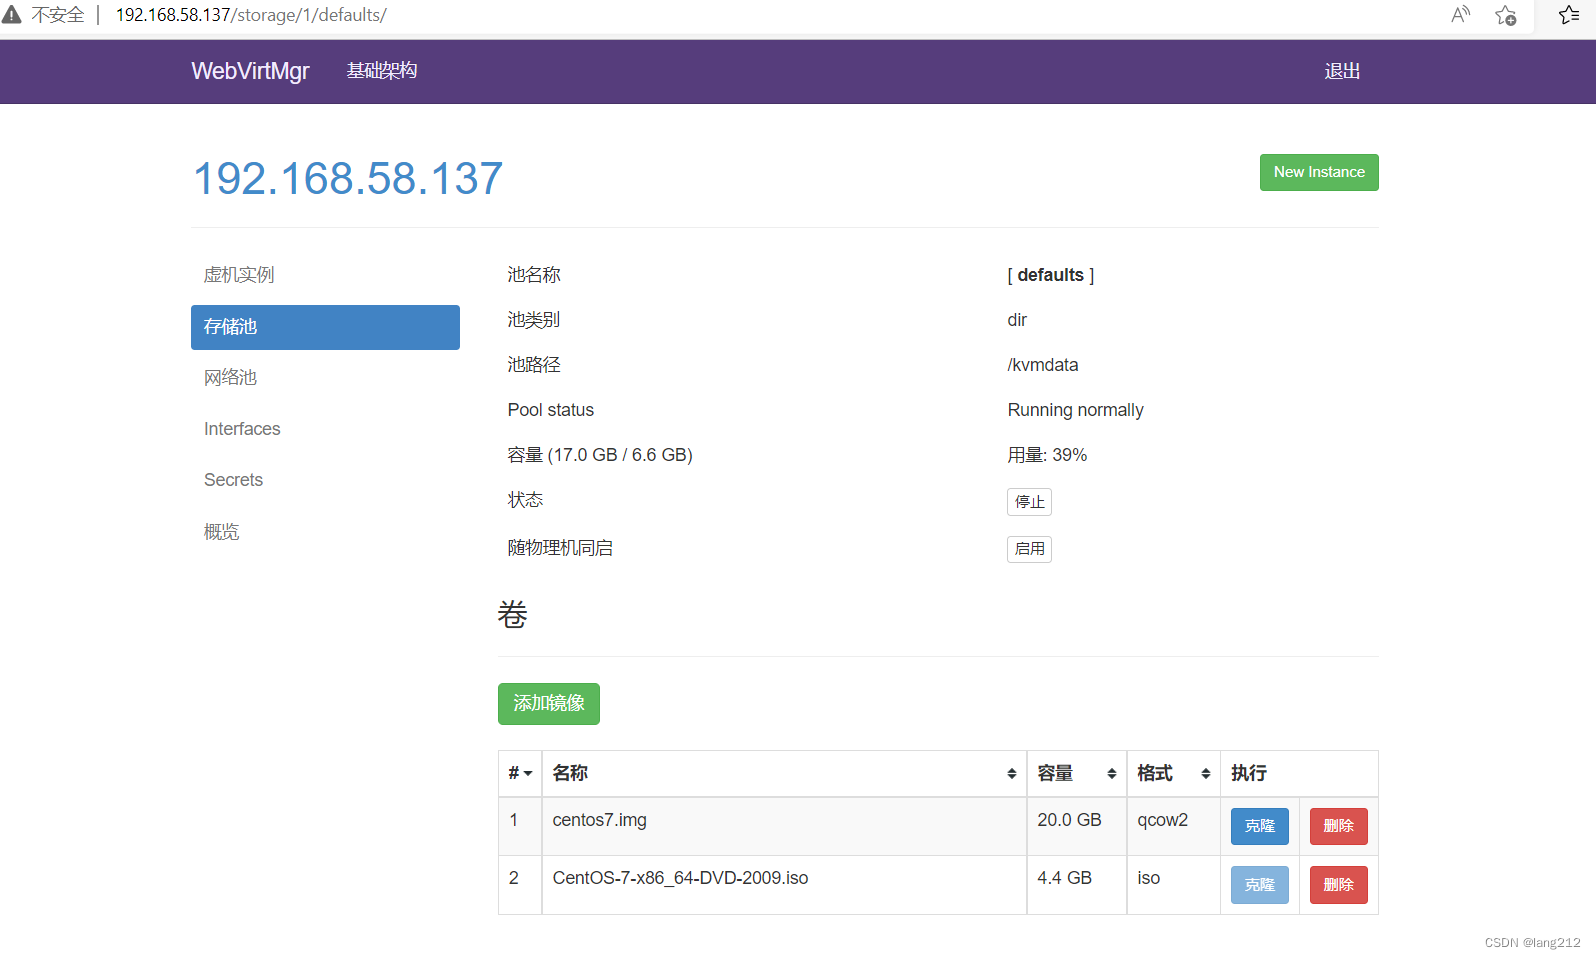
1、新建存储

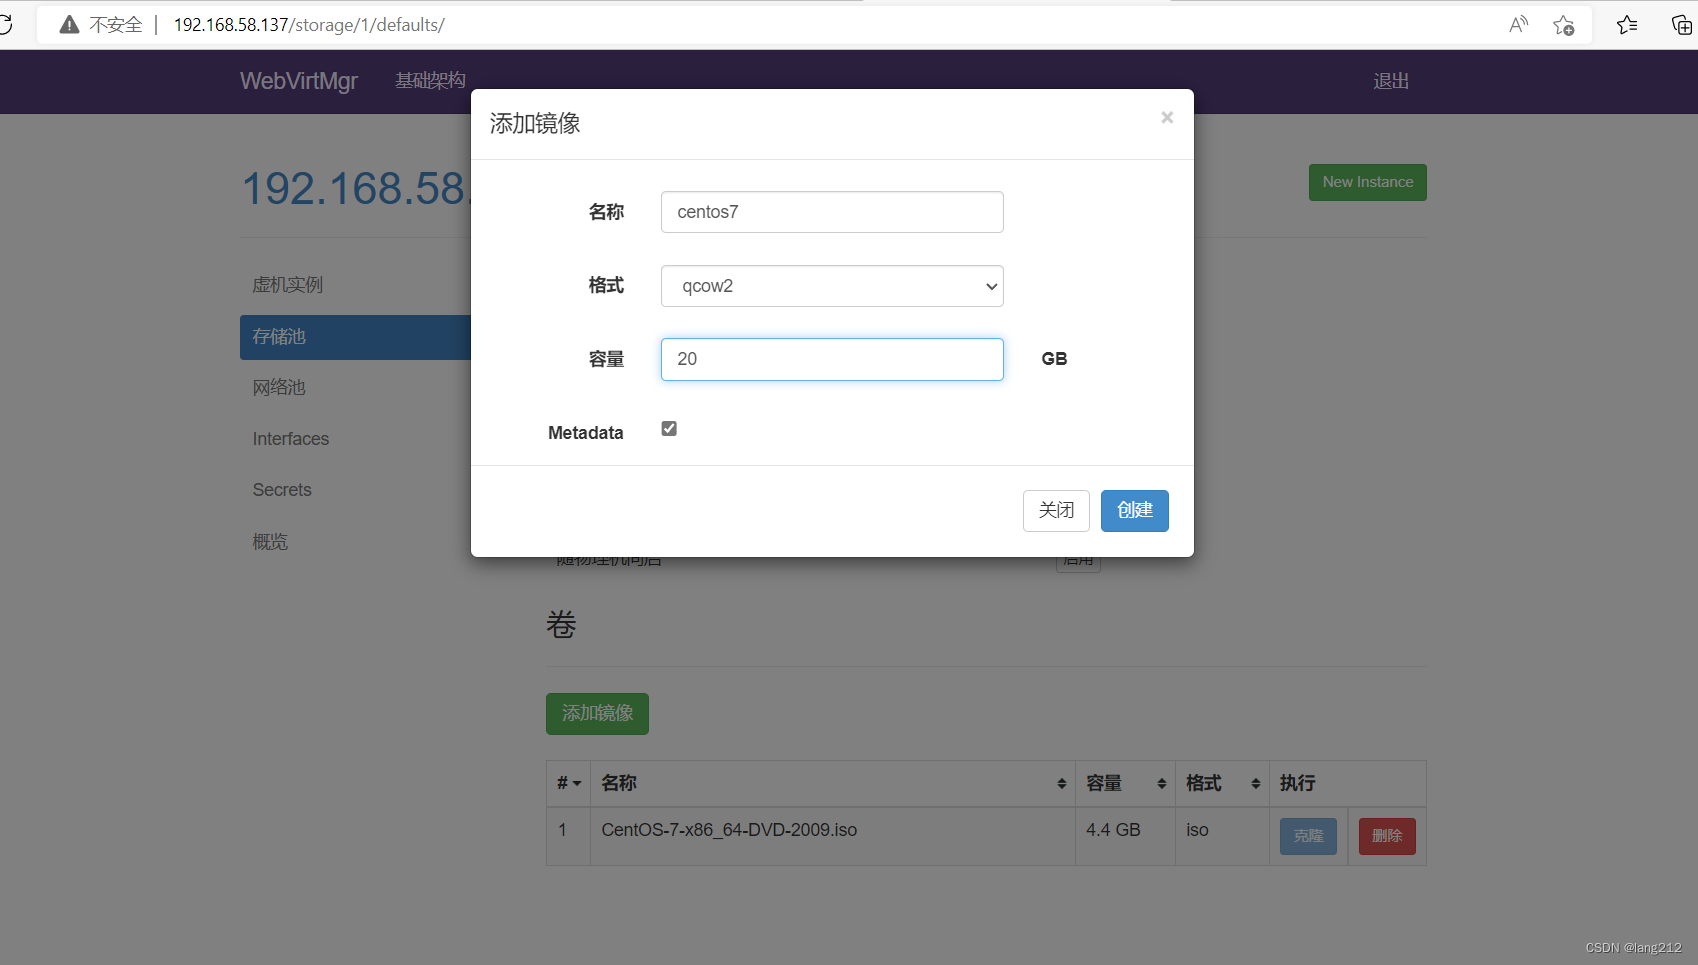
2、上传镜像,使用FinalShell,xftp或者xshell,再或者其他工具,将镜像文件上传到服务器的/kvmdata目录下存放
[root@192 ~]# cd /kvmdata/
[root@192 kvmdata]# ls
CentOS-7-x86_64-DVD-2009.iso

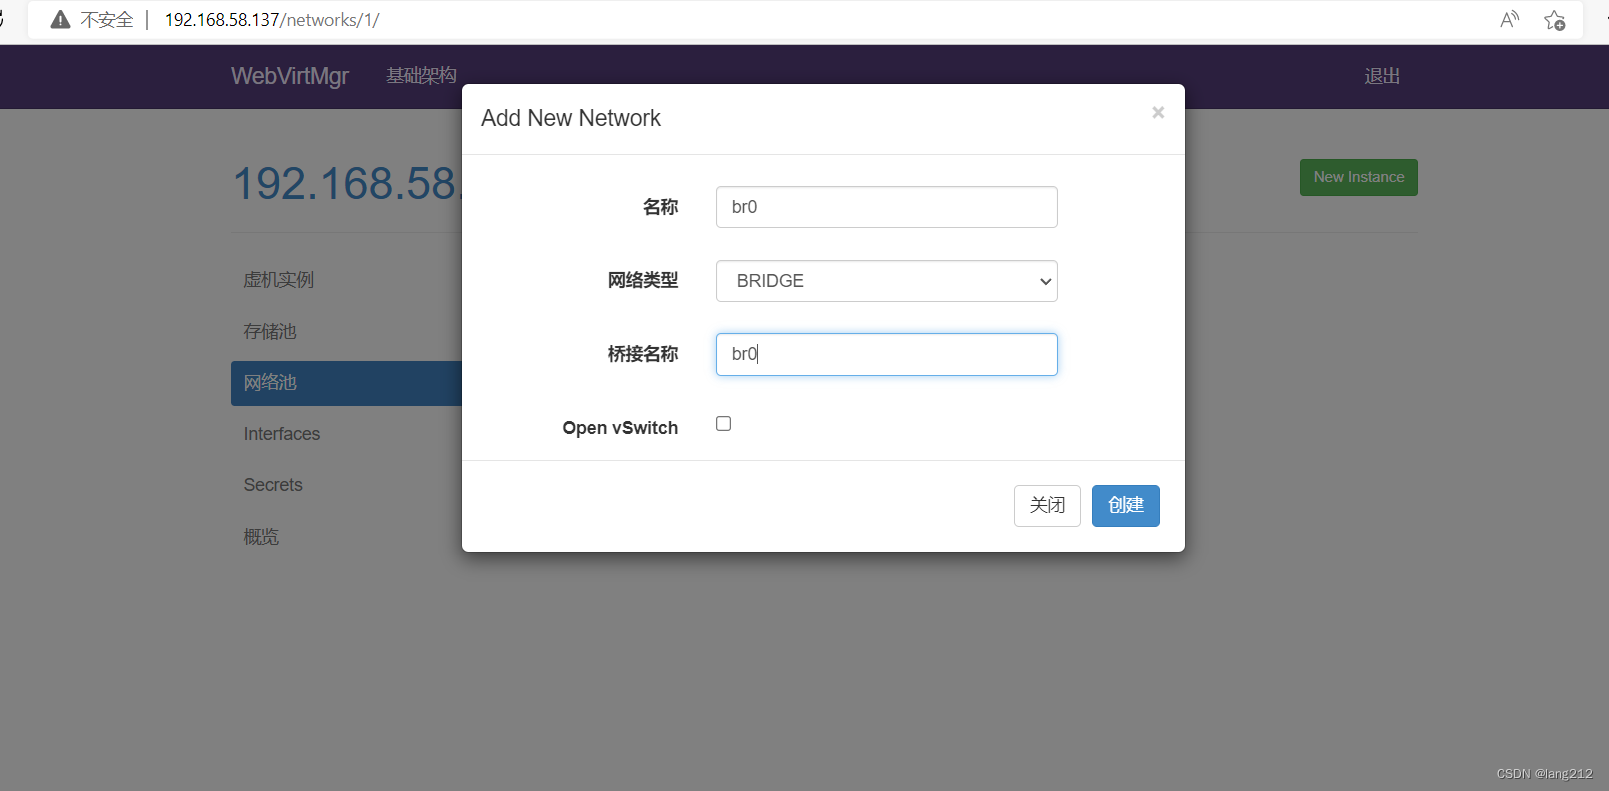
添加网络

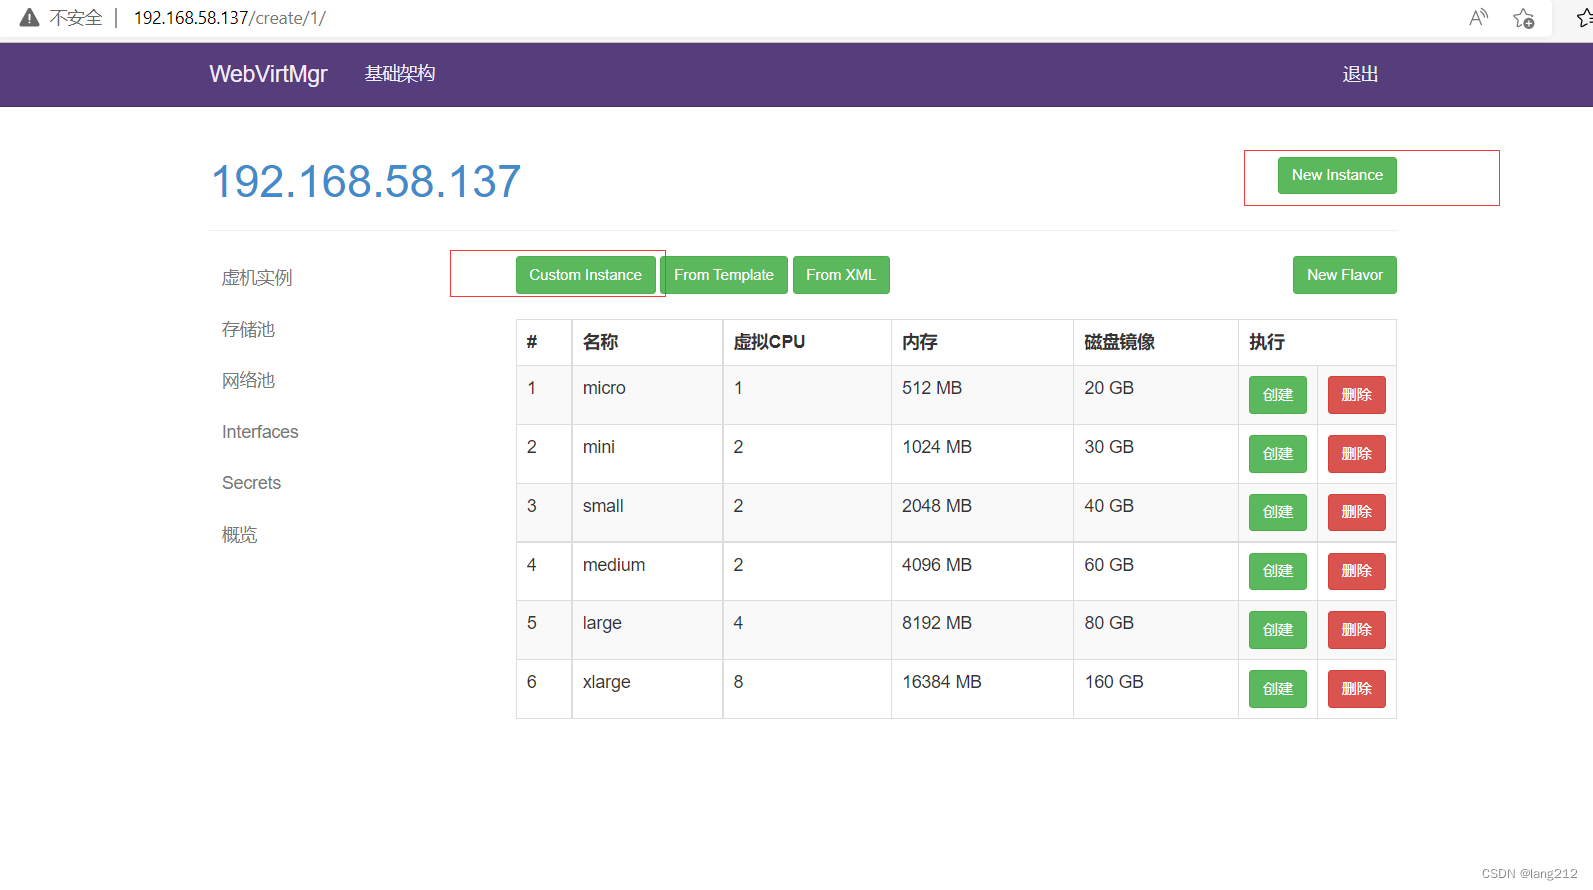
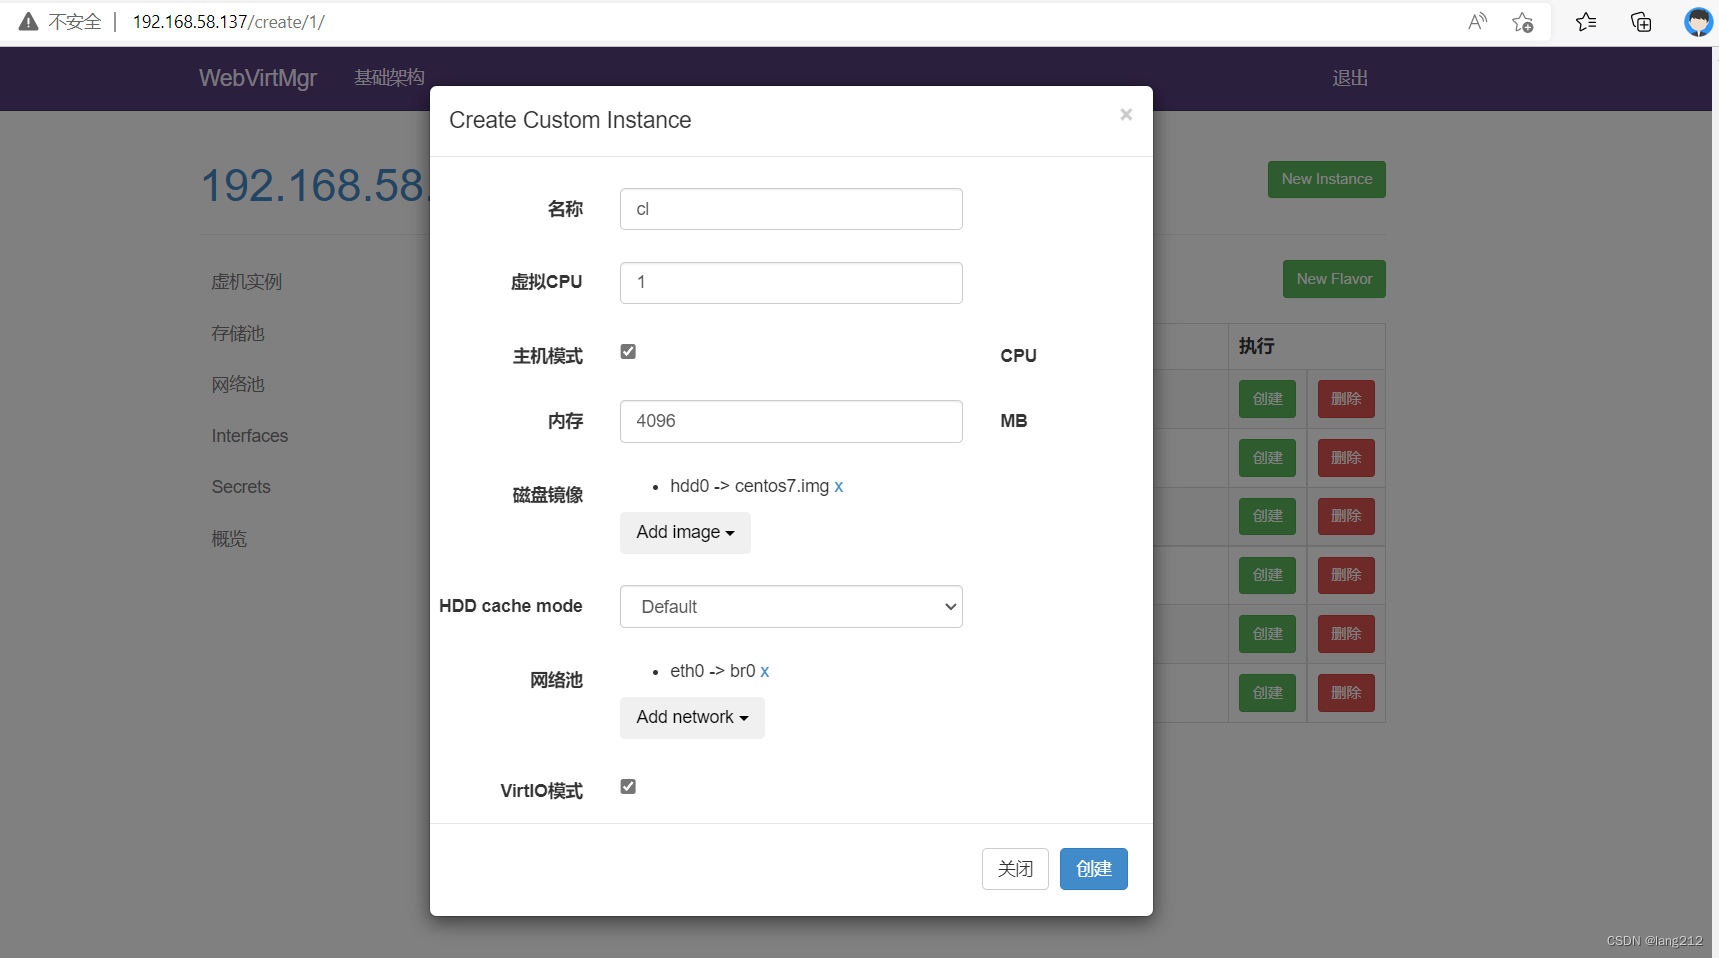
实例管理,现在去创建一个虚拟机


 11万+
11万+

 被折叠的 条评论
为什么被折叠?
被折叠的 条评论
为什么被折叠?
 到【灌水乐园】发言


