


文章目录
docker容器网络
docker的4种网络模式
| 网络模式 | 配置 | 说明 |
|---|---|---|
| host | –network host | 容器和宿主机共享Network namespace |
| container | –network container:NAME_OR_ID | 容器和另外一个容器共享Network namespace |
| none | –network none | 容器有独立的Network namespace, 但并没有对其进行任何网络设置, 如分配veth pair 和网桥连接,配置IP等 |
| bridge | –network bridge | 默认模式 |
 |
bridge模式
当Docker进程启动时,会在主机上创建一个名为docker0的虚拟网桥,此主机上启动的Docker容器会连接到这个虚拟网桥上。虚拟网桥的工作方式和物理交换机类似,这样主机上的所有容器就通过交换机连在了一个二层网络中。
从docker0子网中分配一个IP给容器使用,并设置docker0的IP地址为容器的默认网关。在主机上创建一对虚拟网卡veth pair设备,Docker将veth pair设备的一端放在新创建的容器中,并命名为eth0(容器的网卡),另一端放在主机中,以vethxxx这样类似的名字命名,并将这个网络设备加入到docker0网桥中。可以通过brctl show命令查看。
bridge模式是docker的默认网络模式,不写–network参数,就是bridge模式。使用docker run -p时,docker实际是在iptables做了DNAT规则,实现端口转发功能。可以使用iptables -t nat -vnL查看。
bridge模式如下图所示:

Docker网桥是宿主机虚拟出来的,并不是真实存在的网络设备,外部网络是无法寻址到的,这也意味着外部网络无法通过直接Container-IP访问到容器。如果容器希望外部访问能够访问到,可以通过映射容器端口到宿主主机(端口映射),即docker run创建容器时候通过 -p 或 -P 参数来启用,访问容器的时候就通过[宿主机IP]:[容器端口]访问容器。
container模式
这个模式指定新创建的容器和已经存在的一个容器共享一个 Network Namespace,而不是和宿主机共享。新创建的容器不会创建自己的网卡,配置自己的 IP,而是和一个指定的容器共享 IP、端口范围等。同样,两个容器除了网络方面,其他的如文件系统、进程列表等还是隔离的。两个容器的进程可以通过 lo 网卡设备通信。
container模式如下图所示:

host模式
如果启动容器的时候使用host模式,那么这个容器将不会获得一个独立的Network Namespace,而是和宿主机共用一个Network Namespace。容器将不会虚拟出自己的网卡,配置自己的IP等,而是使用宿主机的IP和端口。但是,容器的其他方面,如文件系统、进程列表等还是和宿主机隔离的。
使用host模式的容器可以直接使用宿主机的IP地址与外界通信,容器内部的服务端口也可以使用宿主机的端口,不需要进行NAT,host最大的优势就是网络性能比较好,但是docker host上已经使用的端口就不能再用了,网络的隔离性不好。
Host模式如下图所示:

none模式
使用none模式,Docker容器拥有自己的Network Namespace,但是,并不为Docker容器进行任何网络配置。也就是说,这个Docker容器没有网卡、IP、路由等信息。需要我们自己为Docker容器添加网卡、配置IP等。
这种网络模式下容器只有lo回环网络,没有其他网卡。none模式可以在容器创建时通过–network none来指定。这种类型的网络没有办法联网,封闭的网络能很好的保证容器的安全性。
应用场景:
- 启动一个容器处理数据,比如转换数据格式
- 一些后台的计算和处理任务
none模式如下图所示:

docker容器网络配置
Linux内核实现名称空间的创建
ip netns命令
可以借助ip netns命令来完成对 Network Namespace 的各种操作。ip netns命令来自于iproute安装包,一般系统会默认安装,如果没有的话,请自行安装。
注意:ip netns命令修改网络配置时需要 sudo 权限。
可以通过ip netns命令完成对Network Namespace 的相关操作,可以通过ip netns help查看命令帮助信息:
[root@localhost ~]# ip netns help
Usage:	ip netns list
	ip netns add NAME
	ip netns attach NAME PID
	ip netns set NAME NETNSID
	ip [-all] netns delete [NAME]
	ip netns identify [PID]
	ip netns pids NAME
	ip [-all] netns exec [NAME] cmd ...
	ip netns monitor
	ip netns list-id [target-nsid POSITIVE-INT] [nsid POSITIVE-INT]
NETNSID := auto | POSITIVE-INT
默认情况下,Linux系统中是没有任何 Network Namespace的,所以ip netns list命令不会返回任何信息。
创建Network Namespace
通过命令创建一个名为ns0的命名空间:
[root@localhost ~]# ip netns list
[root@localhost ~]# ip netns add ns0
[root@localhost ~]# ip netns list
ns0
新创建的 Network Namespace 会出现在/var/run/netns/目录下。如果相同名字的 namespace 已经存在,命令会报Cannot create namespace file “/var/run/netns/ns0”: File exists的错误。
[root@localhost ~]# ls /var/run/netns/
ns0
[root@localhost ~]# ip netns add ns0
Cannot create namespace file "/var/run/netns/ns0": File exists
对于每个 Network Namespace 来说,它会有自己独立的网卡、路由表、ARP 表、iptables 等和网络相关的资源。
操作Network Namespace
ip命令提供了ip netns exec子命令可以在对应的 Network Namespace 中执行命令。
查看新创建 Network Namespace 的网卡信息
[root@localhost ~]# ip netns exec ns0 ip addr
1: lo: <LOOPBACK> mtu 65536 qdisc noop state DOWN group default qlen 1000
    link/loopback 00:00:00:00:00:00 brd 00:00:00:00:00:00
可以看到,新创建的Network Namespace中会默认创建一个lo回环网卡,此时网卡处于关闭状态。此时,尝试去 ping 该lo回环网卡,会提示Network is unreachable
[root@localhost ~]# ip netns exec ns0 ping 127.0.0.1
connect: Network is unreachable
通过下面的命令启用lo回环网卡:
[root@localhost ~]# ip netns exec ns0 ip link set lo up
[root@localhost ~]# ip netns exec ns0 ping 127.0.0.1
PING 127.0.0.1 (127.0.0.1) 56(84) bytes of data.
64 bytes from 127.0.0.1: icmp_seq=1 ttl=64 time=0.020 ms
64 bytes from 127.0.0.1: icmp_seq=2 ttl=64 time=0.054 ms
64 bytes from 127.0.0.1: icmp_seq=3 ttl=64 time=0.052 ms
转移设备
我们可以在不同的 Network Namespace 之间转移设备(如veth)。由于一个设备只能属于一个 Network Namespace ,所以转移后在这个 Network Namespace 内就看不到这个设备了。
其中,veth设备属于可转移设备,而很多其它设备(如lo、vxlan、ppp、bridge等)是不可以转移的。
veth pair
veth pair 全称是 Virtual Ethernet Pair,是一个成对的端口,所有从这对端口一 端进入的数据包都将从另一端出来,反之也是一样。
引入veth pair是为了在不同的 Network Namespace 直接进行通信,利用它可以直接将两个 Network Namespace 连接起来。
创建veth pair
[root@localhost ~]# ip link add type veth
[root@localhost ~]# ip a
3: veth0@veth1: <BROADCAST,MULTICAST,M-DOWN> mtu 1500 qdisc noop state DOWN group default qlen 1000
    link/ether 86:67:f0:52:45:ae brd ff:ff:ff:ff:ff:ff
4: veth1@veth0: <BROADCAST,MULTICAST,M-DOWN> mtu 1500 qdisc noop state DOWN group default qlen 1000
    link/ether 62:5d:18:07:4d:0b brd ff:ff:ff:ff:ff:ff
可以看到,此时系统中新增了一对veth pair,将veth0和veth1两个虚拟网卡连接了起来,此时这对 veth pair 处于”未启用“状态。
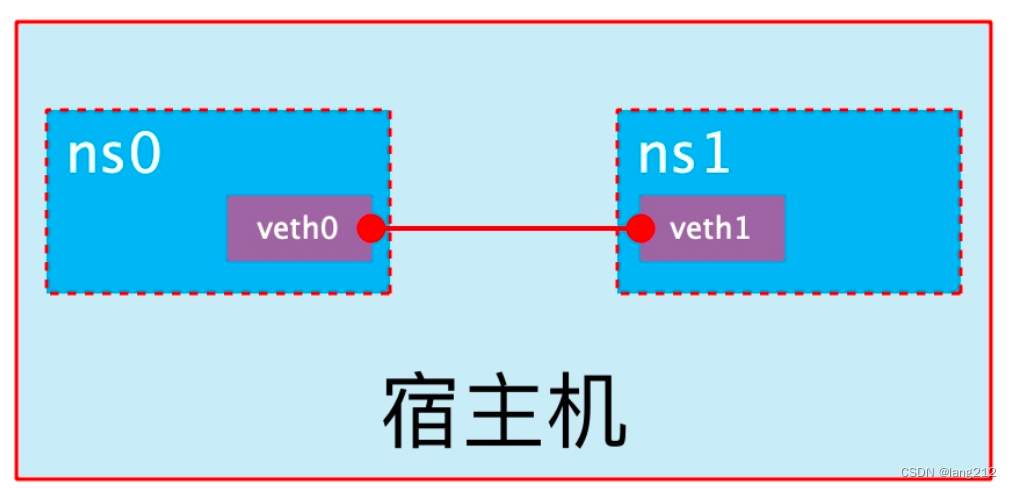
实现Network Namespace间通信
下面我们利用veth pair实现两个不同的 Network Namespace 之间的通信。刚才我们已经创建了一个名为ns0的 Network Namespace,下面再创建一个信息Network Namespace,命名为ns1
[root@localhost ~]# ip netns add ns1
[root@localhost ~]# ip netns list
ns1
ns0
然后我们将veth0加入到ns0,将veth1加入到ns1
[root@localhost ~]# ip link set veth0 netns ns0
[root@localhost ~]# ip link set veth1 netns ns1
然后我们分别为这对veth pair配置上ip地址,并启用它们
[root@localhost ~]# ip netns exec ns0 ip link set veth0 up
[root@localhost ~]# ip netns exec ns0 ip addr add 192.168.58.10/24 dev veth0
[root@localhost ~]# ip netns exec ns1 ip link set lo up
[root@localhost ~]# ip netns exec ns1 ip link set veth1 up
[root@localhost ~]# ip netns exec ns1 ip addr add 192.168.58.11/24 dev veth1
查看这对veth pair的状态
[root@localhost ~]# ip netns exec ns0 ip a
3: veth0@if4: <BROADCAST,MULTICAST,UP,LOWER_UP> mtu 1500 qdisc noqueue state UP group default qlen 1000
    link/ether 86:67:f0:52:45:ae brd ff:ff:ff:ff:ff:ff link-netns ns1
    inet 192.168.58.10/24 scope global veth0
       valid_lft forever preferred_lft forever
    inet6 fe80::8467:f0ff:fe52:45ae/64 scope link
       valid_lft forever preferred_lft forever
[root@localhost ~]# ip netns exec ns1 ip a
4: veth1@if3: <BROADCAST,MULTICAST,UP,LOWER_UP> mtu 1500 qdisc noqueue state UP group default qlen 1000
    link/ether 62:5d:18:07:4d:0b brd ff:ff:ff:ff:ff:ff link-netns ns0
    inet 192.168.58.11/24 scope global veth1
       valid_lft forever preferred_lft forever
    inet6 fe80::605d:18ff:fe07:4d0b/64 scope link
       valid_lft forever preferred_lft forever
从上面可以看出,我们已经成功启用了这个veth pair,并为每个veth设备分配了对应的ip地址。我们尝试在ns1中访问ns0中的ip地址:
[root@localhost ~]# ip netns exec ns1 ping 192.168.58.10
PING 192.168.58.10 (192.168.58.10) 56(84) bytes of data.
64 bytes from 192.168.58.10: icmp_seq=1 ttl=64 time=0.032 ms
64 bytes from 192.168.58.10: icmp_seq=2 ttl=64 time=0.029 ms
可以看到,veth pair成功实现了两个不同Network Namespace之间的网络交互。
veth设备重命名
[root@localhost ~]# ip netns exec ns0 ip link set veth0 down
[root@localhost ~]# ip netns exec ns0 ip link set dev veth0 name eth0
[root@localhost ~]# ip netns exec ns0 ifconfig -a
eth0: flags=4098<BROADCAST,MULTICAST>  mtu 1500
        inet 192.168.58.10  netmask 255.255.255.0  broadcast 0.0.0.0
        ether 86:67:f0:52:45:ae  txqueuelen 1000  (Ethernet)
        RX packets 16  bytes 1216 (1.1 KiB)
        RX errors 0  dropped 0  overruns 0  frame 0
        TX packets 16  bytes 1216 (1.1 KiB)
        TX errors 0  dropped 0 overruns 0  carrier 0  collisions 0
[root@localhost ~]# ip netns exec ns0 ip link set eth0 up
四种网络模式配置
bridge模式配置
[root@localhost ~]# docker pull busybox
Using default tag: latest
latest: Pulling from library/busybox
5cc84ad355aa: Pull complete
Digest: sha256:5acba83a746c7608ed544dc1533b87c737a0b0fb730301639a0179f9344b1678
Status: Downloaded newer image for busybox:latest
docker.io/library/busybox:latest
[root@localhost ~]# docker run -it --name t1 --rm busybox
/ # ifconfig
eth0      Link encap:Ethernet  HWaddr 02:42:AC:11:00:02
          inet addr:172.17.0.2  Bcast:172.17.255.255  Mask:255.255.0.0
          UP BROADCAST RUNNING MULTICAST  MTU:1500  Metric:1
          RX packets:15 errors:0 dropped:0 overruns:0 frame:0
          TX packets:0 errors:0 dropped:0 overruns:0 carrier:0
          collisions:0 txqueuelen:0
          RX bytes:1158 (1.1 KiB)  TX bytes:0 (0.0 B)

lo        Link encap:Local Loopback
          inet addr:127.0.0.1  Mask:255.0.0.0
          UP LOOPBACK RUNNING  MTU:65536  Metric:1
          RX packets:0 errors:0 dropped:0 overruns:0 frame:0
          TX packets:0 errors:0 dropped:0 overruns:0 carrier:0
          collisions:0 txqueuelen:1000
          RX bytes:0 (0.0 B)  TX bytes:0 (0.0 B)
//在创建容器时添加--network bridge与不加--network选项效果是一致的
[root@localhost ~]# docker run -it --name t1 --network bridge --rm busybox
/ # ifconfig
eth0      Link encap:Ethernet  HWaddr 02:42:AC:11:00:02
          inet addr:172.17.0.2  Bcast:172.17.255.255  Mask:255.255.0.0
          UP BROADCAST RUNNING MULTICAST  MTU:1500  Metric:1
          RX packets:8 errors:0 dropped:0 overruns:0 frame:0
          TX packets:0 errors:0 dropped:0 overruns:0 carrier:0
          collisions:0 txqueuelen:0
          RX bytes:696 (696.0 B)  TX bytes:0 (0.0 B)

lo        Link encap:Local Loopback
          inet addr:127.0.0.1  Mask:255.0.0.0
          UP LOOPBACK RUNNING  MTU:65536  Metric:1
          RX packets:0 errors:0 dropped:0 overruns:0 frame:0
          TX packets:0 errors:0 dropped:0 overruns:0 carrier:0
          collisions:0 txqueuelen:1000
          RX bytes:0 (0.0 B)  TX bytes:0 (0.0 B
none模式配置
[root@localhost ~]# docker run -it --name t1 --network none --rm busybox
/ # ifconfig
lo        Link encap:Local Loopback
          inet addr:127.0.0.1  Mask:255.0.0.0
          UP LOOPBACK RUNNING  MTU:65536  Metric:1
          RX packets:0 errors:0 dropped:0 overruns:0 frame:0
          TX packets:0 errors:0 dropped:0 overruns:0 carrier:0
          collisions:0 txqueuelen:1000
          RX bytes:0 (0.0 B)  TX bytes:0 (0.0 B)
container模式配置
启动第一个容器
[root@localhost ~]# docker run -it --name b1 --rm busybox
/ # ifconfig
eth0      Link encap:Ethernet  HWaddr 02:42:AC:11:00:02
          inet addr:172.17.0.2  Bcast:172.17.255.255  Mask:255.255.0.0
          UP BROADCAST RUNNING MULTICAST  MTU:1500  Metric:1
          RX packets:8 errors:0 dropped:0 overruns:0 frame:0
          TX packets:0 errors:0 dropped:0 overruns:0 carrier:0
          collisions:0 txqueuelen:0
          RX bytes:696 (696.0 B)  TX bytes:0 (0.0 B)
启动第二个容器
[root@localhost ~]# docker run -it --name b2 --rm busybox
/ # ifconfig
eth0      Link encap:Ethernet  HWaddr 02:42:AC:11:00:03
          inet addr:172.17.0.3  Bcast:172.17.255.255  Mask:255.255.0.0
          UP BROADCAST RUNNING MULTICAST  MTU:1500  Metric:1
          RX packets:6 errors:0 dropped:0 overruns:0 frame:0
          TX packets:0 errors:0 dropped:0 overruns:0 carrier:0
          collisions:0 txqueuelen:0
          RX bytes:516 (516.0 B)  TX bytes:0 (0.0 B)
可以看到名为b2的容器IP地址是10.0.0.3,与第一个容器的IP地址不是一样的,也就是说并没有共享网络,此时如果我们将第二个容器的启动方式改变一下,就可以使名为b2的容器IP与B1容器IP一致,也即共享IP,但不共享文件系统。
[root@localhost ~]# docker run -it --name b2 --rm --network container:b1 busybox
/ # ifconfig
eth0      Link encap:Ethernet  HWaddr 02:42:AC:11:00:02
          inet addr:172.17.0.2  Bcast:172.17.255.255  Mask:255.255.0.0
          UP BROADCAST RUNNING MULTICAST  MTU:1500  Metric:1
          RX packets:12 errors:0 dropped:0 overruns:0 frame:0
          TX packets:0 errors:0 dropped:0 overruns:0 carrier:0
          collisions:0 txqueuelen:0
          RX bytes:976 (976.0 B)  TX bytes:0 (0.0 B)
此时我们在b1容器上创建一个目录
/ # mkdir /tmp/data
/ # ls /tmp
data
到b2容器上检查/tmp目录会发现并没有这个目录,因为文件系统是处于隔离状态,仅仅是共享了网络而已。
/ # ls /tmp
/ #
在b2容器上部署一个站点
/ # echo 'hello world' > /tmp/index.html
/ # ls /tmp/
index.html
/ # httpd -h /tmp
/ # netstat -antl
Active Internet connections (servers and established)
Proto Recv-Q Send-Q Local Address           Foreign Address         State
tcp        0      0 :::80                   :::*                    LISTEN
在b1容器上用本地地址去访问此站点
/ # wget -O - -q 127.0.0.1:80
hello world
由此可见,container模式下的容器间关系就相当于一台主机上的两个不同进程
host模式配置
启动容器时直接指明模式为host
[root@localhost ~]# docker run -it --name b2 --rm --network host busybox
/ # ifconfig
docker0   Link encap:Ethernet  HWaddr 02:42:6D:5F:F1:5D
          inet addr:172.17.0.1  Bcast:172.17.255.255  Mask:255.255.0.0
          inet6 addr: fe80::42:6dff:fe5f:f15d/64 Scope:Link
          UP BROADCAST MULTICAST  MTU:1500  Metric:1
          RX packets:0 errors:0 dropped:0 overruns:0 frame:0
          TX packets:16 errors:0 dropped:0 overruns:0 carrier:0
          collisions:0 txqueuelen:0
          RX bytes:0 (0.0 B)  TX bytes:1292 (1.2 KiB)

ens160    Link encap:Ethernet  HWaddr 00:0C:29:79:1A:87
          inet addr:192.168.58.130  Bcast:192.168.58.255  Mask:255.255.255.0
          inet6 addr: fe80::20c:29ff:fe79:1a87/64 Scope:Link
          UP BROADCAST RUNNING MULTICAST  MTU:1500  Metric:1
          RX packets:5099 errors:0 dropped:0 overruns:0 frame:0
          TX packets:3189 errors:0 dropped:0 overruns:0 carrier:0
          collisions:0 txqueuelen:1000
          RX bytes:1695009 (1.6 MiB)  TX bytes:313681 (306.3 KiB)

lo        Link encap:Local Loopback
          inet addr:127.0.0.1  Mask:255.0.0.0
          inet6 addr: ::1/128 Scope:Host
          UP LOOPBACK RUNNING  MTU:65536  Metric:1
          RX packets:0 errors:0 dropped:0 overruns:0 frame:0
          TX packets:0 errors:0 dropped:0 overruns:0 carrier:0
          collisions:0 txqueuelen:1000
          RX bytes:0 (0.0 B)  TX bytes:0 (0.0 B)
此时如果我们在这个容器中启动一个http站点,我们就可以直接用宿主机的IP直接在浏览器中访问这个容器中的站点了。
容器的常用操作
查看容器的主机名
[root@localhost ~]# docker run -it --name t2 --network bridge --rm busybox
/ # hostname
5c4462ae2787
在容器启动时注入主机名
[root@localhost ~]# docker run -it --name t1 --network bridge --hostname hello --rm busybox
/ # hostname
hello
/ # cat /etc/hosts
127.0.0.1	localhost
::1	localhost ip6-localhost ip6-loopback
fe00::0	ip6-localnet
ff00::0	ip6-mcastprefix
ff02::1	ip6-allnodes
ff02::2	ip6-allrouters
172.17.0.2	hello   //注入主机名时会自动创建主机名到IP的映射关系
/ # cat /etc/resolv.conf
# Generated by NetworkManager
search localdomain
nameserver 192.168.58.2   //DNS也会自动配置为宿主机的DNS
/ # ping www.baidu.com
PING www.baidu.com (182.61.200.6): 56 data bytes
64 bytes from 182.61.200.6: seq=0 ttl=127 time=23.536 ms
64 bytes from 182.61.200.6: seq=1 ttl=127 time=24.756 ms
手动指定容器要使用的DNS
[root@localhost ~]# docker run -it --name t1 --network bridge --hostname hello --dns 114.114.114.114 --rm busybox
/ # cat /etc/resolv.conf
search localdomain
nameserver 114.114.114.114
/ # nslookup -type=a www.baidu.com
Server:		114.114.114.114
Address:	114.114.114.114:53

Non-authoritative answer:
www.baidu.com	canonical name = www.a.shifen.com
Name:	www.a.shifen.com
Address: 182.61.200.7
Name:	www.a.shifen.com
Address: 182.61.200.6
手动往/etc/hosts文件中注入主机名到IP地址的映射
[root@localhost ~]# docker run -it --name t1 --network bridge --hostname hello --add-host www.a.com:1.1.1.1 --rm busybox
/ # cat /etc/hosts
127.0.0.1	localhost
::1	localhost ip6-localhost ip6-loopback
fe00::0	ip6-localnet
ff00::0	ip6-mcastprefix
ff02::1	ip6-allnodes
ff02::2	ip6-allrouters
1.1.1.1	www.a.com
172.17.0.2	hello


 被折叠的 条评论
为什么被折叠?
被折叠的 条评论
为什么被折叠?
 到【灌水乐园】发言


