


安装Nginx服务
解压安装
[root@localhost opt]# tar zxf nginx-1.15.9.tar.gz
[root@localhost opt]# cd nginx-1.15.9/
[root@localhost nginx-1.15.9]# useradd -M -s /sbin/nologin nginx
下载安装nginx所需的软件
[root@localhost nginx-1.15.9]# yum install -y gcc gcc-c++ pcre-devel zlib-devel make
编译安装
[root@localhost nginx-1.15.9]# ./configure --prefix=/usr/local/nginx \
> --user=nginx \
> --group=nginx \
> --with-http_stub_status_module
[root@localhost nginx-1.15.9]#make && make install
[root@localhost nginx-1.15.9]# ln -s /usr/local/nginx/sbin/nginx /usr/local/sbin/
[root@localhost nginx-1.15.9]# nginx -t
nginx: the configuration file /usr/local/nginx/conf/nginx.conf syntax is ok
nginx: configuration file /usr/local/nginx/conf/nginx.conf test is successful
[root@localhost nginx-1.15.9]# nginx
[root@localhost nginx-1.15.9]# netstat -antp | grep 80
tcp        0      0 0.0.0.0:80              0.0.0.0:*               LISTEN      118523/nginx: maste
[root@localhost nginx-1.15.9]# vim /usr/lib/systemd/system/nginx.service  #将nginx给予systemctl管理
[unit]
Description=nginx
After=network.target
[Service]
Type=forking
PIDFile=/usr/local/nginx/logs/nginx.pid
ExecStart=/usr/local/nginx/sbin/nginx
ExecSTOP=/bin/kill -s QUIT $MAINPID
ExecReload=/bin/kill -s HUP $MAINPID
PrivateTmp=true
[Install]
wantedBy=multi-user.target
[root@localhost nginx-1.15.9]# chmod 754 /usr/lib/systemd/system/nginx.service
[root@localhost nginx-1.15.9]# systemctl enable nginx.service
[root@localhost nginx-1.15.9]# systemctl start nginx.service
Job for nginx.service failed because the control process exited with error code. See "systemctl status nginx.service" and "journalctl -xe" for details.
#### 这里出现错误
[root@localhost nginx-1.15.9]# netstat -antp | grep nginx     #可以查出nginx在前面已经开启
tcp        0      0 0.0.0.0:80              0.0.0.0:*               LISTEN      118523/nginx: maste
[root@localhost nginx-1.15.9]# kill -3  118523        #先停止nginx
[root@localhost nginx-1.15.9]# systemctl start nginx         #用systemctl重新开启
修改配置文件,使其支持php
[root@localhost nginx-1.15.9]# cd /usr/local/nginx/conf
[root@localhost conf]# vim nginx.conf
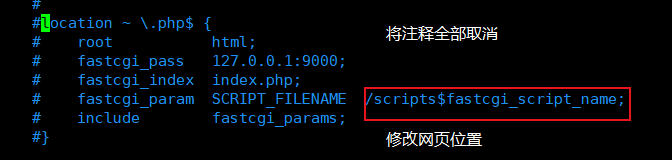
        location ~ \.php$ {
            root           html;
            fastcgi_pass   127.0.0.1:9000;
            fastcgi_index  index.php;
            fastcgi_param  SCRIPT_FILENAME  /usr/local/nginx/html$fastcgi_script_name;
            include        fastcgi_params;
编写php网页
[root@localhost conf]# vim /usr/local/nginx/html/index.php
<?php
phpinfo();
?>
~
安装MySQL数据库
为了与Nginx,PHP环境保持一直,这里需要采用源码编译安装MySQL。
1)上传并编译安装MySQL

[root@localhost mysql-5.7.20]# yum -y install gcc gcc-c++ ncurses ncurses-devel bison cmake autoconf
//安装依赖包
[root@localhost opt]# tar -xf mysql-boost-5.7.20.tar.gz
[root@localhost mysql-5.7.20]# cmake \
> -DCMAKE_INSTALL_PREFIX=/usr/local/mysql \
> -DMYSQL_UNIX_ADDR=/usr/local/mysql/mysql.sock \		#指定通讯文件。连接数据库
> -DSYSCONFDIR=/etc \									#指定配置文件指定目录
> -DSYSTEMD_PID_DIR=/usr/local/mysql \					#指定pid目录文件
> -DDEFAULT_CHARSET=utf8  \								#指定中文字符集
> -DDEFAULT_COLLATION=utf8_general_ci \					#字符集设定
> -DWITH_INNOBASE_STORAGE_ENGINE=1 \					#一下三行均为存储引擎ENGINE
> -DWITH_ARCHIVE_STORAGE_ENGINE=1 \
> -DWITH_BLACKHOLE_STORAGE_ENGINE=1 \
> -DWITH_PERFSCHEMA_STORAGE_ENGINE=1 \
> -DMYSQL_DATADIR=/usr/local/mysql/data \				#指定数据库存放位置
> -DWITH_BOOST=boost \									#底层c++运营库
> -DWITH_SYSTEMD=1										#守护进程id
[root@localhost mysql-5.7.20]# make && make install
2)优化调整
[root@localhost mysql-5.7.20]# useradd -s /sbin/nologin mysql
[root@localhost mysql-5.7.20]# chown -R mysql:mysql /usr/local/mysql/

[root@localhost mysql-5.7.20]# vim /etc/my.cnf
[mysqld_safe]
log-error=/var/log/mariadb/mariadb.log
pid-file=/var/run/mariadb/mariadb.pid

#
# include all files from the config directory
#
!includedir /etc/my.cnf.d
[client]
port = 3306
default-character-set=utf8
socket = /usr/local/mysql/mysql.sock

[mysql]
port = 3306
default-character-set=utf8
socket = /usr/local/mysql/mysql.sock

[mysqld]
user = mysql
basedir = /usr/local/mysql
datadir = /usr/local/mysql/data
port = 3306
character_set_server=utf8
pid-file = /usr/local/mysql/mysqld.pid
socket = /usr/local/mysql/mysql.sock
server-id = 1

sql_mode=NO_ENGINE_SUBSTITUTION,STRICT_TRANS_TABLES,NO_AUTO_CREATE_USER,NO_AUTO_VALUE_ON_ZERO,NO_ZERO_IN_DATE,NO_ZERO_DATE,ERROR_FOR_DIVISION_BY_ZERO,PIPES_AS_CONCAT,ANSI_QUOTES
//默认加载的模块
3)初始化数据库
[root@localhost mysql-5.7.20]# chown mysql:mysql /etc/my.cnf
[root@localhost mysql-5.7.20]# echo "PATH=/usr/local/mysql/bin:/usr/local/mysql/lib:$PATH" >> /etc/profile
[root@localhost mysql-5.7.20]# echo "export PATH" >> /etc/profile
[root@localhost mysql-5.7.20]# source /etc/profile
[root@localhost mysql-5.7.20]# cd /usr/local/mysql
[root@localhost mysql]# bin/mysqld --initialize-insecure --user=mysql --basedir=/usr/local/mysql --datadir=/usr/local/mysql/data  //初始化数据库
[root@localhost mysql]# cp usr/lib/systemd/system/mysqld.service /usr/lib/systemd/system/
//将mysqld给予systemctl管理
4)启动MySQL服务
[root@localhost mysql]# systemctl enable mysqld.service
[root@localhost mysql]# systemctl start mysqld.service
[root@localhost mysql]# netstat -antp | grep 3306

5)设置MySQL数据库
[root@localhost mysql]# mysqladmin -u root -p password
Enter password:    //初始密码没有直接回车
New password:     //输入新密码
Confirm new password:   //再次确认密码
Warning: Since password will be sent to server in plain text, use ssl connection to ensure password safety.
[root@localhost mysql]# mysql -uroot -p
Enter password:   //输入密码abc123
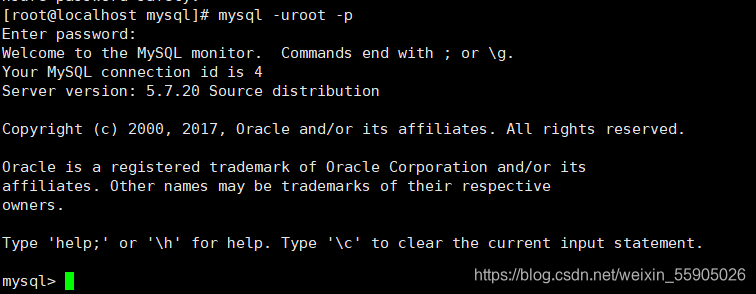
mysql> show databases;   //查看数据库
+--------------------+
| Database           |
+--------------------+
| information_schema |
| mysql              |
| performance_schema |
| sys                |
+--------------------+
4 rows in set (0.00 sec)
安装PHP解析环境
1)安装依赖包
[root@localhost opt]# yum -y install \     #安装需要的依赖环境
> libjpeg \                                     #下载jpg图片依赖
> libjpeg-devel \
> libpng libpng-devel \							#下载png图片依赖
> freetype freetype-devel \						#字体
> libxml2 \										#支持xml
> libxml2-devel \
> zlib zlib-devel \								#压缩格式
> curl curl-devel \								#识别curl
> openssl openssl-devel

[root@localhost php-7.1.10]# ./configure \
> --prefix=/usr/local/php \
> --with-mysql-sock=/usr/local/mysql/mysql.sock \			#指定sock通讯文件位置
> --with-mysqli \
> --with-zlib \
> --with-curl \
> --with-gd \
> --with-jpeg-dir \
> --with-png-dir \
> --with-freetype-dir \
> --with-openssl \
> --enable-fpm \							#开启fpm模块
> --enable-mbstring \						#开启多字段模块
> --enable-xml \							#开启拓展性标记语言模块
> --enable-session \						#指定会话
> --enable-ftp \							#文本传输协议
> --enable-pdo \							#函数库
> --enable-tokenizer \						#令牌解释器
> --enable-zip								#指定压缩格式
2)解压安装PHP
[root@localhost opt]# tar -jxf php-7.1.10.tar.bz2
[root@localhost opt]# cd php-7.1.10/

[root@localhost php-7.1.10]# ./configure \
> --prefix=/usr/local/php \
> --with-mysql-sock=/usr/local/mysql/mysql.sock \			#指定sock通讯文件位置
> --with-mysqli \
> --with-zlib \
> --with-curl \
> --with-gd \
> --with-jpeg-dir \
> --with-png-dir \
> --with-freetype-dir \
> --with-openssl \
> --enable-fpm \							#开启fpm模块
> --enable-mbstring \						#开启多字段模块
> --enable-xml \							#开启拓展性标记语言模块
> --enable-session \						#指定会话
> --enable-ftp \							#文本传输协议
> --enable-pdo \							#函数库
> --enable-tokenizer \						#令牌解释器
> --enable-zip								#指定压缩格式
[root@localhost php-7.1.10]#make && make install
3)复制模板文件
PHP的三个配置文件:
- php.ini :核心配置文件
- php-fpm.conf :进程服务配置文件
- www.conf :拓展配置文件
[root@localhost php-7.1.10]# cp php.ini-development /usr/local/php/lib/php.ini   //复制php模板文件至核心配置文件
[root@localhost php-7.1.10]# vim /usr/local/php/lib/php.ini
 939 date.timezone =Asia/Shanghai  //设置时间区域。去掉前面的 ;
1170 mysqli.default_socket =/usr/local/mysql.sock
配置Nginx支持PHP环境
PHP-FPM模块配置
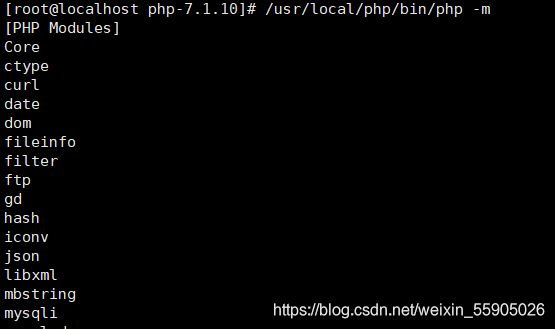
[root@localhost php-7.1.10]# /usr/local/php/bin/php -m
//验证安装的模板
1)复制模块
[root@localhost php-7.1.10]# cd /usr/local/php/etc
[root@localhost etc]# cp php-fpm.conf.default php-fpm.conf
[root@localhost etc]# vim php-fpm.conf  //修改配置文件
 17 pid = run/php-fpm.pid  //删除注释 ;
启动模块,进程使用9000端口。
[root@localhost etc]# ln -s /usr/local/php/bin/* /usr/local/bin
[root@localhost etc]# ln -s /usr/local/php/sbin/* /usr/local/sbin
[root@localhost etc]# php-fpm
[root@localhost etc]# netstat -antp | grep 9000
tcp        0      0 127.0.0.1:9000          0.0.0.0:*               LISTEN      98432/php-fpm: mast
[root@localhost conf]# systemctl restart nginx.service
[root@localhost conf]# netstat -antp | grep 80
tcp        0      0 0.0.0.0:80              0.0.0.0:*               LISTEN      101376/nginx: maste
ps aux | grep -c "php-fpm"   //查看php的进程
4
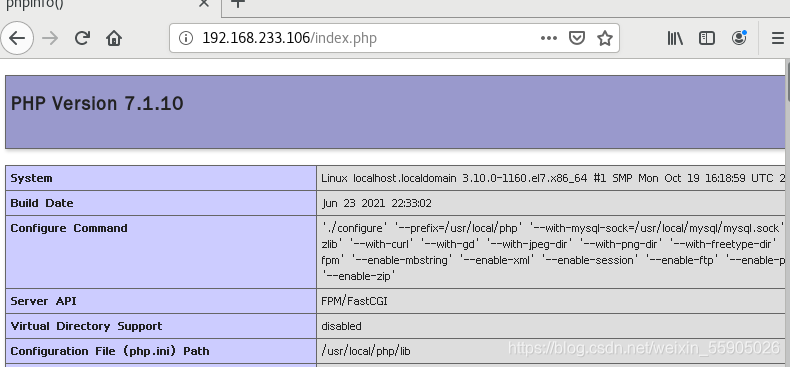
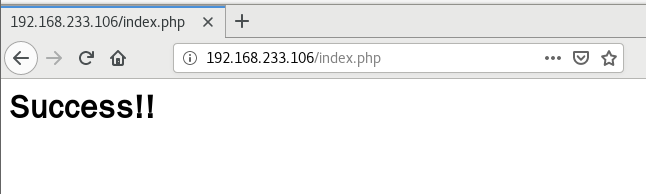
访问网页
测试数据库

```bash
[root@localhost conf]# mysql -uroot -pabc123
mysql> create database bbs;  //创建bbs
Query OK, 1 row affected (0.00 sec)

mysql> show databases;
+--------------------+
| Database           |
+--------------------+
| information_schema |
| bbs                |
| mysql              |
| performance_schema |
| sys                |
+--------------------+
5 rows in set (0.00 sec)

mysql> grant all on bbs.* to 'bbsuser'@'%' identified by 'admin123';
Query OK, 0 rows affected, 1 warning (0.00 sec)

mysql> grant all on bbs.* to 'bbsuser'@'localhost' identified by 'admin123';
Query OK, 0 rows affected, 1 warning (0.00 sec)
修改index.php配置文件
[root@localhost conf]# vim /usr/local/nginx/html/index.php
<?php
$link=mysqli_connect('192.168.233.106','bbsuser','admin123');
if($link) echo "<h1>Success!!</h1>";
else echo "fail!!";
?>
重启并访问网页
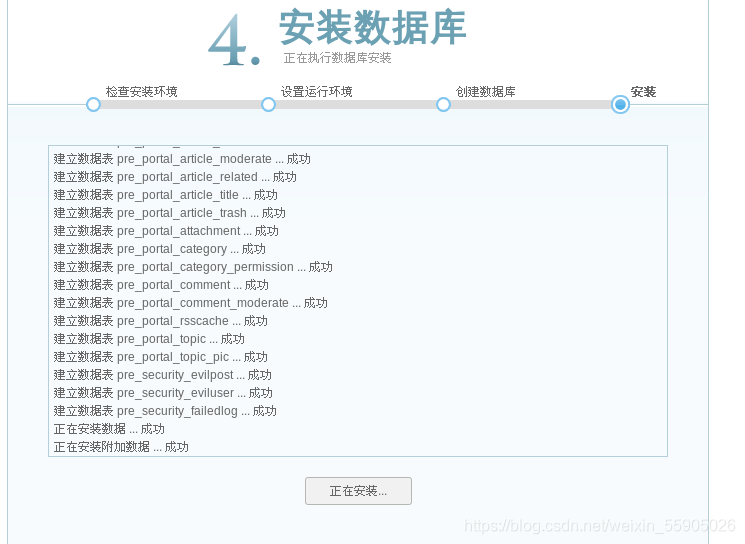
设置论坛
1)创建论坛安装位置,并解压
[root@localhost opt]# mkdir dis
[root@localhost opt]# unzip Discuz_X3.4_SC_UTF8.zip -d dis
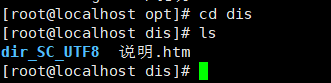
[root@localhost dis]# cd dir_SC_UTF8/
[root@localhost dir_SC_UTF8]# cp -r upload/ /usr/local/nginx/html/bbs/
[root@localhost dir_SC_UTF8]# cd /usr/local/nginx/html/bbs/
[root@localhost bbs]# chown -R root:nginx ./config/
[root@localhost bbs]# chown -R root:nginx ./data/
[root@localhost bbs]# chown -R root:nginx ./uc_client/
[root@localhost bbs]# chown -R root:nginx ./uc_server/
[root@localhost bbs]# chmod -R 777 ./config/
[root@localhost bbs]# chmod -R 777 ./data
[root@localhost bbs]# chmod -R 777 ./uc_client/
[root@localhost bbs]# chmod -R 777 ./uc_server/
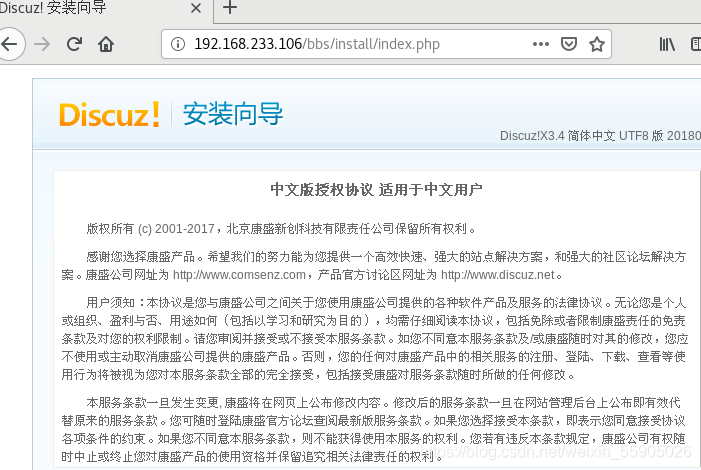
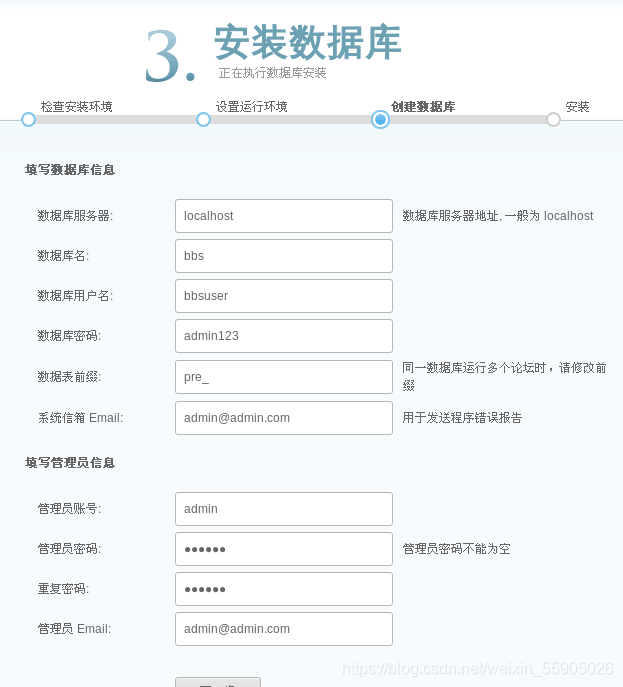
访问网页


 被折叠的 条评论
为什么被折叠?
被折叠的 条评论
为什么被折叠?
 到【灌水乐园】发言


