


1、安装pipeline
docker run -d -p 9099:9099 --add-host=host.docker.internal:host-gateway -v pipelines:/app/pipelines --name pipelines --restart always ghcr.io/open-webui/pipelines:main
2、对接OpenWebUI(密码:0p3n-w3bu!)
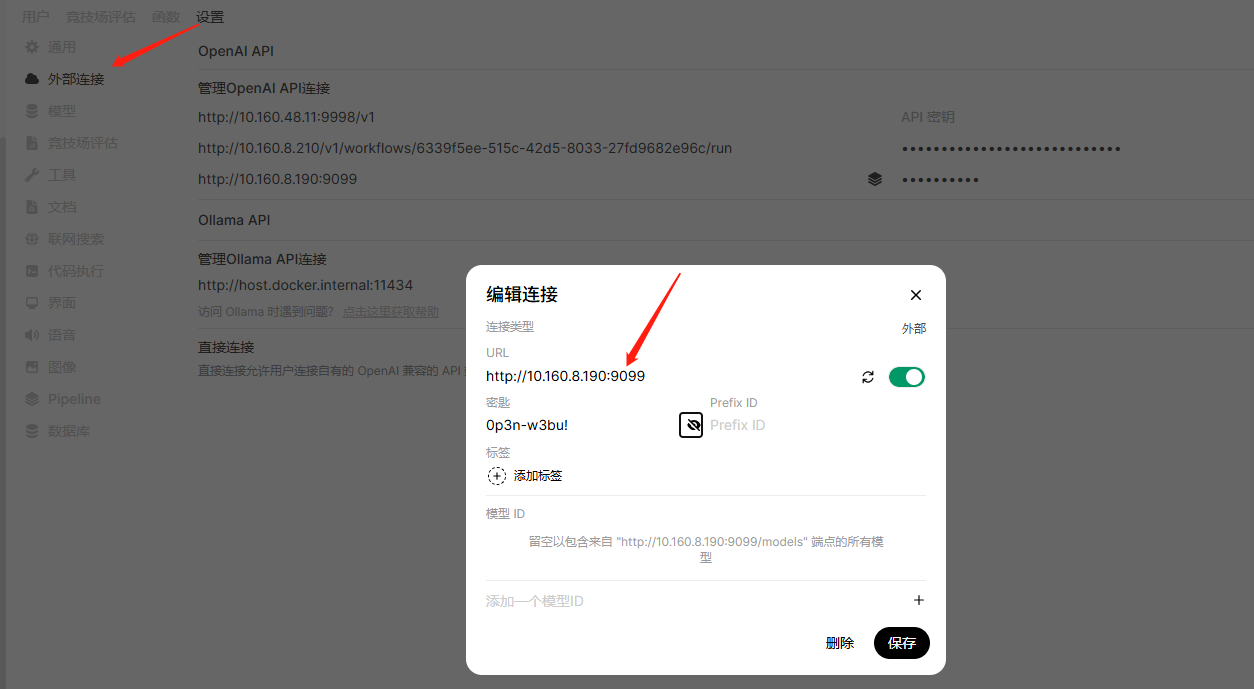 3、进入pipeline容器配置
只需几个简单的步骤即可开始使用 Pipelines:
1、确保已安装 Python 3.11。它是唯一官方支持的 Python 版本
2、克隆管道存储库
git clone https://github.com/open-webui/pipelines.git
cd pipelines
3、安装所需的依赖项
pip install -r requirements.txt
4、启动 Pipelines 服务器
sh ./start.sh
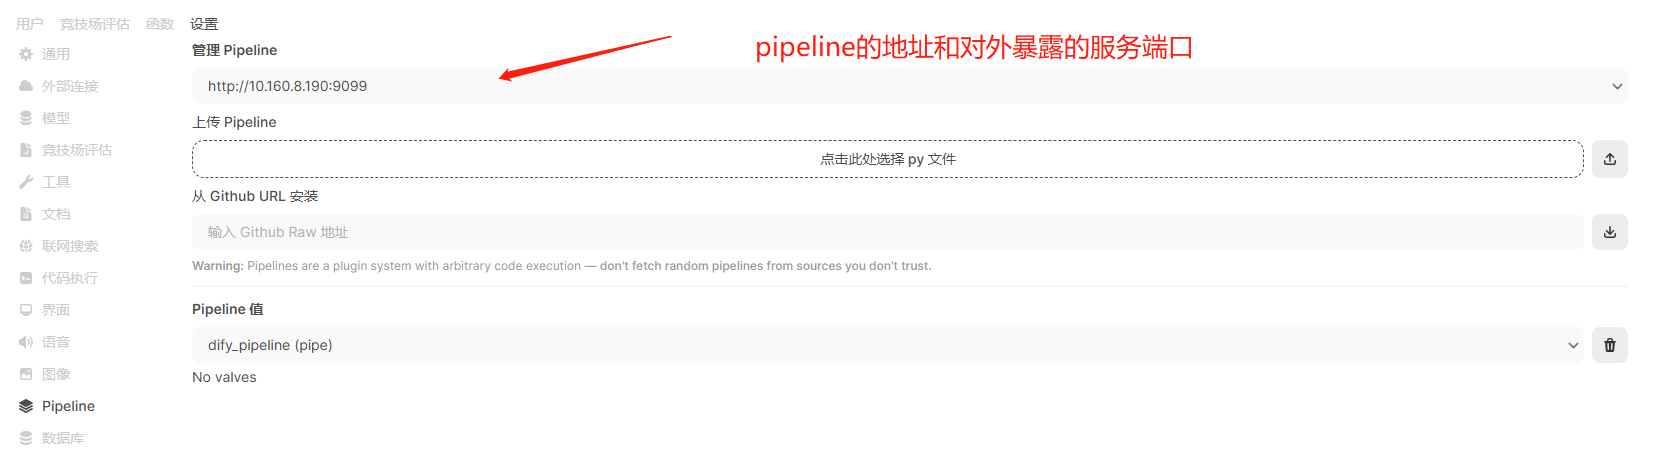
服务器运行后,将客户端上的 OpenAI URL 设置为 Pipelines URL。这解锁了 Pipelines 的全部功能,集成了任何 Python 库并创建了适合您需求的自定义工作流程。4、上传dify的python脚本(url,key,输入输出变量名都需要更改)
from typing import List, Union, Generator, Iterator, Optional
from pprint import pprint
import requests, json, warnings

# Uncomment to disable SSL verification warnings if needed.
# warnings.filterwarnings('ignore', message='Unverified HTTPS request')

class Pipeline:
    def __init__(self):
        self.name = "IT_AI智能知识平台"  # 平台名称
        self.api_url = "http://10.160.8.210/v1/workflows/run"  # Dify API 地址
        self.api_key = "app-raqQgGRuLSCKxatmFy8S0JmD"          # Dify API Key
        self.api_request_stream = True                         # 启用流式响应(但仅取最终结果)
        self.verify_ssl = True                                 # 自部署 Dify 可设为 False
        self.debug = True                                      # 开启调试日志(必须保留!)

    async def on_startup(self):
        print(f"on_startup: {self.name} 初始化完成")

    async def on_shutdown(self):
        print(f"on_shutdown: {self.name} 已停止")

    async def inlet(self, body: dict, user: Optional[dict] = None) -> dict:
        if self.debug:
            print(f"inlet: body={body}, user={user}")
        return body

    async def outlet(self, body: dict, user: Optional[dict] = None) -> dict:
        if self.debug:
            print(f"outlet: body={body}, user={user}")
        return body

    def pipe(self, user_message: str, model_id: str, messages: List[dict], body: dict) -> Union[str, Generator, Iterator]:
        print(f"pipe: {self.name} - 开始处理用户消息")

        if self.debug:
            print(f"pipe: 用户输入: {user_message}")
            print(f"pipe: body内容: {body}")

        # 1. 构建请求参数
        response_mode = "streaming" if self.api_request_stream else "blocking"
        headers = {
            'Authorization': f'Bearer {self.api_key}',
            'Content-Type': 'application/json'
        }
        data = {
            "inputs": {"user_message_text": user_message},  # Dify 输入变量名(与工作流定义一致)
            "response_mode": response_mode,
            "user": body.get("user", {}).get("email", "default_user")
        }

        # 2. 发送请求到 Dify
        try:
            response = requests.post(
                self.api_url,
                headers=headers,
                json=data,
                stream=self.api_request_stream,
                verify=self.verify_ssl
            )

            # 3. 处理响应(核心修正:仅返回最终完整文本)
            if response.status_code == 200:
                full_text = ""
                final_output = False  # 标记是否已获取最终结果
                for line in response.iter_lines():
                    if not line or final_output:
                        continue  # 空行或已获取最终结果,跳过
                    line = line.decode('utf-8').strip()
                    if self.debug:
                        print(f"pipe: Dify 原始响应行: {line}")

                    # 解析流式响应(仅处理 workflow_finished 事件)
                    if line.startswith("data: "):
                        json_str = line[len("data: "):]
                        try:
                            json_data = json.loads(json_str)
                            # 关键:仅处理最终完成事件(event: workflow_finished)
                            if json_data.get("event") == "workflow_finished":
                                outputs = json_data.get("data", {}).get("outputs", {})
                                full_text = outputs.get("summary", "")  # Dify 输出变量名(summary)
                                if full_text:
                                    final_output = True  # 标记已获取最终结果
                                    yield full_text  # 仅返回一次完整文本
                                    break  # 退出循环,避免重复处理
                        except json.JSONDecodeError:
                            error_msg = f"[JSON解析错误] {json_str[:100]}"
                            print(f"pipe: {error_msg}")
                            yield error_msg
                # 容错:若未触发 workflow_finished,但有累积文本(极端情况)
                if not final_output and full_text:
                    yield full_text
            else:
                error_details = response.text[:500]
                yield f"请求失败: 状态码 {response.status_code},详情: {error_details}"

        except Exception as e:
            yield f"执行错误: {str(e)}"
5、将上述脚本上传到下图所在位置
另:
这些示例展示了如何集成不同的功能,为构建您自己的自定义管道奠定基础。https://github.com/open-webui/pipelines/blob/main/examples参考链接:⚡ 管道 |打开 WebUI


 874
874

 被折叠的 条评论
为什么被折叠?
被折叠的 条评论
为什么被折叠?
 到【灌水乐园】发言


