ubuntu-base 获取
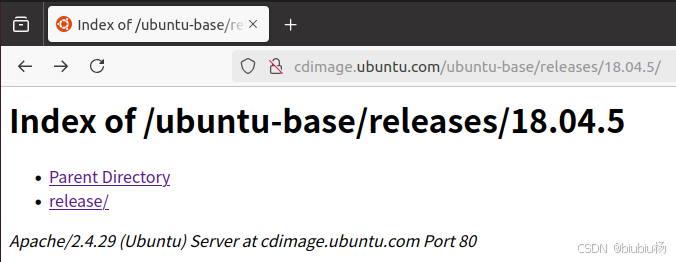
Ubuntu 的移植非常简单,不需要我们编译任何东西,因为 Ubuntu 官方已经将根文件系统制作好了!我们只需要简单配置一下 Ubuntu 官方提供的 base 根文件系统,使其在我们的开发板上跑起来即可。因此我们首先需要下载 Ubuntu-base,为了和我们的教程一致,本章我们移植Ubuntu 20.04 版本根文件系统,根 文 件 系 统 下 载 地 址 为http://cdimage.ubuntu.com/,点击 ubuntu-base,进入到 ubuntu-base 下载界面,点击releases,点击18.04.5

点击releases

Ubuntu 针对不同的 CPU 架构提供相应的 ubuntu base 根文件系统,有 amd64(64 位 X86)、 armhf、 i386(32 位 X86)、 powerpc、 ppc64el 等系统的。 MP157 是 CortexA 内核的 CPU,并且有硬件浮点运算单元,因此选择 armhf 版本。
ubuntu根文件系统构建
解压缩 ubuntu base 根文件系统
为了存放 ubuntu base 根文件系统,先在 PC 的 Ubuntu 系统中的 nfs 目录下创建一个名为u1804_rootfs 的目录,命令如下:
cd /home/yang-vm/linux/nfs //进入到 nfs 目录下
mkdir u1804_rootfs //创建名为“ubuntu_rootfs”目录
将 上面得到 的“ ubuntu-base-18.04.5-base-armhf.tar.gz ” 拷贝 到上 面创建 的“u1804_rootfs”目录中,然后使用如下命令对其解压缩:
tar -vzxf ubuntu-base-18.04.5-base-armhf.tar.gz

安装 qemu
需要在 PC 的 Ubuntu 上安装 qemu 工具,命令如下:
sudo apt-get install qemu-user-static
将刚刚安装的 qemu-user-static 拷贝到刚刚解压出来的 ubuntu base 目录中,也就是u1804_rootfs/usr/bin 目录下,命令如下:
cd /home/yang-vm/linux/nfs/u1804_rootfs //进入到 u1804_rootfs 目录下
sudo cp /usr/bin/qemu-arm-static ./usr/bin/ //拷贝 qemu-arm-static
设置软件源
我们在 ubuntu 下使用 apt-get 安装软件的时候,是从网上下载软件并安装的,因此需要指定软件源。在设置软件源之前先将 Ubuntu 主机下的 DNS 配置文件/etc/resolv.conf 拷贝到根文件系统中,命令如下:
cd /home/yang-vm/linux/nfs/u1804_rootfs //进入到 ubuntu_rootfs 目录下
sudo cp /etc/resolv.conf ./etc/resolv.conf //拷贝 resolv.conf
设置软件源,使用vi打开根文件系统中的 ubuntu_rootfs/etc/apt/sources.list 文件,在此文件最后面添加软件源,比如国内常用的清华源、中科大源等等,这些软件源可以直接在网上查找。 注意这里要用 ubuntu18.04 的 ARM 源,不能找成了 X86 的源。
vi ./etc/apt/sources.list //记得加点.哦
随便给个镜像把
deb http://mirrors.aliyun.com/ubuntu-ports/ bionic main restricted universe multiverse
deb http://mirrors.aliyun.com/ubuntu-ports/ bionic-updates main restricted universe multiverse
deb http://mirrors.aliyun.com/ubuntu-ports/ bionic-security main restricted universe multiverse
deb http://mirrors.aliyun.com/ubuntu-ports/ bionic-backports main restricted universe multiverse
在主机挂载并配置根文件系统
在主机挂载根文件系统
接下来将上面制作的根文件系统挂载到主机上,需要挂载 proc、 sys、 dev、 dev/pts 等文件系统,最后使用 chroot 将主机的根文件系统切换到我们前面制作的根文件系统中。这里我们通过两个脚本文件来完成挂载和卸载操作,首先是挂载脚本 mount.sh,在 u1804_rootfs 目录下创建一个名为 mount.sh 的 shell 脚本,然后在里面输入如下所示内容:
  1 #!/bin/bash
  2 echo "MOUNTING"
  3 sudo mount -t proc /proc /home/yang-vm/linux/nfs/u1804_rootfs/proc
  4 sudo mount -t sysfs /sys /home/yang-vm/linux/nfs/u1804_rootfs/sys
  5 sudo mount -o bind /dev /home/yang-vm/linux/nfs/u1804_rootfs/dev
  6 sudo mount -o bind /dev/pts /home/yang-vm/linux/nfs/u1804_rootfs/dev/pts
  7 sudo chroot /home/yang-vm/linux/nfs/u1804_rootfs
再编写一个卸载的脚本文件,新建名为 unmount.sh 的 shell 脚本,在里面输入如下所示内容:
  1 #!/bin/bash
  2 echo "UNMOUNTING"
  3 sudo umount /home/yang-vm/linux/nfs/u1804_rootfs/proc
  4 sudo umount /home/yang-vm/linux/nfs/u1804_rootfs/sys
  5 sudo umount /home/yang-vm/linux/nfs/u1804_rootfs/dev/pts
  6 sudo umount /home/yang-vm/linux/nfs/u1804_rootfs/dev
最后给予 mount.sh 和 unmount.sh 这两个 shell 脚本可执行权限,命令如下:
chmod 777 mount.sh unmount.sh
一切准备就绪以后执行 mount.sh 脚本,将制作的根文件系统挂载到主机下,输入如下命令:
/mount.sh

安装常用的命令和软件
由于 ubuntu base 是一个最小根文件系统,很多命令和软件都没有,因此我们需要先安装一下常用的命令和软件,输入如下命令(注意!是在电脑的 Ubuntu 下输入这些命令,因为现在电脑的 Ubuntu 正挂载着我们移植的 Ubuntu-base 根文件系统):
apt update
可能会出现报错
root@yang-vm:/# apt update
Get:1 http://mirrors.ustc.edu.cn/ubuntu-ports bionic InRelease [242 kB]
Get:2 http://mirrors.ustc.edu.cn/ubuntu-ports bionic-updates InRelease [102 kB]
Get:3 http://mirrors.ustc.edu.cn/ubuntu-ports bionic-security InRelease [102 kB]
Get:4 http://mirrors.ustc.edu.cn/ubuntu-ports bionic-backports InRelease [102 kB]
Err:1 http://mirrors.ustc.edu.cn/ubuntu-ports bionic InRelease
  Couldn't create temporary file /tmp/apt.conf.2dNOVb for passing config to apt-key
Err:2 http://mirrors.ustc.edu.cn/ubuntu-ports bionic-updates InRelease
  Couldn't create temporary file /tmp/apt.conf.Op2uKb for passing config to apt-key
Err:3 http://mirrors.ustc.edu.cn/ubuntu-ports bionic-security InRelease
  Couldn't create temporary file /tmp/apt.conf.kV9I9a for passing config to apt-key
Err:4 http://mirrors.ustc.edu.cn/ubuntu-ports bionic-backports InRelease
  Couldn't create temporary file /tmp/apt.conf.Kpk9sa for passing config to apt-key
Reading package lists... Done
W: GPG error: http://mirrors.ustc.edu.cn/ubuntu-ports bionic InRelease: Couldn't create temporary file /tmp/apt.conf.2dNOVb for passing config to apt-key
E: The repository 'http://mirrors.ustc.edu.cn/ubuntu-ports bionic InRelease' is not signed.
N: Updating from such a repository can't be done securely, and is therefore disabled by default.
N: See apt-secure(8) manpage for repository creation and user configuration details.
W: GPG error: http://mirrors.ustc.edu.cn/ubuntu-ports bionic-updates InRelease: Couldn't create temporary file /tmp/apt.conf.Op2uKb for passing config to apt-key
E: The repository 'http://mirrors.ustc.edu.cn/ubuntu-ports bionic-updates InRelease' is not signed.
N: Updating from such a repository can't be done securely, and is therefore disabled by default.
N: See apt-secure(8) manpage for repository creation and user configuration details.
W: GPG error: http://mirrors.ustc.edu.cn/ubuntu-ports bionic-security InRelease: Couldn't create temporary file /tmp/apt.conf.kV9I9a for passing config to apt-key
E: The repository 'http://mirrors.ustc.edu.cn/ubuntu-ports bionic-security InRelease' is not signed.
N: Updating from such a repository can't be done securely, and is therefore disabled by default.
N: See apt-secure(8) manpage for repository creation and user configuration details.
W: GPG error: http://mirrors.ustc.edu.cn/ubuntu-ports bionic-backports InRelease: Couldn't create temporary file /tmp/apt.conf.Kpk9sa for passing config to apt-key
E: The repository 'http://mirrors.ustc.edu.cn/ubuntu-ports bionic-backports InRelease' is not signed.
N: Updating from such a repository can't be done securely, and is therefore disabled by default.
N: See apt-secure(8) manpage for repository creation and user configuration details.
解决:
root@yang-vm:/# ls -ld /tmp
drwxrwxr-x 2 1000 1000 4096 Aug  6  2020 /tmp
root@yang-vm:/# sudo chmod 1777 /tmp
bash: sudo: command not found
root@yang-vm:/# chmod 1777 /tmp
root@yang-vm:/# apt update
Get:1 http://mirrors.ustc.edu.cn/ubuntu-ports bionic InRelease [242 kB]
Get:2 http://mirrors.ustc.edu.cn/ubuntu-ports bionic-updates InRelease [102 kB]
Get:3 http://mirrors.ustc.edu.cn/ubuntu-ports bionic-security InRelease [102 kB]
Get:4 http://mirrors.ustc.edu.cn/ubuntu-ports bionic-backports InRelease [102 kB]
Get:5 http://mirrors.ustc.edu.cn/ubuntu-ports bionic/main armhf Packages [968 kB]
Get:6 http://mirrors.ustc.edu.cn/ubuntu-ports bionic/main Translation-en [516 kB]
Get:7 http://mirrors.ustc.edu.cn/ubuntu-ports bionic/restricted armhf Packages [8360 B]
Get:8 http://mirrors.ustc.edu.cn/ubuntu-ports bionic/restricted Translation-en [3584 B]
Get:9 http://mirrors.ustc.edu.cn/ubuntu-ports bionic/universe armhf Packages [8269 kB]
Get:10 http://mirrors.ustc.edu.cn/ubuntu-ports bionic/universe Translation-en [4941 kB]
Get:11 http://mirrors.ustc.edu.cn/ubuntu-ports bionic/multiverse armhf Packages [129 kB]
Get:12 http://mirrors.ustc.edu.cn/ubuntu-ports bionic/multiverse Translation-en [108 kB]
Get:13 http://mirrors.ustc.edu.cn/ubuntu-ports bionic-updates/main armhf Packages [1438 kB]
Get:14 http://mirrors.ustc.edu.cn/ubuntu-ports bionic-updates/main Translation-en [554 kB]
Get:15 http://mirrors.ustc.edu.cn/ubuntu-ports bionic-updates/restricted armhf Packages [13.4 kB]
Get:16 http://mirrors.ustc.edu.cn/ubuntu-ports bionic-updates/restricted Translation-en [187 kB]
Get:17 http://mirrors.ustc.edu.cn/ubuntu-ports bionic-updates/universe armhf Packages [1626 kB]
Get:18 http://mirrors.ustc.edu.cn/ubuntu-ports bionic-updates/universe Translation-en [421 kB]
Get:19 http://mirrors.ustc.edu.cn/ubuntu-ports bionic-updates/multiverse armhf Packages [6200 B]
Get:20 http://mirrors.ustc.edu.cn/ubuntu-ports bionic-updates/multiverse Translation-en [6088 B]
Get:21 http://mirrors.ustc.edu.cn/ubuntu-ports bionic-security/main armhf Packages [1162 kB]
Get:22 http://mirrors.ustc.edu.cn/ubuntu-ports bionic-security/main Translation-en [467 kB]
Get:23 http://mirrors.ustc.edu.cn/ubuntu-ports bionic-security/restricted armhf Packages [9576 B]
Get:24 http://mirrors.ustc.edu.cn/ubuntu-ports bionic-security/restricted Translation-en [182 kB]
Get:25 http://mirrors.ustc.edu.cn/ubuntu-ports bionic-security/universe armhf Packages [1091 kB]
Get:26 http://mirrors.ustc.edu.cn/ubuntu-ports bionic-security/universe Translation-en [308 kB]
Get:27 http://mirrors.ustc.edu.cn/ubuntu-ports bionic-security/multiverse armhf Packages [2672 B]
Get:28 http://mirrors.ustc.edu.cn/ubuntu-ports bionic-security/multiverse Translation-en [3928 B]
Get:29 http://mirrors.ustc.edu.cn/ubuntu-ports bionic-backports/main armhf Packages [53.2 kB]
Get:30 http://mirrors.ustc.edu.cn/ubuntu-ports bionic-backports/main Translation-en [14.6 kB]
Get:31 http://mirrors.ustc.edu.cn/ubuntu-ports bionic-backports/universe armhf Packages [17.7 kB]
Get:32 http://mirrors.ustc.edu.cn/ubuntu-ports bionic-backports/universe Translation-en [8668 B]
Fetched 22.5 MB in 12s (1834 kB/s)
Reading package lists... Done
Building dependency tree
Reading state information... Done
53 packages can be upgraded. Run 'apt list --upgradable' to see them.
接下来安装:
apt install sudo vim kmod net-tools ethtool ifupdown language-pack-en-base rsyslog htop iputils-ping
按提示输入y,waitting。。。。。。
设置 root 用户密码
设置一下 root 用户的密码,这里我设置简单一点, root 用户密码也设置为“root”,相当于用户名和密码一样,命令如下:
passwd root //设置 root 用户密码

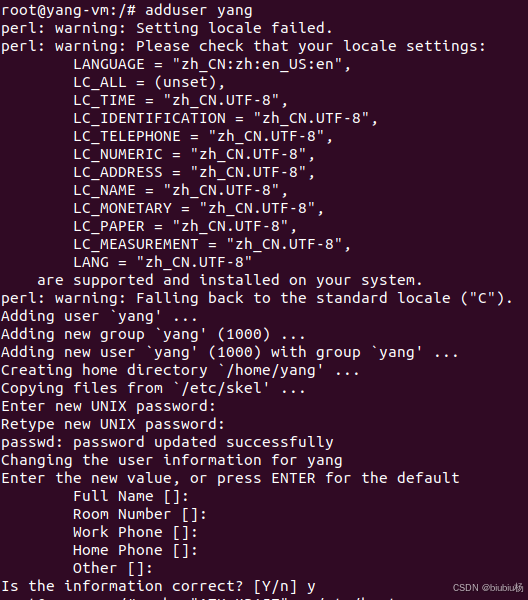
建议直接添加新用户
adduser yang

设置新用户可以使用 sudo 命令
/etc/sudoers 文件默认是只读的,因此需要先修改此文件的写权限,使用如下命令:
chmod u+w /etc/sudoers
然后使用 vi 打开/etc/sudoers,找到“root ALL=(ALL:ALL) ALL”这一行,在这一行下面添加:
yang ALL=(ALL:ALL) ALL

修改完成以后保存退出,重新恢复/etc/sudoers 的只读属性,使用如下命令:
chmod u-w /etc/sudoers
设置本机名称和 IP 地址
输入如下命令设置本机名称和 IP 地址:
echo "ATK-MP157" > /etc/hostname
echo "127.0.0.1 localhost" >> /etc/hosts
echo "127.0.0.1 ATK-MP157" >> /etc/hosts
设置串口终端
ubuntu 根文件系统在开发板上启动以后我们通常也希望串口终端正常工作,首先确定自己所使用的串口设备文件,比如正点原子的 STM32MP157 开发 板 使 用 的 UART4 对 应 的 串 口 设 备 文 件 为 ttySTM0 , 我 们 需 要 添 加 一 个 名 为getty@ttySTM0.service 的链接,链接到getty@.service 服务上,输入如下命令:
ln -s /lib/systemd/system/getty@.service /etc/systemd/system/getty.target.wants/getty@ttySTM0.service
但是18.04没有
root@yang-vm:/# ls /lib/systemd/system/getty@.service
/bin/ls: cannot access '/lib/systemd/system/getty@.service': No such file or directory
解决:
apt install systemd
root@yang-vm:/# ls /lib/systemd/system/getty@.service
/lib/systemd/system/getty@.service
root@yang-vm:/# ln -s /lib/systemd/system/getty@.service /etc/systemd/system/getty.target.wants/getty@ttySTM0.service
设置好以后就可以退出根文件系统了,输入如下命令退出:
exit
退出以后再执行一下 unmount.sh 脚本取消挂载,命令如下:
./unmount.sh
ubuntu 根文件系统测试
nfs 挂载测试
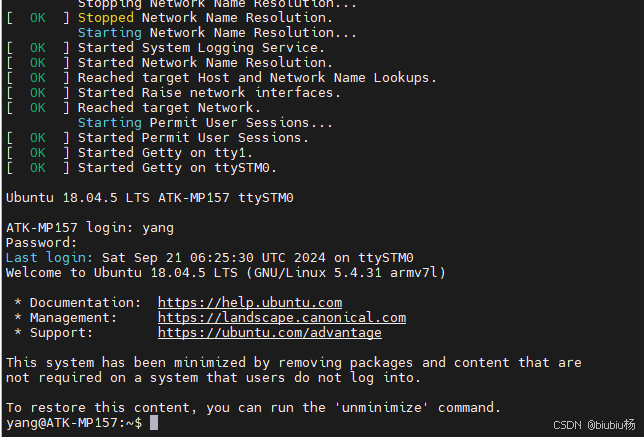
根文件系统已经制作完成了,接下来就是测试,先用 nfs 挂载根文件系统,在 uboot 里面设置 bootargs 环境变量的值如下:
setenv bootargs 'console=ttySTM0,115200 root=/dev/nfs nfsroot=192.168.1.222:/home/yang-vm/linux/nfs/u1804_rootfs rw ip=192.168.1.101:192.168.1.222:192.168.1.1:255.255.
255.0::eth0:off'
saveenv
ping 192.168.1.222	//需要ping一下,要不然就nfs连接超时,待解决
boot
看串口输出

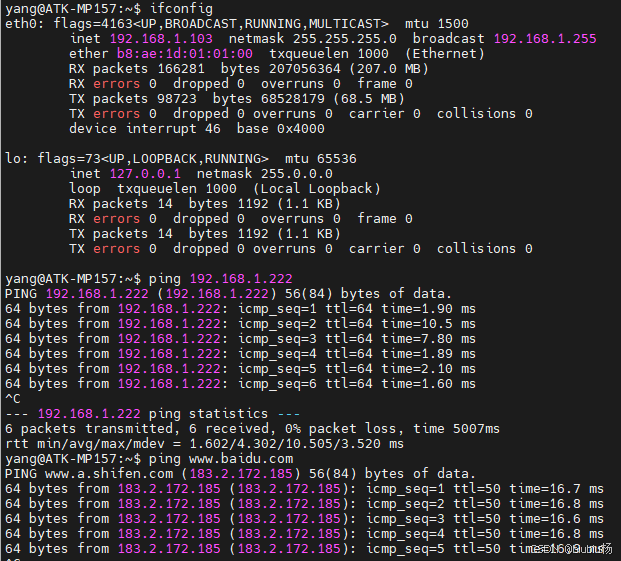
网络 DHCP 配置
我们默认没有配置 DHCP,因为 ubuntu 启动以后不能直接联网,需要手动启动网卡并设置IP 地址。这里我们配置一下网络 DHCP,这样系统启动以后就会自动设置好网络。在 linux 系统下的网卡名字为 eth0 如何配置其 DHCP,输入如下命令:
echo auto eth0 > /etc/network/interfaces.d/eth0
echo iface eth0 inet dhcp >> /etc/network/interfaces.d/eth0
/etc/init.d/networking restart

打包根文件系统
。。。
烧写
。。。


 2102
2102

 被折叠的 条评论
为什么被折叠?


